7 Ways to Create Slow Motion: DaVinci Resolve (+ Fix lag)
Making your videos slow motion is the perfect way to get that cinematic vibe!
There is a BUNCH of ways you can do this in DaVinci Resolve. However, I’ve made this EASY for you and gathered all the best methods in this article.
Here are the different methods if you want to skip ahead:
- Beginner Method (EASY)
- Footage Shot in Higher Frame Rates (BEST)
- Retime Controls (Most Effective)
- Retime Controls, No Cutting (Most Options)
- Retime Curve (SMOOTH)
- “Fit to Fill” (Weird, but effective)
- “Cut” Page Method (Using “Cut” Page)
1. Beginner Method
This method is one of the easiest to use and definitely, the easiest to remember!
Make sure to be on the “Edit” page of Resolve:

It’s also important that you have added the clip to the timeline before we can make it slow motion.
In the timeline, go to the part of the video you want the slow motion to start. Or place the playhead where you want the slow motion to start manually.
Then go ahead and press the keyboard shortcut: “Ctrl + B” or “Command + B” to split the clip at that point in time:
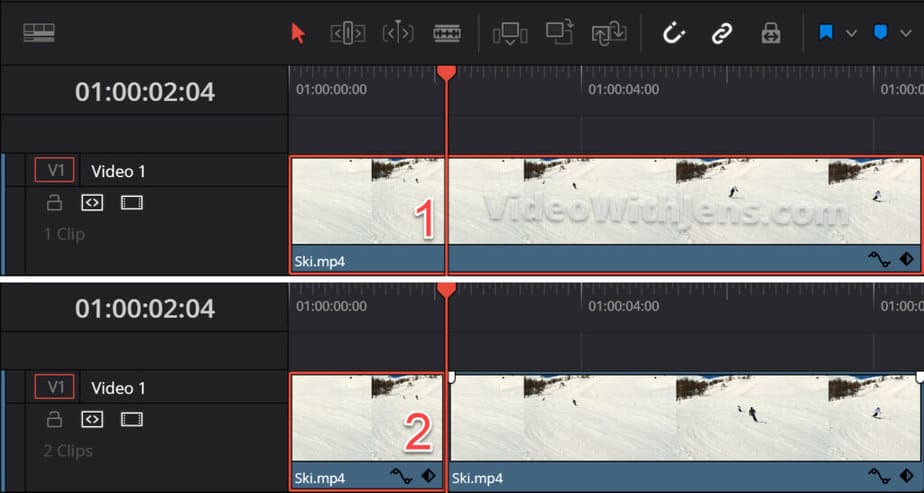
Next, go to the point where you want the slow motion to end and split the clip there as well:
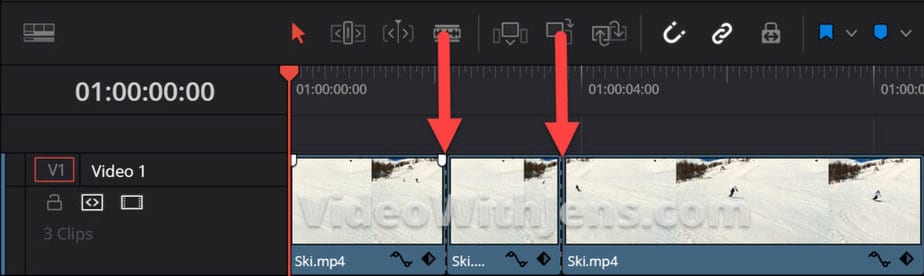
Now, the part that will be in slow motion is its own clip in the timeline.
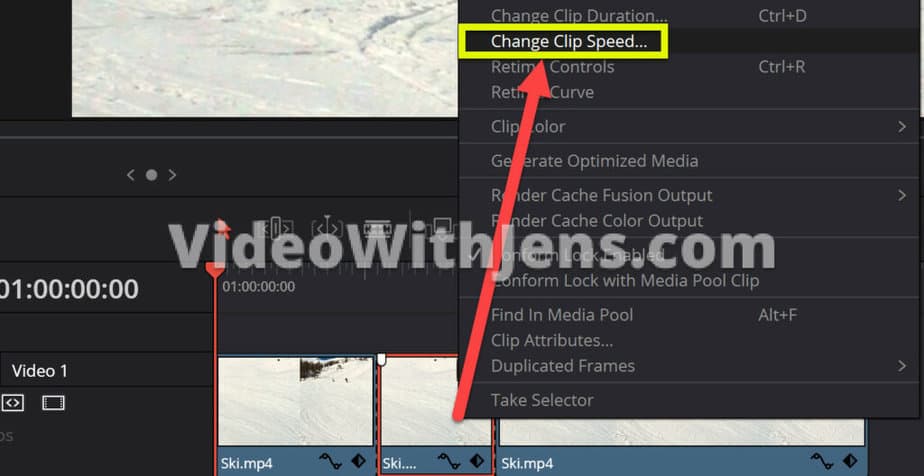
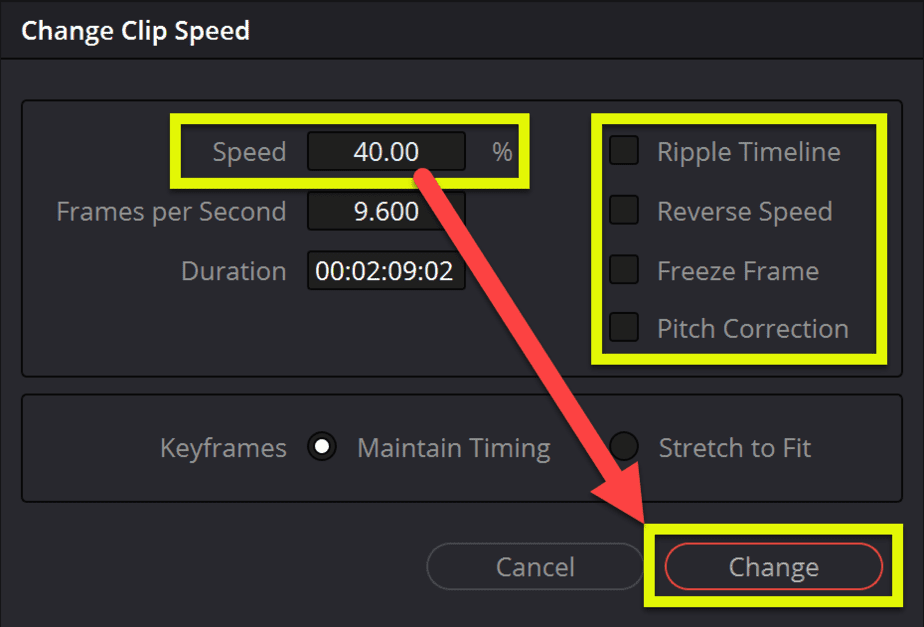
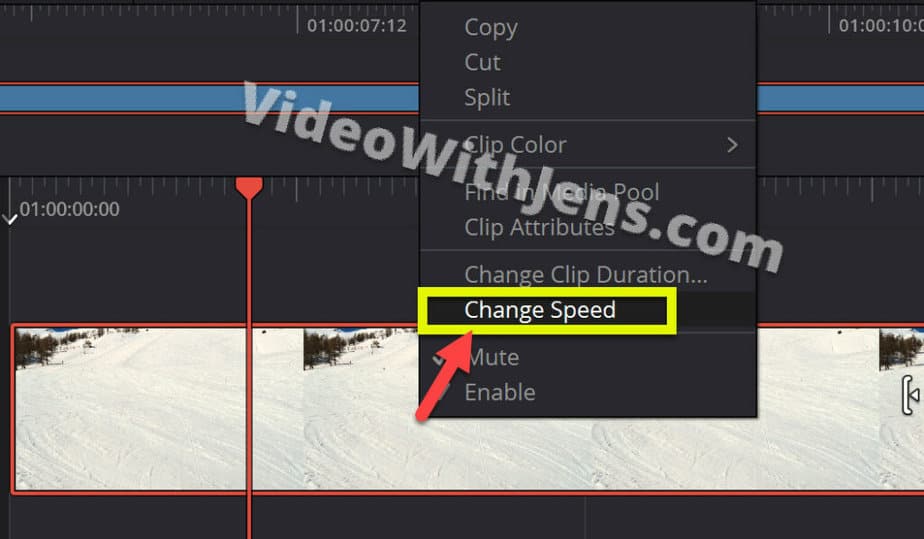
Right-click the new “slice” in the timeline and click on “Change Clip Speed…“:
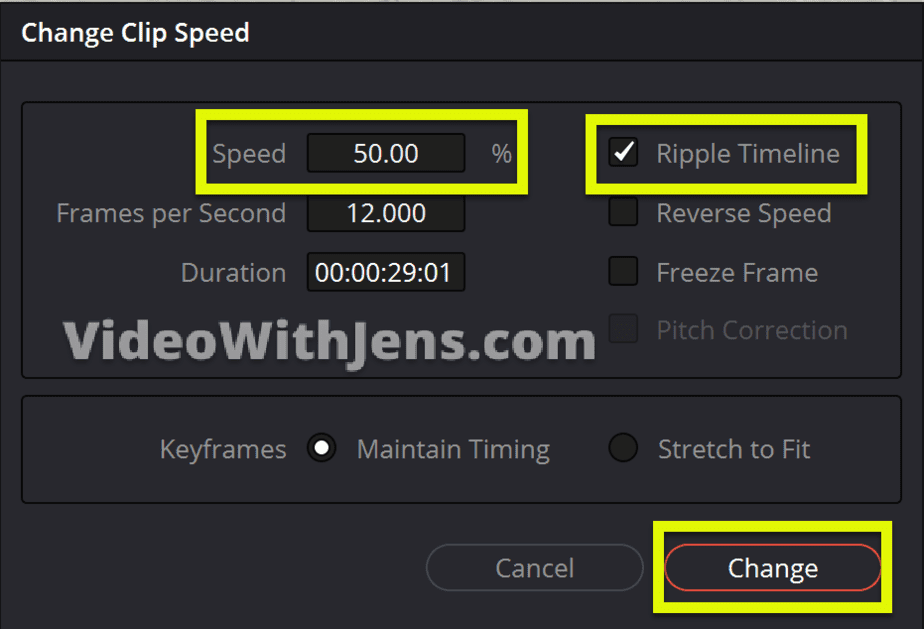
Then you will see the speed adjustment window.
The “Speed” value will default be set to 100%, i.e., normal speed.
For slow motion, 40-50% is a great range to set it against.
Also, make sure that the “Ripple Timeline” is checked off. If not, you will run into some annoying issues…
Lastly, click on “Change“:
That’s about it for this method!
However, your clip is likely choppy/laggy when creating slow motion this way.
And as promised, I have a quick fix for this.
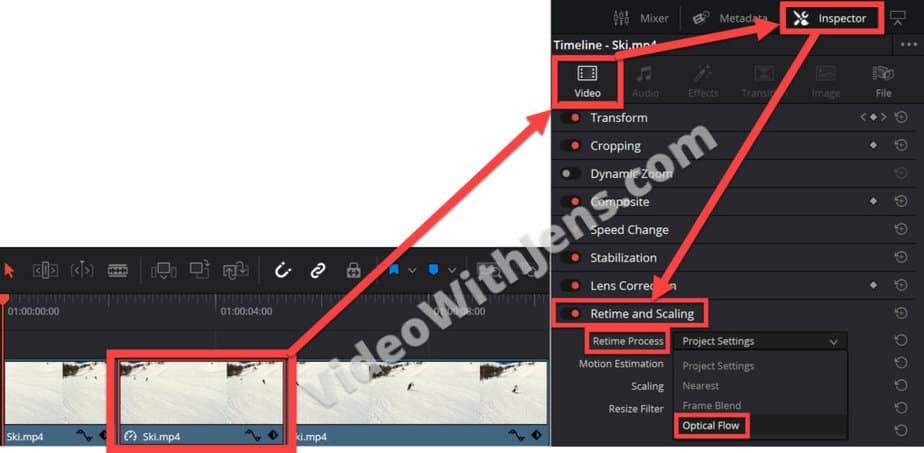
Select the slow motion clip in the timeline, and then open “Inspector” > “Video” > “Retime and Scaling.“
Then set the “Retime Process” against “Optical Flow.“ Check the image below:
(Ignore that the arrow points at “Video” before the “Inspector”…)
You will add some additional frames to the video by enabling optical flow, which should help make it less choppy. But, it will never be as smooth as footage shot in a higher FPS than the timeline!
Keep on reading for more advanced methods to create slow motion!
Also, check out this article if you want to read the encyclopedia on different ways to change clip speed inside Resolve.
Anyways, let’s get to the next method:
2. Footage Shot in Higher Frame Rates
This is the best way to create slow motion.
But to use this method, you must shoot the footage at a higher frame rate. Meaning it’s too late if you have not already done so. In that case, I would recommend learning this way of doing it now as you have the skill set to do it later on!
If not, simply skip to the next method here.
Ok, so don’t add the video to the timeline yet, as we have to make some adjustments.
First, import the video as it’s located in the “Media Pool” on the “Edit” page.
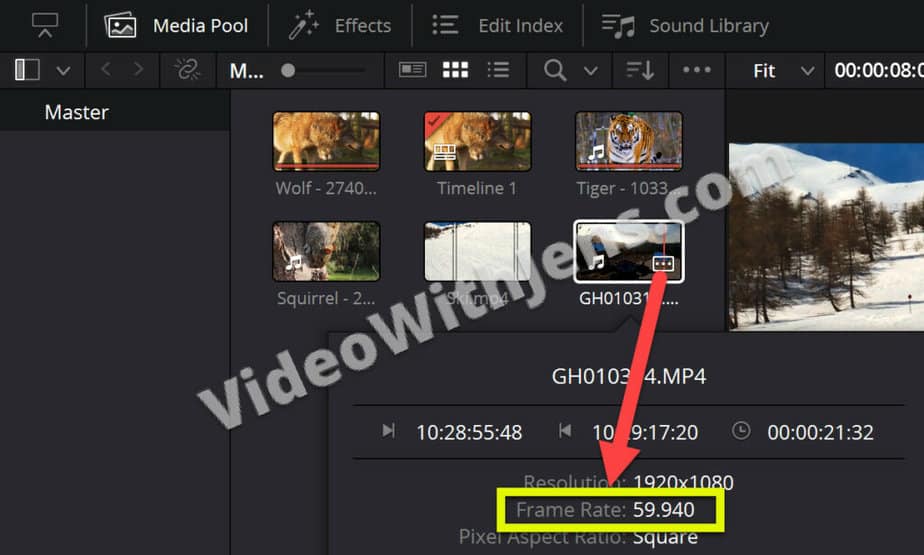
When you hover over the clip’s thumbnail in the “Media Pool,” you should see a rectangle with three dots inside it.
Click on that icon, and then you should be able to see the “Frame Rate” of the clip.
In my case, it’s 59.940, i.e., 60 fps:
Next, click on “File” > “Project Settings…” in the upper left-hand corner of Resolve. Alternatively, use the keyboard shortcut “Shift + 9“.
Then open “Master Settings“, and locate “Timeline frame rate“. There you’ll find the frame rate of your project, so write that number down and close the window.

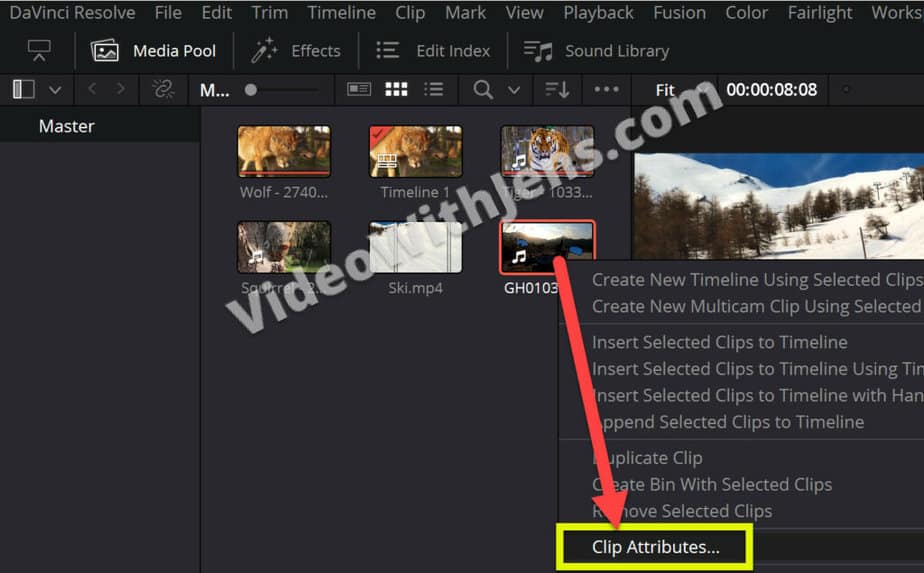
Right-click the clip in the “Media Pool” and select “Clip Attributes…“:
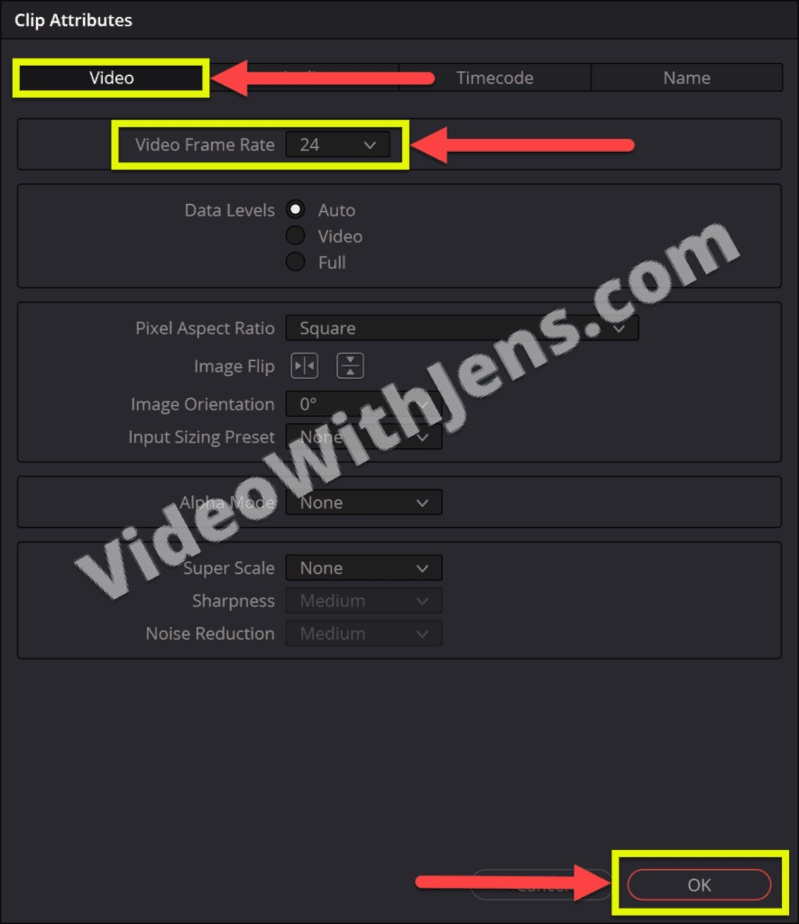
Make sure to be in the “Video” tab, and then set the “Video Frame Rate” to match the timeline frame rate (the number I told you to write down from above).
In my case, I’ll set it to 24, and then click on “OK“:
Once that is done, add the clip to the timeline.
It will now play back in beautifully smooth slow motion!
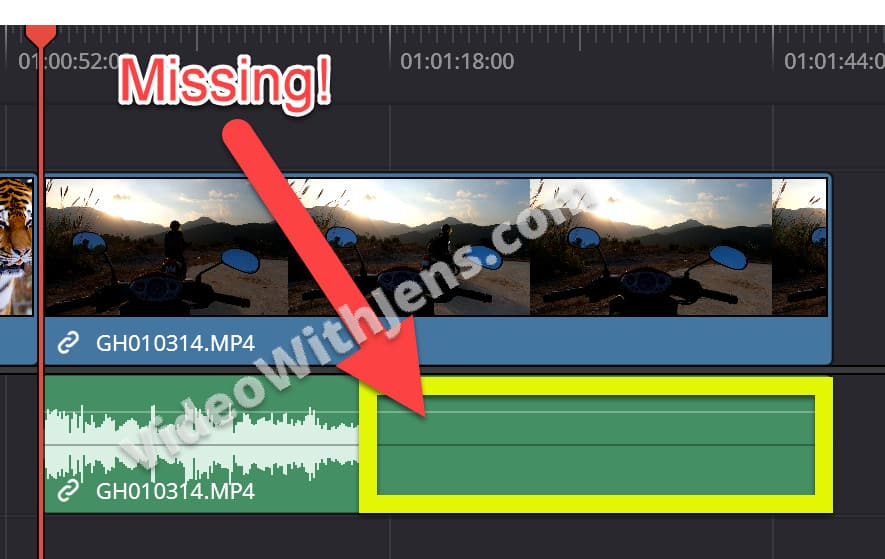
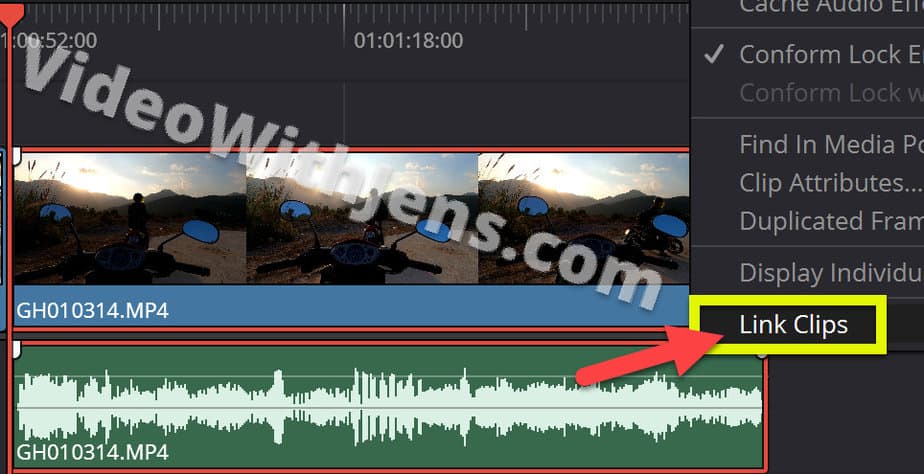
However, if it includes audio, we’ll have to do a couple more adjustments, as the audio is not slow motion yet… If your clip does not include audio, you can go to the next slow-motion method here.
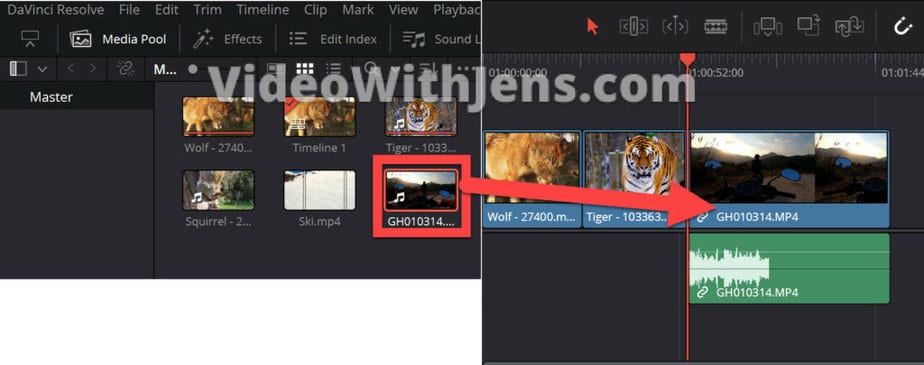
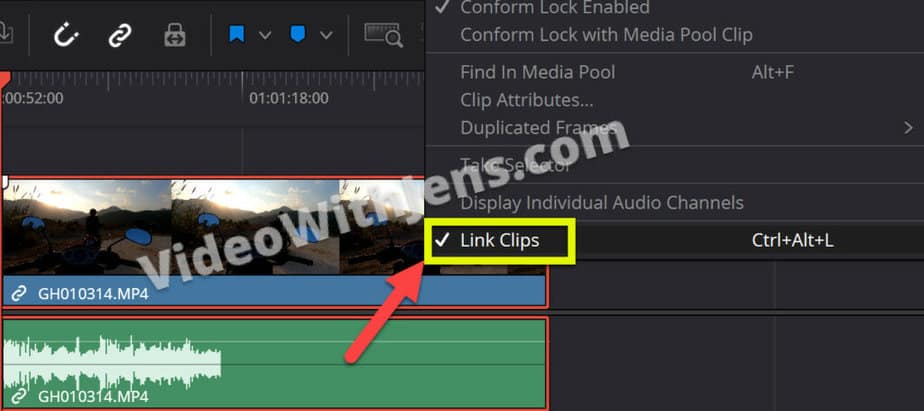
Start by right-clicking the clip and then uncheck the “Link Clips” at the bottom of the menu:
Then, click on the audio and make sure that the video part is not selected (the red border around the clip means it’s selected).
Next, right-click the audio, and click on “Change Clip Speed“:

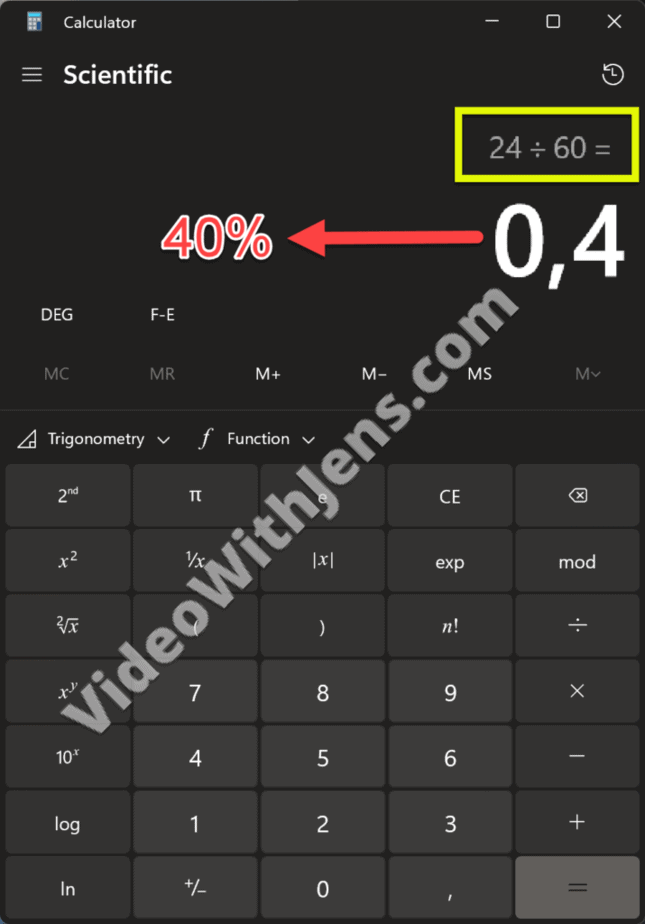
To calculate how much you need to slow the audio down, simply divide the timeline frame rate by the clip’s original frame rate.
In my case, the timeline was 24 fps, and the clip was 60 fps. So 24 / 60 = 0.4. Meaning we should set the “Speed” to 40%.
Timeline frame rate / Clip frame rate = Speed percentage.
So, I’ll set the “Speed” against 40%, and click on “Change“:
IMPORTANT: This time make sure that the “Ripple Timeline” is not enabled.
If you want the audio to sound like slow motion and not be corrected, make sure that “Pitch Correction” is not enabled either:
That’s it!
Now you can go ahead and select both the video and audio (hold down Ctrl or Command and click on both) then right-click the clips and select “Link Clips“:
The next method is the fastest way of creating slow motion:
3. Using Retime Controls
This method is also very easy to use and gives you a bit more flexibility and options than the first method.
You want to be on the “Edit” page for this method as well:
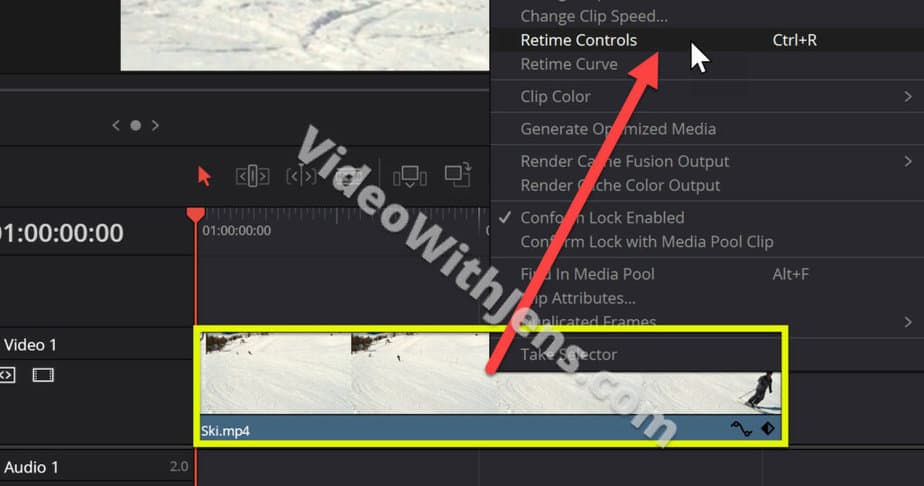
Then as we did in the first method, cut out the part of the video you want to make in slow motion in the timeline.
When you have done that, right-click the cut-out part and click on “Retime Controls“:
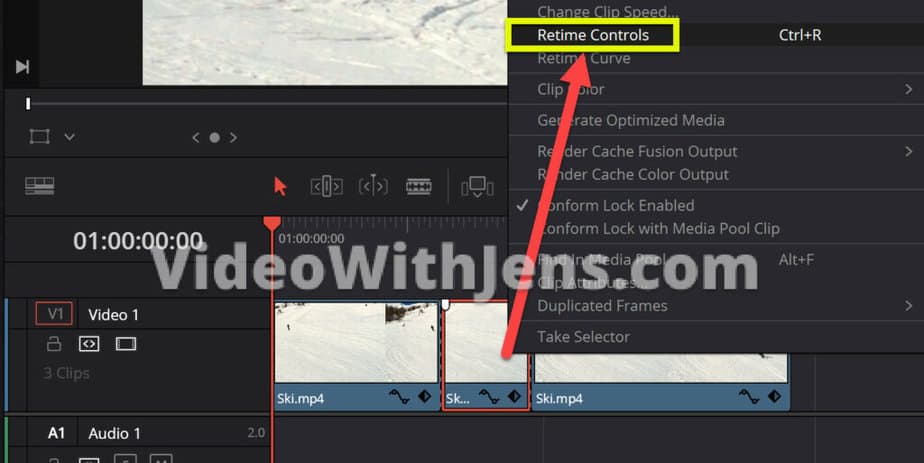
Now you should be able to see some triangles etc., on top of the clip in the timeline.
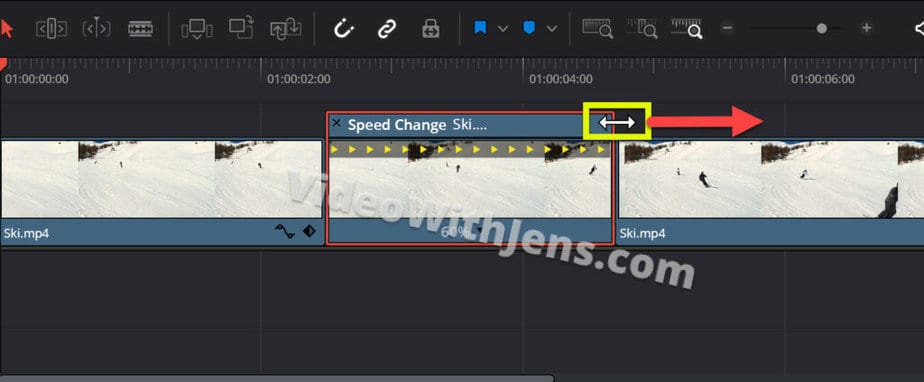
To make the clip slow motion, hover the mouse over the edge of the clip (above the triangles) and then pull it to the right! The cursor should look like in the image below.
You can see the speed percentages at the bottom of the clip.
What’s cool about the “Retime Controls” is that you don’t have to cut out the clip to make part of the clip slow motion.
Method 4 will show you how to do this:
4. Retime Controls, WITHOUT Cutting
This method gives you more control and options to choose from:
If you have split the clip following the other methods, you can simply undo changes by pressing the keyboard shortcut “Ctrl + Z” or “Command + Z“.
Next, right-click the clip and select “Retime Controls“:
Now, place the playhead where you want the slow motion to start.
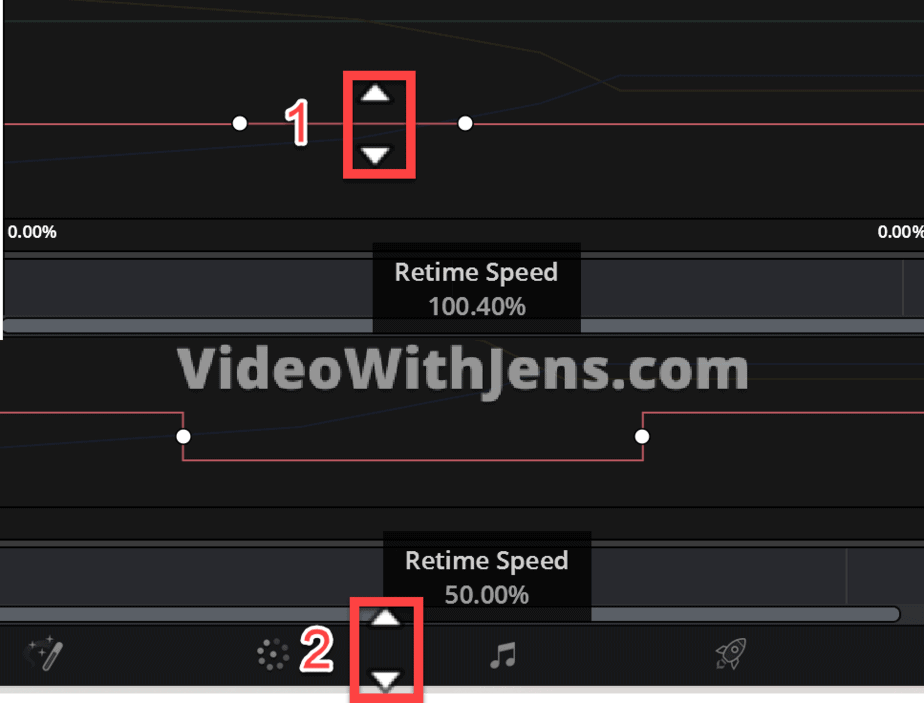
Then, click on that little triangle on the right side of the speed percentage. Doing this you will open the retime controls menu where you want to click on “Add Speed Point“:

Add another speed point where you want the slow motion to end.
Then to adjust the speed, pull on the top of those gray handles that appear. To slow the clip down, you want to pull on the handle on the right side and drag it to the right.
Notice that the speed percentage is changing.
40-50% is a good range for slow motion.
By dragging on the bottom of the gray handles, you can adjust where the slow motion starts and end! This is nice as you don’t have to re-join and cut the clips.

Alright! That’s an awesome method of making the slow motion.
The next method is really great if you want the transition from fast to slow to be more gradual:
5. Retime Curve: Smooth Transition to Slow Motion
You can create a smooth transition using the “Retime Controls” as well. However, using this method is a lot faster for that.
Using this method, you don’t have to cut out the part you want to make in slow motion.
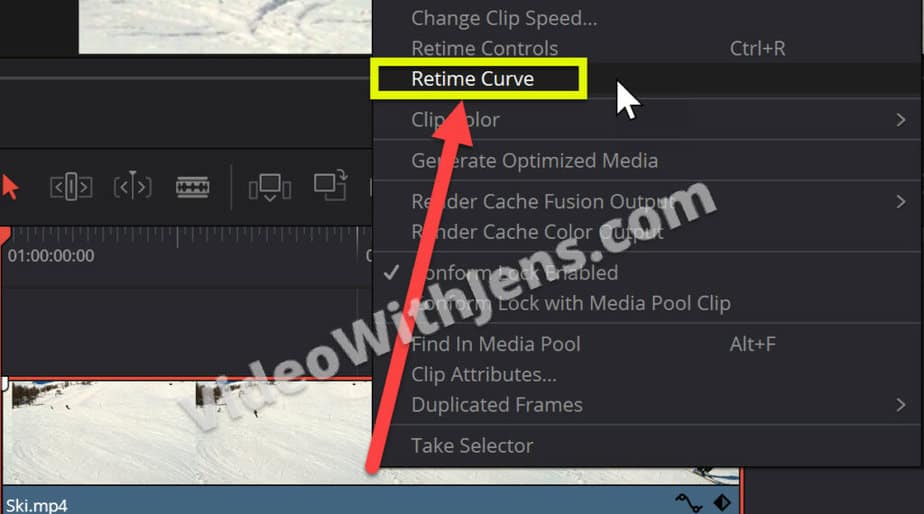
Simply, right-click the clip in the timeline and select “Retime Curve“:
Now, you should be able to see the retime curve window beneath the clip in the timeline.
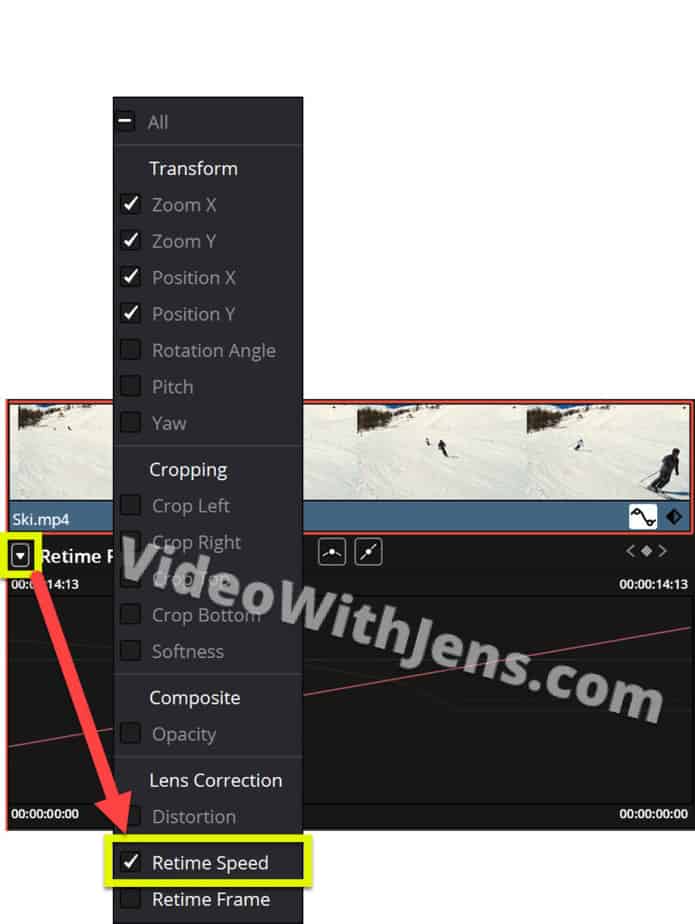
In the top left-hand corner of this window, open the drop-down menu by clicking on the small triangle icon.
At the bottom of the menu, uncheck the “Retime Frame” and check off the “Retime Speed” instead:
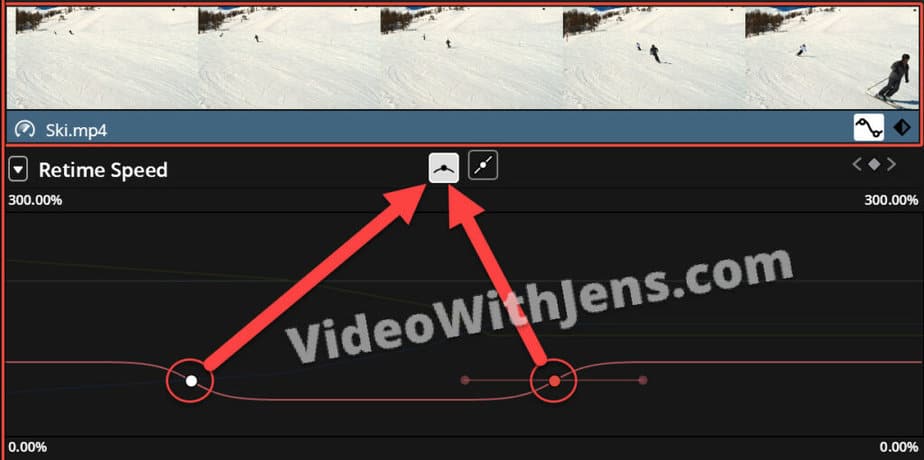
Then place the playhead where you want the slow motion to start in the clip, and click on that little diamond icon in the upper right-hand corner of the retime window.
Doing this will create keyframes, which you can see as those white dots on the gray line in the retime curve window.
Create another keyframe where you want the slow motion to end:
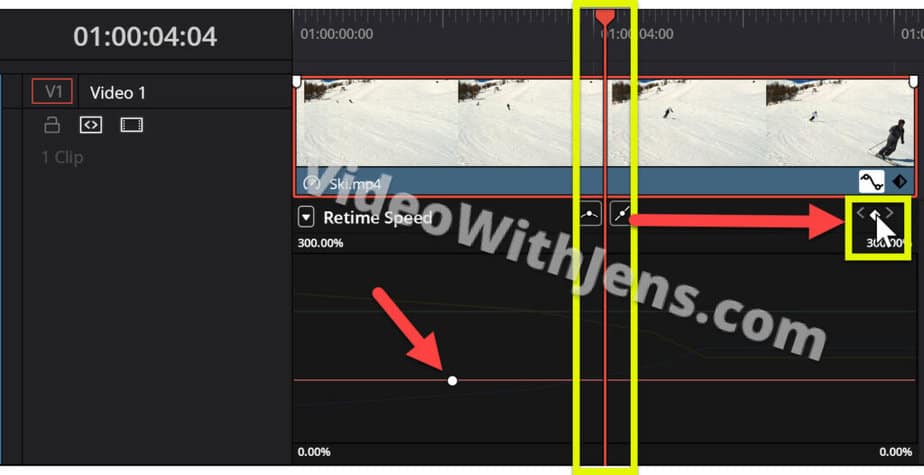
Once you have two keyframes, you can simply hover your cursor over the line between the dots and drag it downwards.
You can see how much you slow the clip down in the window that says “Retime Speed” and shows the speed percentage.
40-50% is a good range for slow motion.
Here is the best part:
By clicking on the keyframes (red means they are selected), you can click on that curved line at the top of the retime curve window.
Doing this, you can see that the transition from normal speed to slow motion is much smoother!
Do this for both keyframes.
The next method is nice if you are trying to fit the clip to a certain length in the timeline:
6. “Fit to Fill” to Create Slow Motion
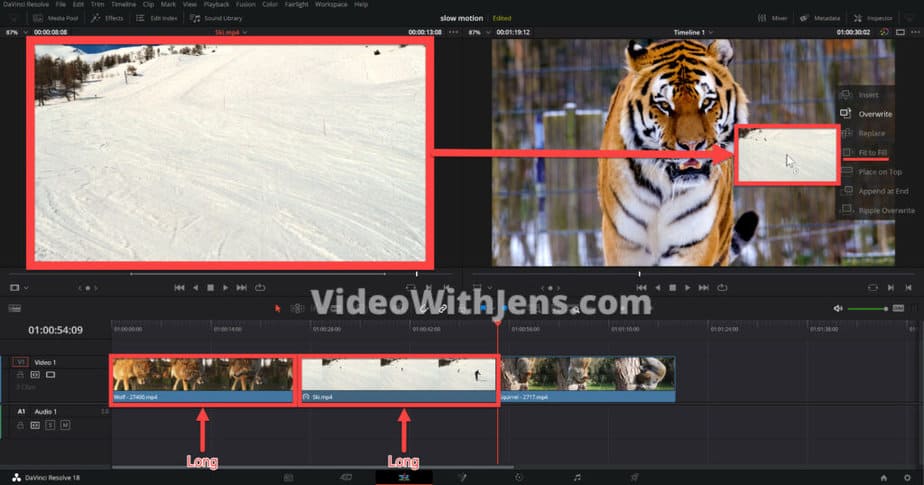
In the illustration image below, you can see two long clips and one short clip.
For this example, we will replace the short clip with one of the long clips. And to replace the length, it has to be slowed down…
Let me show you what I mean by this.
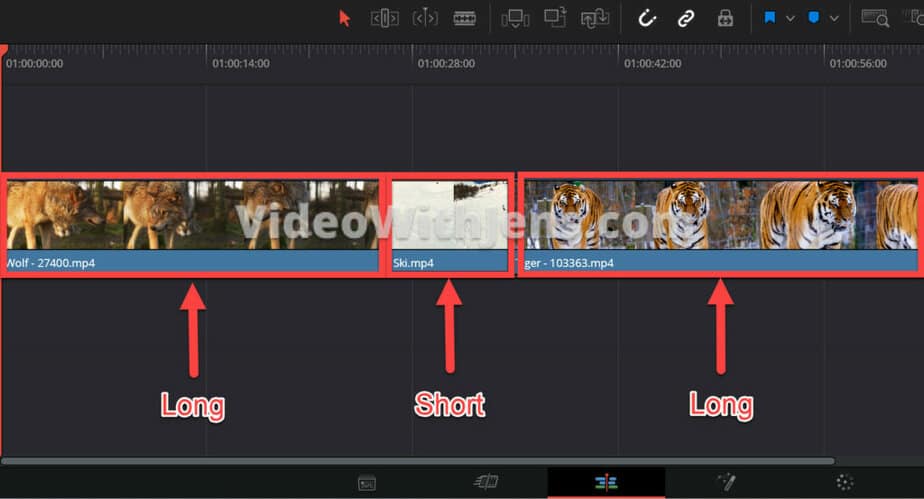
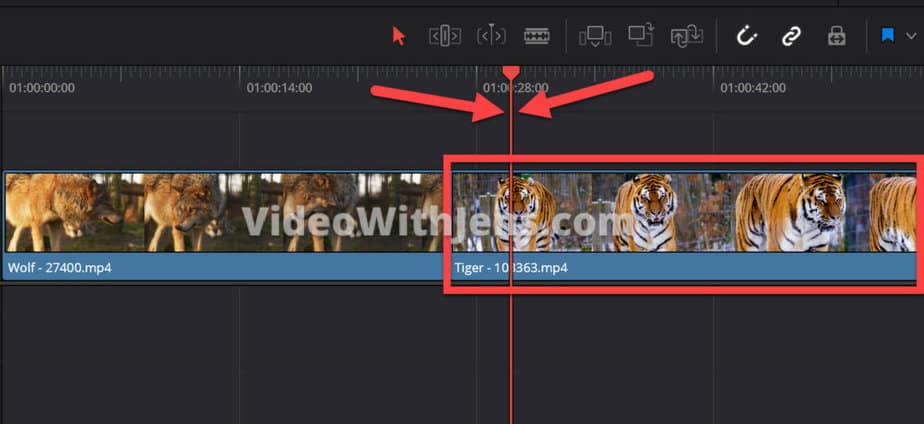
I have removed the short clip from the timeline to replace it with the tiger clip.
So to do this, place the playhead above the clip you want to replace, like in the image below:
You need to have both the “Source Viewer” and the “Timeline Viewer” open for this to work.
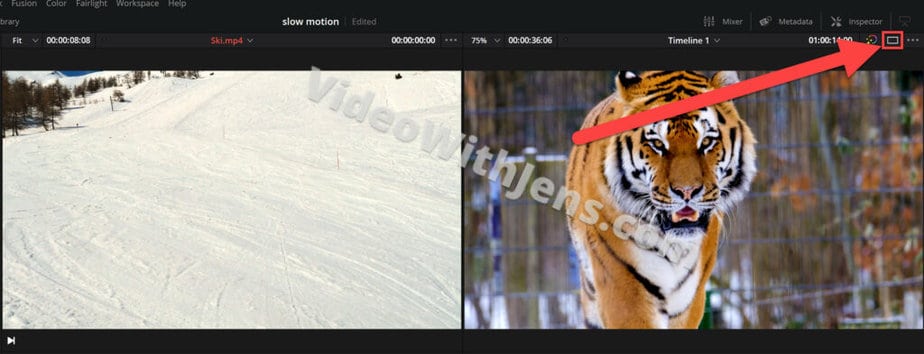
Click on those two little rectangles in the top right-hand corner above the viewer to show both:
Then, open the “Media Pool” and double-click the clip you want to make in slow motion as it shows up in the “Source Viewer.“
Next, simply drag the video from the “Source Viewer” to the “Timeline Viewer“and drop it on top of “Fit to Fill” in the menu that pops up.
The clip on which you placed the playhead on top should now be replaced by the new clip.
In my case, I’ve replaced the tiger clip with a clip that was originally much shorter. However, using the “Fit to Fill” has now simply reduced the clip speed to make it last longer= slow motion.
That’s the best ways to create slow motion on the “Edit” page!
If you’re a fan of the “Cut” page, you can also make slow motion there:
7. Create Slow Motion on the “Cut” page
This method is really easy.
Cut the clip where you want the slow motion to start and where you want it to end (like we did in the first method.)
Then, right-click it in the timeline, and select “Change Speed“:
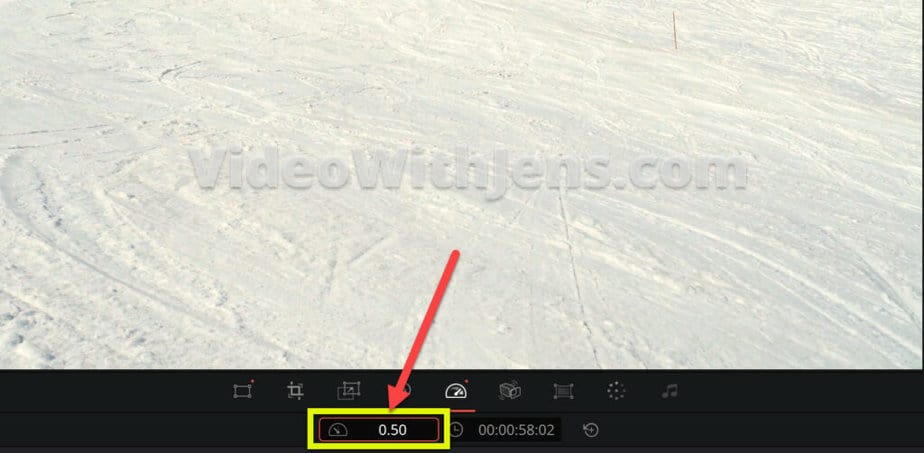
Now you should be able to see the speed controls below the viewer!
To create slow motion, simply type “0.5” in the box I’m showing you in the image below: (meaning 50% of its original speed)
There are many possibilities when it comes to changing clip speed and creating different effects. Check out this article where I’ve gathered a bunch of useful methods and tips.