How to Add Text in DaVinci Resolve 18 (+ Animate it)
Let’s look at how to add text to your video in DaVinci Resolve.
Gladly, this is an effortless and straightforward thing to do!
I will also show you how to edit the text and add animation. Doing this will make your video look more professional and engaging to watch.
How to Add Text in DaVinci Resolve
Quick Version
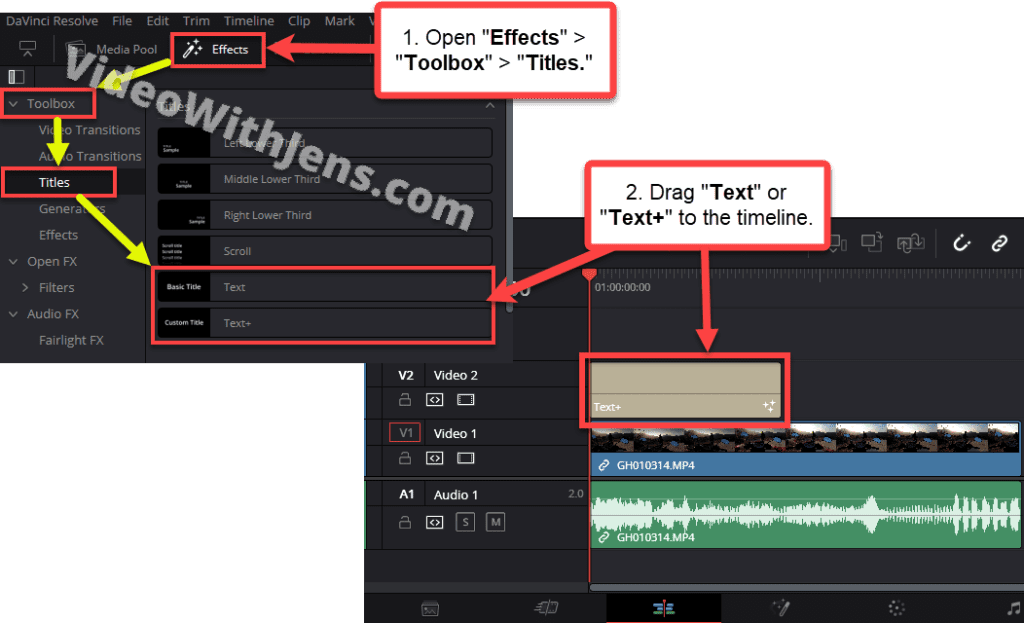
To add text to your video in DaVinci Resolve, go to the “Edit” page, and then open “Effects” (top left-hand corner) > “Titles.” Next, drag the “Text+” generator to the timeline, and drop it one track above your video clip. To edit the text, click on the text generator, and open the “Inspector” tab.
Detailed Version
Start by opening the “Edit” page, found in the menu bar at the bottom of Resolve:

Next, open the “Effects” tab (top right-hand corner), and then “Titles” under “Toolbox.”
Here you have many different text/title generators to choose from.
I recommend choosing the one called “Text+” for the most flexibility and adjustment options.
Drag and drop the desired text generator in the timeline, one track above your video clip.
- This way, you are creating a text overlay. However, if you want a black background, place the text generator in the first video track, “Video 1.”
Next up, we are going to make the text look good!
How to Edit the Text (Easy Styling)
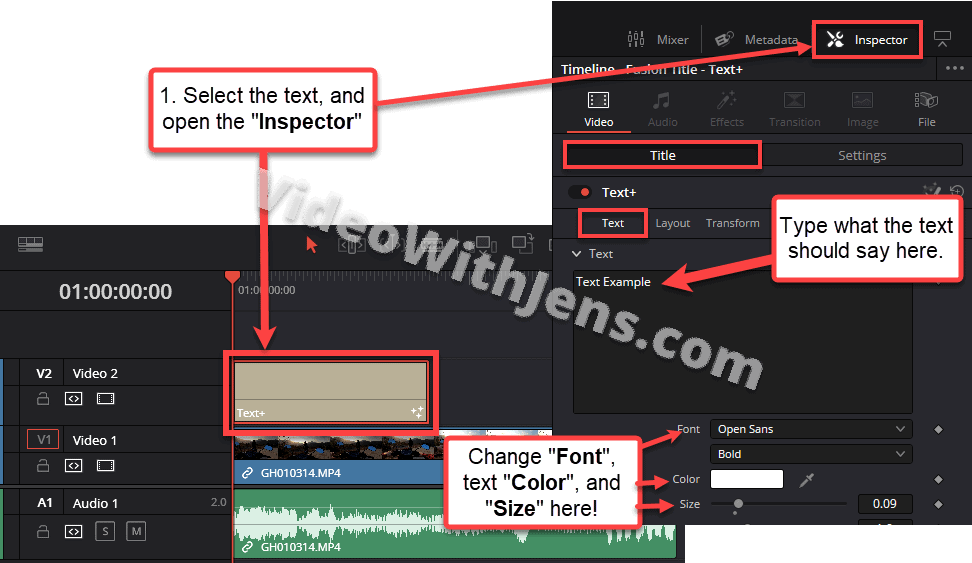
Select the text generator in the timeline, and open the “Inspector” tab in the top right-hand corner. Inside it, you can edit the text and make adjustments.
Don’t worry if the “Inspector” tab seems intimidating; I will explain what you need to know.
There are two primary tabs inside the inspector; “Title” and “Settings,” we’ll start with the first one (Title).
Basic Adjustments:
- The text box is where you type in what the text says.
- «Font» is the text type; choose the one you like.
- I’ll explain how to import better-looking fonts here.
- «Color» adjusts the color of your text.
- «Size» adjusts the size of your text; drag the slider to the right to increase it.
Don’t worry; there’s more coming.
How to Move & Position Text in DaVinci Resolve
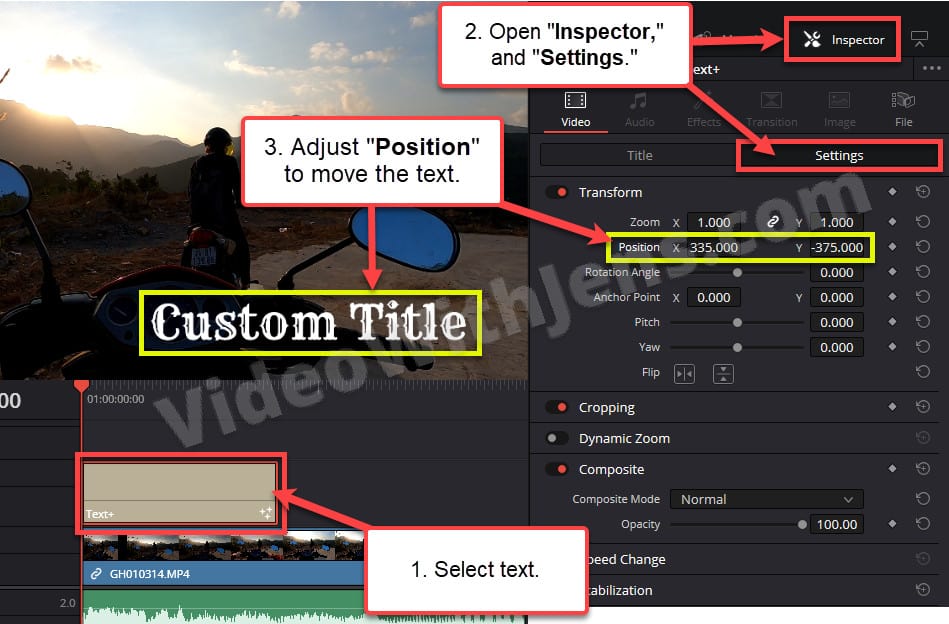
- Open the “Edit” page.
- Select the text generator in the timeline.
- Open the “Inspector” tab and then the “Settings” sub-tab.
- Under “Transform,” adjust the x- and y-value next to “Position.”
Watch the image below on how to do this
It’s also possible to animate movement to the text with a couple of extra steps. I’ve written more about that later in the article; click here to read it.
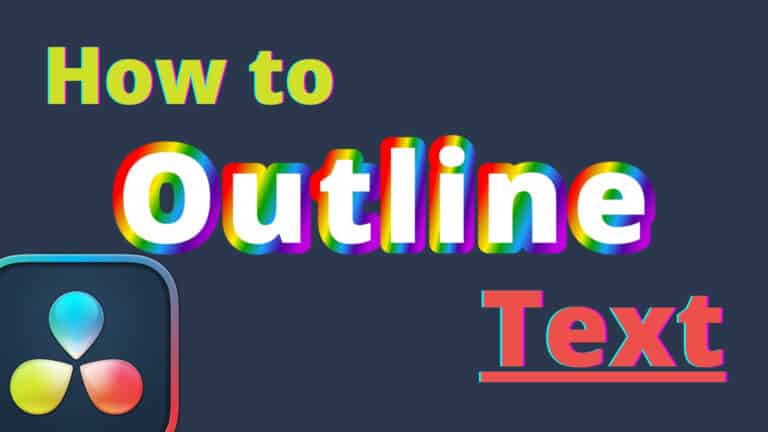
How to Outline Text in DaVinci Resolve
Outlining text is a great way to make it more visible and stand out from the background.
Here’s a full tutorial on how to outline text, customize it, and add animation.
How to outline text in Resolve differ a bit depending on which title generator you chose in the “Effects”> “Title” tab.
I will show you how to outline using both, first the “Text+” and then the “Text” afterward.
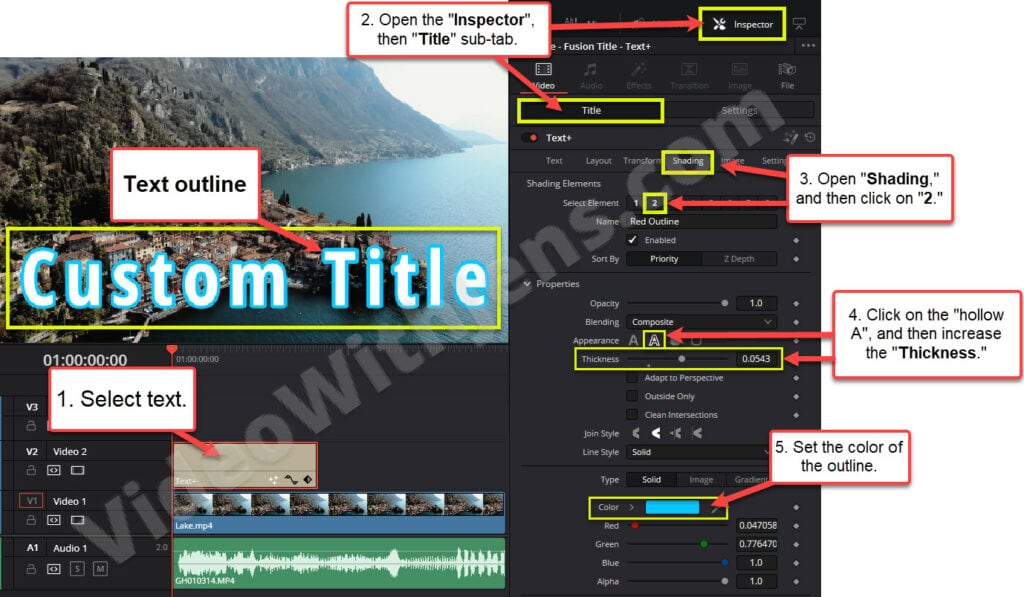
How to outline “Text+”: (refer to the image below)
- Go to the “Edit” page.
- Select the “Text+” generator in the timeline.
- Click on “Inspector” > “Title” > “Shading.”
- “Shading” is one of the tabs at the top.
- On the right side of “Select Element,” click on the number “2.”
- Next to “Appearance,” select the hollow “A.”
- Increase the “Thickness” while watching the text in the viewer.
- Change the “Color” of the outline at the bottom of the menu.
- Click on the box to adjust it.
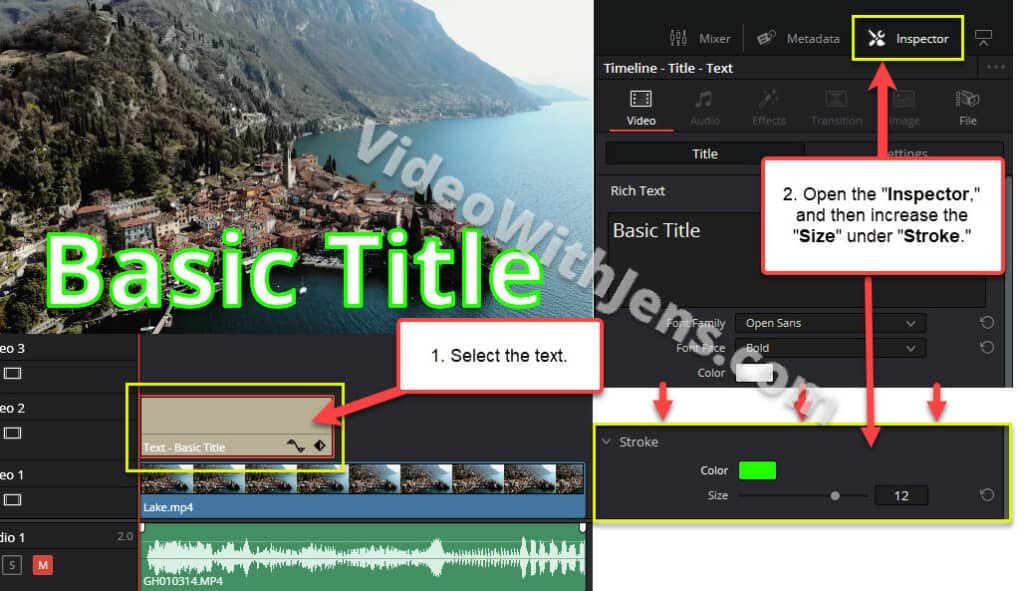
Here’s how to outline the basic “Text” generator:
- Open the “Edit” page.
- Select the text generator in the timeline.
- Open the “Inspector” tab and then the “Title” sub-tab.
- Open the “Stroke” settings, and increase the “Size.”
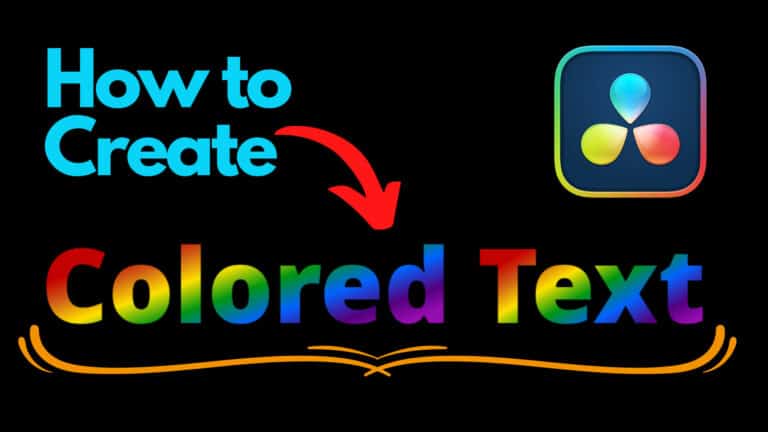
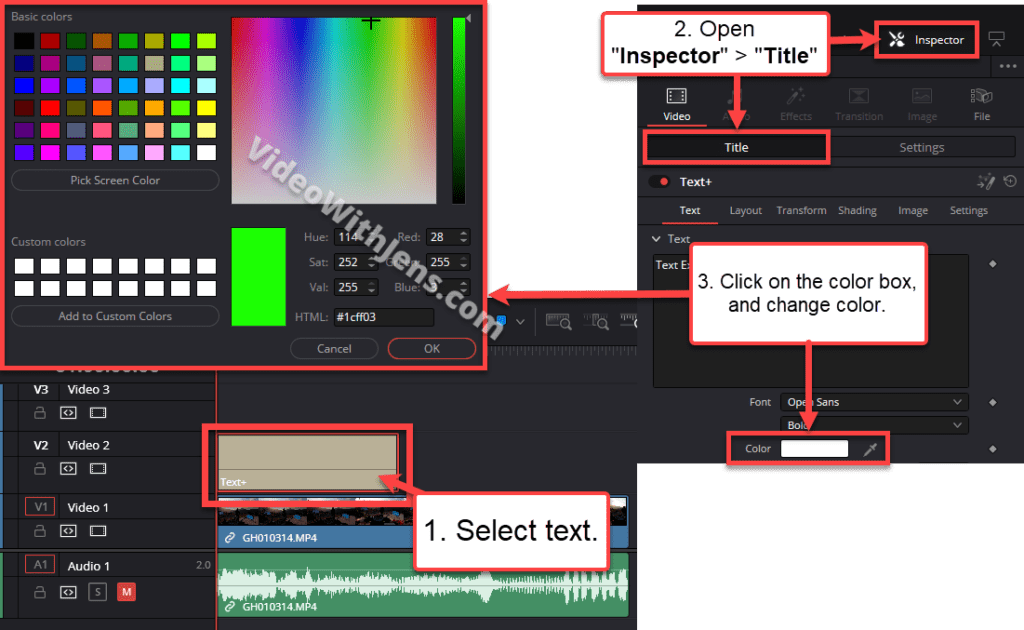
How to Change Text Color in DaVinci Resolve
To change the text color in DaVinci Resolve, select the text generator in the timeline, open the “Inspector” tab, and then the “Title” sub-tab. Next, change the “Color” by clicking on the white box next to it.
Check out the image illustration below on how to do this:
You can also make the text gradient, rainbow-colored, and even change color over time; check out this article on how to do that.
How to Add Background to Text in DaVinci Resolve
Adding background to your text is also a great way to make it more visible.
It is not an easy way to do this with the “Text+” effect, but it is with the basic “Text” generator.
- If you are using the “Text+,” I would create the background using the method described here.
How to Add Background to “Text” (not “Text+”)
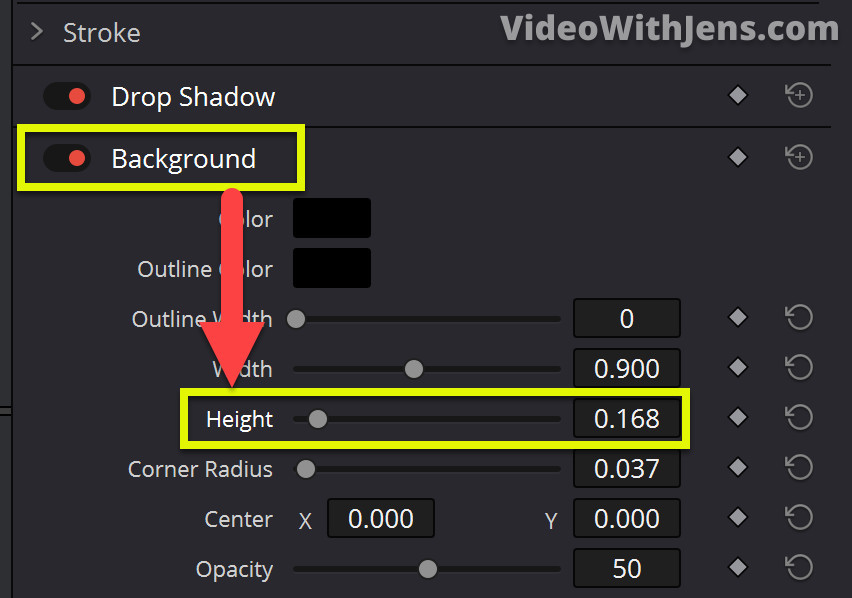
To add background to your text, select the text generator in the timeline and open the “Inspector” tab.
Then you want to be in the “Title” sub-tab and not the “Settings.” Finally, if you move your eyes to the bottom of the inspector, there should be a tab called “Background»; click on the name to open it.
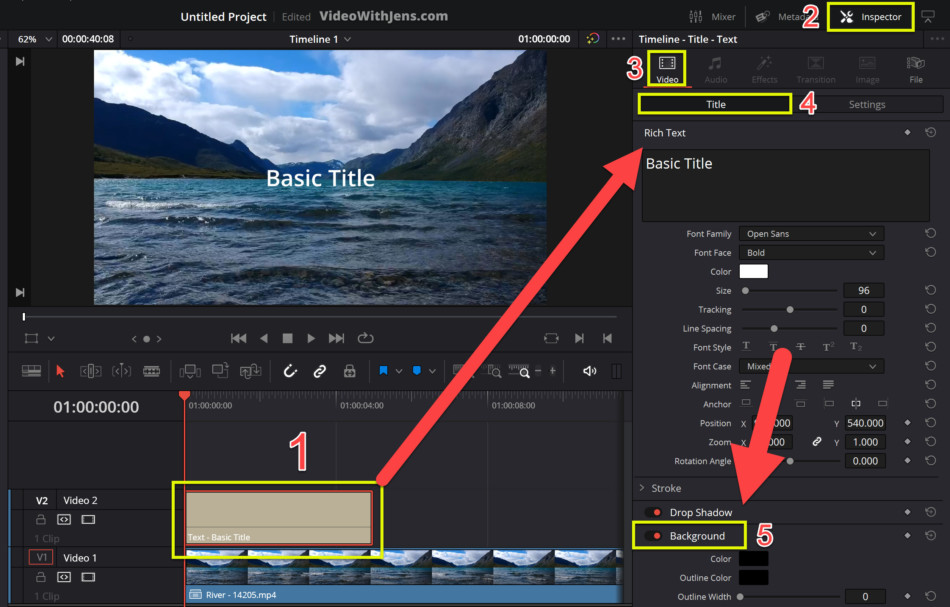
Then, increase the “Height” by dragging the slider to the right. By doing this, you should be able to see the background appearing behind your text.
Here’s an article explaining how to customize the text background and make it look better.
Alright, enough styling!
It’s time to add some fancy effects to our text:
2 Super Easy Text Effects in DaVinci Resolve
Adding effects to your text is a great way to keep your viewers engaged.
Once you know how to do these two effects, you will probably use them a hundred times in the future! They are easy to do + make your video look much more high-value.
The two effects are:
- Write-On Text Effect
- Text Animation (Make it move!)
How to Make Write-On Text Effect in DaVinci Resolve
This effect will make it look like the text is written in real-time.
The text will go from not showing to being fully written on the screen.
- Understanding that sentence is going to make this easy.
Because…
We have to tell DaVinci Resolve where the effect will start (or where the writing will start!).
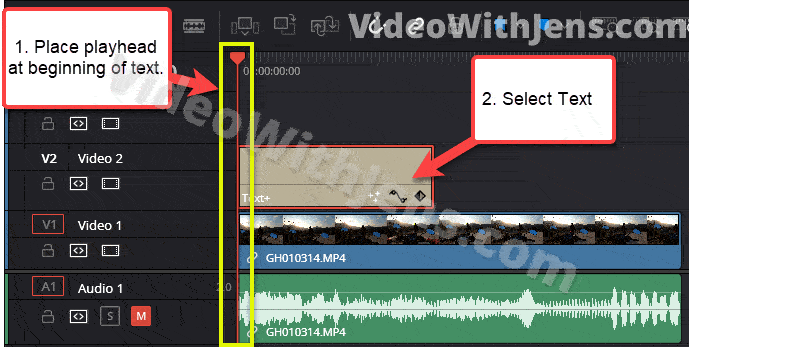
To do this, place a “Text+” where you want the effect to start (Refer to the image below).
- NB, you must use the “Text+” generator for this!
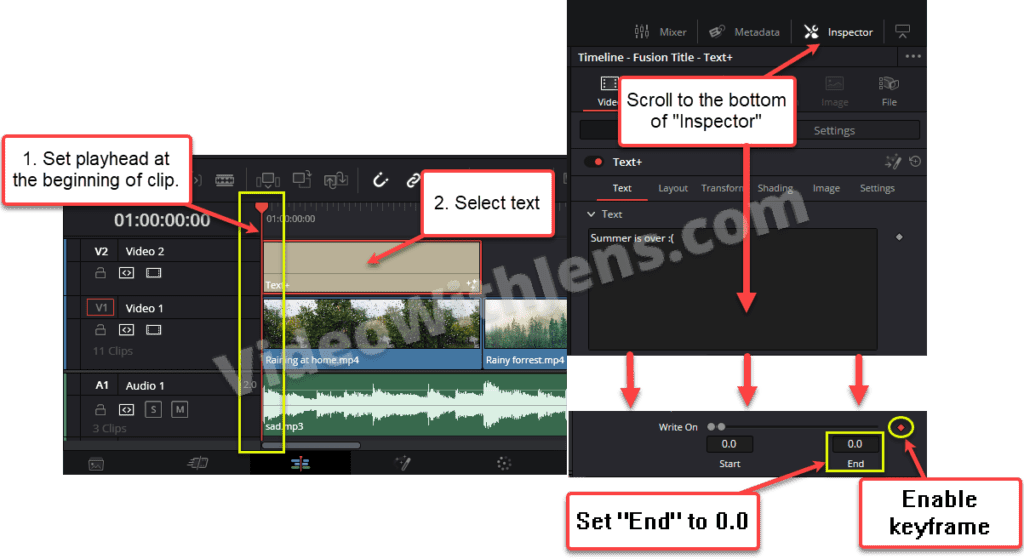
Then place the timeline playhead (red time marker) at the beginning of the “Text+” generator, where the effect will start.
Next, select the text by clicking on it in the timeline, and then open the “Inspector” tab.
Inside it, scroll down to the option “Write On.” On the right side of the slider, there should be a diamond icon (keyframe icon); click on it as it turns red.
Then, set the “End” value to “0.0,” alternatively, drag the slider entirely to the left side.
Once the above is done, we have told DaVinci Resolve where the effect/writing will start!
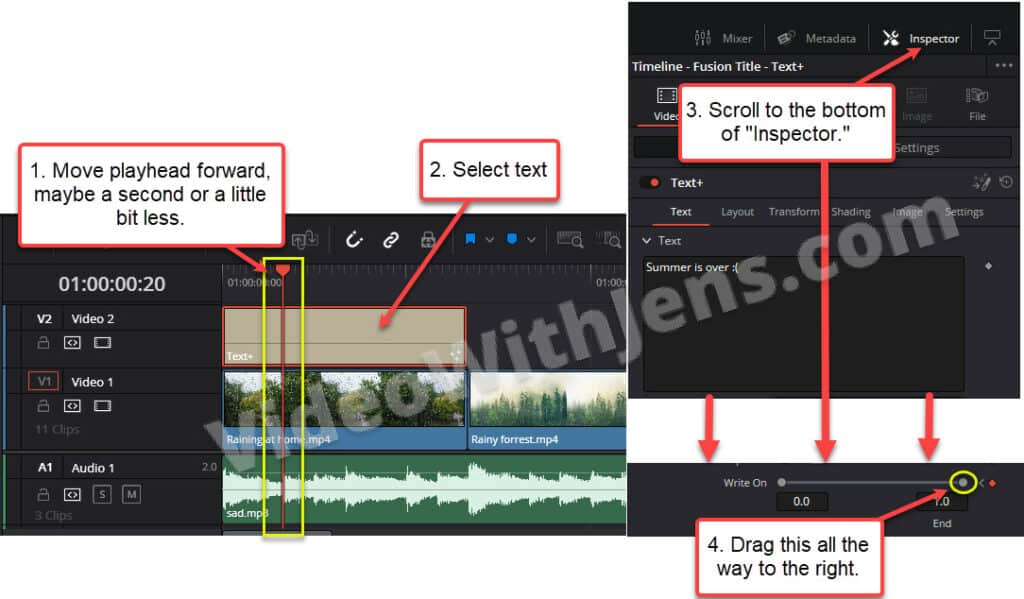
Now, we need to tell Resolve where it will end, which may be a second or five seconds forward.
- The longer forward, the slower the writing will be and vice versa.
To do this, go to the point in the video where you want the text to be fully written. Either play the video or move the timeline playhead forward by dragging it.
Next, ensure the text generator is still selected, and then go to the “Inspector” tab again.
This time we want to drag the “Write On” slider entirely to the right side, or type “1.0” in the box above “End.”
- Notice that the diamond (keyframe icon) turns red automatically! This is because you only have to activate a keyframe once, and then a new keyframe is created every time you change the value later on.
That’s how to do the write-on effect!
Next up, we are going to animate some movement to our text!
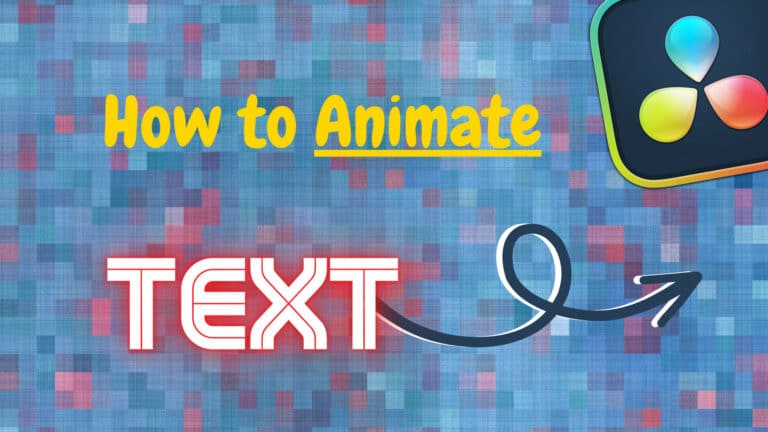
How to Animate Text in DaVinci Resolve (Make it move!)
Now we are going to do some text animation!
Sounds fancy and complicated, but it’s pretty simple (but fancy).
And the best part…
The effect is based upon using keyframes, which you are familiar with if you read how to do the write-on effect above.
But, I’ll show you exactly step-by-step how to do this effect as well:
(In this animation, we’ll make the next move from one position to another).
Refer to the GIF illustration below when following the steps.
- Add a “Text+” to the timeline, and adjust the style how you want it (as I showed you above).
- Place the timeline playhead where you want the text to start moving.
- Select the text in the timeline, and open the “Inspector” tab.
- Inside the inspector, open the “Settings” sub-tab.
- Then on the right side of “Position,” click on that little diamond (keyframe icon) as it turns red.
- This is the starting position, so adjust it if you want the text to start moving from another position.
- Place the timeline playhead where you want the movement to stop.
- Open the “Inspector” tab, and then adjust the “Position” to where the text will move to.
If that was confusing, watch the GIF illustration below:
Check out this article for more information on how to animate text and other cool things you can do with it!
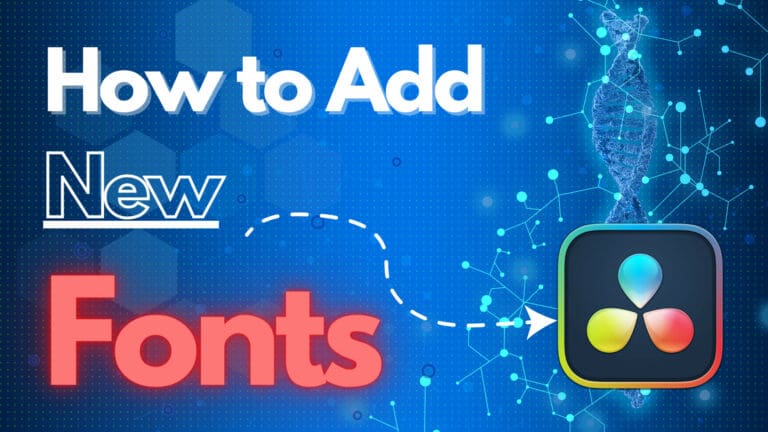
Did you know it’s also possible to download fonts (text styles) to use in DaVinci Resolve?
How to Add New Fonts to DaVinci Resolve
Using unique fonts is one of the most important things to make your video stand out!
And this is, too, an easy and non-techy thing to do, yet not known to many beginners.
Quick Answer
To add new fonts to DaVinci Resolve, find a trusted resource on the web and download a font you like. Next, double-click the .ttf or .otf file, and install the font. If DaVinci Resolve is running, you must restart it for the new font to be accessible.
Detailed answer (with images)
A bunch of good resources on the web offer free fonts for you to download. However, it’s important to check the license if you are going to use it for commercial use.
Here’s a list of the 4 best resources to download free fonts for DaVinci Resolve.
- Showing you where to get the best-looking fonts and what sites are best if you use the font for any commercial intentions.
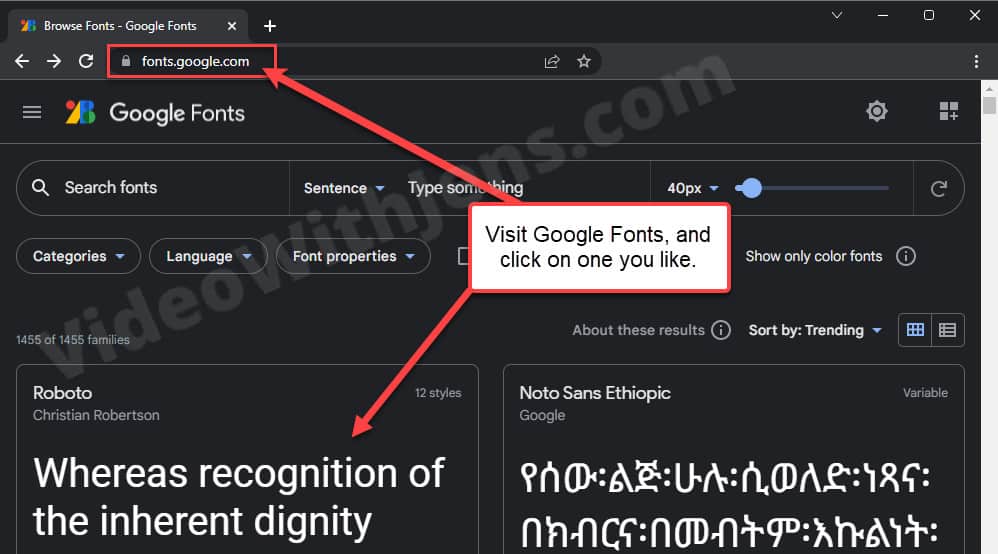
Next, let’s add some fonts to DaVinci Resolve; I’ll show you how to do this using Google fonts as my resource, but the installation process is the same for all the sites:
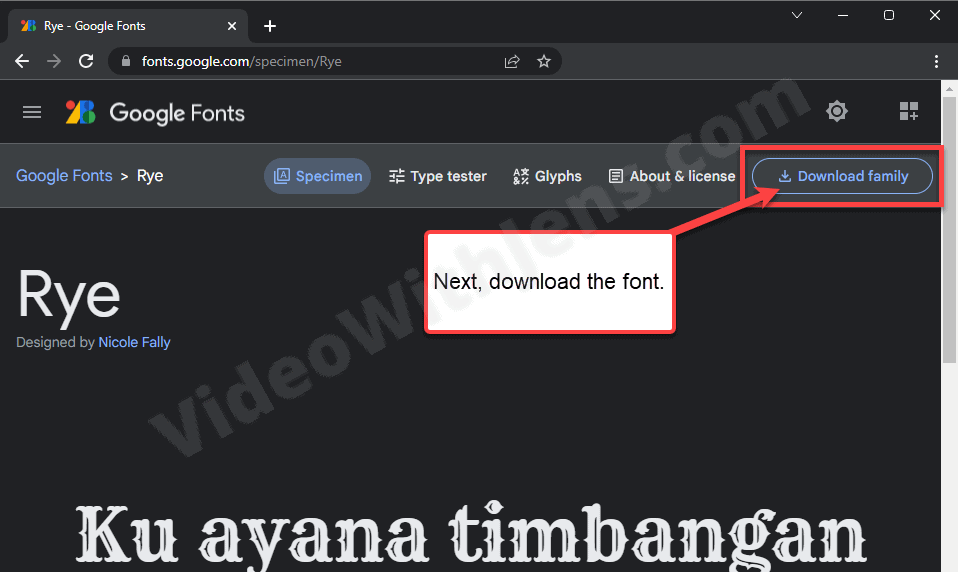
Visit Google fonts (opens in a new tab), then scroll down and find a font you like; then click on it to get to the download page.
Next, click on “Download family”:
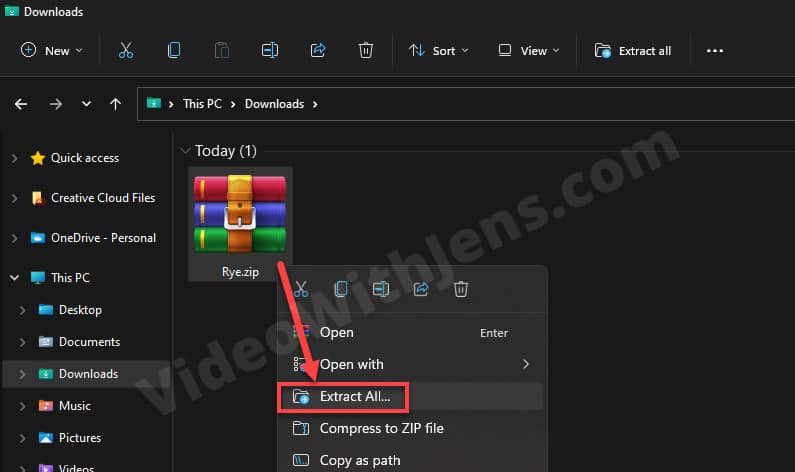
Once it’s downloaded, it’s by default located in the “Downloads” folder.
Right-click the .zip file and click on “Extract All.”
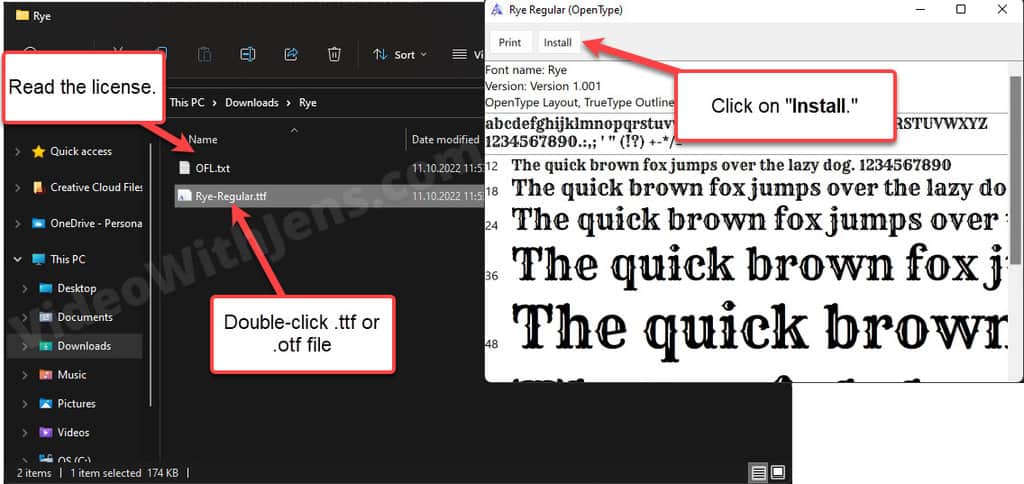
When the .zip is extracted, open the folder and double-click the font file, usually a .ttf or .otf extension.
Then in the window that pops up, click on the install button.
The other document is the font license, which I recommend you read, especially if you make the font for any commercial intent.
- Most Google fonts are free for commercial use, which is fantastic! But better safe than sorry.
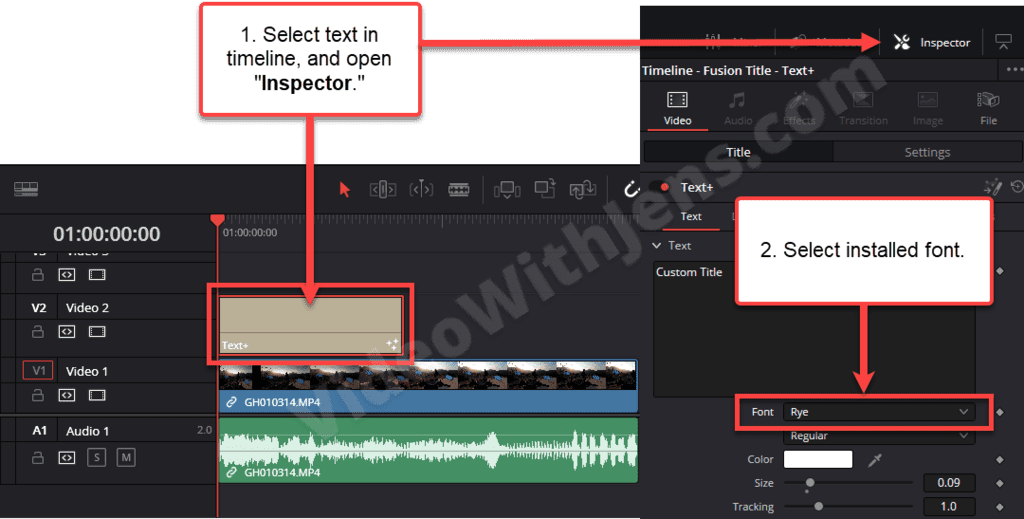
When it’s finished installing, you’ll have to restart DaVinci Resolve to find it.
Then add a “Text” layer to the timeline; click here to learn that.
Next, select the text in the timeline, open the “Inspector” tab, and then the “Title” sub-tab inside it.
When you expand the “Font” drop-down list, you should be able to find the font you installed. It should have the same name as the font file.
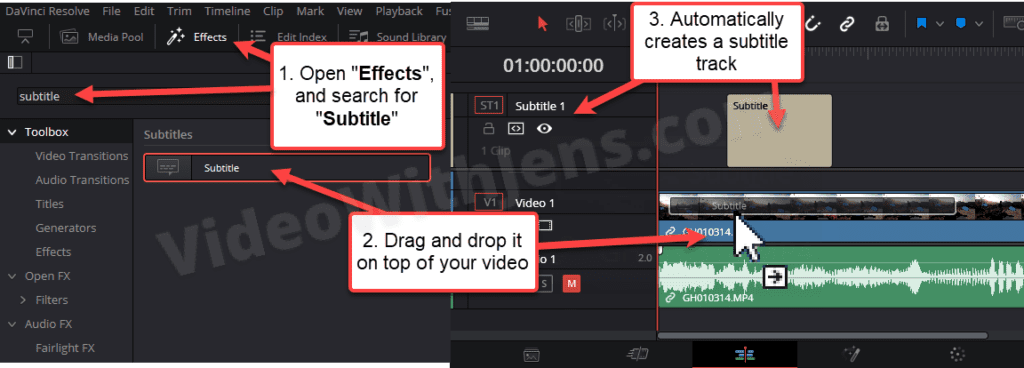
How to Add Subtitles in DaVinci Resolve
Adding subtitles is not done using the same text/title generators as you usually would. Instead, DaVinci Resolve has its own feature intended to create subtitles.
To add subtitles in DaVinci Resolve, open the “Effects” library, search for “Subtitle,” then drag and drop it on top of your video in the timeline. Next, select the “Subtitle” generator in the timeline, open the “Inspector”> “Caption,” and then type in the text box to transcribe the video.
Here’s a little more information on how to do it: (+ the workflow of adding subtitles)
After dropping the “Subtitle” on top of the video, you can drag it to place it where you want it to start.
Next, to start transcribing the video, click on the subtitle in the timeline, and open the “Inspector” tab.
Then you want to open the “Caption” sub-tab, where you’ll find the text box to type into:
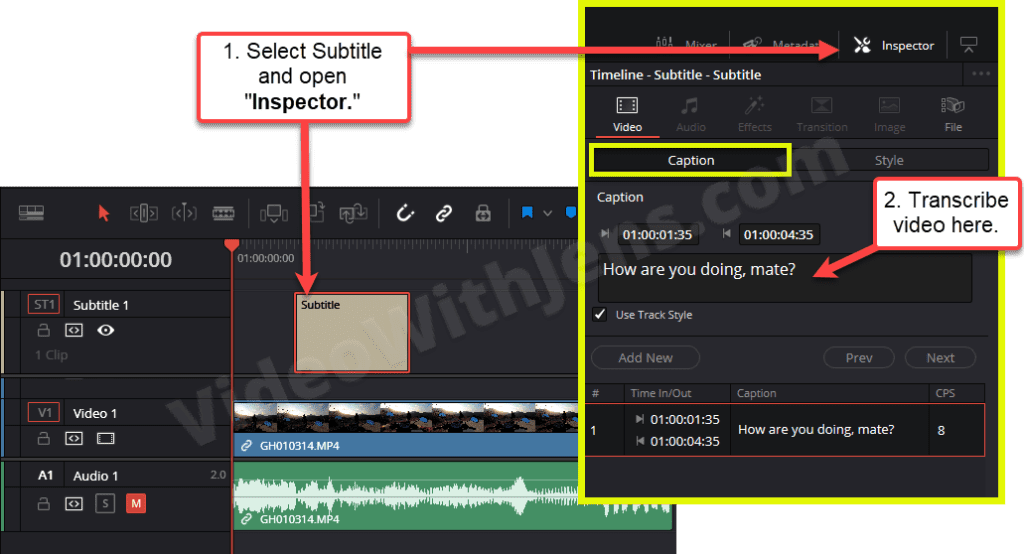
Simply way of transcribing using this tool:
- Type the dialogue into the text box.
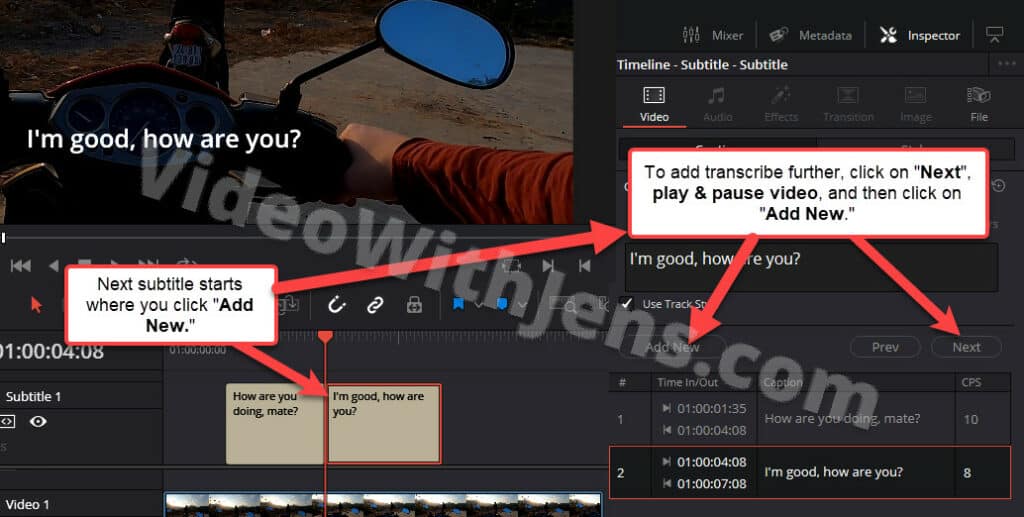
- Click on “Next” once it’s finished, and press “Spacebar” (keyboard) to play the video.
- Stop the video where the next person starts talking by pressing “Spacebar.”
- Click “Add New,” and then type into the text box.
There is no way to animate subtitles in DaVinci Resolve, however, here’s a workaround I found.
Next, I will show you how to overlay the video with text, which will probably be pretty obvious if you have read the whole article…
How to Add Text Overlay in DaVinci Resolve
To add a text overlay in DaVinci Resolve, go to the “Edit” page, and open the “Effects” library (top left-hand corner). Then, open the tab called “Titles,” drag the one called “Text+” to the timeline, and drop it one track above the video clip.
Here’s a bit more information:
Follow the instruction in the image below:
To edit the text and add animation to it, I wrote about that above.

Adding text is only one of the basic skills everyone should know!
- Check out this tutorial to learn about the others. Once you master those, you have the skillset needed to start evolving and get more advanced.