Adding GIFs in Davinci Resolve (Import / Export explained)
In this tutorial I will show you how to add GIFs to your videos in Davinci Resolve!
To make this possible, you will also have to know how to import them… Which I’ll also show you.
You will learn how to export GIFs out of Resolve as a original GIF file.
Here are the different part of this tutorial if you want to skip ahead:
If you want to know how to make GIFs with Resolve, that’s a seperate article, check it out here.
Without wasting any more of your precious time, let’s get to it!
Can You Use GIFs in Davinci Resolve?
Davinci Resolve does not support GIF files. In order to use them in the software, they have to be converted into a supported video format. This can be done by using an online file converter.
How to Import GIFs to Davinci Resolve
To import a GIF file into Davinci Resolve, it has to be converted to a video format that is supported by the software. This is because Davinci Resolve does not support GIF files. However, there are many online converters for this specific task.
Gladly for you, I’ve written a detailed description on how to do this below!
Using this method, it will look exactly like a genuine GIF in the video.
Without further ado… Let’s get to it!
After testing out a bunch of the different online file converters out there, Ezgif’s GIF to MP4 is without doubt the best one!
It’s also totally free, no need for sign-up and very clean looking. So open the converter here (it opens in a new tab so you won’t lose this one).
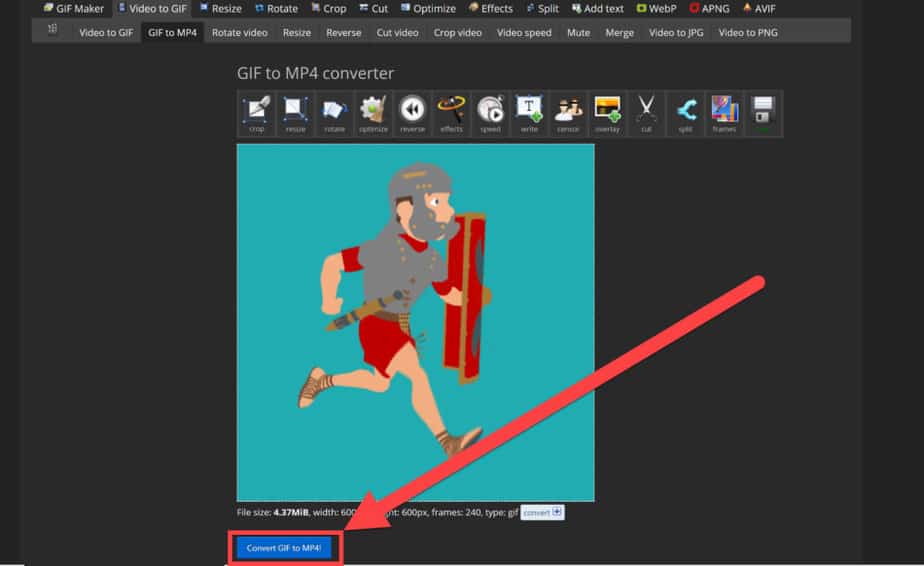
Next, go ahead and locate the GIF file on your computer and drag it into the upload box on Ezgif. Watch image below:
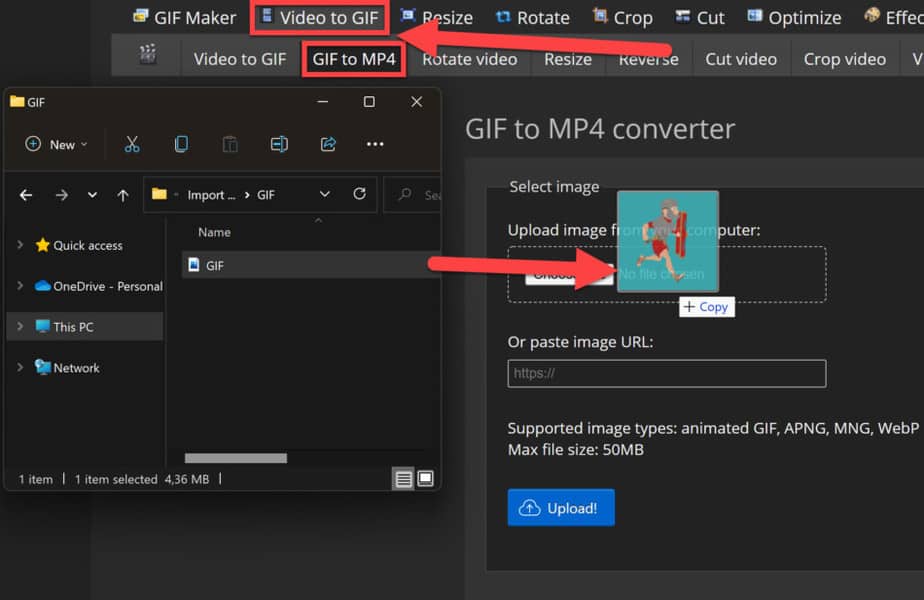
Once, you’ve uploaded the file, click on “Upload!“:
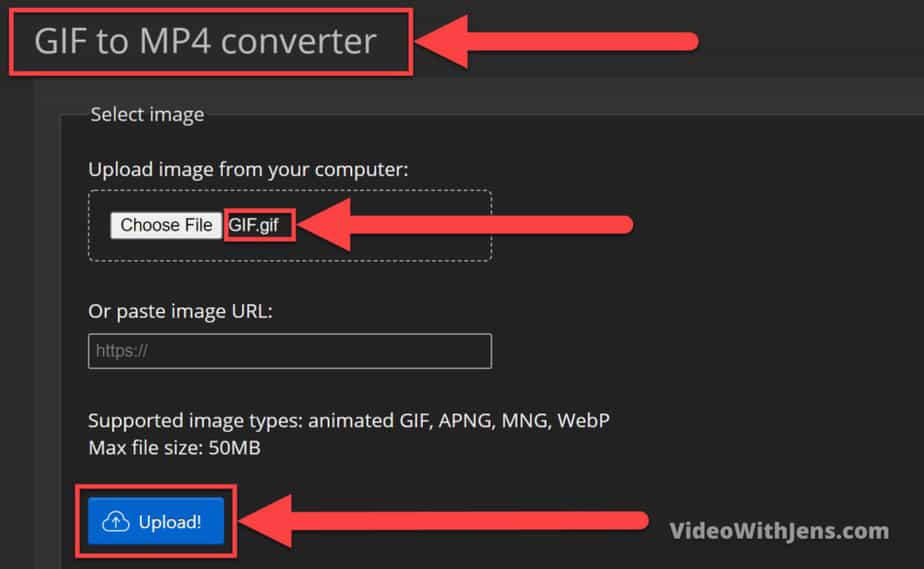
Then you will see your GIF in the preview and beneath it click on the “Convert GIF to MP4!” button:
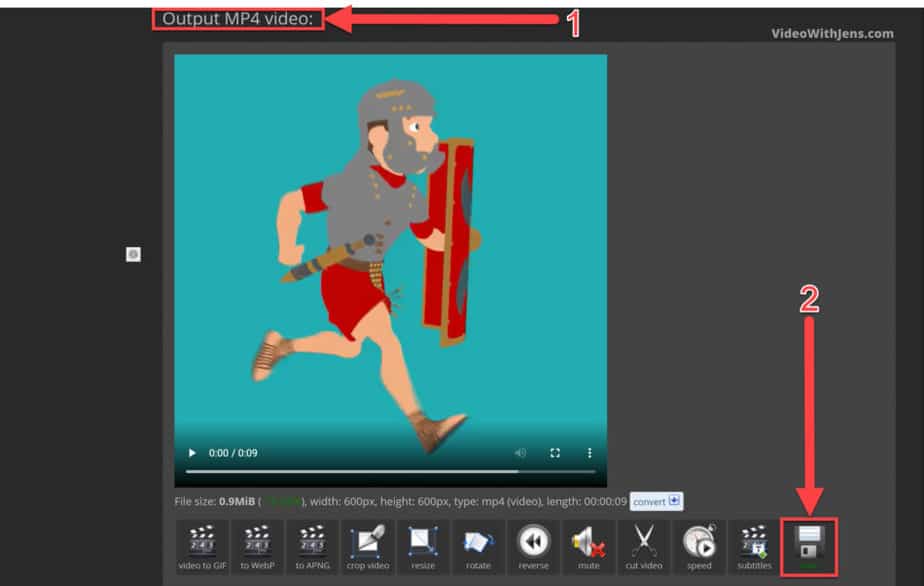
Scroll a little further down the page, and you will see a video preview under “Output MP4 video:“. Under the video preview there is a bunch of different options. Click on the one that says “Save“, to download the video file:
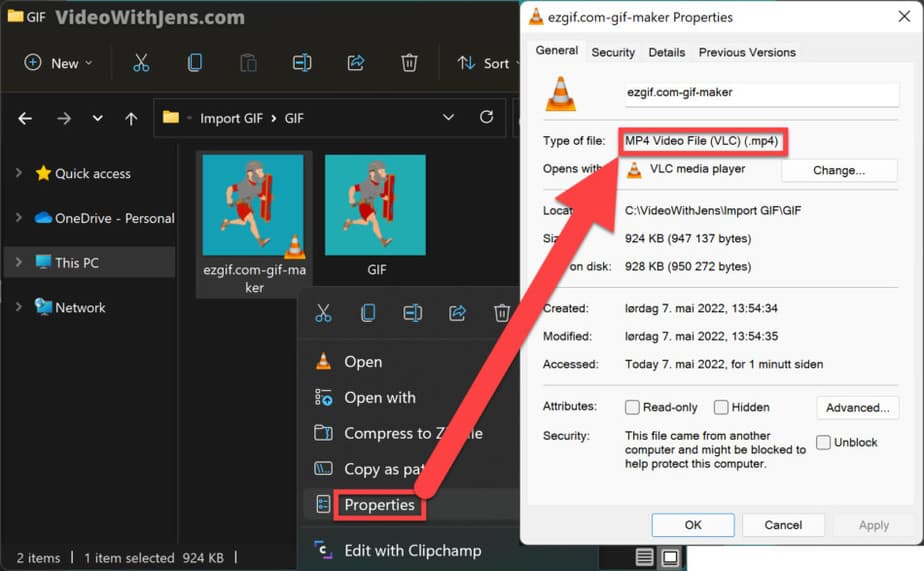
Once it’s downloaded you’ll find it in the “Downloads” by default (atleast for windows).
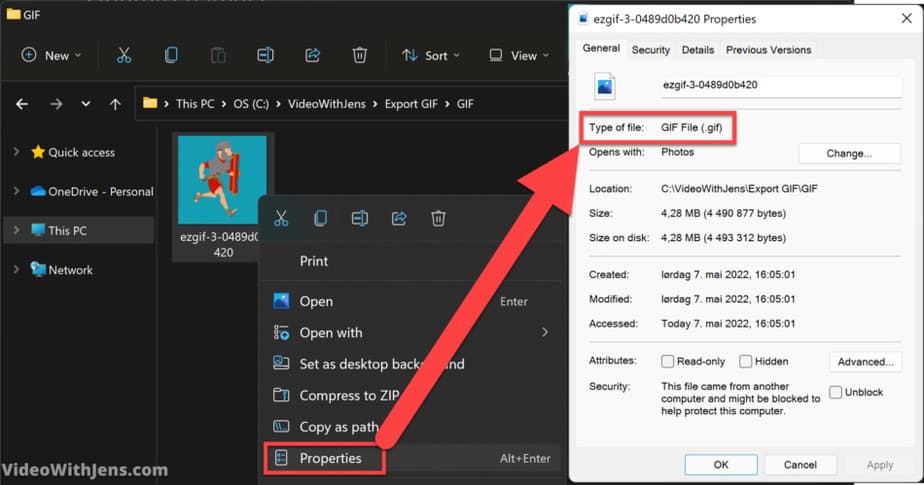
If you right-click the file and click on “Properties” you’ll see in the window that pops up that we have successfully converted the GIF to a MP4 file:
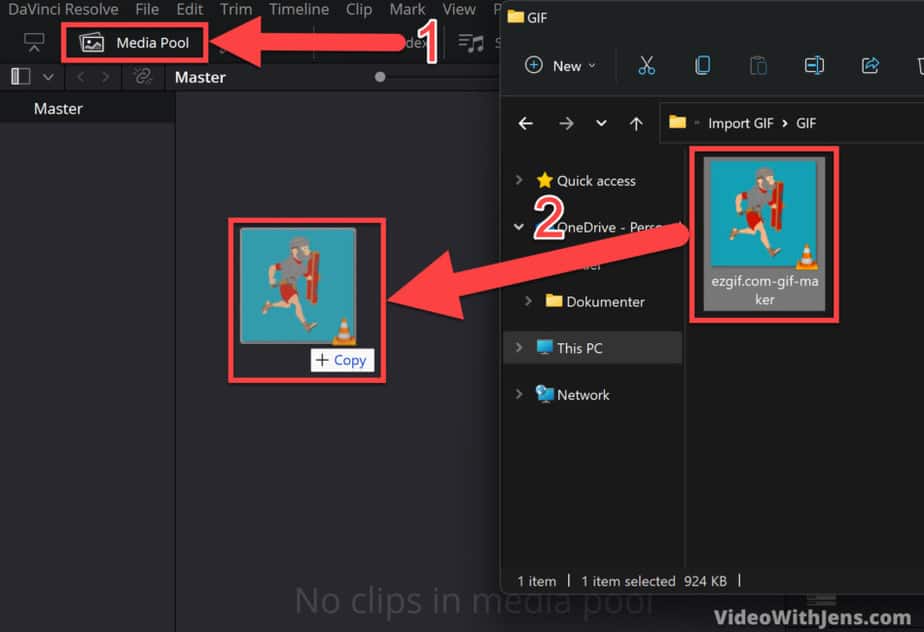
Next open Davinci Resolve and go to the “Edit” page.

Make sure that the “Media Pool” in the left-hand top corner is open.
Go ahead and open the folder the file is located on your computer, and drag it into the “Media Pool“:
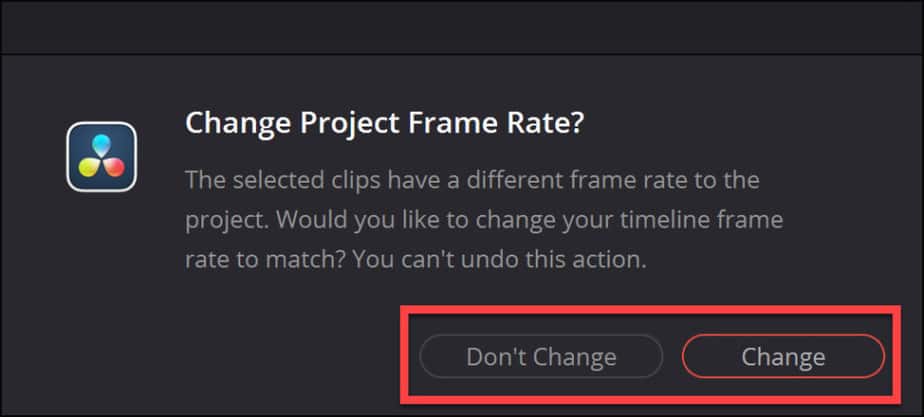
If you have not added any videos to the project yet you will get asked that standard question, “Change Project Frame Rate?” by Resolve.
If you are going to use to GIF in combination with an other video, I guess you want to click “Don’t Change” as it’s natural to use the main clips frame rate if they differ.
However, if you are only going to add the GIF to the project you can just go ahead and click “Change“:
Boom!
Once that is done you have successfully imported a GIF to Davinci Resolve!

Next up, you will learn how to add GIFs to your videos. Since this is no longer a GIF file, it needs to be looped in order to look like a GIF:
How to Add GIFs to Your Videos in Davinci Resolve
Next you’ll learn how to add GIFs to your videos in Davinci Resolve and make them look like real GIFs.
For those who did not read the previous section:
To add GIFs to videos in Davinci Resolve, they first have to be converted to a supported video format. This is because the software does not offer support for GIF files. However, there are many converters online which specify on this particular task.
If you have not converted your GIF yet, read this.
Alright, let’s get to it!
How do we loop the GIF/video to make it look like a genuine GIF?
First, go head and add the video to your timeline. To do this simply drag it from the “Media Pool” to the timeline.
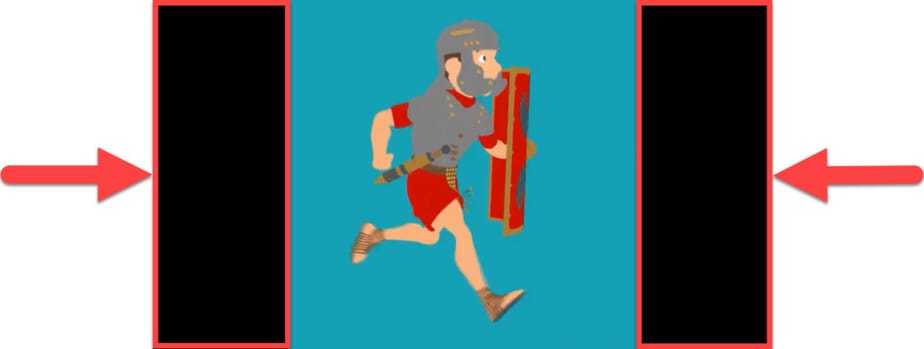
If you are going to have the GIF on top of another video, drop the video above the other video in the timeline this will create another video track. Watch image below:

Once you this is done, there is a change it may be way too big in comparison to the other video.
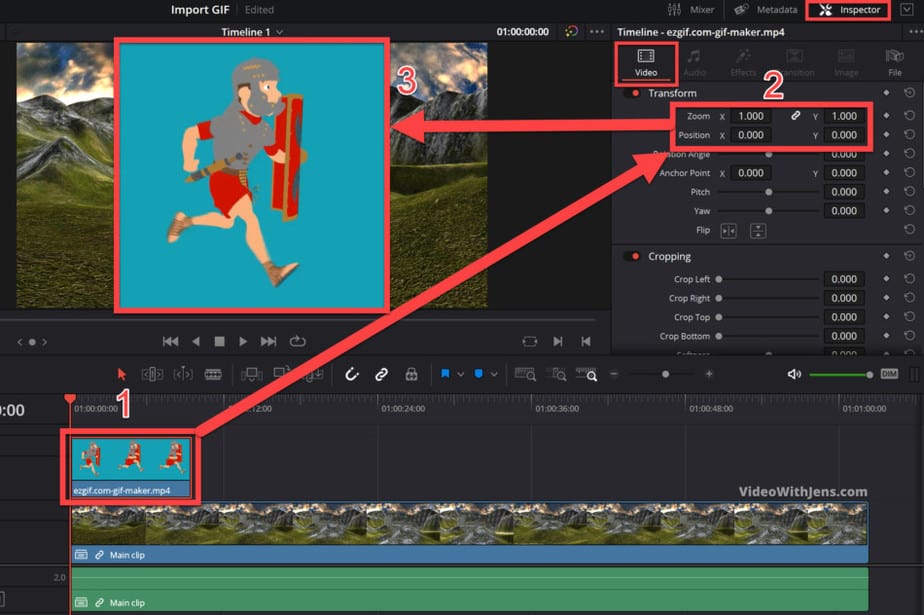
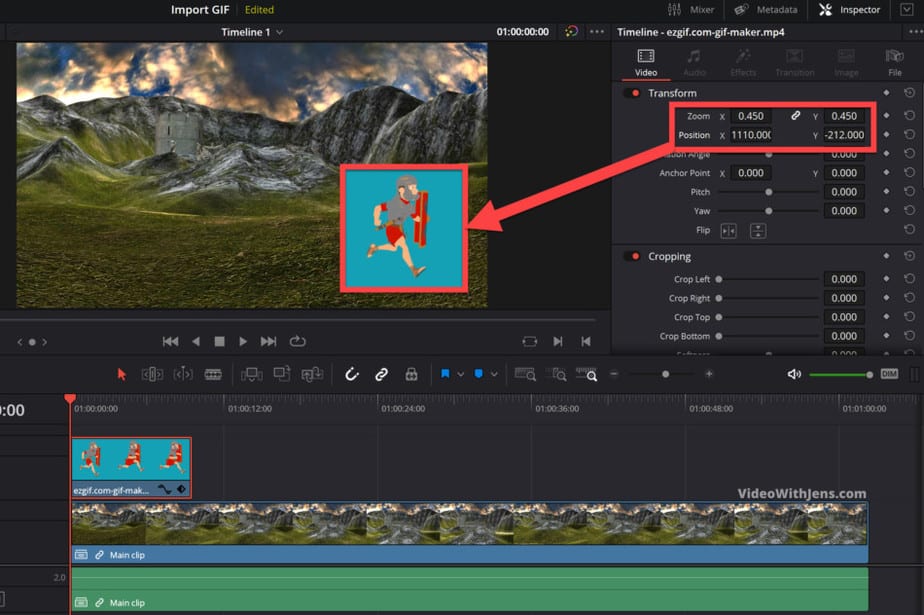
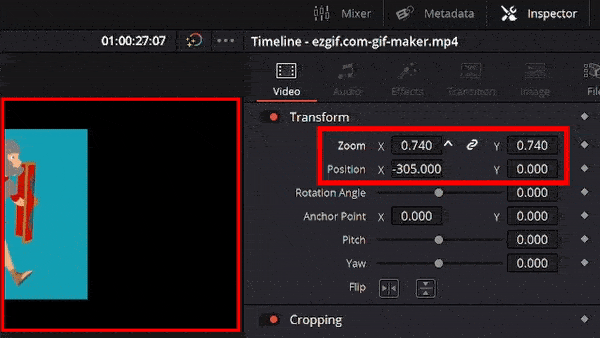
To adjust the size of the clip, select it in the timeline, then open the “Inspector” in the top right-hand corner.
Then make sure to be in the “Video” tab, and below “Transform” you wan to change the “Zoom” and “Position“:
- Zoom adjusts the size.
- Position adjusts where it’s placed on top of the other video.
Watch the illustrations below on how to do this:
Alright!
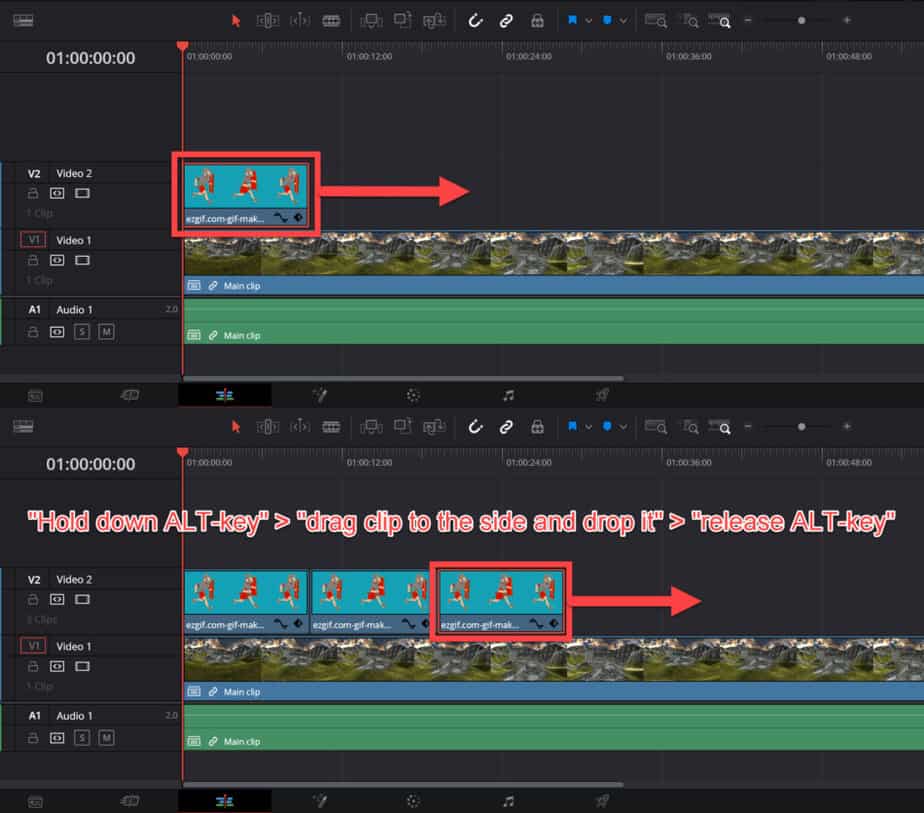
Now it’s time to loop the video.
To do this, we are going to duplicate the clip a bunch of times.
Hold down the ALT-key on your keyboard, then click, hold and drag the clip to the side with your mouse.
Place it right next to the other clip, and release the mouse button first, then the ALT-key.
Watch illustation below:
Voilà!
Now just create as many copies as you want, depending on how long you want it to last!
This is the easiest and many time the best way to do it. However, if you’re interested in a more advanced method, where you literally loop the clip, I’ve written a little tutorial on that here.
Coming up, is how to export GIFs from Davinci Resolve and convert it back to a GIF file:
How to Export GIFs from Davinci Resolve
There is no option to directly export GIF files in Davinci Resolve. Instead, export the project to a standard video format, and then convert it to a GIF file using an external application. There are many online file converters doing this.
I guess this came as no surprise for those who have read the whole article.
The online converters comes with a bunch of features and alot of what we are going to do could be done using one of those aswell.
However, in order to do that the video files cannot be bigger than 100 MB…
So in order to upload them, you’ll most likely have to trim them down using Resolve anyways… Also it’s WAY better to edit in Resolve, obviously.
If you want a more detailed tutorial on how to do this, I’ve written one here.
Now, let me show you how this is done:
It does not matter what resolution or frame rate your video is, this process is the same anyway.
First, check the resolution and frame rate of your clip:
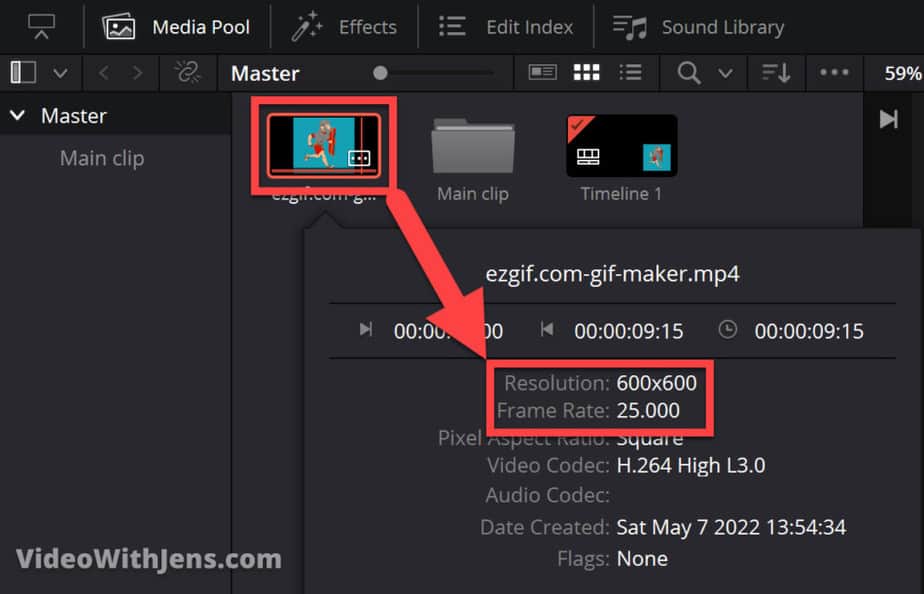
Open the “Media Pool” located in the top left-hand corner.
Then above the clip (GIF) click on that small white rectangle with three dots in it.
In the window that pops up take note of the “Resolution” and “Frame Rate“:
Go to “File > Project Settings…”
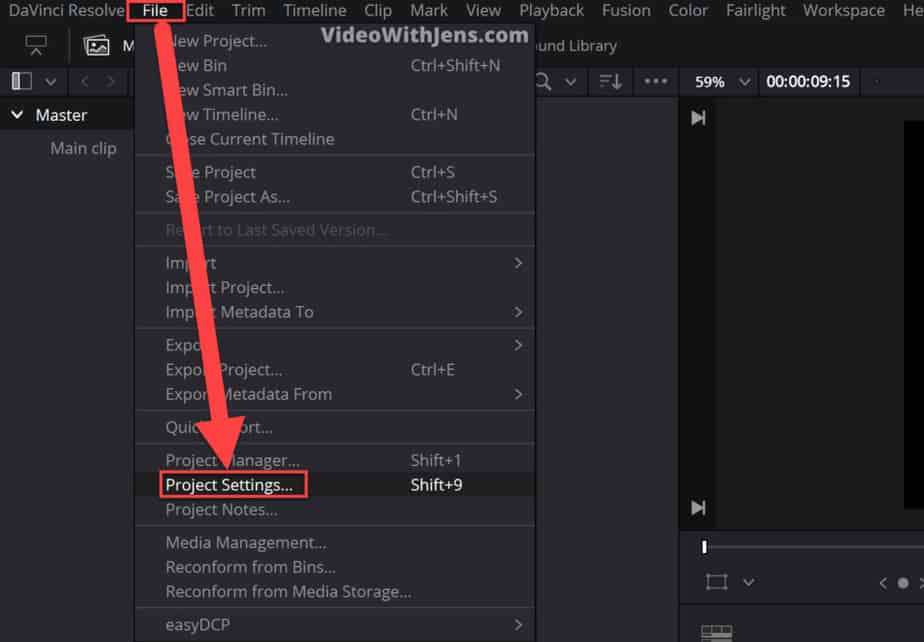
In the window that pops up, go to “Master Settings“.
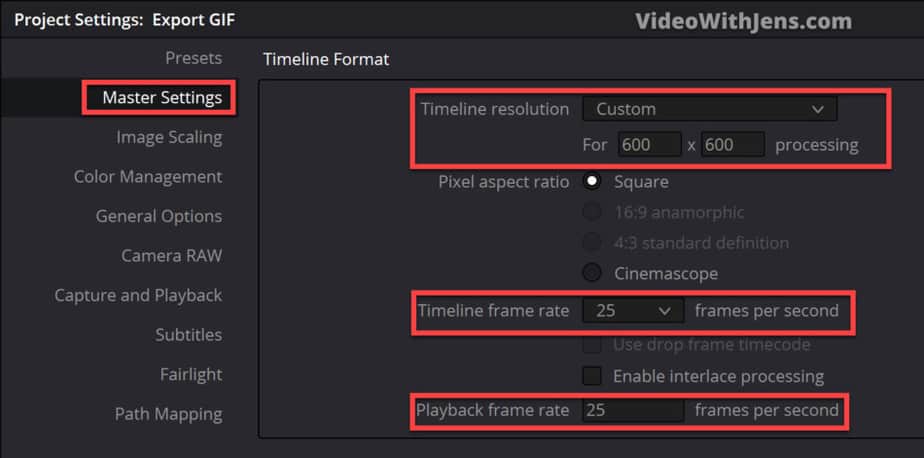
Next, change the “Timeline resolution” to the same as your clip or to what you prefer.
If you want to make a standard GIF those are usually 480 x 480. But that does not matter.
Then set the “Timeline frame rate” and “Playback frame rate” to the same as your clip (optional). A standard GIF is usually between 15-24 FPS.
When we are creating GIFs I’m usually not very exact when it comes to FPS. But this depends on what you are going to use them for. Normally I set the FPS to the lowest possible right before they look terrible.
The reason for this is that I use GIFs on my website, and want a small file size.
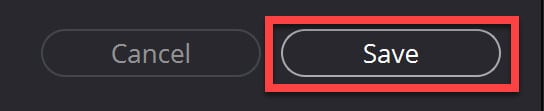
Save the project settings:
If you changed the resolution, your video may look something like this:
Then all you have to do is change the “Size” and the “Positon“, like in the illustation below:
And just to answer your question:
Yes, I’m using a GIF to show you how to make a GIF.
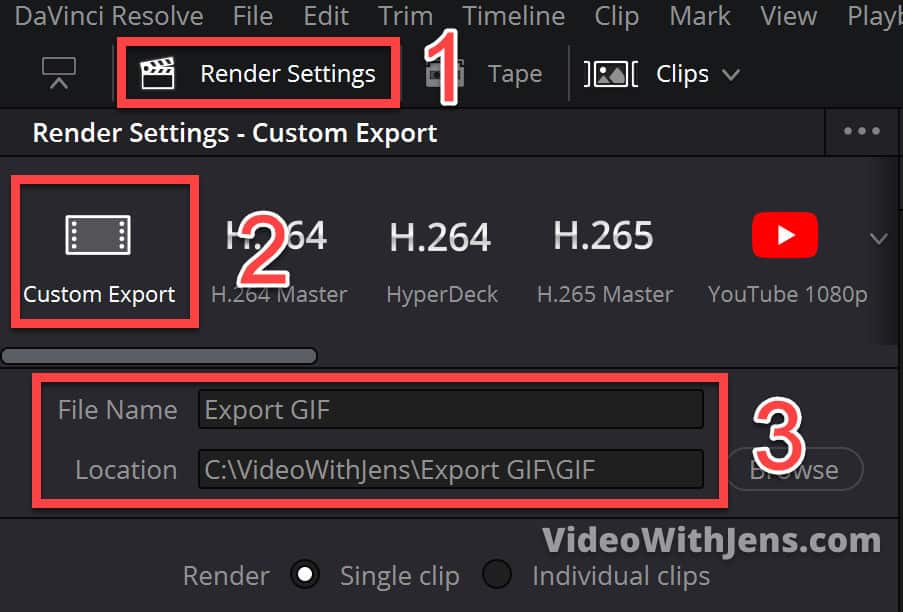
Now, head over to the “Deliver” page:

Go to the “Render Settings” located in the left-hand top corner.
Then select the “Custom Export“, and call you file what you want and set the location where it’s going to be saved on your computer:
A little further down the “Render Settings” tab, make sure to be in the “Video” tab.
Then, select your desired format, I’m going with MP4.
Make sure the “Resolution” and “Frame rate” match the ones we set in the “Project Settings…“:

The “Quality” depends on what you are going to use your GIF for.
If you use the “Automatic” you can choose between a few different options.
Which you choose depends on what you are going to use the GIF for. If you are going to upload it to the web, I suggest going with the medium or below.
If you want the clearest quality possible, go with one of the higher ones!
Then, select “Add to Render Queue“, and it will pop up as a “Job” in the “Render Queue” tab on the right-hand side of the “Deliver” page. Next, click on “Render All“:

Once it’s completed rendering, right-click the job and select “Open File Location“:

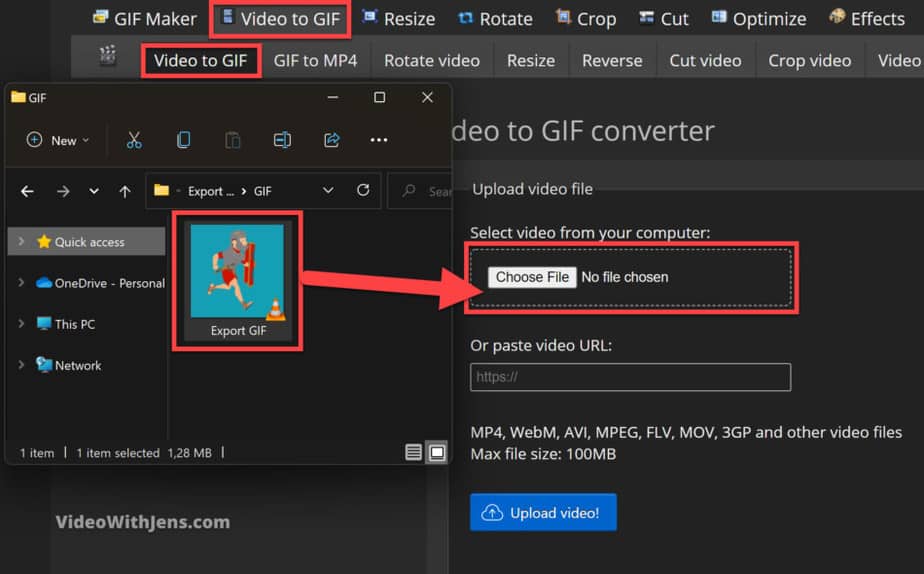
Now it’s time to convert it to a GIF file!
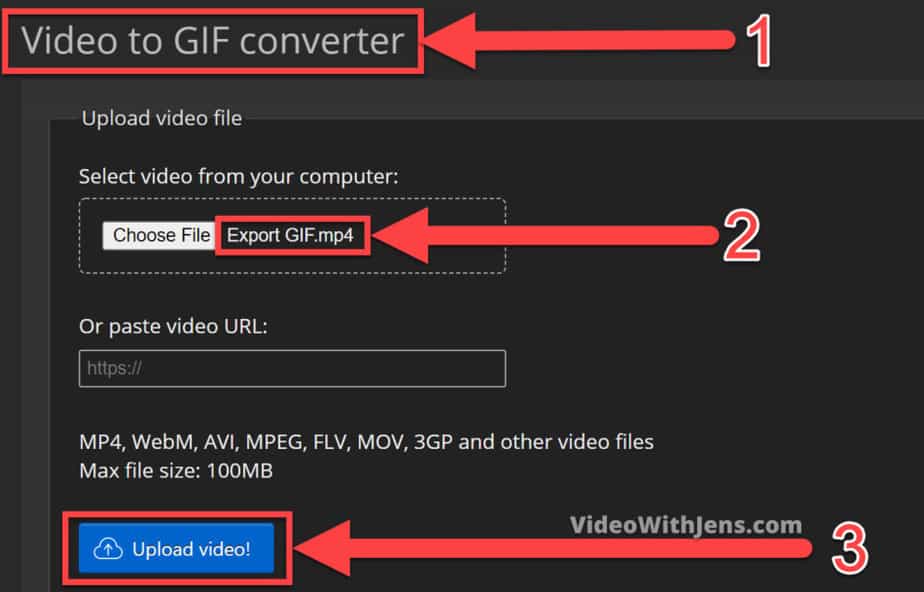
Open the Ezgif’s Converter (link will open in new tab).
Drag the video file into the upload box in the Ezgif converter like this:
Once you’ve dropped it in the box, click on “Upload video!“:
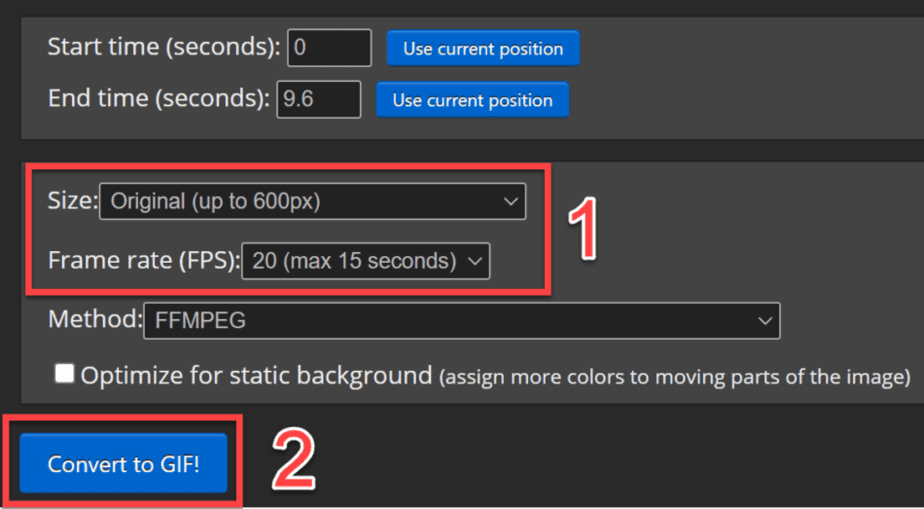
Under the video preview, you will see the some options to change the size and frame rate of the video.
Select the size/resolution that fits your video the best. If you want to change the resolution you can just choose another resolution than your current one!
Then set the “Frame rate” to what you prefer. It may not be any options that match the frame rate of your video clip in that case select the one that’s closest, if you want a GIF looks closest possible to the video.
However, if you want a smaller sized file, you can choose one of the lower alternatives. This depends on how smooth you want it to be.
Once that’s done, click on “Convert to GIF!“:
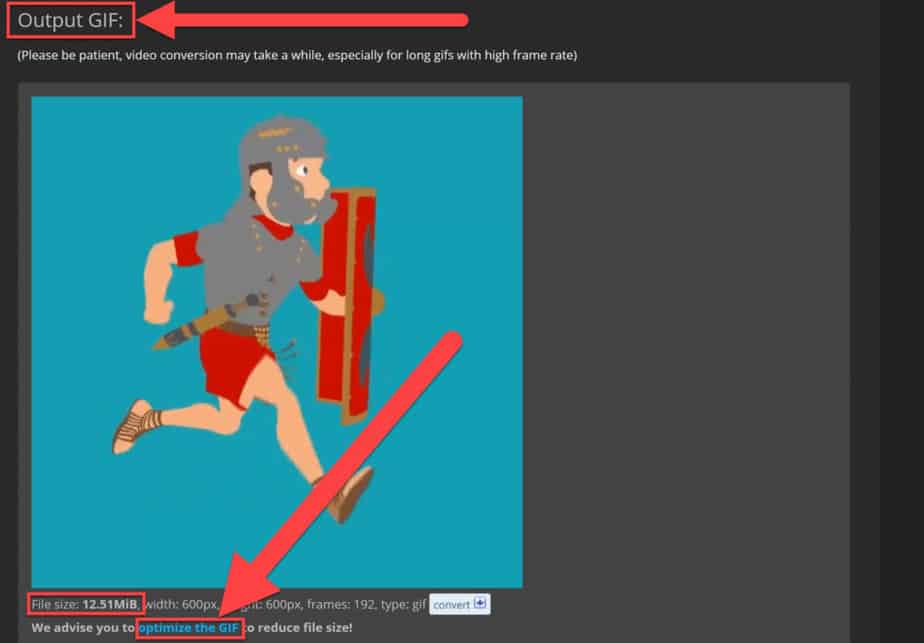
Now your video is officially turned in to a GIF file!
If you don’t care about size and want the highest quality possible then you are pretty much done, and can go ahead and click “Save“.
However, one of the reasons I think Ezgif’s converter is the best, is because of this next feature where you can optimize your GIF, meaning you can compress the file.
To do this, click on “optimize the GIF“:
Set the “Compression level” to whatever you wish! You can test out different compression rates as many time as you want.
Try some different ones and watch the quality of the GIF and the “File size“. Usually you want to have some balance between this two:
So to optimize click on the button “Optimize GIF!“:

Below you the optimization tab you can see the optimized GIF.
Now to the awesome part!
If you go ahead and right-click your GIF, you can see the option “Save image as…“, it’s no longer a video! Select that option if you want to save it on your computer!
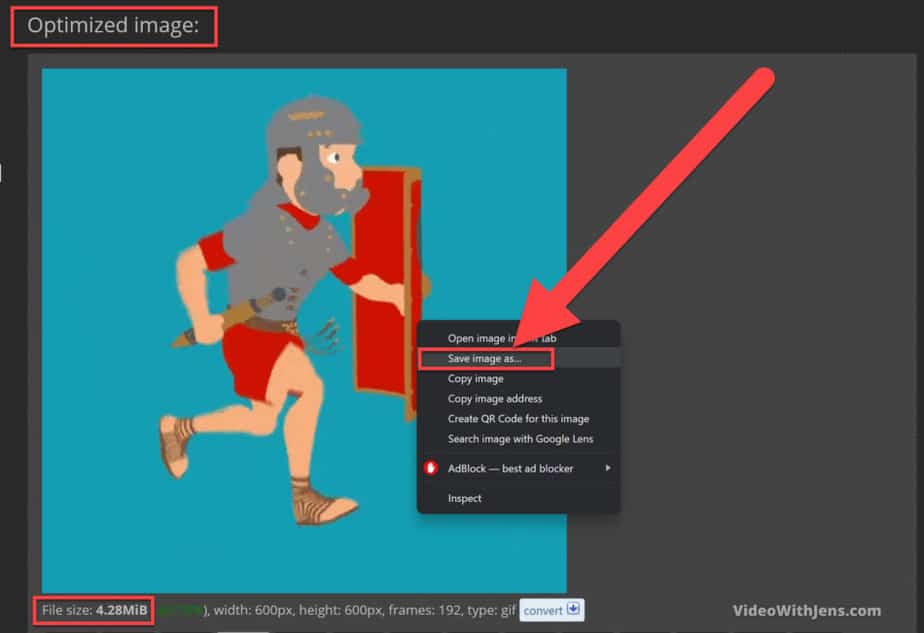
Next, if you right click the file where it’s stored on your computer and select “Properties” you can see that it’s a GIF file:
Congratulations!
You’ve successfully made a GIF! Here is mine:
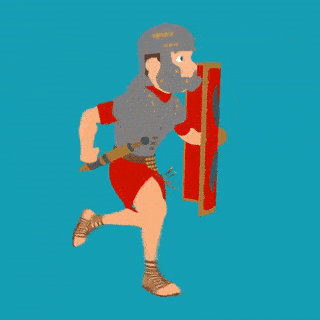
This one is 7 FPS, 320 x 320, with full compression set to “200”. Then reduced by 10% or so with a website plugin… However, it looks quite good. File size: 335 KB, so it’s not too bad.
I hope you found what you were looking for! Make sure to check out my other Davinci Resolve tutorials if any are of interest here.
Best regards,
Your friend and mentor, Jens.