8 Ways to Change Clip Speed: DaVinci Resolve (+ Fix Issues)
In this article, you’ll find every way to change clip speed in DaVinci Resolve.
(And also how to fix common issues.)
If you just want a quick answer on how to change the clip speed, here you go:
To change clip speed in DaVinci Resolve, open the “Edit” page. Then, right-click a clip in the timeline, and select “Change Clip Speed“. In the menu that appears, adjust the percentage next to “Speed“. Lastly, check off the box next to “Ripple Timeline“, and click on “Change“.
How to Speed Up a Clip in DaVinci Resolve
1. Go to the “Edit” page inside Resolve.

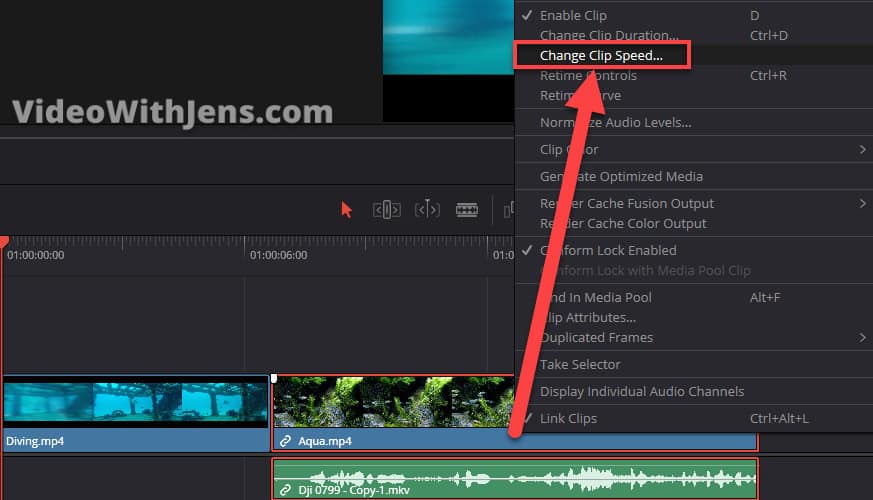
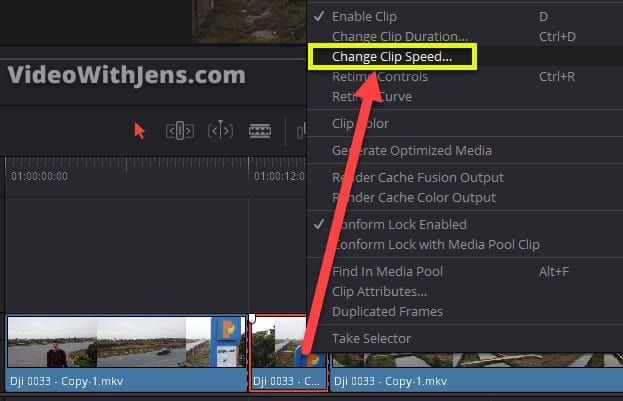
2. Right-click the clip, and select “Change Clip Speed“.
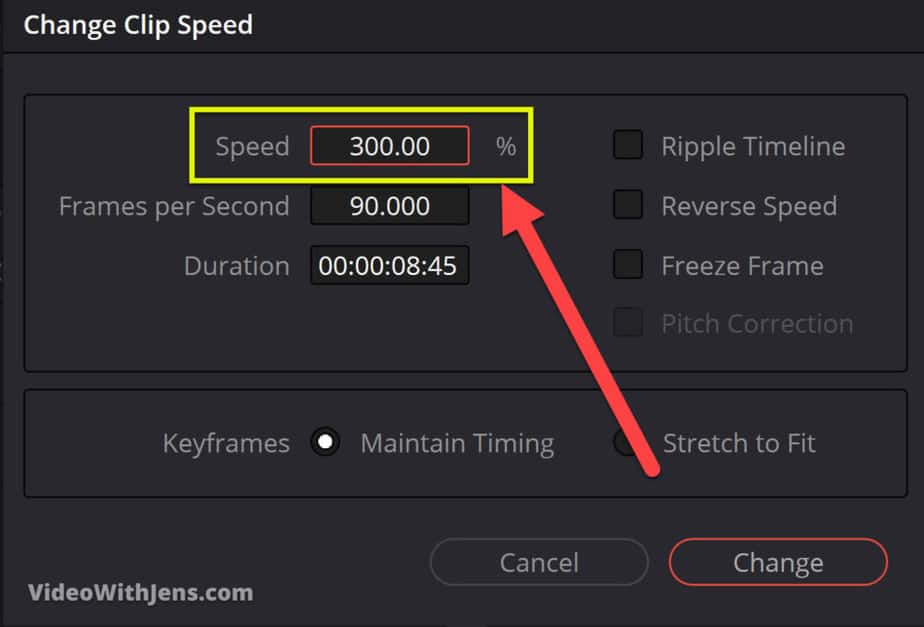
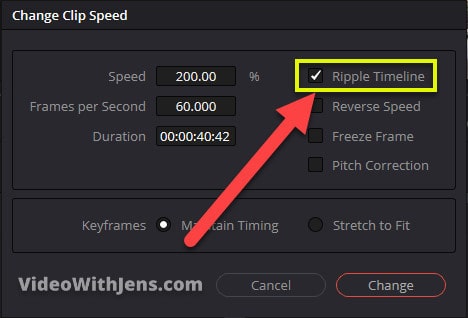
3. Increase the “Speed” to above 100%.
If you set the clip to 200% you have doubled the speed of the clip etc.
You can adjust the percentage by either hovering your mouse over the number, clicking your right mouse button down, and dragging it to the right. Or you can simply type in the number!
4. Check off “Ripple Timeline“, and click on “Change“.
Toggling on “Ripple Timeline” is very important if you have trimmed your video etc.
If not toggled on, the clip will try to maintain its duration in the timeline. For example, if you speed it up to 200%, the clip will just double its length to have the same total duration.
In contrast, if it’s toggled on, then the duration of the clip will be only half the length if you speed it up by 200%.
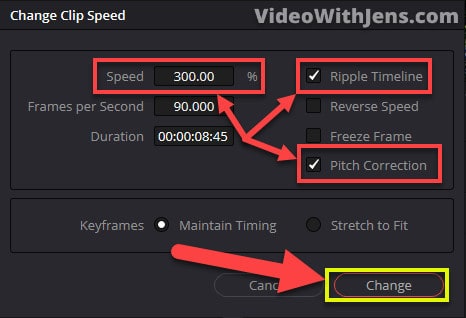
When it comes to the “Pitch Correction”, this will fix the audio if you don’t want to sound like a mouse. Sometimes that’s cool as well.
Once you have clicked “Change” it will get this icon:
Changing clip speed is one of the basic skills every video editor should know; check out this tutorial to learn about the rest of the skills.
- Once you know the basics, it’s way easier to evolve and learn the more advanced stuff.
How to Slow Down a Clip in DaVinci Resolve
1. Go to the “Edit” page inside Resolve.
2. Right-click the clip, and select “Change Clip Speed“.
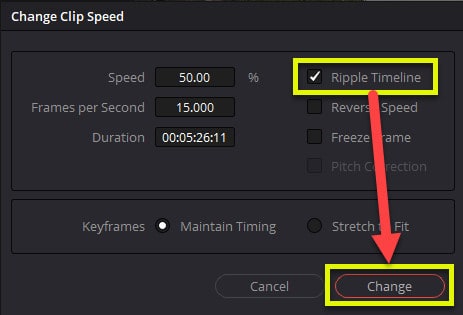
3. Decrease the “Speed” to below 100%.
Everything below 100% is slowing the clip down. Meaning at 50% it’s only half the speed.
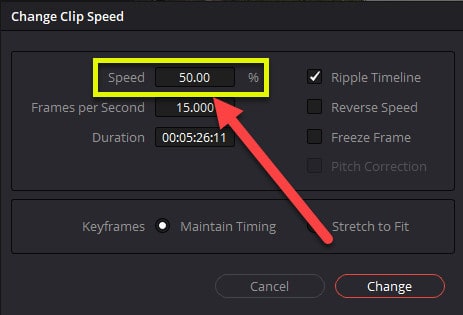
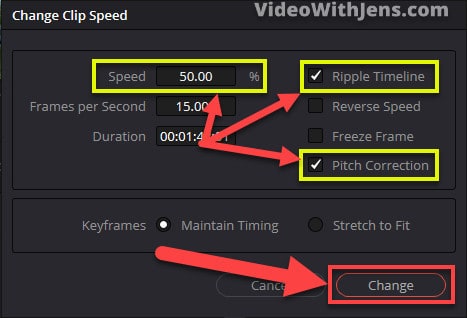
4. Enable “Ripple Timeline“, and click on “Change“.
If you have trimmed down your clip it’s important that you check the box next to “Ripple Timeline”. By doing this you prevent the clip from trying to maintain its length in the timeline.
This is very frustrating if you don’t want the cut-out parts to suddenly be included in the project…
TIP: “Pitch Correction” prevents your voice from sounding super high-pitched.
Once you have clicked on “Change” you will see this icon, meaning the clip speed is adjusted:
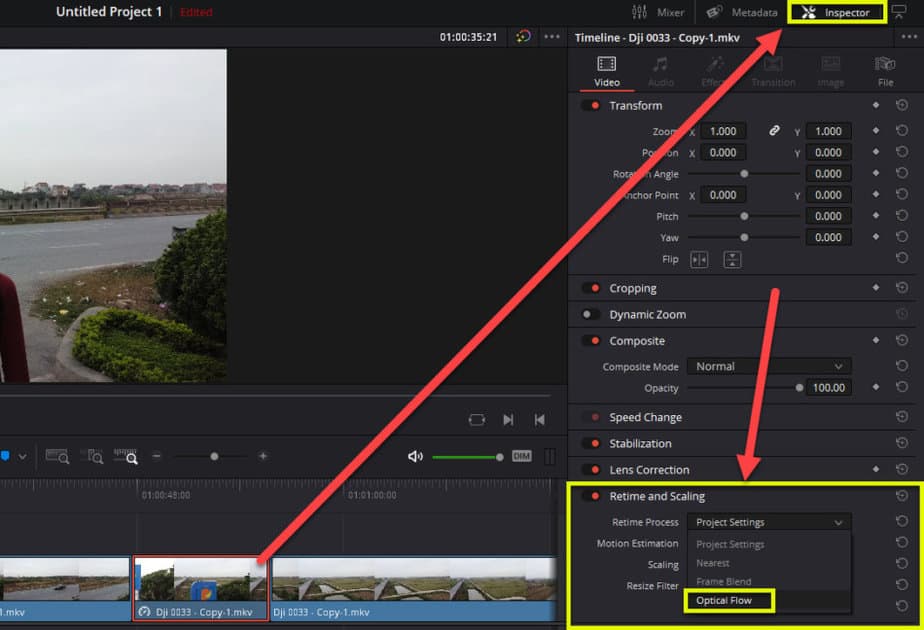
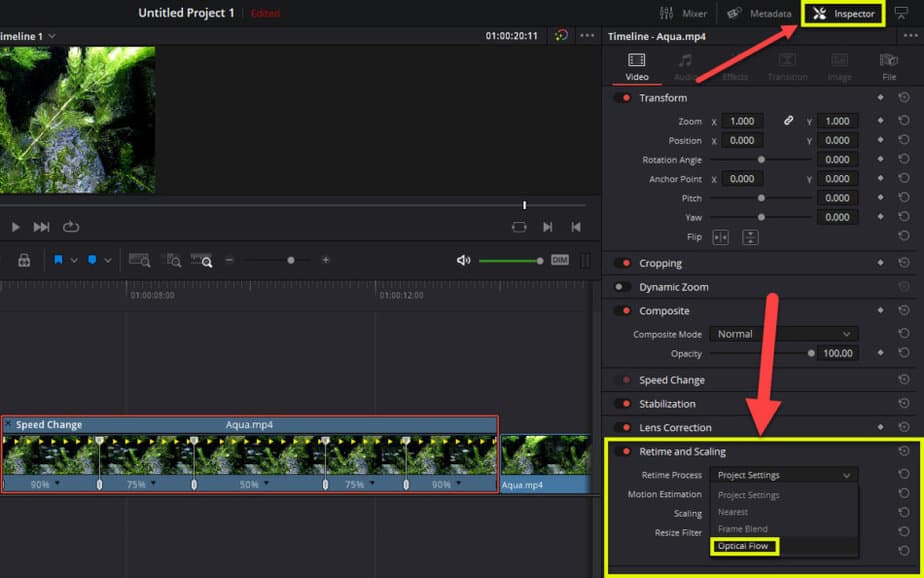
5. Select the clip, open the “Inspector”, and go to “Retime and Scaling”.
Step 5 and 6 are optional.
(Refer to the image below for both steps.)
By doing this your video will get more smooth. This is because Resolve will add some additional frames to the clip if it gets choppy/laggy.
6. Set “Retime Process” against “Optical Flow”.
Here’s a video on how to slow down clips:
Change Clip Speed of Multiple Clips in DaVinci Resolve
1. Change the clip speed of a single clip.
If you don’t know how to change the clip speed of only one clip; click here.
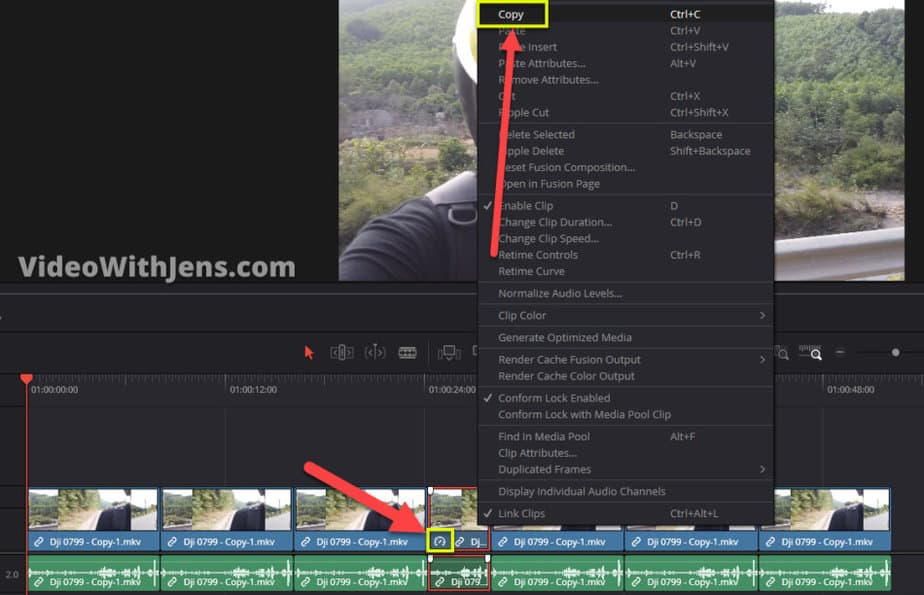
2. Right-click the clip, and click on “Copy“.
Copy the clip you’ve changed the clip speed of:
3. Select all the clips you want to change the speed of.
You can select multiple clips, by dragging over them like in the image below.
Or you can hold down CTRL (Cmd on MacBook), and just click on the ones you want to change the speed of.

4. Right-click one of the clips, and click on “Paste Attributes“.
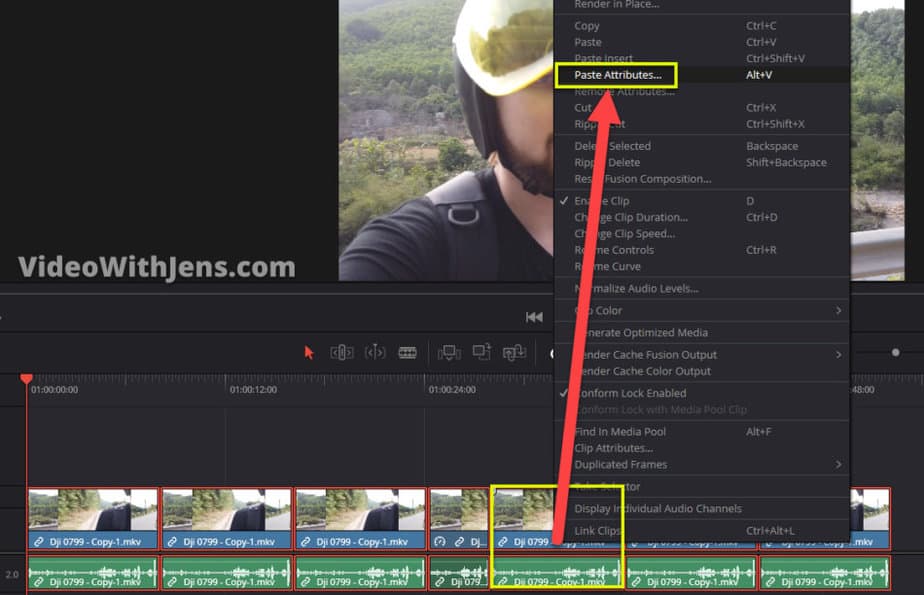
5. Enable “Retime Effects” and “Ripple Sequence“.
“Retime Effects” means that you are pasting the clip speed from the clip you copied.
“Ripple Sequence” prevents the clips from trying to maintain their timing in the timeline. This is usually what you would prefer.
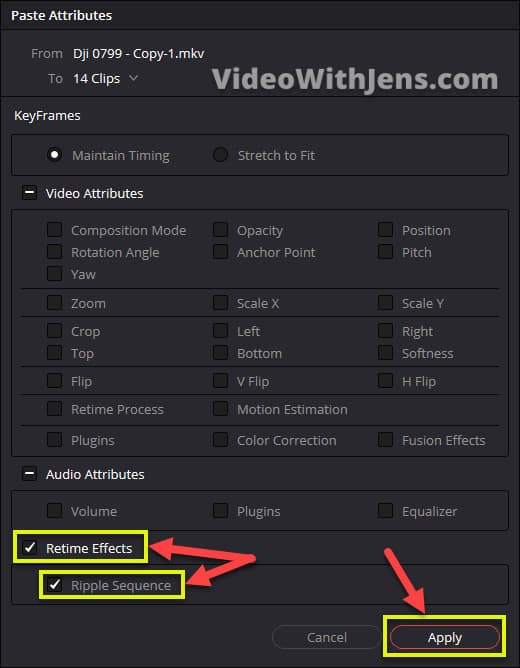
6. Click on “Apply“.
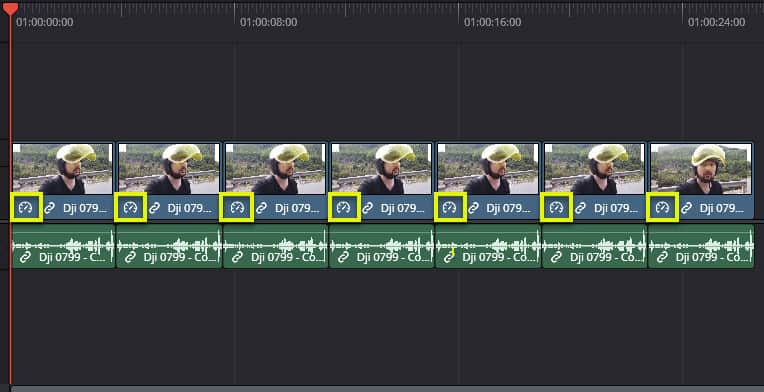
Once you’ve clicked “Apply” you have changed the clip speed of all the selected clips.
You can then see these icons on the ones adjusted:
Video explanation:
How to Speed Up Certain Parts of Video in DaVinci Resolve
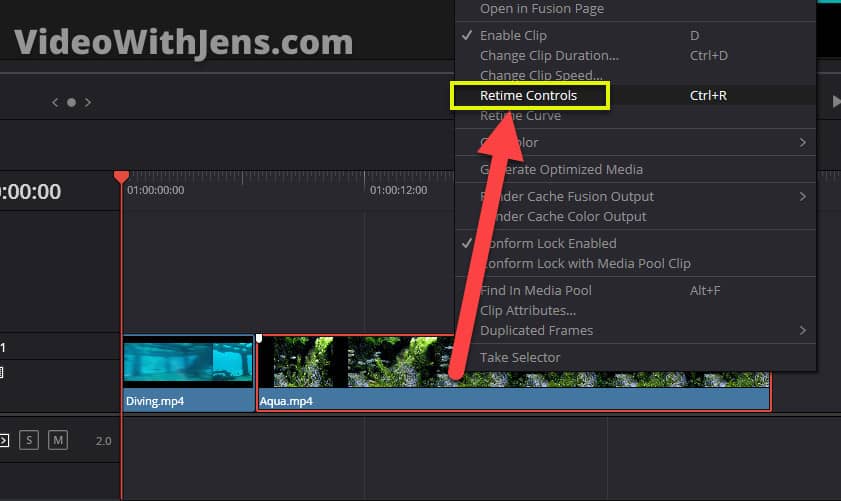
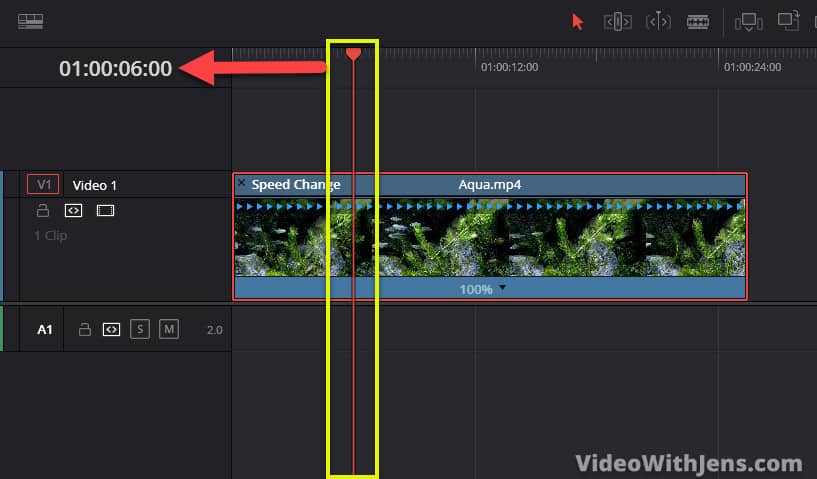
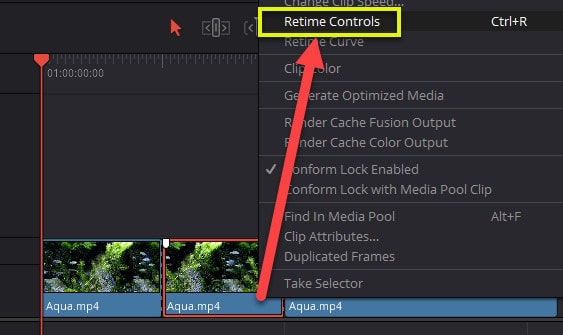
1. Right-click the clip in the timeline, and select “Retime Controls“.
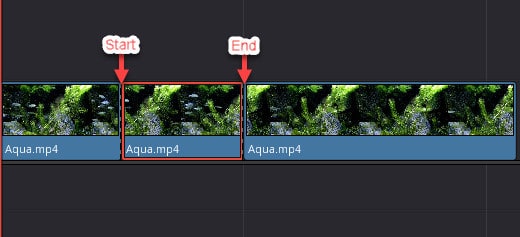
2. Place the timeline playhead where you want the speed adjustment to start.
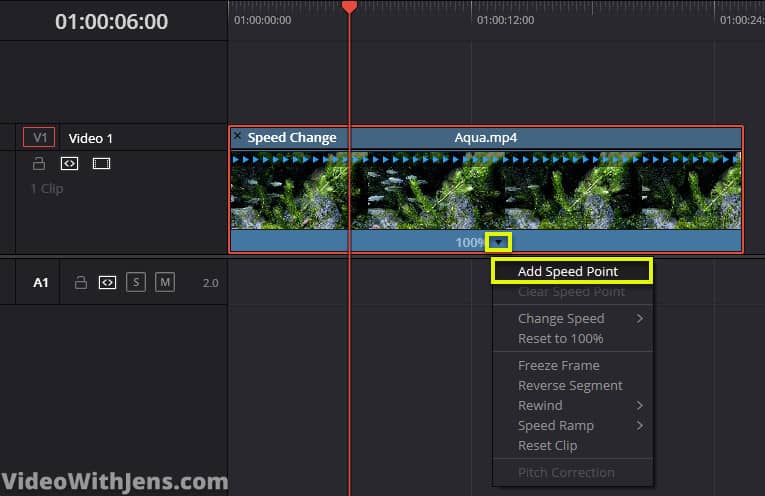
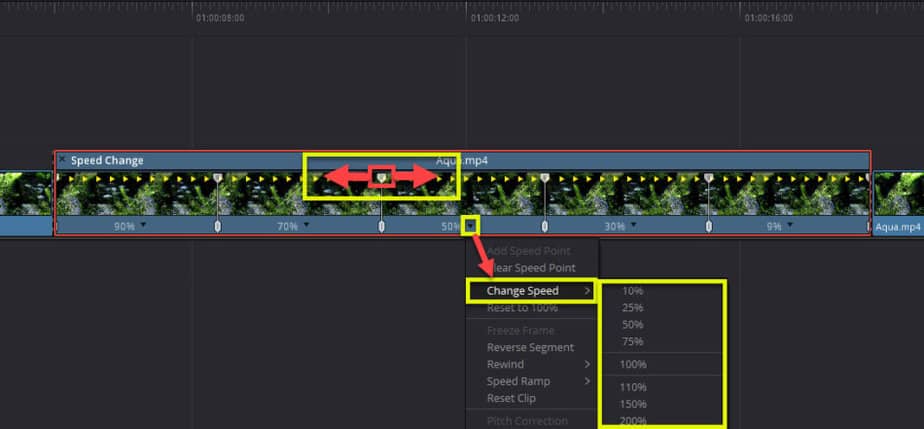
3. Open the retime controls menu, then click on “Add Speed Point“.
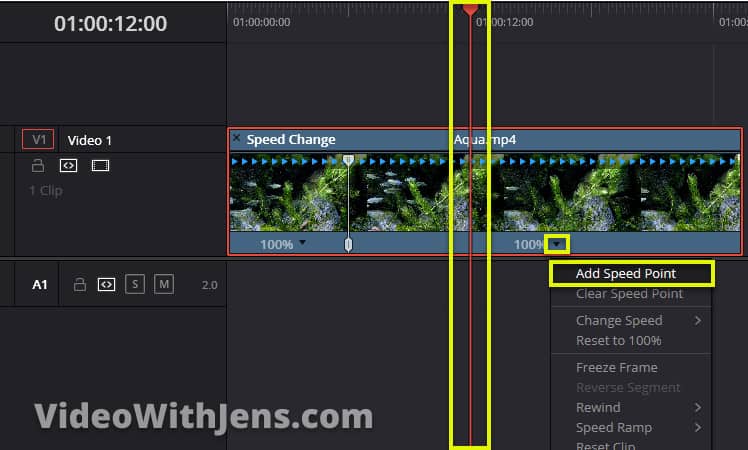
4. Add another “Speed Point” where you want speed adjustment to end.
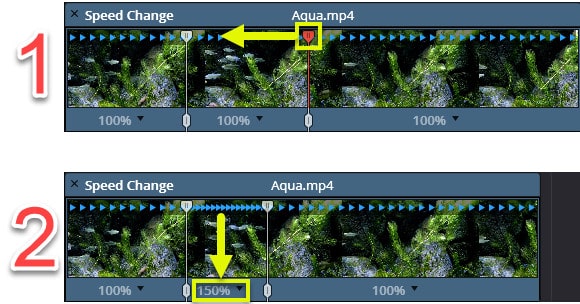
5. Change the speed by dragging on the gray handles.
In the image below, you can see how to adjust the speed. Simply, drag on the gray handles to adjust the speed.
Video explanation:
How to Speed Ramp in DaVinci Resolve
1. Add the clip to the timeline on the “Edit” page.
2. Cut the clip where you want the speed ramp to start and end.
3. Right-click the cut-out part, and select “Retime Controls“.
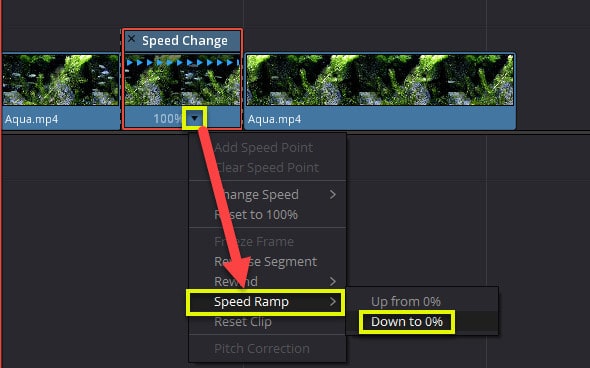
4. Click on the arrow next to the percentage > “Speed Ramp” > “Down to 0%“.
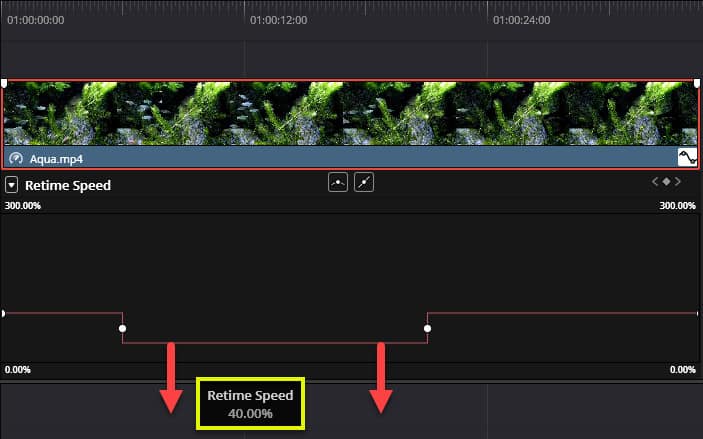
5. Adjust the speed by dragging the gray handles.
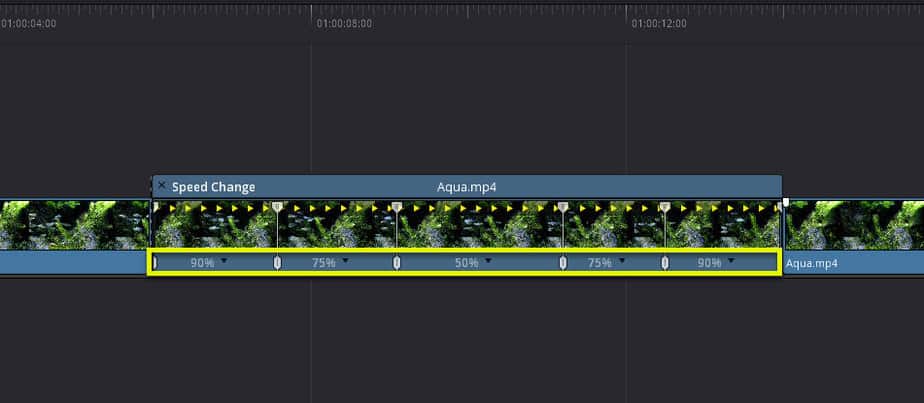
In the image below you can see two ways to adjust the speed ramp:
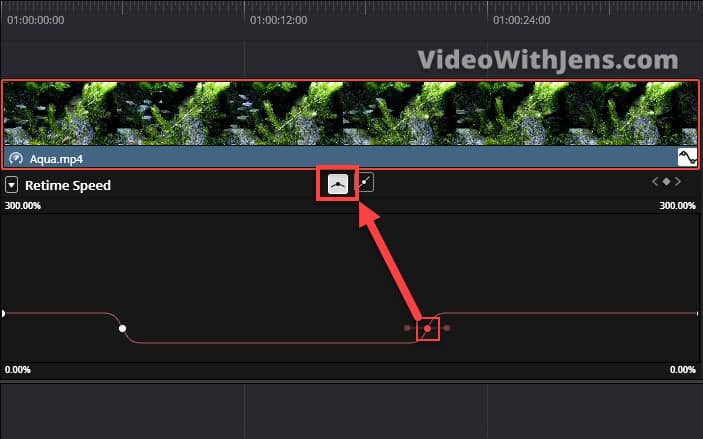
To make a smooth speed ramp, watch the image below.
As you can see I have made the clip first go slow down, then speed it up again. Which is something you can do by just playing around with the handles.
To make it even more smooth you can add even more “Speed Points”. I wrote about how to add them earlier in the article here.
TIP: If your video gets choppy/laggy when slowing it down you can easily fix this by using “Optical Flow“.
Simply, select the clip in the timeline, click on the “Inspector” tab (top right-hand corner), and go down to “Retime and Scaling“. Then set “Retime Process” against “Optical Flow“.
Check out this complete tutorial to make the speed ramp more awesome!
A video of how to do an easy speed ramp:
Advanced Way to Make a Speed Ramp
If you want a quicker and even smoother way of making a speed ramp, this is it:
Simply right-click the clip you want the speed ramp, and click on “Retime Curve“.
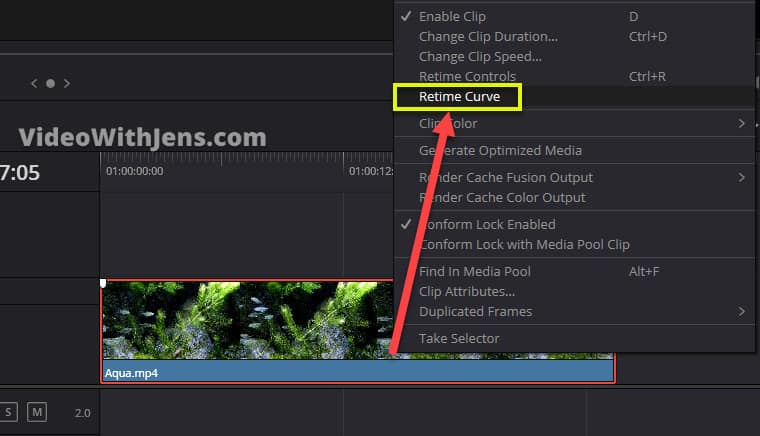
Then the clip should look like in the image below.
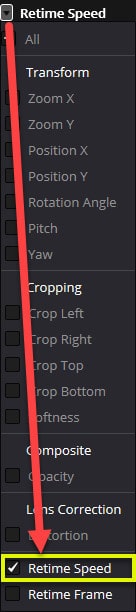
Now click on the arrow in the top left-hand corner beneath the clip, like this:
By default, this menu is set to “Retime Frame” (Watch the image below).
However, we want the “Retime Speed“, so enable that one, and disable “Retime Frame“.
Like in the image:
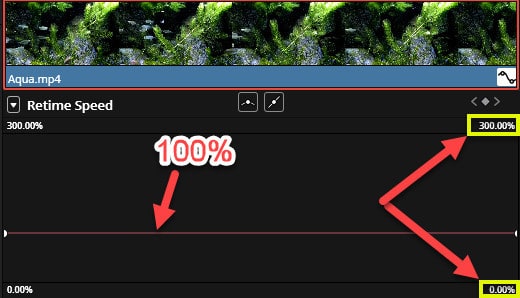
Then instead of a diagonal line, you should now have a horizontal one.
You can drag the line either upwards (to speed up the clip) or downwards (to slow the clip down).
By default, the line is positioned at 100% (normal speed), the bottom will be 0% and the top will be 300%. However, you can change the bot and top values by dragging on the number.
Watch the image below for reference:
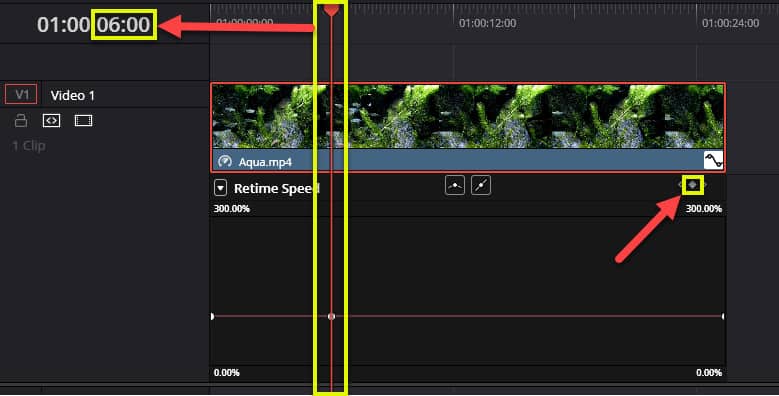
Now, to make the speed ramp. Place the timeline playhead to where you want the speed ramp to start.
Timeline playhead=Red time marker.
You can simply drag the playhead to where you want it.
Once it’s positioned create a keyframe by clicking on the little “diamond” in the top right-hand corner, like this:
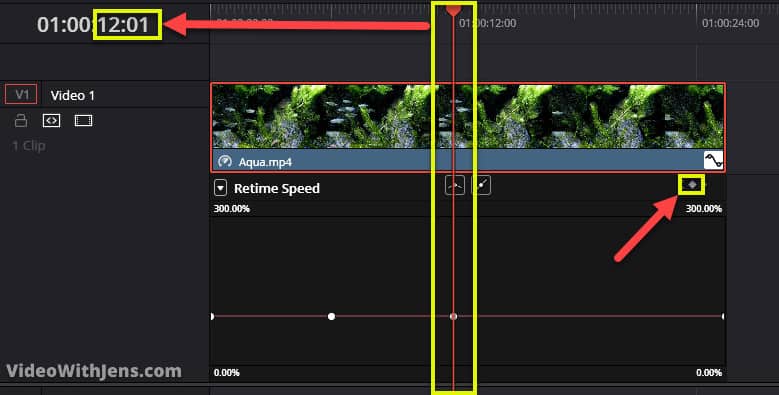
Then do the same for where you want the speed ramp to end.
By the end, I mean the point where you want the clip to be at normal speed again.
Next, hover over the line in between the points, click, hold and drag it downwards:
Now, instead of the clip instantly just getting slower, we want to smooth this out. This way it will look more cinematic.
To smooth the transition out, simply click on the points we have made (the white dots), then click on the symbol shown in the image below: (do this for both of the points)
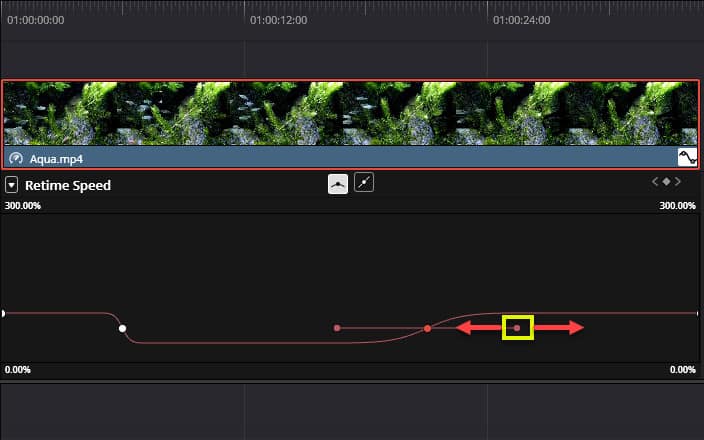
You can adjust how fast the speed is going to change by pulling on the two dots/handles on each side of the points like this:
(the points must be selected in order to see them)
Here’s a complete guide on how to create speed ramps in Resolve, giving you some additional tips.
How to do Slow Motion in DaVinci Resolve
- Cut the clip where you want the slow motion to start and end.
- Right-click the cut-out part, and select “Change Clip Speed“.
- Adjust the “Speed” value to less than 100%.
- Enable “Ripple Timeline“, and click on “Change“.
- Go to the “Inspector” > “Retime and Scaling”.
- Set “Retime Process” against “Optical Flow”.
Here are some images of how to do it:
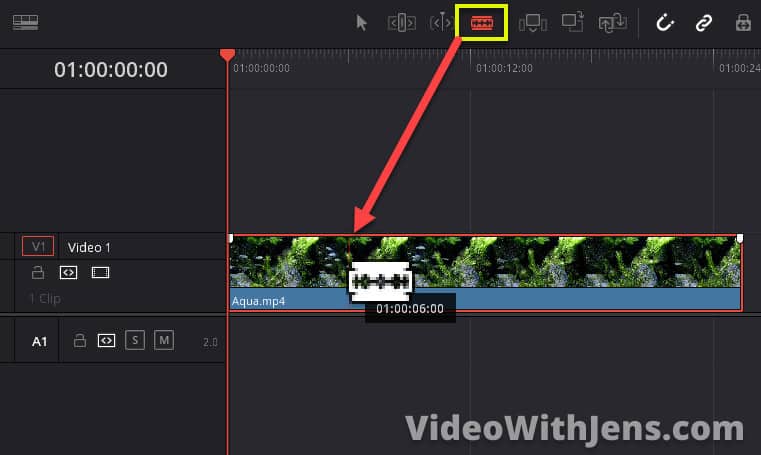
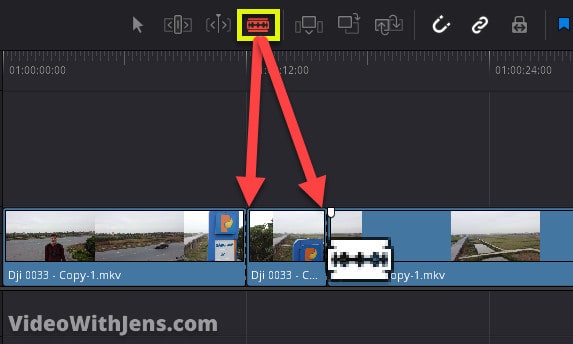
To cut the start and end of the slow motion, you can use the razor blade. Press shortcut B to use it or click on “Blade Edit Mode” in the toolbar above the timeline.
Once it’s activated, simply click on the clip to cut it, like this:
Then right-click the cut-out part of the clip, and select “Change Clip Speed“:
In the window that pops up, you want to change the percentage next to “Speed“.
To make slow motion set it to below 100%, probably below 50% as well (depending on what you prefer).
Make sure that the box next to “Ripple Timeline” is checked off. This way it will only affect the speed and not the duration.
Then, click on “Change“:
BONUS TIP: If your clip gets choppy/laggy in slow motion you can easily fix this by using “Optical Flow”.
Simply, select the clip in the timeline, and click on the “Inspector” tab in the top right-hand corner of Resolve.
Then scroll down to the “Retime and Scaling” tab. If it’s not open, simply click on the name.
Inside this tab set “Retime Process” against “Optical Flow”.
If you want to make slow motion even better, check out this tutorial where I’ve written every way to do slow motion in DaVinci Resolve!
Common Issues
Speed Up Clip Without Extending Duration in DaVinci Resolve
This is the most annoying thing ever. Gladly it’s easy to fix:
To speed up a clip without the clip extending, simply check off the box next to “Ripple Timeline” in the “Change Clip Speed” menu. This prevents the clip from trying to maintain its duration in the timeline.
Video explanation:
How to Fix ‘Change Clip Speed Grayed Out’
When the “Change Clip Speed” menu is grayed out, simply uncheck the box next to “Freeze frame“. You should then be able to change the clip speed.
Here’s what the issue looks like:
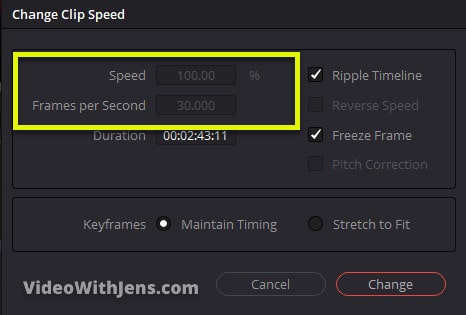
Here’s how to fix it:

Check out this complete beginners guide on DaVinci Resolve; showing you EVERYTHING you need from importing to exporting a video.