Fix “Unsupported GPU Processing Mode” in DaVinci Resolve
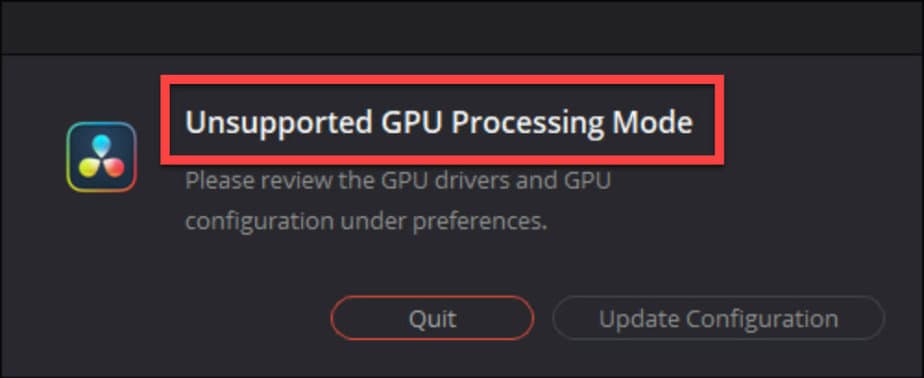
Is your DaVinci Resolve suddenly showing the error message, “Unsupported GPU Processing Mode “? Don’t you know what happened or how to fix it?
No worries, we’ve compiled a list of solutions that seems to fix this error:
- Meet the System Requirements
- Downgrade Your Driver
- Upgrade Your Driver
- Clean Install Old (working) Driver
I’ve also made a video version of the article:
The first thing to check:
1. Is the GPU Meeting Resolve’s Requirements?
These are the GPU’s requirements for running DaVinci Resolve 18:
• Integrated GPU or discrete GPU with at least 2 GB of VRAM.
• GPU which supports OpenCL 1.2 or CUDA 11.
• NVIDIA/AMD/Intel GPU Driver version – as required by your GPU.
How to Check Amount of VRAM
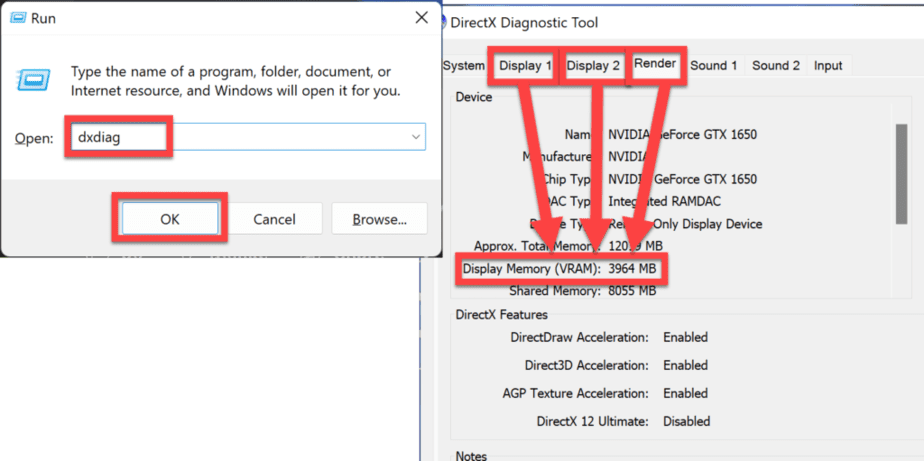
To check VRAM, press the keyboard shortcut: “Windows key + R “, type “dxdiag” and click on “OK “.
Wait a few seconds for it to load.
Then check the different “Display” tabs, and also “Render” (if you have it). In all of these tabs you’ll find the “Display Memory (VRAM)” and then your amount of VRAM written in megabytes.
In the image below you can see its 4 GB VRAM:
How to Check OpenCL 1.2 or CUDA 11 Compatibility
I found this neat list on Wikipedia showing which GPUs support the different OpenCL versions.
Simply ensure that your GPU is included in the 1.2 support or above. If not, your GPU is too old for the current version of DaVinci Resolve. Check the older versions for lower minimum requirements.
If you have a GPU from NVIDIA, check this list from Wikipedia and make sure that your has a compute compatibility of 3.5 or higher.
If it’s lower than 3.5, it does not support CUDA 11, which is required to run DaVinci Resolve 16.2.7 and above. Your options are then:
- Check if it supports OpenCL 1.2.
- Downgrade to DaVinci Resolve 16.2.6 (if it supports CUDA 10).
- Get a new GPU that meets Resolve’s minimum requirements.
Worth Testing:
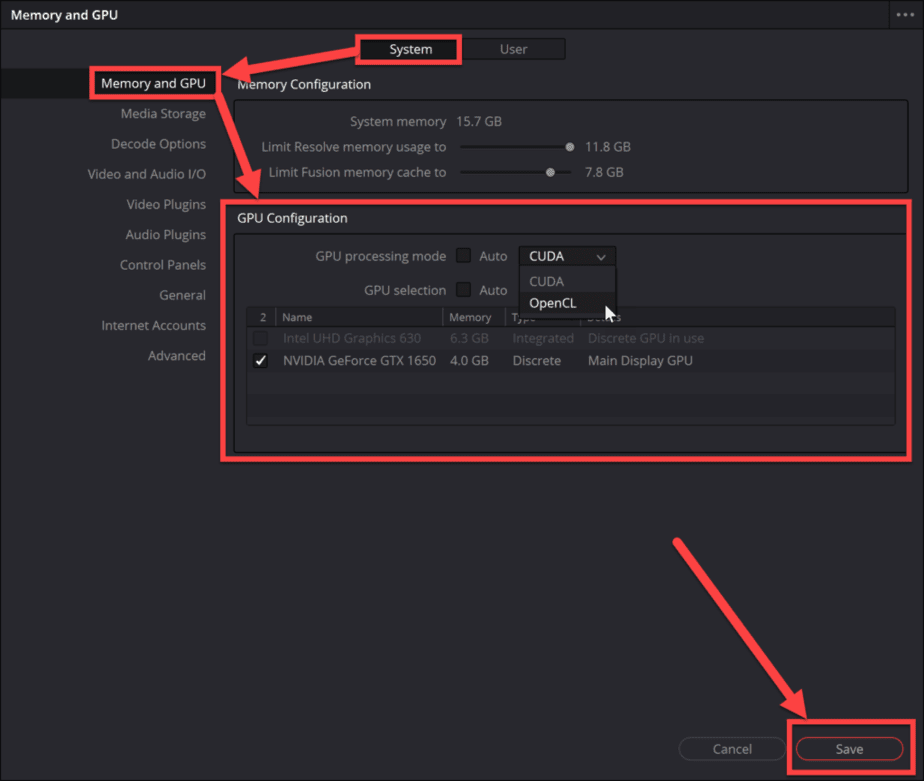
To change GPU settings in Resolve, go to “DaVinci Resolve (top left corner) > Preferences > Memory and GPU” or press the keyboard shortcut “Ctrl + ,” or “Command + , “.
Try unchecking the “Auto” boxes, set them to CUDA or OpenCL, and choose a GPU manually.
If the GPU meets the minimum requirements and adjusting the GPU settings did not work, read on!
2. Downgrade Your Drivers
If DaVinci Resolve was working properly before updating your drivers, the error is likely because of the new driver version. Unfortunately, your new drivers could be incompatible with DaVinci Resolve. Hence you see the error “Unsupported GPU Processing Mode.”
In that case, the solution is to downgrade your GPU driver(s).
Gladly, this is a straightforward thing to do!
Start by checking what’s your current driver version.
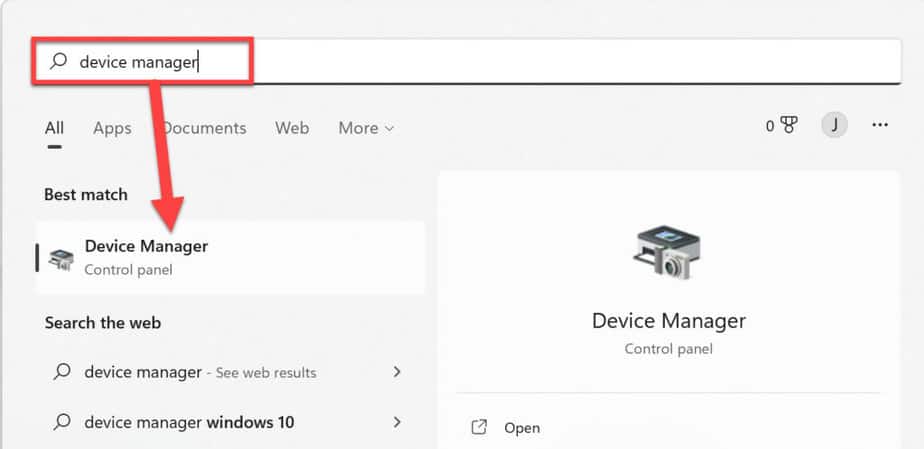
Click the “Start” button and search for “Device Manager,” and open it:
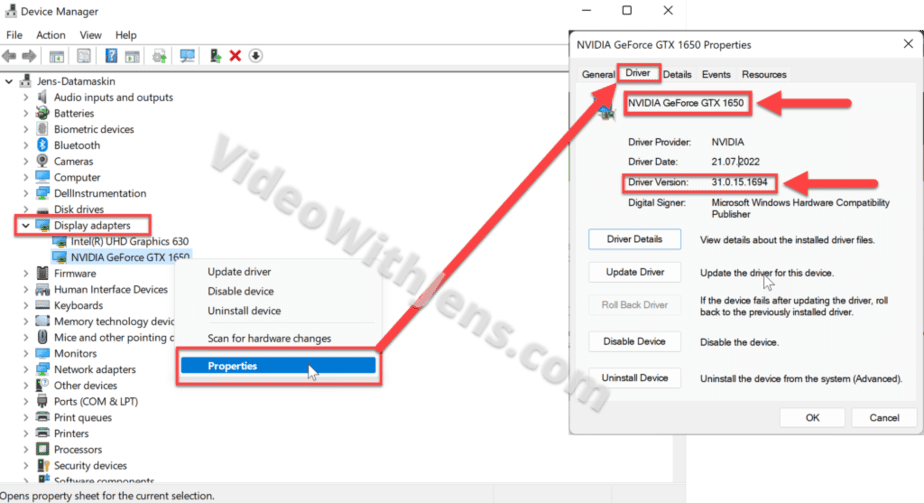
Inside the Device Manager, locate “Display adapters” and expand it to see your drivers.
Click on the driver with the name and model of your GPU, then right-click on it and select “Properties.”
In the window that pops up, open the “Driver” tab, and write down your driver’s name and the driver version:
Next, head to the GPU manufacturer’s official website to download an older driver version.
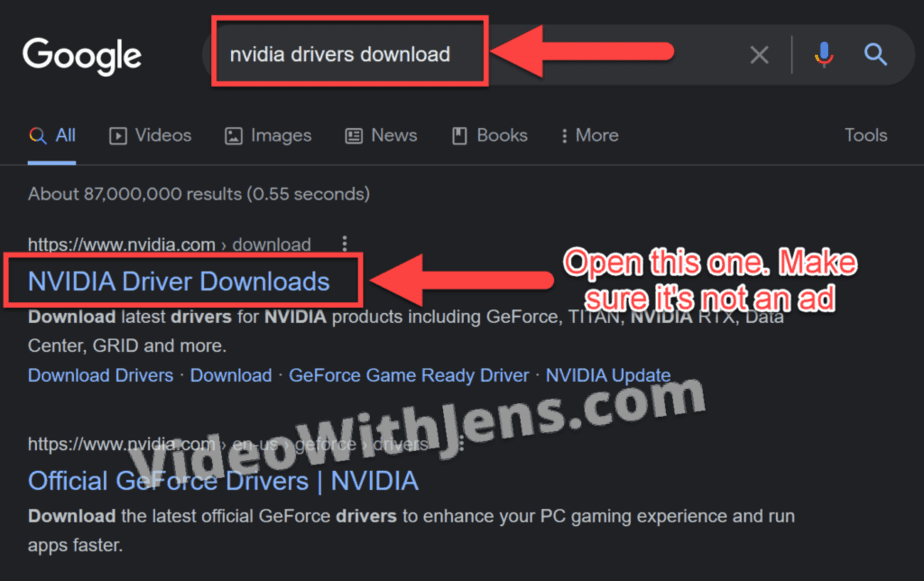
To find it, you can google the manufacturer name followed by “drivers download.” Then the right website is most likely the first result (make sure it’s not an ad):
How to find old drivers will vary depending on the structure of the manufacturer’s site. I will show you how to find them if you have a GPU from Nvidia.
If you have another manufacturer, google “How to find old … drivers”.
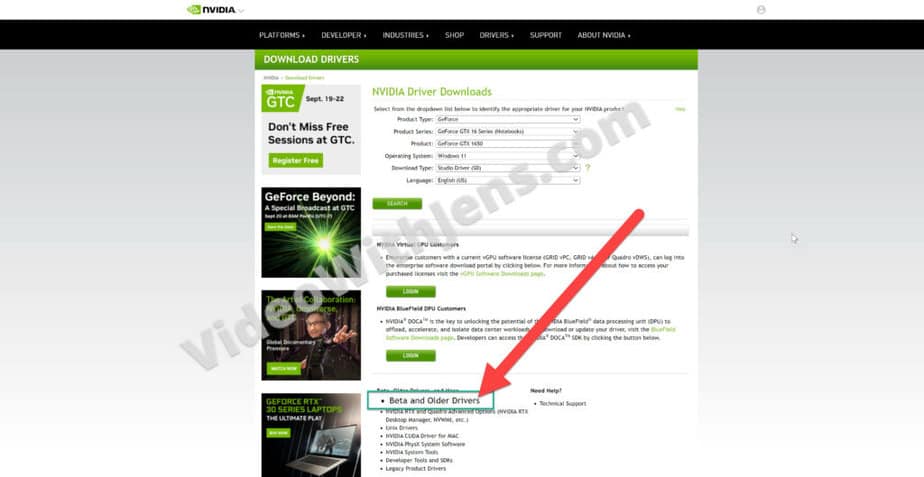
If you scroll down on the driver download page on Nvidia’s website, you should be able to see “Beta and Older Drivers,” click on that option:
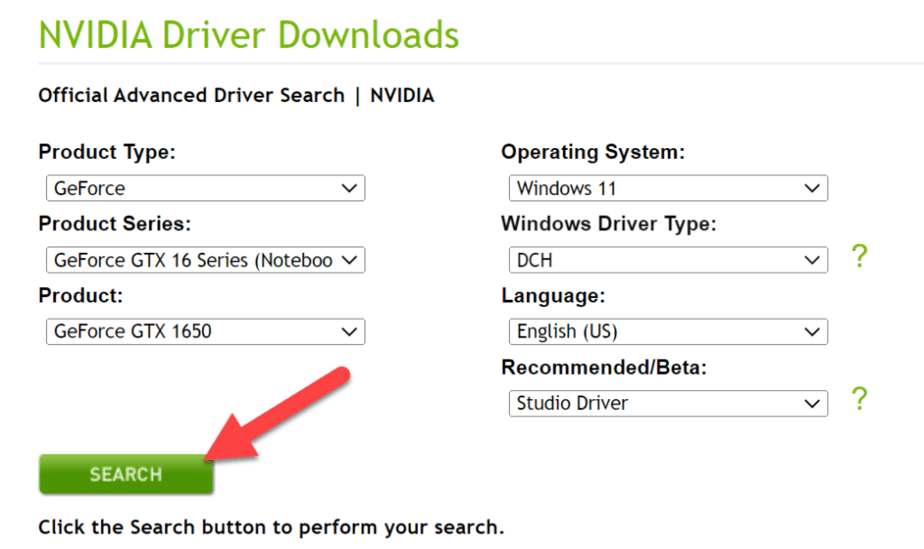
Then fill out your GPU information:
If you are unsure about the “Product…” specifications, that’s the information you wrote above when checking the current driver version and name.
To check which Windows version you are using, press the keyboard shortcut: “Windows Key + R” and search for “winver.”
If you’re unsure about “Windows Driver Type,” check out this article from Intel (pretty ironic, I know…)
Since we will be editing videos, it’s best to search for “Studio Driver.”
Once all of that is done, click on “Search “:
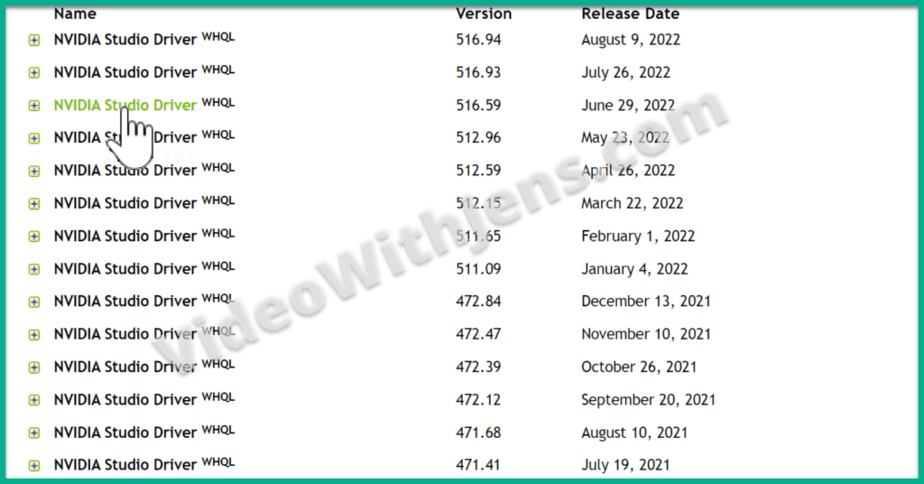
Then in the search results, choose an older driver version than the one you are currently using, and download it. That’s the number I told you to write down earlier.
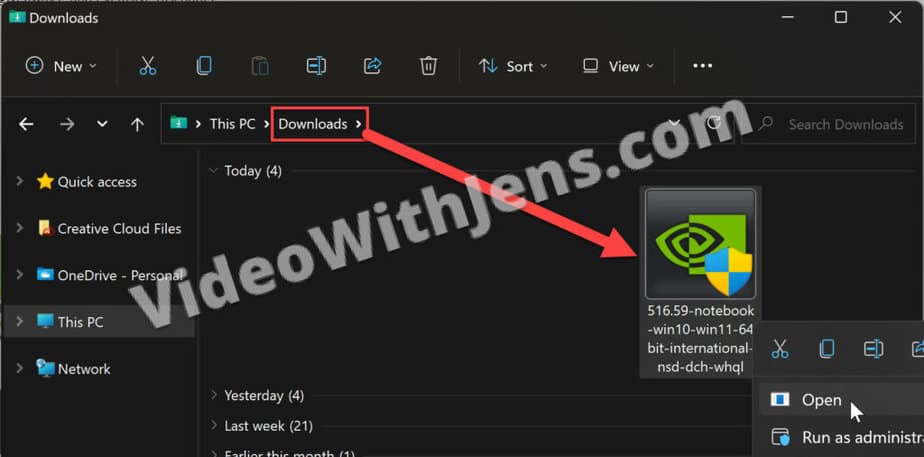
Once you have downloaded it, you’ll find it in the “Downloads” if you’ve not set the location manually.
Next, install the driver. And when that’s done, you’ve downgraded your driver. To check if everything has been done successfully, you can check the driver version as we did above.
Now you can test DaVinci Resolve; hopefully, the error will not occur!
However, if this problem started when installing a newer version of Resolve, check out this solution.
By default, Windows will update your drivers automatically every time you update Windows. This can be annoying if you need an older driver for DaVinci Resolve to work.
Here’s how to stop Windows from doing this:
(By disabling this option, you have to check for updates manually in the future)
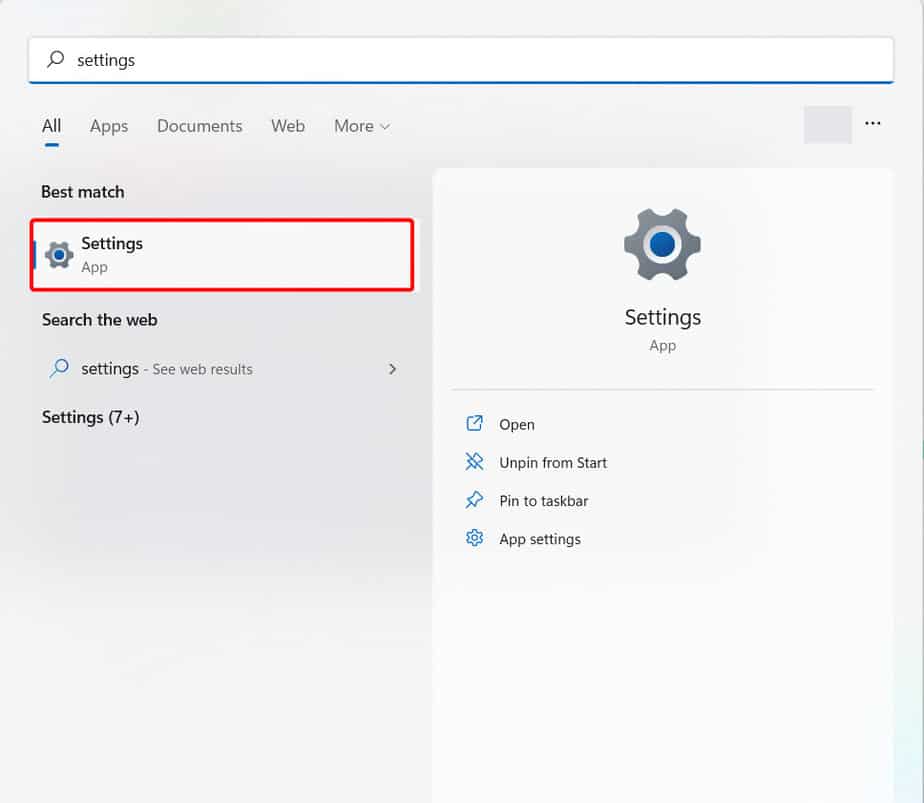
- Click on the “Search” button on your taskbar, type “Settings,” and then open it from the results.
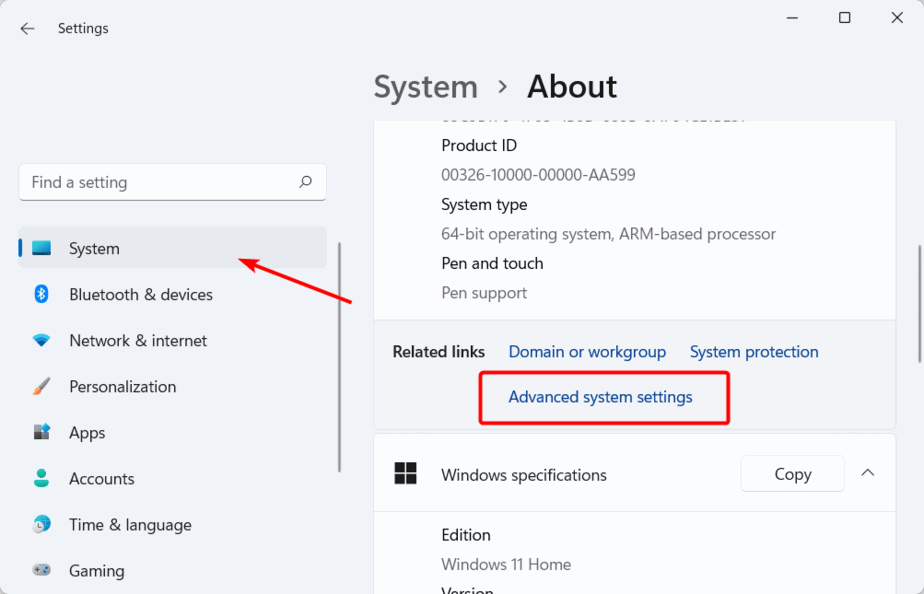
- Under “System,” scroll down and select “About,” and then click “Advanced system settings” under the “Related links.”
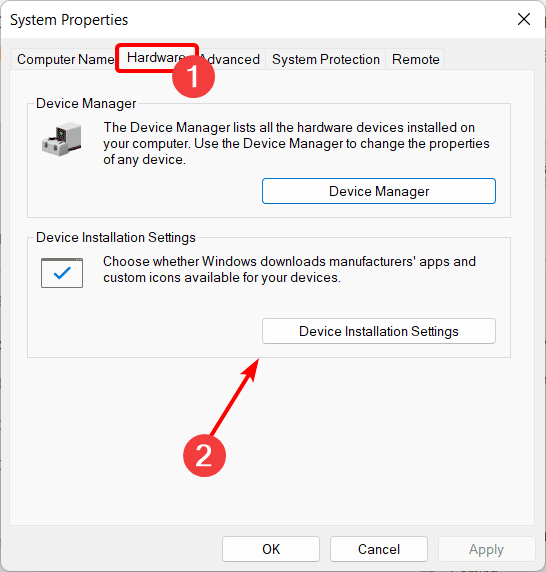
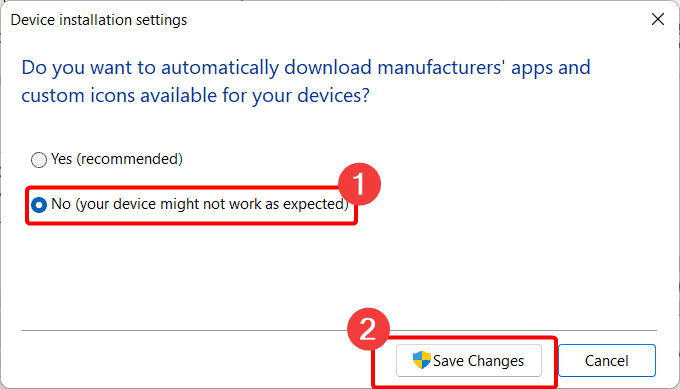
- Click the Hardware tab, and then select Device Installation Settings. Now select the “No (your device might not work as expected)” option.
- Click on “Save Changes” to disable Windows from updating your drivers with the Windows updates.
Here’s another common solution for the error:
3. Upgrade Your Drivers
If you recently downloaded DaVinci Resolve and encounter “Unsupported GPU Processing Mode” when running the program, Resolve may be unable to identify your graphics card.
This could be because the drivers that are installed for the graphics card are outdated, and DaVinci Resolve doesn’t recognize them.
If that’s the case, your solution can be to update your driver.
Here’s how to upgrade your graphic card drivers automatically:
- Click on the “Start” button, type “Device Manager,” and open it from the results.
- Expand the “Display drivers,” and you should see more than two driver listings. Click on the driver with the name and model of your GPU, and then right-click on it and select “Properties.”
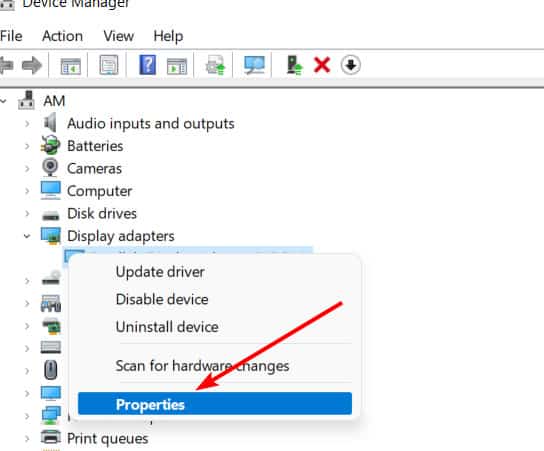
- Select the Driver tab, select “Update Driver,” and then select “Search automatically for updated driver software.” Then allow some time to detect the latest drivers.
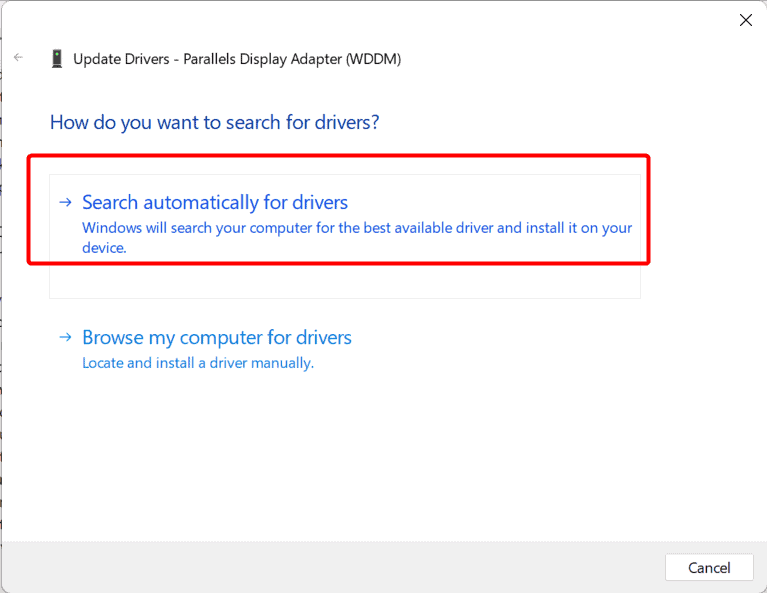
- Once the drivers are selected, click “Next” to install.
If windows say you’ve already the newest version installed, you should also check the manufacturer’s website.
The reason is that Windows often does not provide the latest version of the driver; instead, the more stable versions that’s been field-tested for some time.
Here’s how to manually update drivers:
- For example, on your preferred choice of search engine, search for graphic card drivers with the manufacturer name, for instance, Ryzen graphic cards or Nvidia graphic cards.
You’ll find the manufacturer of your GPU in the “Device Manager” under “Display adapters,” following the steps above. Please write down the full name of it. You’ll need it for the next steps.
Most likely the first link will be the manufacturer’s official website. If that’s the case, open it:

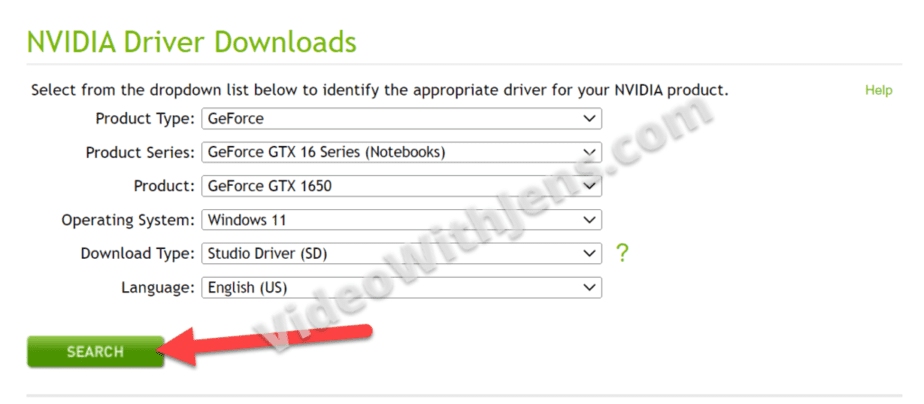
- Fill in the necessary GPU specifications. You’ll find those in the name of your GPU, which you wrote down in step 1.
To check your Windows version, press the keyboard shortcut: “Windows key + R” and search for “winver.”
Also, choose “Studio Driver” as that’s what is recommended for video editing.
Lastly, click on “Search “:
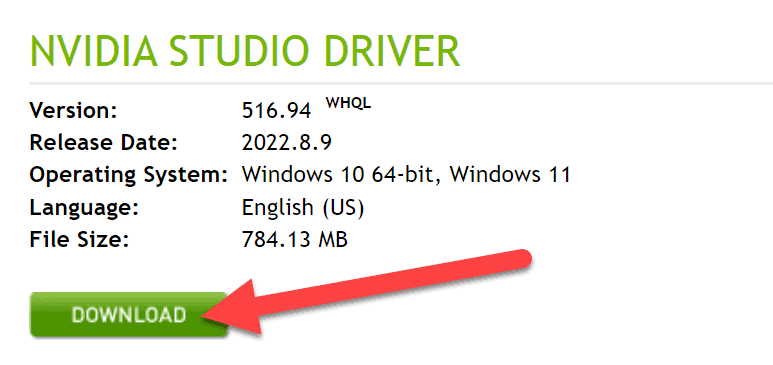
- Click on “Download “:
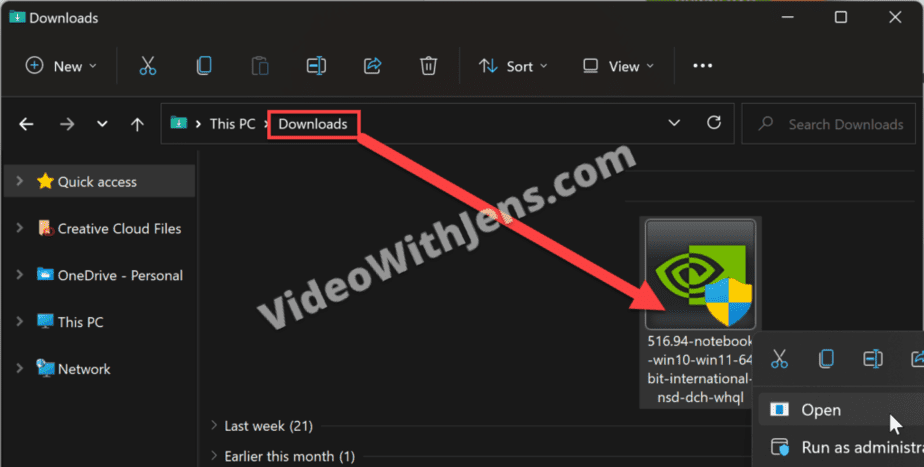
- Once you’ve downloaded it, you’ll find it in the “Downloads” by default. Right-click the file and click on open to start the installation.
When it’s finished, it’s recommended to restart your computer.
To make sure the driver has been successfully installed, you can check the driver version by going to Device Manager > Display adapters, right-clicking the GPU > Properties > Driver, and checking the “Driver Version. “
Hopefully, you won’t run into the “Unsupported GPU Processing Mode” error!
4. Clean Install Old Driver
Users have reported that simply installing the older version of the driver wasn’t enough.
Instead, they found that using a DDU (Display Driver Uninstaller) before installing the older version of the driver solved the issue.
A DDU is used for clean installing drivers. It simply removes all traces of the driver when uninstalling it, and then you can have a clean re-installation of the driver.
I would give this a shot if the solutions above did not solve the issue for you, as it’s just a couple of extra steps.
How to do it:
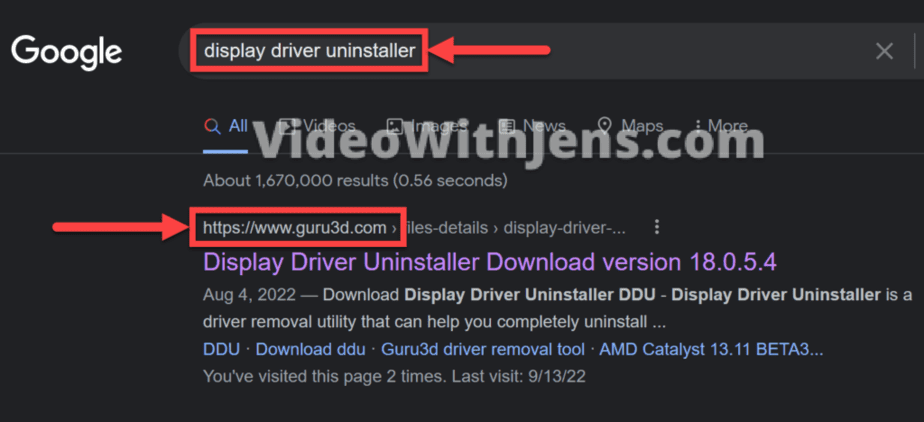
Search for “display driver uninstaller” in google, and choose the one from “guru3d.com,” a known tech site. Guru3d’s DDU only supports NVIDIA, AMD, and Intel GPUs. If you have another manufacturer, find out which DDU is best for you.
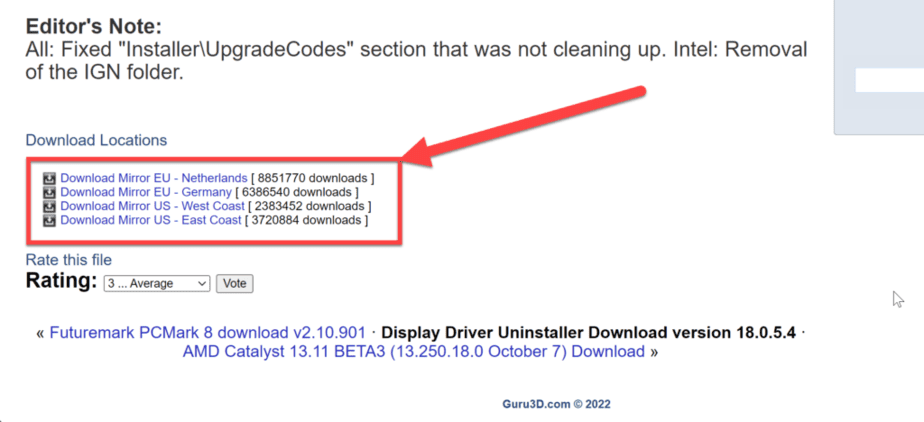
Scroll down to the bottom of the page, and choose the location closest to you. You’ll then be directed to another page, where the download is going to start automatically after a few seconds:
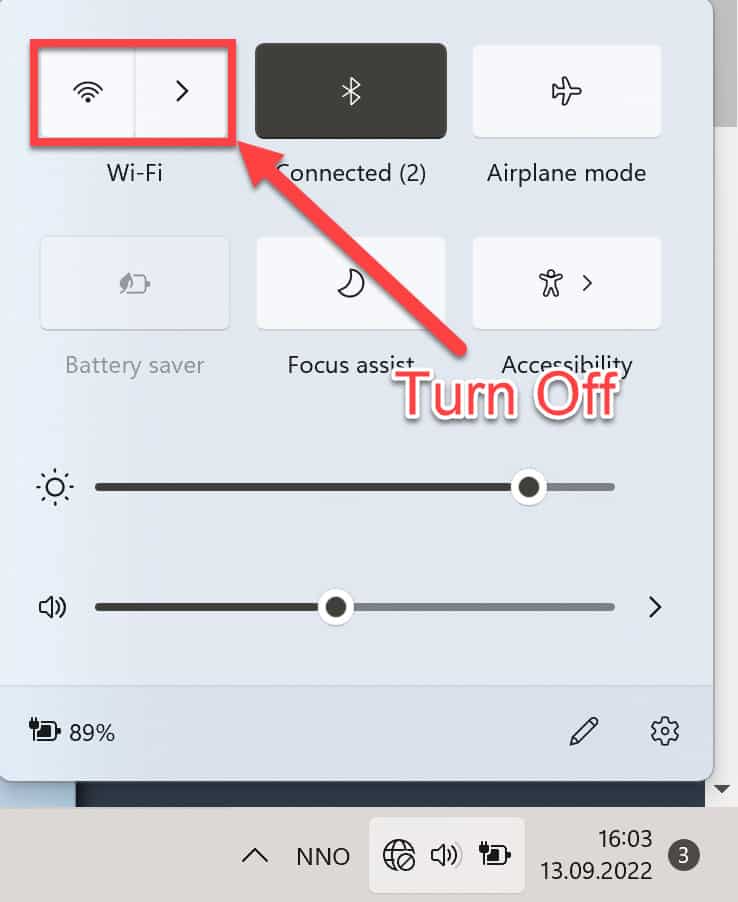
Disable your Wi-Fi connection:
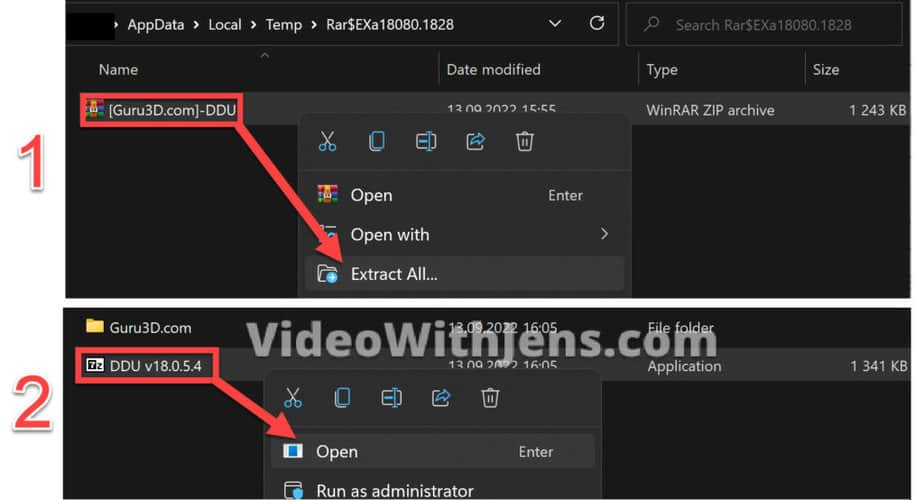
By default, you’ll find the downloaded file in “Downloads” on your computer.
Right-click it, and click on “Extract All… “
Then, you’ll see a new file; right-click the “DDU v…” and click on “Open “:
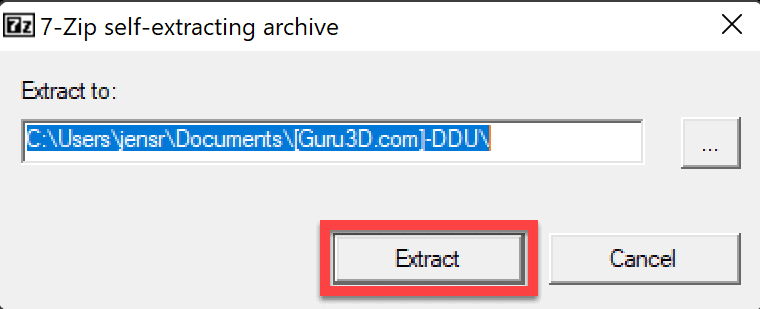
Next, you should get a popup window; click on extract:
Okay, so before doing anything else, we will activate Windows’ safe mode.
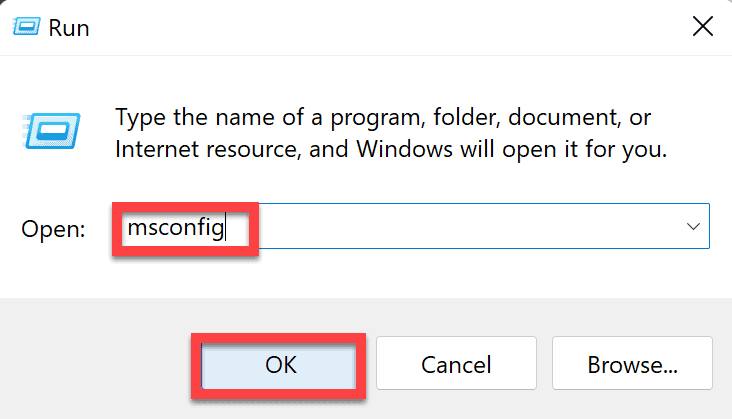
To do this, press the keyboard shortcut: “Windows key + R” to open the run command window.
Then type “msconfig” in the run command window and click on “OK “:
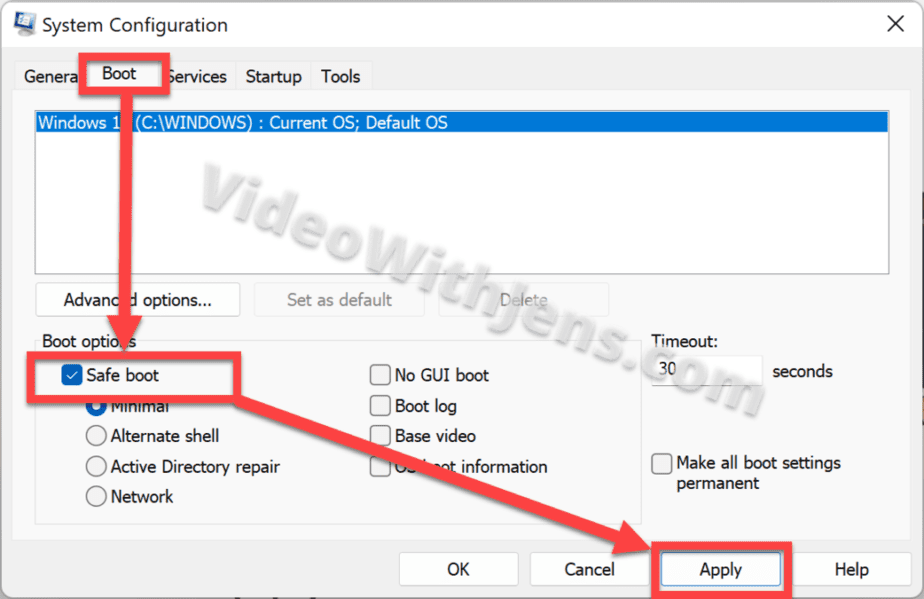
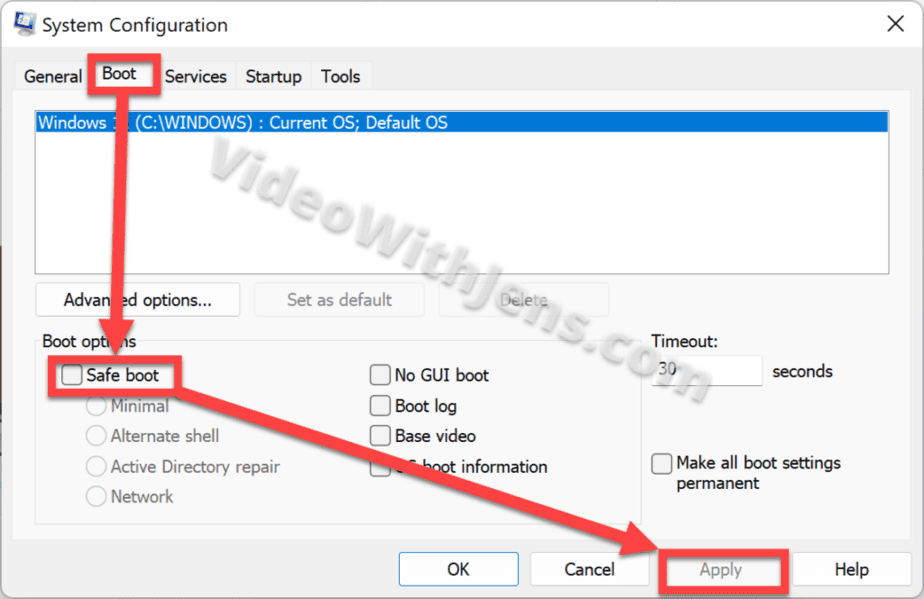
Inside the “System Configuration, “open the “Boot” tab.
Under “Boot options, “check off the box next to “Safe boot” to enable safe mode, and click on “Apply. “
When doing this, you may get a warning saying that you will need your BitLocker recovery key upon reboot. If that’s the case, I would obtain that before activating the safe mode.
The easiest method is simply going to Microsoft’s official website > login to your account > Account > Devices > choose your computer among devices. Then you should be able to find information about the BitLocker and the recovery key.
Once that is done, click on “Apply” again, and “OK “:
Click on “Restart “:

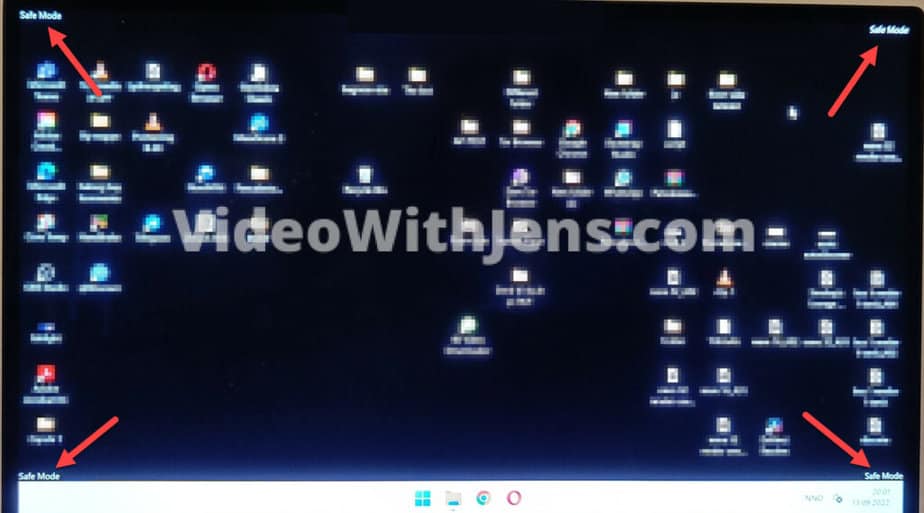
When you are logged in after restarting the computer, your desktop background should be black, and in the corners, it’s written “Safe Mode.» If this is the case, you have successfully activated the safe mode.
If not, do the step above one more time.
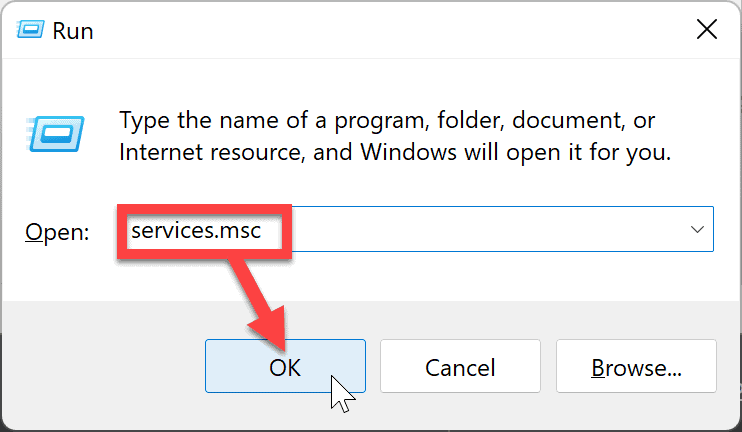
Next, press “Windows key + R” to open the run command window, and type “services.msc”:
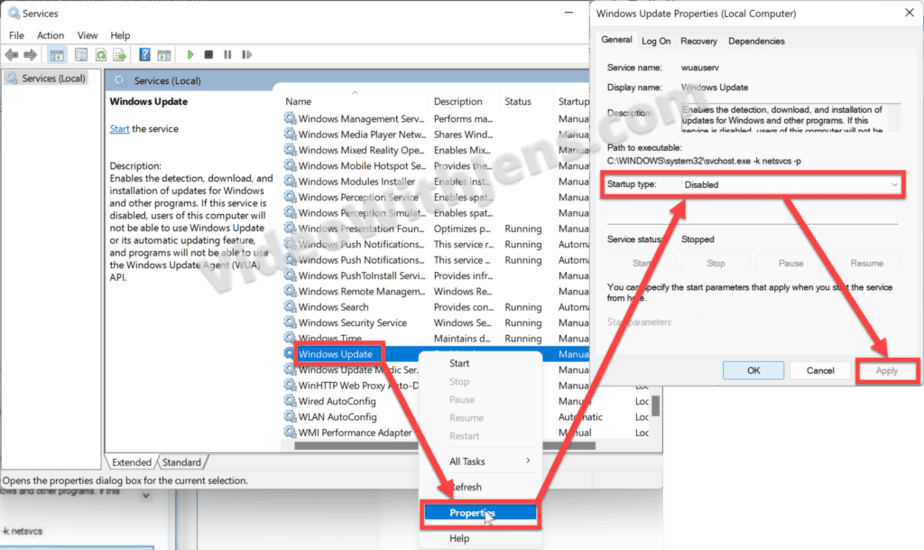
In the window that pops up, scroll down and locate “Windows Update “; right-click it and click on “Properties. “
Set the “Startup type” against “Disabled, “click on “Apply,” and “OK. “
This will prevent Windows from updating in the middle of the DDU process. It will go back to “Manual” once you restart the computer; if you want it to be “Automatic,” you have to do that manually.
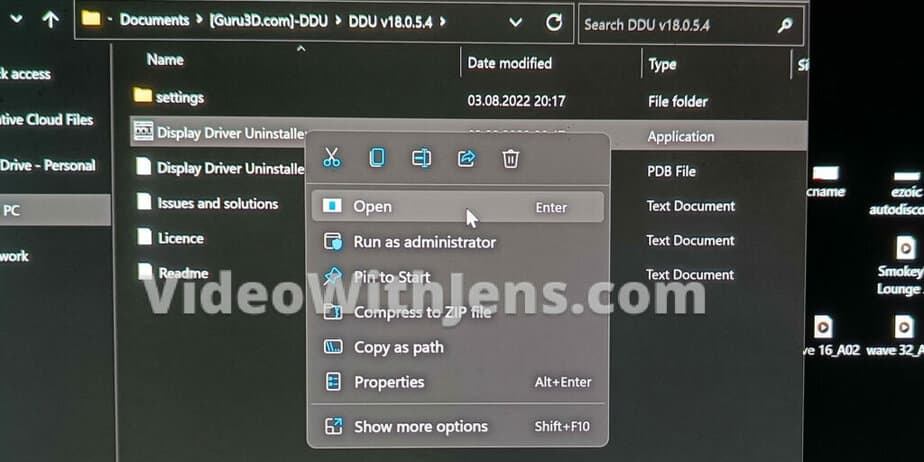
Now, go to the folder where you extracted the DDU. Then, right-click and open the “DDU v…” folder:

Next, right-click the “Display Driver Uninstaller” and click on “Open “:
Alright, now we are getting close!
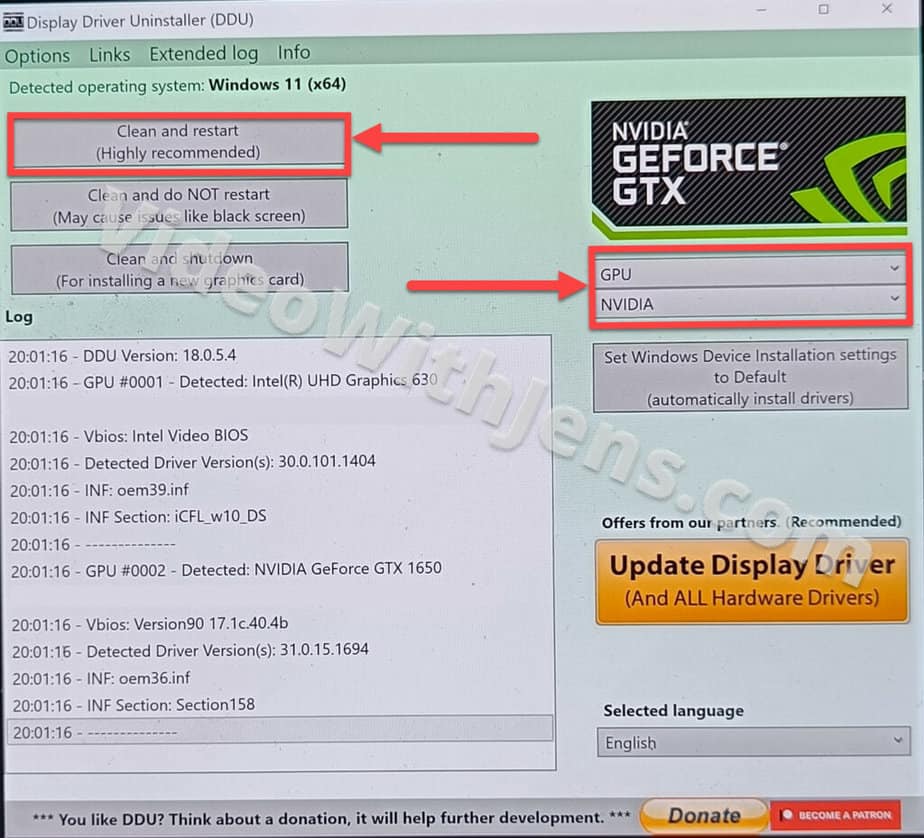
Select “GPU” and your manufacturer in the program’s drop-down menus on the right side.
Then, click on “Clean and restart” to run the DDU.
You can see what’s going on in the log when it’s running. Now it’s just to wait; once it’s finished, the computer will restart automatically.
Once it’s complete and your computer has restarted, open the run command window (Shortcut: Windows key + R), type “msconfig” and click on “OK “:

Head over to the “Boot” tab, and uncheck the “Safe boot” to disable it.
Click on “Apply” and “OK “:
Click on “Restart,” and you should be out of safe mode.
Sometimes there is a little bug where you are still in safe mode; if that’s the case, restart the computer one more time.

Alright, so if you now check your driver in the “Device Manager,” you can’t find your GPU anymore. That’s because there is no trace of it ever being there…
Which is what we wanted.
Now, install an older driver version than the one you were using when experiencing the error. Preferably the previous driver version you had before getting the “Unsupported GPU Processing Mode” error…
Gladly, I have written an in-depth guide on how to do this above!
I also recommend that you stop windows from updating your drivers every Windows update. Since you depend on an older GPU driver for DaVinci Resolve to work… Anyways, you find how to do that as well above. NB: in that case, you must manually check for hardware driver updates.
Another common GPU-related error you might face is when you are using the full capacity of your graphics card. Here’s a couple solutions to increase the capacity.

