DaVinci Resolve: “GPU Configuration Warning” (4 Solutions)
Are you met with the “GPU Configuration Warning” when launching DaVinci Resolve? We know exactly what to do to fix this.
After researching this error a bunch!
We have found that these 4 solutions solve the problem for most people:
- Is DaVinci Resolve Compatible With Your GPU?
- Are Your Graphics Card Drivers Corrupted?
- Download Studio Drivers (NVIDIA)
- Uninstall and Reinstall DaVinci Resolve (The right way)
(Click on the links to jump directly to a specific solution)
The “GPU Configuration Warning” means that DaVinci Resolve is unable to use your graphics card as it’s set up in the GPU settings. This is usually due to an outdated GPU driver, or graphics card. To fix this try changing the GPU settings inside Resolve or more preferably find out what’s causing the complication.
Here’s a video format of the article:
1. Is DaVinci Resolve Compatible With Your GPU?
Here are the minimum GPU requirements to run DaVinci Resolve:
- Integrated GPU or discrete GPU with at least 2 GB of VRAM.
- OpenCL 1.2 or CUDA 11 or higher should be supported by your graphics card.
- NVIDIA/AMD/Intel GPU Driver version – as required by your GPU.
How to Check Your GPUs Amount of VRAM
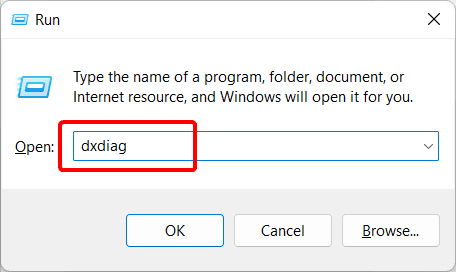
- Press “Win + R” to open the Run dialog box. Next, type “dxdiag” and press the “OK” button, and then “Yes” in the confirmation tool.
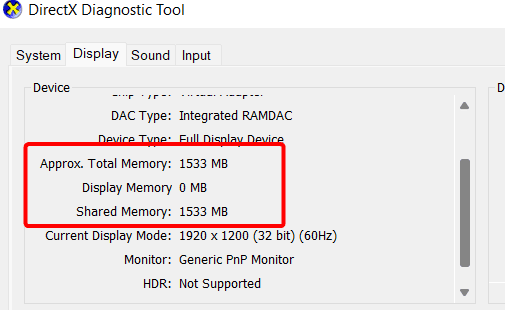
- A DirectX Diagnostics tool will open.
Click on all the available “Display” and “Render” tabs and check the “Display Memory (VRAM).”
If the number in megabytes is “7957”, it means the VRAM of your graphics card is 8GB. If it is “3987”, the VRAM of your GPU is 4GB. It depends on each GPU card and its manufacturer.
(Don’t mind that the display memory is 0 MB in the image…)
Check for CUDA 11 or OpenCL 1.2 Support
No matter if you are using a discrete or an integrated GPU, to run DaVinci Resolve (since version 16.2.7), you need a graphics card that supports CUDA 11 or OpenCL 1.2.
How to Check for CUDA 11 Support
CUDA is only available for NVIDIA graphics cards; therefore, you can skip this section of the article if you use any other type of GPU.
For NVIDIA GPUs to support CUDA 11, they must have a minimum compute capability of 3.5.
To check the compute capability, check out this list from Wikipedia.
If you can find your GPU in the compute capability of 3.5 or above, you should be able to run CUDA 11 and the newer versions of DaVinci Resolve.
However, if your GPU has a compute capability lower than 3.5, all hope is not lost yet!
In that case, the solution to your problem is either:
- Check for OpenCL 1.2 support.
- Download a DaVinci Resolve version below 16.2.7.
- Get a newer GPU.
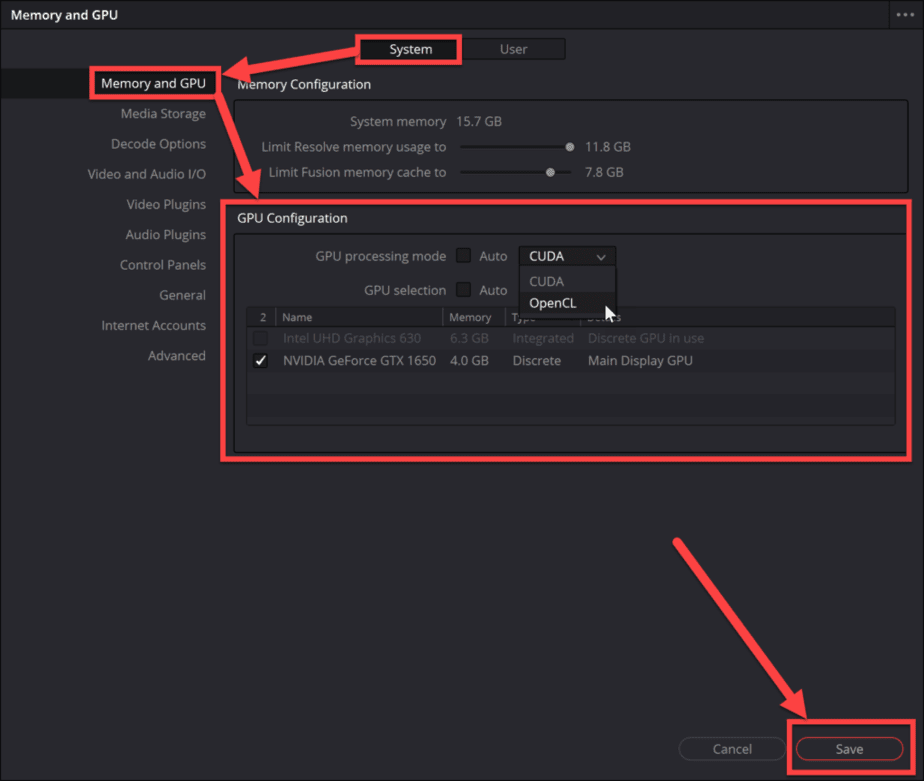
To test if OpenCL works; inside Resolve click on DaVinci Resolve (top left-hand corner) > Preferences > System > Memory and GPU.
Next, uncheck the boxes next to “Auto“, choose “OpenCL” instead of “CUDA,” and click on “Save.”
How to Check for Open CL 1.2 Support
Here’s a Wikipedia list showing which GPUs support the different OpenCL versions.
Make sure that your GPU is included in the OpenCL 1.2 or above. If not, your GPU will not be able to run the newer versions of DaVinci Resolve. Then I would research what version of Resolve supports the older versions and download that one.
If you change from CUDA to OpenCL 1.2, know that the speed will differ.
How to Install an Older Version of DaVinci Resolve
First, uninstall the current version of Resolve, if you don’t know how to do it, read this and come back to read the rest.
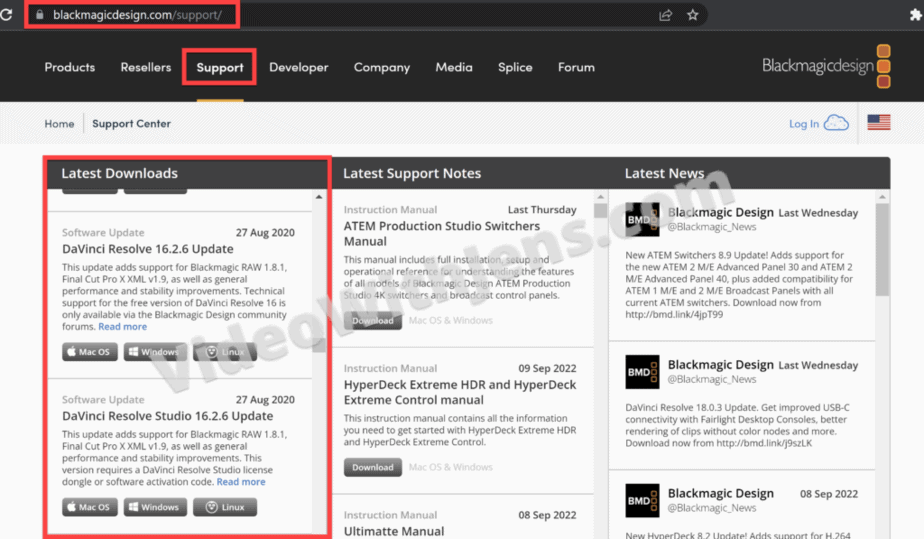
Now, head to Black Magic Design’s official website and the support section.
Scroll down in the “Latest Downloads” tab and find the version you are looking for.
Another reason why you might be seeing the “GPU Configuration Warning” is that your graphics card driver is corrupted:
2. Are Your Graphics Card Drivers Corrupted?
It’s possible that corrupted graphic card drivers could be the reason behind the error “GPU Configuration Warning.”
If the graphic card drivers are corrupted, your graphic card is either functioning abnormally or not working at all.
You could open any other GPU-intensive app or launch any game and see if it is performing as usual or showing signs of performance issues.
If it is performing poorly, it could be because the GPU is not performing at its best state, or it has completely stopped working, and the CPU is using its graphic cores to launch the app or game.
What you need to do in this case is to check if the drivers for the graphics card are corrupted.
Here’s how to do that:
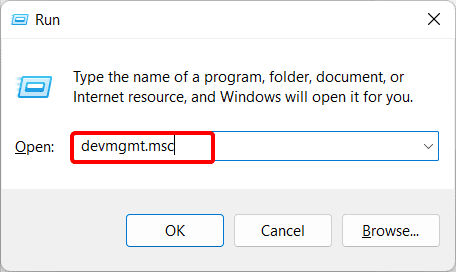
- Press “Win+R” to open the Run dialog box. Now, type “devmgmt.msc” to open the “Device Manager.”
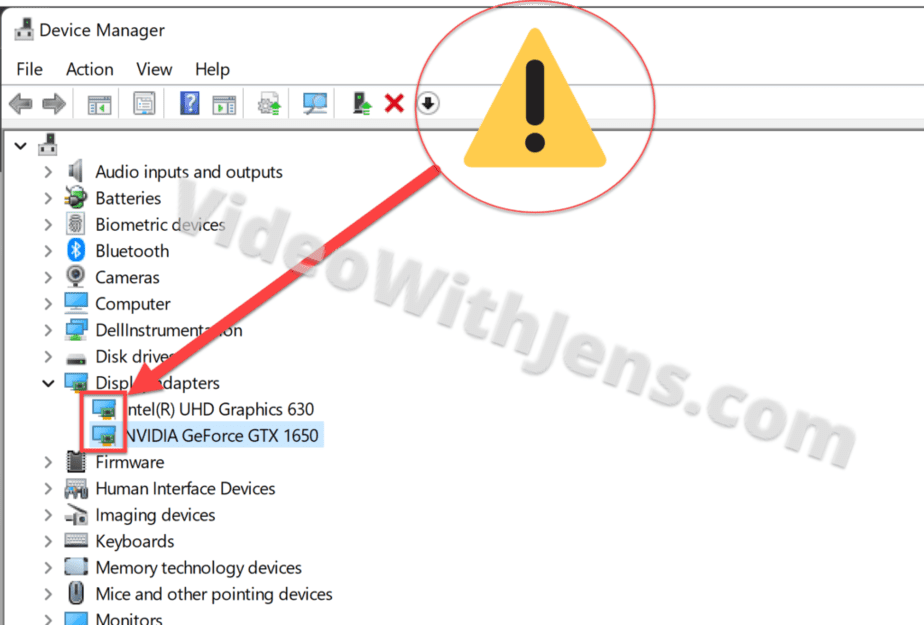
- Expand “Display adapters” and see if any of your graphic drivers have a yellow icon next to them.
- If you have the yellow icon, you need to update the drivers as they are corrupted.
Here’s how to update your graphics card drivers automatically using Device Manager
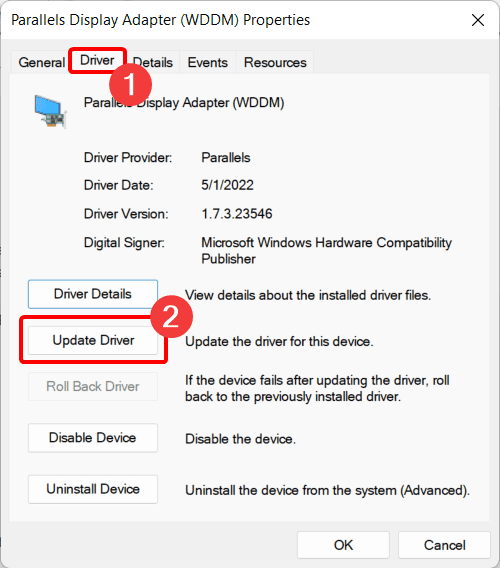
- After expanding the “Display adapter,” select the driver that shows the yellow icon and right-click on it.
- Select “Properties” then click on the “Driver” tab, and finally click on “Update Driver.”
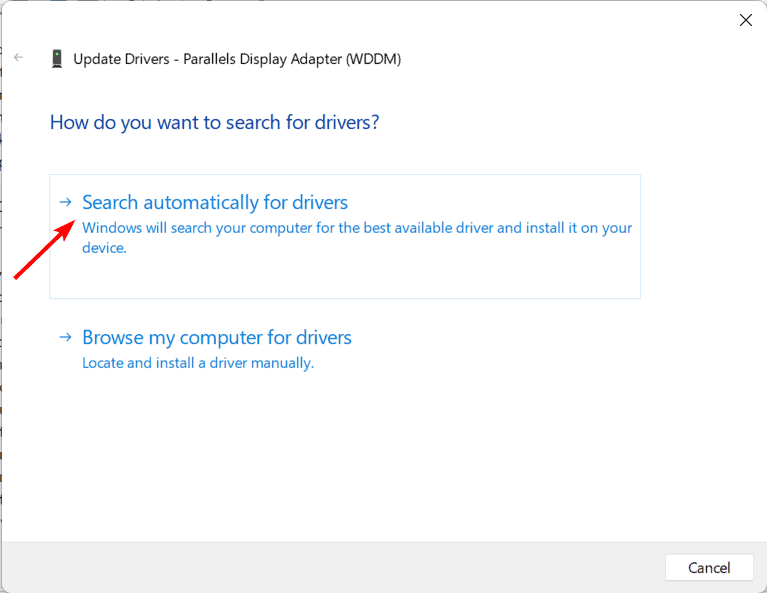
- Select “Search automatically for updated driver software” and follow the prompts.
If it didn’t detect any drivers, it could be because it wasn’t registered in Microsoft’s directory yet.
In that case, consider downloading the drivers manually from the manufacturer’s official website and installing the drivers.
Manually update your graphic card’s drivers
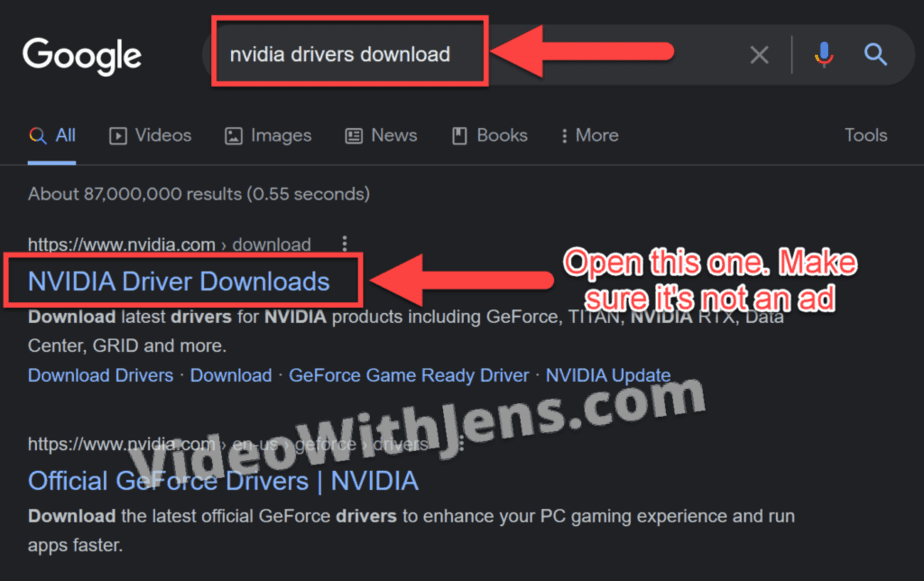
To manually upgrade drivers visit the driver section on your manufacturer’s official website, and download the one that’s for your GPU.
Here are links to AMD, Intel, and NVIDIA’s official websites:
Once it’s downloaded, open the file and go through the installation process as normal:
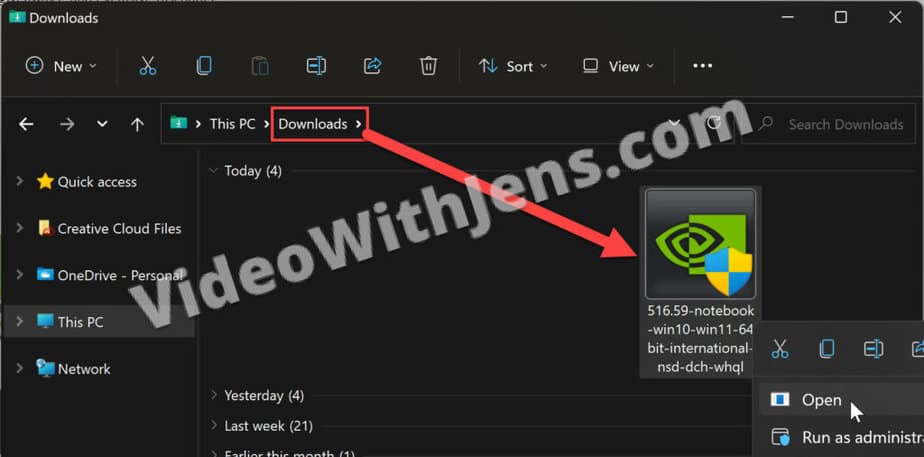
When the installation process is complete, restart your computer, and try to launch DaVinci Resolve!
Here’s a solution that seems to work for NVIDIA users:
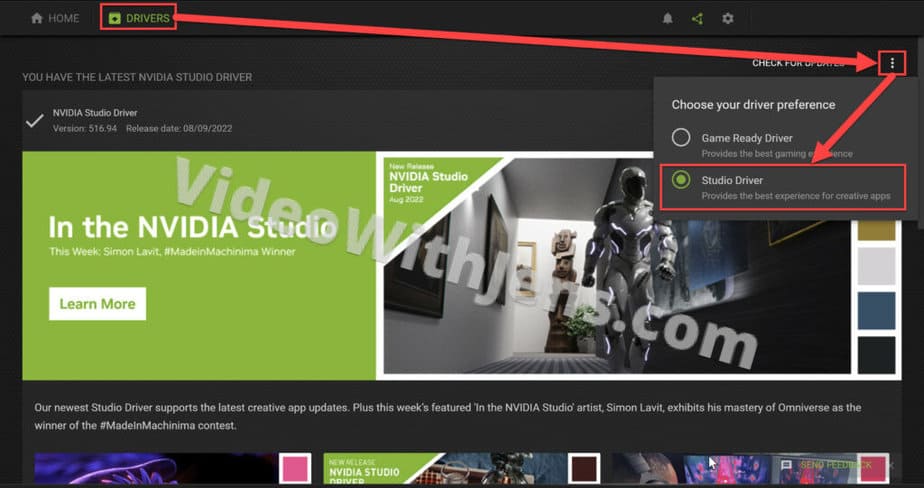
3. Download Studio Drivers (NVIDIA)
Nvidia offers two types of drivers for its users: studio drivers and game drivers. The game drivers are focused on providing the ultimate gaming experience.
The studio drivers are for video editing, sound editing, graphics design, and other purposes.
Here’s how to download the Studio drivers for your Nvidia graphics card:
- Click on the taskbar’s search icon, search for “GeForce Experience,” and open it.
- Go to the “Drivers” tab.
- Click on the three vertical dots in the top right corner and select “Studio Driver” if “Game Ready Driver” was selected.
- Allow a few seconds for it to download, and after it has downloaded, click on “Express installation.”
If you are unable to see the three dots, re-install GeForce Experience.
The studio drivers will install in the background, so allow a few seconds, click “Close” once the installation is complete, and restart your computer.
After your computer restarts, log in to your user account. Then, restart DaVinci Resolve, and the “GPU Configuration Warning” will hopefully not appear.
4. Uninstall and Reinstall DaVinci Resolve
Usually, by upgrading the drivers, the error should be gone. However, if that didn’t help, you should uninstall and reinstall DaVinci Resolve.
FYI. suppose you see the same error even after reinstalling DaVinci Resolve. In that case, you should try installing the previous Resolve version and see if you are still getting the same error.
Uninstall DaVinci Resolve
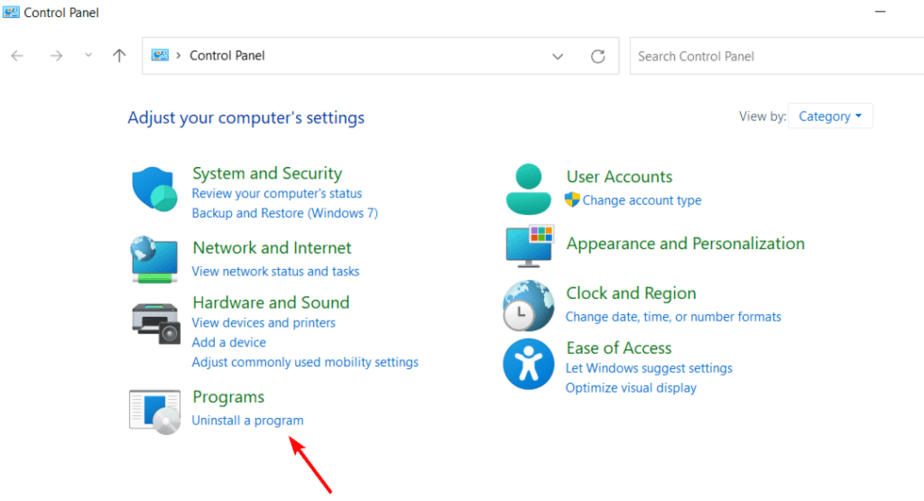
- Click on the search button, search for “Control Panel,” and then open it from the results.
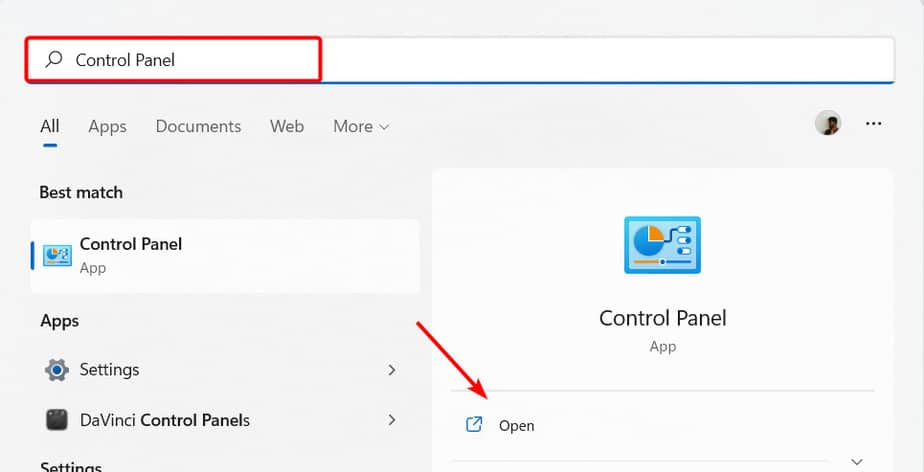
- You should see an option called “Uninstall a program” under “Programs.” Click on it to access the uninstallation window.
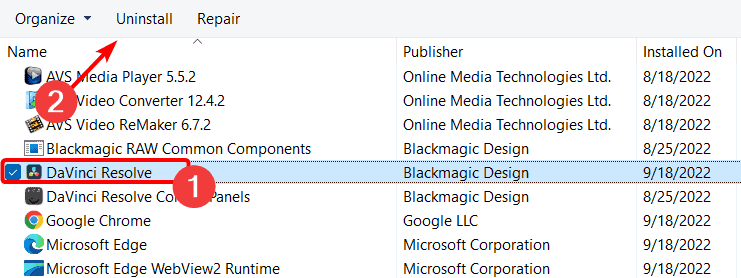
- Click on “DaVinci Resolve” from the app list and click on “Uninstall.”
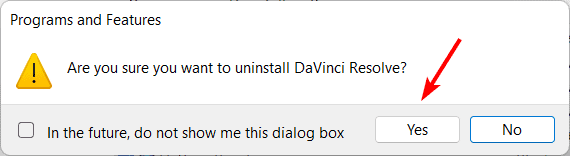
- Click on “Yes” when the DaVinci Resolve’s uninstallation Wizard opens.
- Click on the search icon again, and type “%appdata%” to open the folder and delete the junk files of DaVinci Resolve.
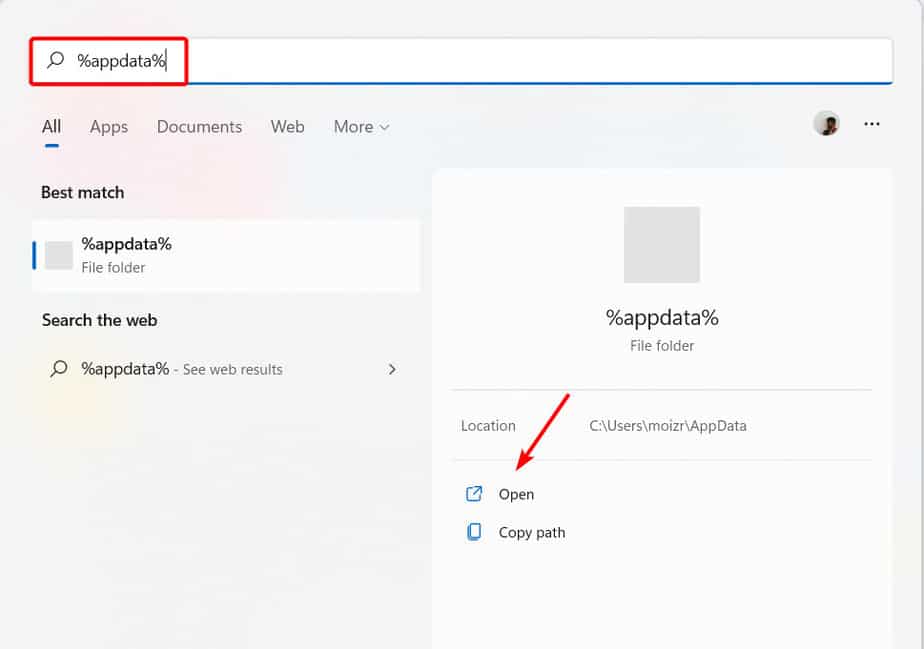
- Locate the DaVinci Resolve’s folder under %appdata%, then right-click on the folder and click on the “Delete” option to delete the folder.
Reinstall DaVinci Resolve
- Open Chrome or Edge and go to blackmagicdesign.com > Products > DaVinci Resolve and Fusion software.
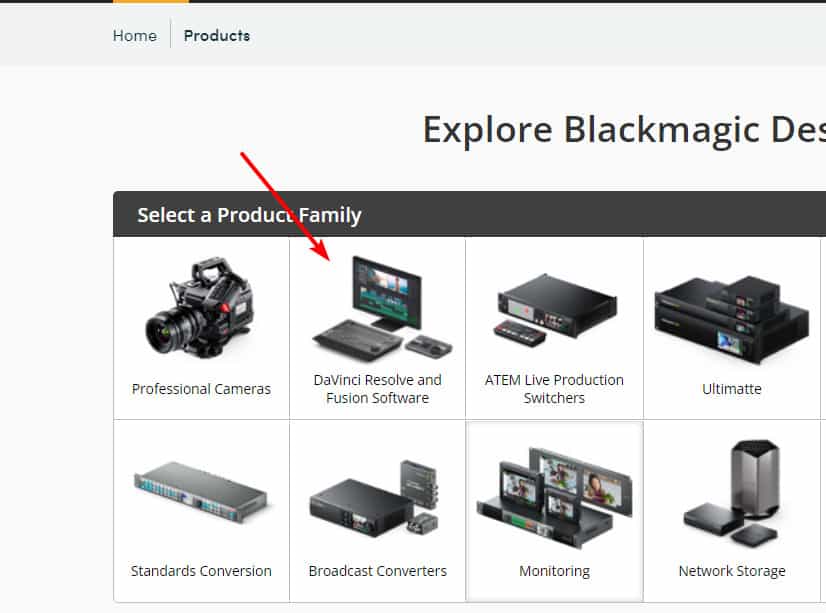
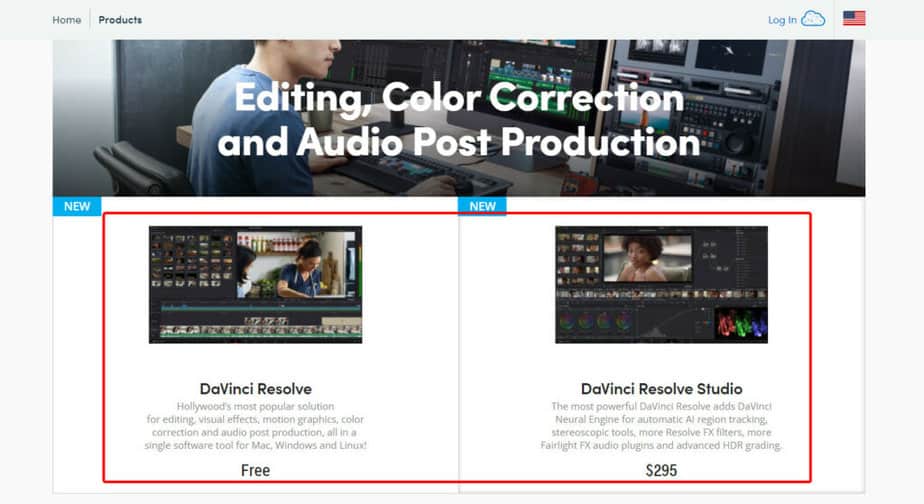
- Click on DaVinci Resolve Studio if you already have the license, or click on DaVinci Resolve, a free-to-use Resolve editor.
- Hit the “Download” button and then choose your operating system.

- You will find a registration form. Fill in the form with your details, and select the “Register & Download” button.
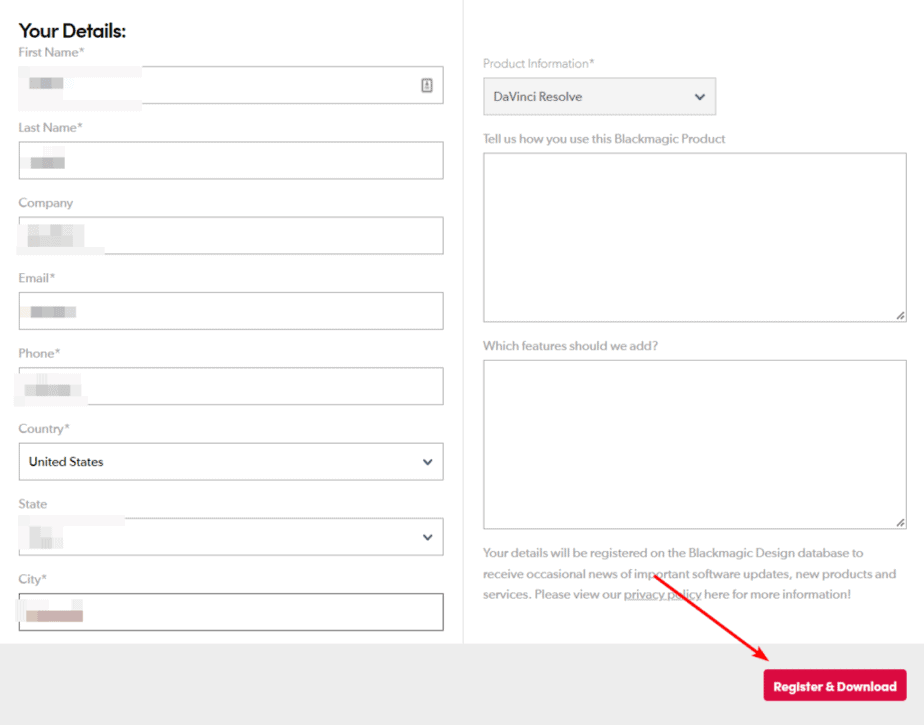
- Your download will begin. Once the file has been downloaded, double-click on the .exe file.
- Click “Next” in DaVinci Resolve’s installation wizard.
- Now, click “I accept the terms in the license agreement” and select “Next.”
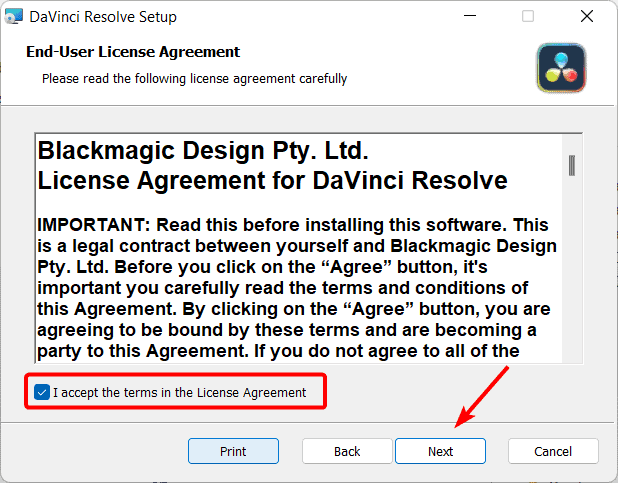
- Choose the destination folder, press the “Next” button, and click on “Install.”
- Give the installation a few minutes, and then hit the “Finish” button to complete the installation of DaVinci Resolve.
If you didn’t find a solution that helped in this article, I’ve written about other GPU related issues. Maybe this article has something that might help you out!

![DaVinci Resolve: “Add to Render Queue” GRAY Button [SOLVED]](https://videowithjens.com/wp-content/uploads/2022/09/gray-render-button-davinci-resolve-768x432.png)