DaVinci Resolve 18: Complete Tutorial for Beginners (2023)
This is a complete beginner tutorial on how to use DaVinci Resolve 18.
In this new guide you’ll learn:
Let’s get to it.
How to Get Started with DaVinci Resolve
- Download & Install DaVinci Resolve
- Create a New Project
- General Overview of DaVinci Resolve
- Setup the Timeline in DaVinci Resolve
- How to Import Media to DaVinci Resolve
1. Download & Install DaVinci Resolve
Since this is a complete beginner guide, I decided to include this as one of the steps.
To download DaVinci Resolve, head over to Black Magic Design’s Official Website (opens in a new tab), go to the “Products” page, and locate DaVinci Resolve.
When you get to the download page (it looks like in the image below), choose either the free or paid version of Resolve.
Check out this guide walking you through the download & installation process step-by-step.

2. Create a New Project
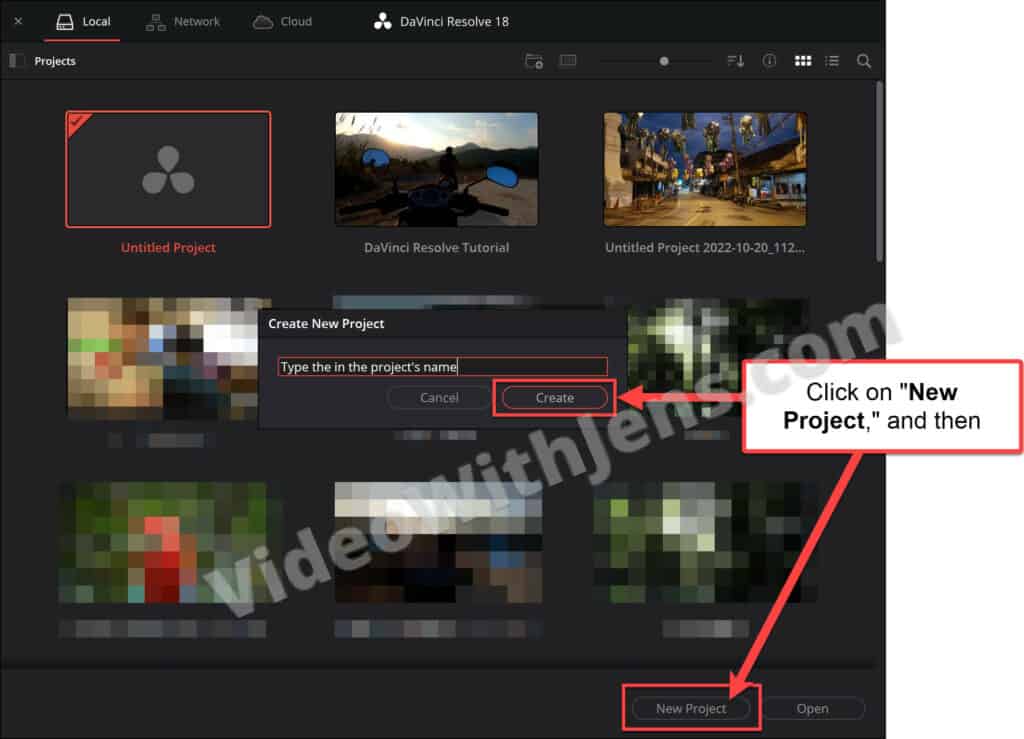
When you launch DaVinci Resolve, you’ll first be met by the “Project Manager.”
- If you get stuck on “Loading Fairlight Engine” when launching Resolve, check out this tutorial on how to fix it.
The “Project Manager” is where you can access all your projects and organize them into different databases, etc.
It’s also where you create a new project; click on “New Project” in the lower right corner, give it a name, and click “Create.”
3. General Overview of DaVinci Resolve
Inside DaVinci Resolve, there are seven different pages, all having their unique purpose.
The different pages are as follows:
- Media: Imports and organize media with direct access to your file system.
- Cut: For editing faster and with rough cuts.
- Edit: Slower editing than the «Cut» page, but easier to manage media.
- Fusion: intended for graphic design.
- Color: color correct, color grading, etc.
- Fairlight: advanced tools for managing your audio.
- Deliver: this is where you export your video.
To open the individual pages, click on the buttons at the bottom of Resolve:

4. Setup the Timeline in DaVinci Resolve
Before importing your media, we will set up the timeline correctly.
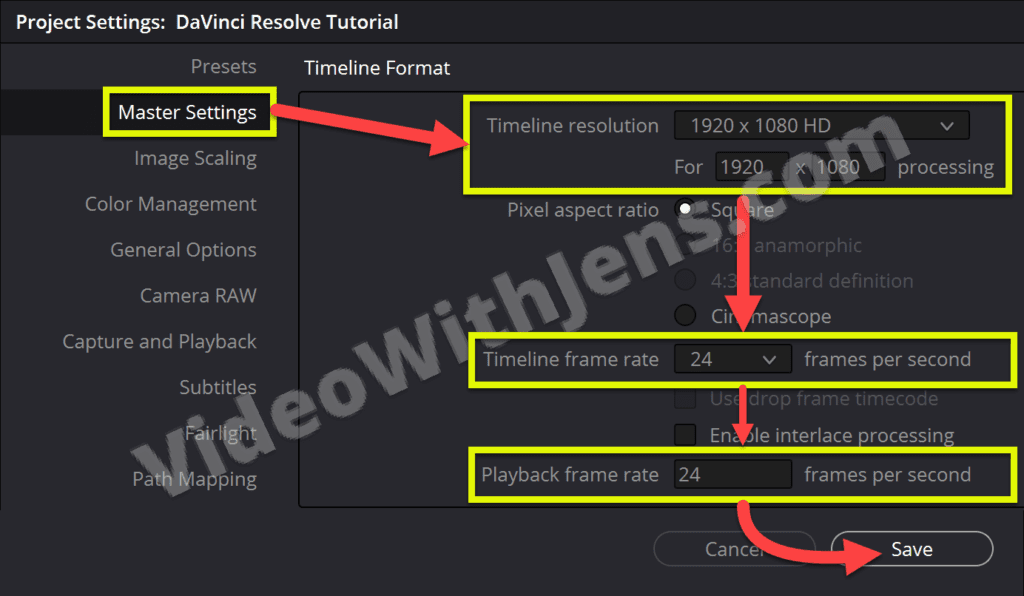
Open the “Project Settings” by either pressing “Shift + 9” or clicking on “File” (top left-hand corner) > “Project Settings.”
- To make videos for TikTok, Instagram, or YouTube Shorts, the resolution (aspect ratio) has to be vertical. Check out this complete tutorial on making vertical videos for social media.
Then, open the “Master Settings” tab, where you set the resolution and frame rate.
Set the “Timeline resolution,” “Timeline framerate,” and “Playback frame rate” to the same as the clips you will import.
Then click on “Save“:
5. How to Import Media to DaVinci Resolve
There are many ways to import media to DaVinci Resolve; I will show you one of them now.
Check out this article to learn about the other ways to import (including the Media page).
We are going to import directly to the “Cut” page:

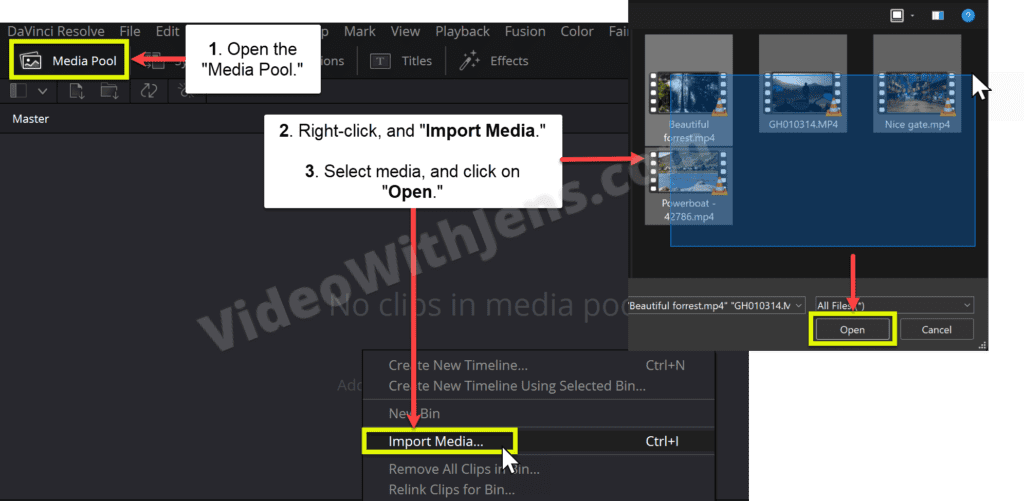
Inside the “Cut” page, open the “Media Pool” (top left-hand corner).
- This is where you’ll find all your source clips once imported.
Right-click on the gray area inside the “Media Pool” and click on “Import Media.”
Then, select the clips in your file system, and click “Open.”
- If you are unable to import or face any issues, read this article on how to fix that.
How to Edit Videos in DaVinci Resolve
In this part of the tutorial, you’ll learn all you need to get started editing videos.
- Adding clips to the timeline (effective method).
- An overview of the “Edit” page.
- How to Trim & Clips.
- How to Move Clips.
- Adjust Audio Levels.
- Add Titles/Text.
- Add Video Transitions.
- Change Clip Speed.
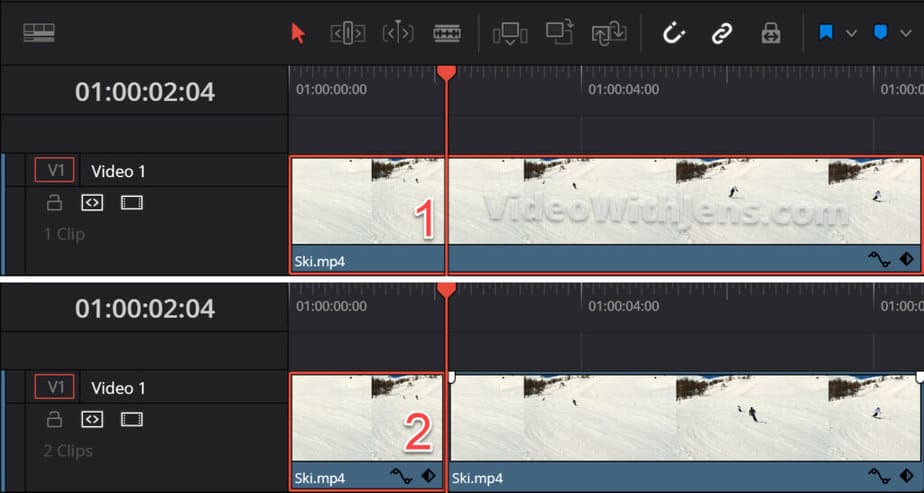
1. How to Add Clips to the Timeline in DaVinci Resolve
The first step is to add the clips to the timeline, where you will cut and compose your video.
To do this, I’ll show you a powerful method that will spare you a lot of unnecessary editing work.
On the “Cut” page next to the “Media Pool” section, click on the button called “Source Tape” (watch the image below showing you what it looks like).
Now, in the video preview, all clips in the “Media Pool” are seen as one:
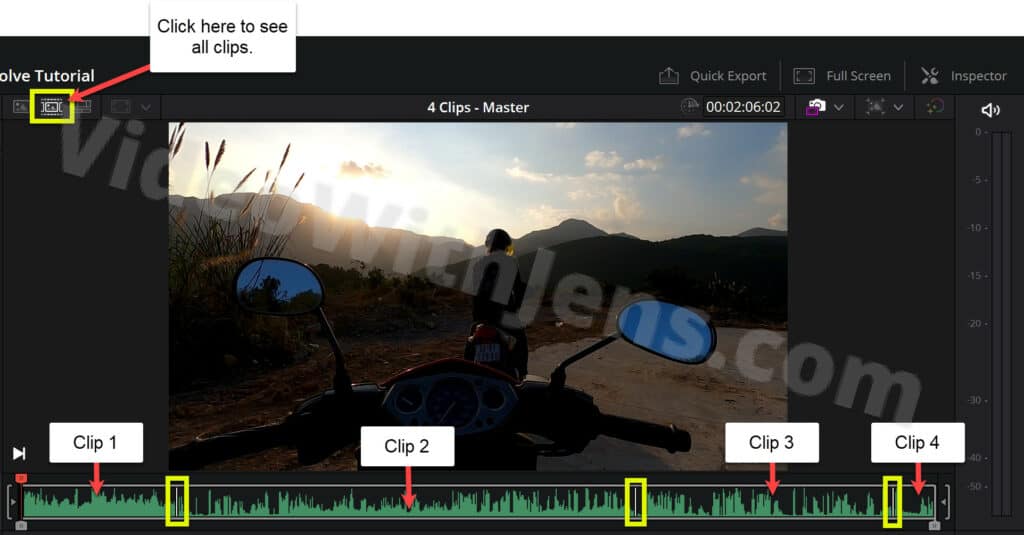
Next, to add the lips to the timeline, use the following keyboard shortcuts:
- Press “L” to play forward (double tap to play faster).
- Press “K” to stop playing.
- Press “J” to play backward (double tap to play faster).
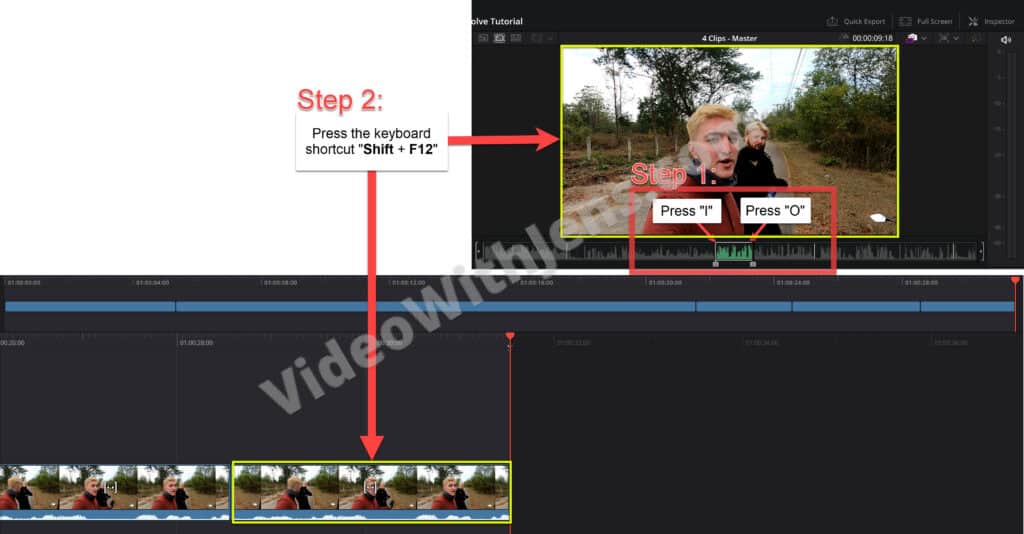
- Press “I” to create an in-point.
- Press “O” to make an out-point.
- Press “Shift + F12” simultaneously to add what is between the in and out-point to the timeline.
Watch the image illustration below on how to do this:
I have written about other useful methods to add clips to the timeline here.
2. Head over to the “Edit” page.
Open the “Edit” page at the bottom of DaVinci Resolve:

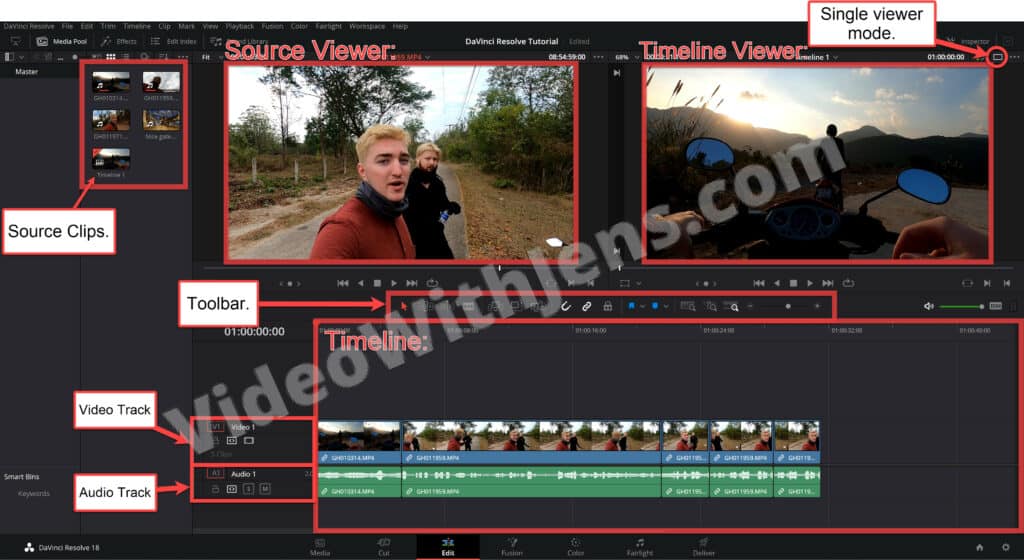
Here is a quick overview of the “Edit” page:
- The “Media Pool” contains the source clips.
- By default, there are two viewers/video previews:
- The “Source Viewer” shows the clips in the “Media Pool.”
- The “Timeline Viewer” shows your project (what’s in the timeline).
- Click on the icon shown in the image below for a single-viewer mode.
- The timeline is where you compose your project.
- Video tracks are where the video part is found.
- Audio tracks are where the audio is found.
- The toolbar contains a bunch of options only affecting the timeline.
3. How to Split, Cut, and Trim Clips in DaVinci Resolve
Knowing how to effectively split, cut, and trim clips is critical if you want to edit your videos fast.
I’m going to show you some basic methods to get started. However, if you want to learn the more advanced techniques right away, you may want to check out this article.
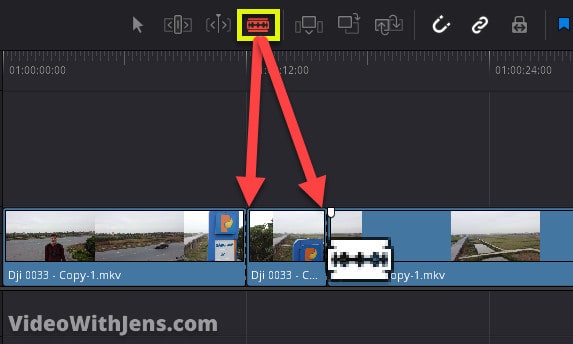
Blade Edit Mode
This is the most basic way of cutting clips.
Click on the razor blade icon in the toolbar, and then click on the clips in the timeline to split them.
- Recommended: Use the keyboard shortcut “B” to enable “Blade Edit Mode.”
To delete the clip, click on the cursor icon in the toolbar (Selection Mode), select the clip in the timeline, and press “Shift + Backspace” (Windows) or “Shift + Delete” (macOS).
- Recommended: Use the keyboard shortcut “A” to enable “Selection Mode.”
Playhead Split
Instead of using the razor blade to cut the clips, you can split the clips where the timeline playhead (red time marker) is positioned.
Good way of using it:
- Press “L” to play forward in the timeline.
- Press “K” to pause.
- Press “Ctrl or Command + B” or “Ctrl or Command + \” to split the clip.
If you want to remove part of your clip, continue by:
- Play forward, pause, and split again.
- Press “J” to move the playhead above the “cutout” part of the clip.
- Press the keyboard shortcut “Shift + V” to select the clip.
- Press “Shift + Backspace” or “Shift + Delete” (macOS) to remove the part..
Step 4-7 is not the most effective way of continuing, yet far more effective than using the razor blade and selecting the clip manually.
- Check out this tutorial, and scroll down to “Ripple trim start/end to playhead” to find the best way to do steps 4-7.
Trim Edit Mode
Another approach to editing is using the trim tools.
To do this, hover over the end of the clips in the timeline, and trim it shorter or stretch it longer.
You can’t stretch the clip more than its original length (then you must change the clip speed).
Trimming your clips will leave a gap in the timeline or overlap the neighbor clip. To prevent this from happening, enable “Trim Edit Mode” (shortcut: “T“) in the toolbar.
In this mode, you will also trim or lengthen the timeline and not leave gaps or overlap other clips.

4. How to Move Clips in DaVinci Resolve
To move clips in the timeline, you drag and drop them where you want. However, there are some things you can do to make this a lot more efficient.
One way of moving clips is by pressing “Ctrl/Command + Shift” and then dragging the clip. When doing this, the other clips in the timeline will make room for the clip you are dragging.
Here are 7 more ways to move clips in DaVinci Resolve.
Check out the GIF illustration below on how this works:
5. How to Adjust Audio Levels in DaVinci Resolve
Next, let’s look at ways to adjust the audio levels in DaVinci Resolve.
If you want to add any audio file/melody to the timeline, you can do this like with a regular video clip.
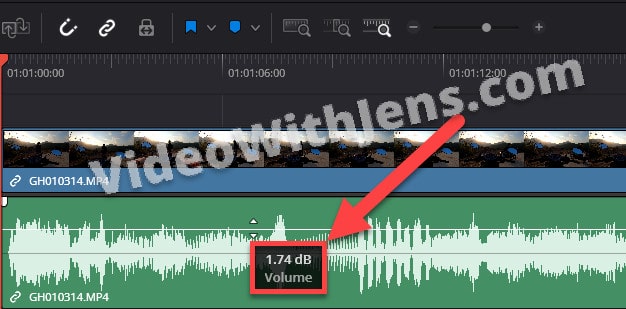
Adjust individual audio clip:
To do this, hover over the white horizontal line on top of the audio clip, and drag it upwards or downwards to increase or decrease the volume.
Check out the image below:
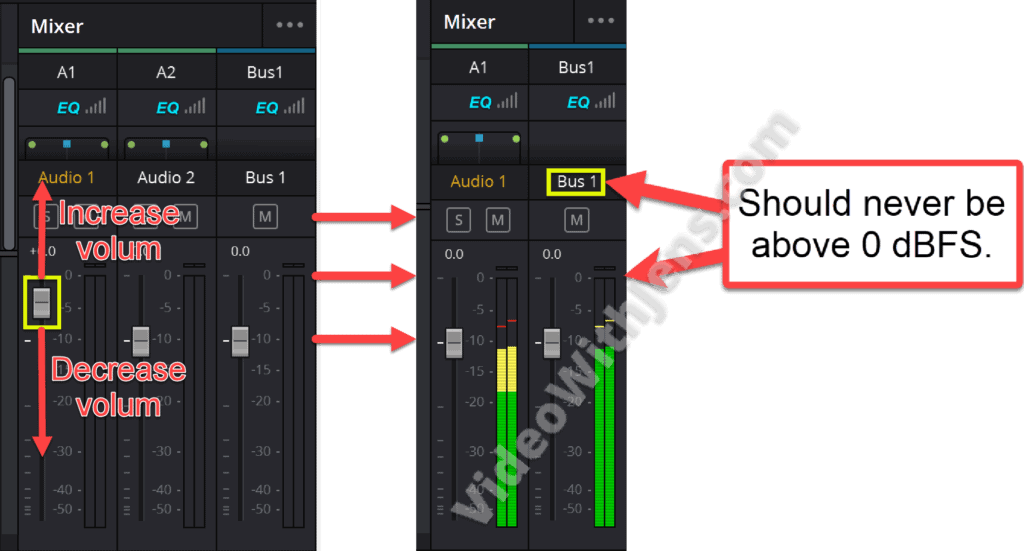
Adjust audio tracks and project volume:
This is done from the “Mixer” tab; you can open it in the top right-hand corner.
Here you can adjust the volume of each audio track, or the whole project, by using the sliders.
- Audio 1 is the first audio track in the timeline.
- Audio 2 is the second audio track in the timeline.
- Bus 1 is the master volume and controls the whole project’s volume.
Make sure that the “Bus 1” never is above 0 dBFS. You can check this when playing through the video.
If you have music, a good benchmark is to set it 20-30 dB lower than the main dialogue. However, there is no exact rule for this.
Here’s an article with some additional ways to change the volume.
6. How to Add Titles/Text in DaVinci Resolve
Now that your video is composed and the audio levels are set, it’s time to add some text and effects to it!
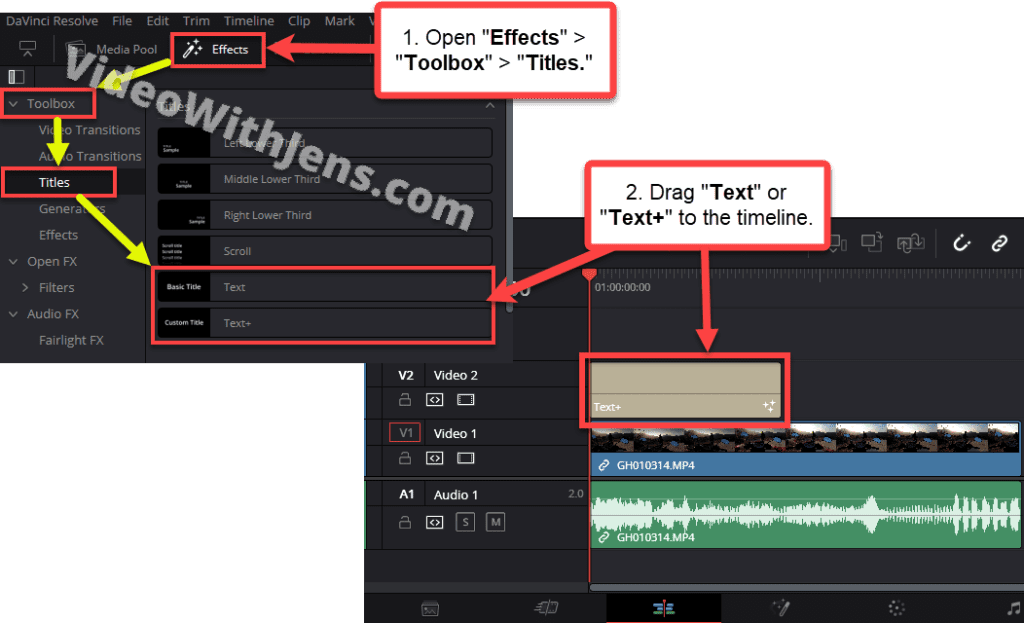
To add text to your video, open the “Effects” library (top left-hand corner), and under “Toolbox,” open the “Titles” tab.
Next, drag one of the “Text” or “Text+” generators to the timeline, and drop it one track above the video.
- Doing this will create a text overlay. Drop the text in the “Video 1” track if you want a black background.
Here’s an illustration showing you how to do this:
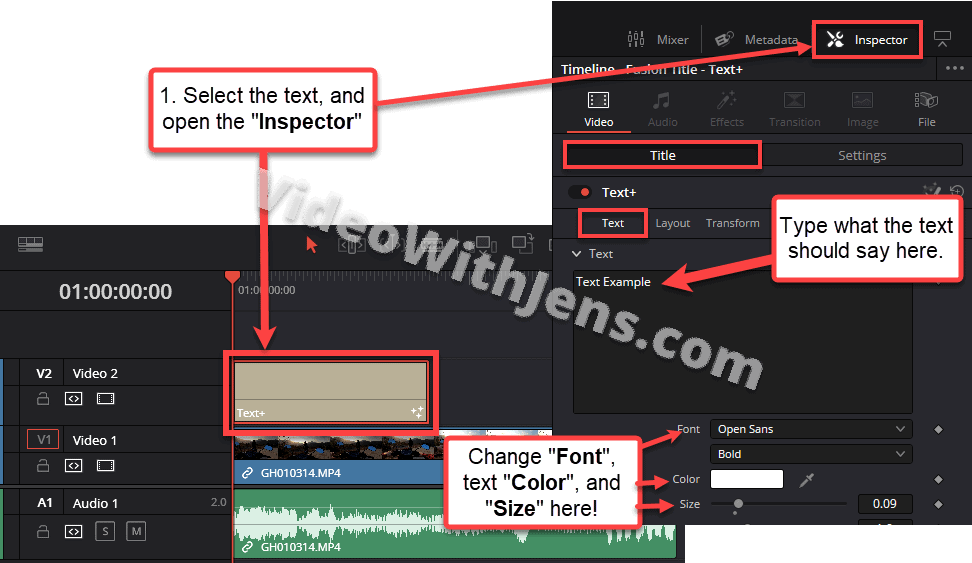
To edit the text, click on the text generator in the timeline, and open the “Inspector” (top right-hand corner).
Make sure to be in the “Title” sub-tab; from here, you can adjust the text how you want it.
Switch the “Title” tab to the “Settings” tab to adjust the position.
Check out this article to learn more about how to customize and create text animation.
7. How to add Video Transitions
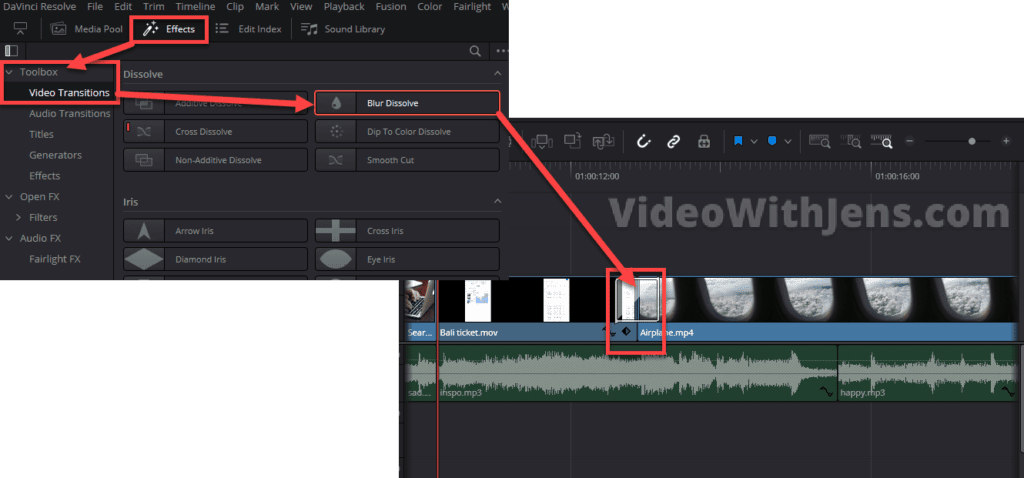
If you want to create a smooth transition from one clip to another, there are many good transitions presets in the “Video Transition” tab inside the “Effects.”
You can preview how they look in your video by hovering your mouse cursor over them.
- If it doesn’t work, click on the three dots in the top right-hand corner of the tab, and enable “Hover Scrub Preview.”
Once you find a transition you like, drag and drop it between two clips like this:
8. How to Change Clip Speed in DaVinci Resolve
Speeding up or creating slow motion is probably one of those things you want to know early on.
Let me show you how it’s done in Resolve:
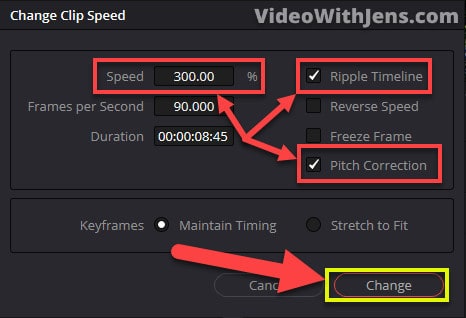
Start by right-clicking the clip in the timeline, and then select “Change Clip Speed.”
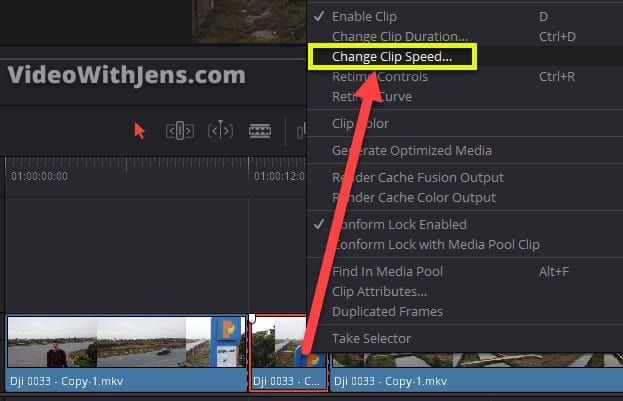
Then this window should pop up.
Adjust the percentage next to “Speed” to change the clip speed.
- 200% is twice the normal speed.
- 50% is half the normal speed.
Tick off the box next to “Ripple Timeline,” or you will probably not get the desired result.
Check off “Pitch Correction” if you want the pitch of the voice to stay the same as usual.
- If you enable it, you will get that high-pitched voice.
Lastly, click on “Change.”
Check out this article to learn more advanced ways of changing clip speed.
How to Export Videos in DaVinci Resolve
Lastly, it’s time to export your video out of Resolve.
I will show you how to export your video to a basic MP4, but I won’t go into detail about the render settings.
Here’s a more in-depth explanation, and how to get high-quality on social media.
Anyways, let’s get to it!
Exporting videos is done using the “Deliver” page:

On the left side of the “Deliver” page, you’ll see the “Render Settings” tab. This is where we give Resolve all the instructions on how we want the video to be encoded.
Start by choosing the “Custom Export” option, then give the video a “File Name,” and click on “Browse” to set the export location in your file system.
Make sure the next option is set to “Single Clip,” meaning all the clips in the timeline will be one video.
Then in the “Video” tab, set…:
- Format against MP4.
- Codec against H.264.
- Resolution to match your timeline resolution.
- As we set above.
- The Frame rate should be correct.
- Quality to Automatic and Best.
- The “Best” option may be overkill, but at least you will unlikely lose any quality; read more about that here.
- You can leave the rest by default.
Once the above is done, click on “Add to Render Queue“:

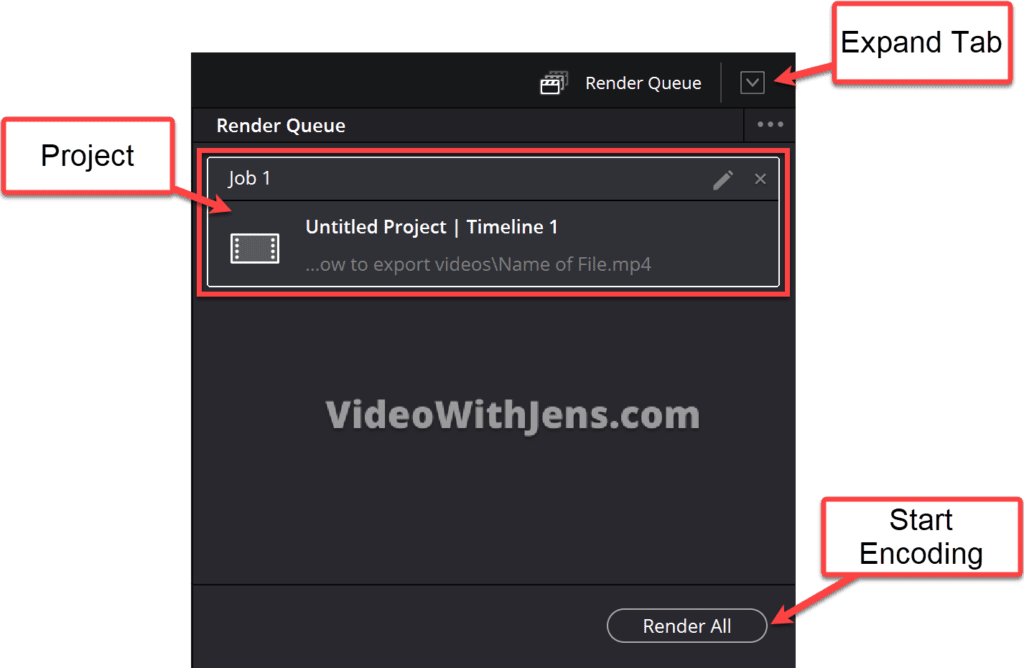
Then the project will appear as a “Job” in the “Render Queue” tab on the right side of the “Deliver” page.
To start the encoding, click on the “Render All” button, and wait.
Once it’s finished, you’ll find the video where you set the “Location” in your file system.
- Alternatively, right-click the finished “Job” and select “Open File Location.”