Export MOV in DaVinci Resolve: Best Settings (+ Fix Issues)
In this tutorial, you’ll learn how to export your project in a MOV file format from DaVinci Resolve.
I will also show you the best settings depending on your situation + fix common issues related to exporting MOV files.
For those who just want a quick answer:
To export from DaVinci Resolve in a MOV container, go to the “Deliver” page, and open the “Render Settings.” Next, choose “Custom Export,” set “Format” against “QuickTime,” click on “Add to Render Queue”, and “Render All” in the “Render Queue” tab.
How to Export MOV in DaVinci Resolve (With Images)
Once you are finished editing the video, head over to the “Deliver” page:

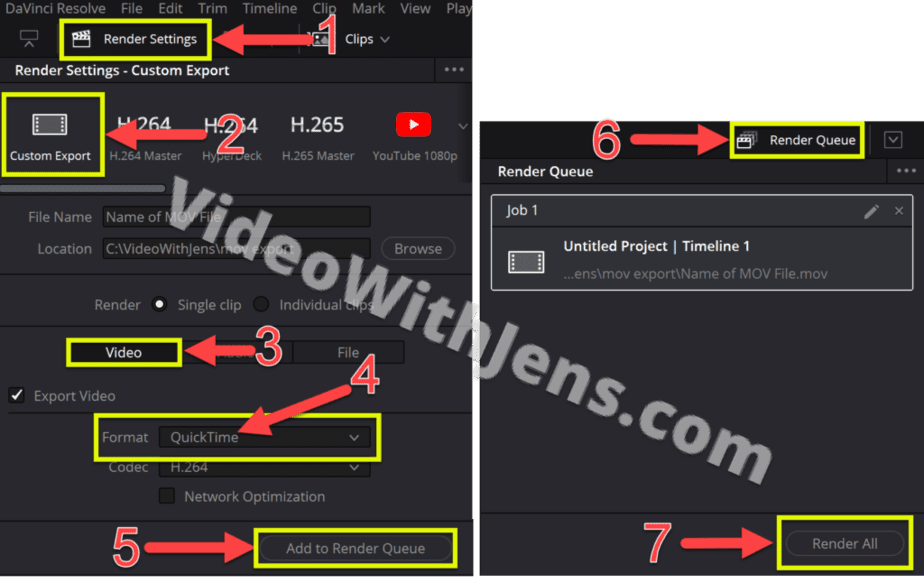
Open the “Render Settings” and select “Custom Export.”
Give the file a name, and click “Browse” to set the export location.
Under “Video,” ensure that the “Export Video” is selected.
Set “Format” against “QuickTime” this is the full container name of .mov files!
Next, click on “Add to Render Queue,” and then you should see the video under “Render Queue” on the right-hand side of the “Deliver” page. From there, click on “Render All.” Once it’s finished, you’ll find the MOV file where you set its location.
Best Render Settings for MOV files in DaVinci Resolve
As you may know, the .mov is only the file extension name for the QuickTime container. Therefore, when exporting MOV files, you have to choose QuickTime in the format menu.
However, where things get confusing when exporting MOV files is when choosing the codec.
Because, unlike the MP4, where you can only choose between a couple, the MOV container got a bunch of codecs to choose from. They all serve their purpose depending on what you want to accomplish. Therefore, in this article, I will help you understand which to choose, depending on what you want to do.
To make it easy for you to follow along, I’ve categorized them into different groups:
Final Codecs
- H.264
- H.265
- MPEG-4 Part 2
You choose these codecs when the video is finished, and no more editing will occur.
This is because they encode highly compressed files, which are hard for your computer to decode. Not the ideal situation…
However, once you are done editing, this does not matter instead, the file size becomes the most important factor, for example, because of internet capacity.
Intermediate Codecs
- DNxHD
- DNxHR
- ProRes
- Only available to macOS users.
- GoPro CineForm
Intermediate codecs, also known as mezzanine codecs, are made for post-production to make editing more smooth.
The reason is that the final codecs are hard to decode, and the other option, raw footage straight from the camera, would fill up your whole hard drive. Those are HUGE…
Because of this, intermediate codecs are the best of them both; they are easy to decode AND have smaller file sizes (although much larger than the final codecs).
Lossless Codecs
- Uncompressed
Lastly, you have the enormous lossless codecs, which are supposed not to be compressed (i.e. the least compression possible).
These are made to contain all the details from the real world; this will give you a lot of data to work with, critical for things such as color grading.
But the drawback is that the file size is often too big for regular hard drives.
Which Codec is Right for Me?
Now that you better understand the different groups of codecs, it’s time to decide what is best suited for you.
I’ve come up with three questions to help you choose a codec:
- Is the video finished and going to be uploaded to YouTube or any other social media?
- If yes, choose a final codec (probably H.264).
- Is the video not finished, and will it be processed further?
- If yes, choose an intermediate codec.
- Does your client ask for any specific codec?
- If so, choose that one.
Uploading to Social Media
If you are going to upload to a social media platform, H.264 or H.265 is going to be your go-to codecs. Mainly because it’s what the platforms recommend that you use.
For example, if you upload an intermediate codec to YouTube, it will be converted to their preferred codec anyway. However, some people do this regardless to avoid multiple compressions. There are a bunch of discussions around that topic. I’ve written more about the best settings here.
All social media platforms have criteria, so I recommend finding and following those.
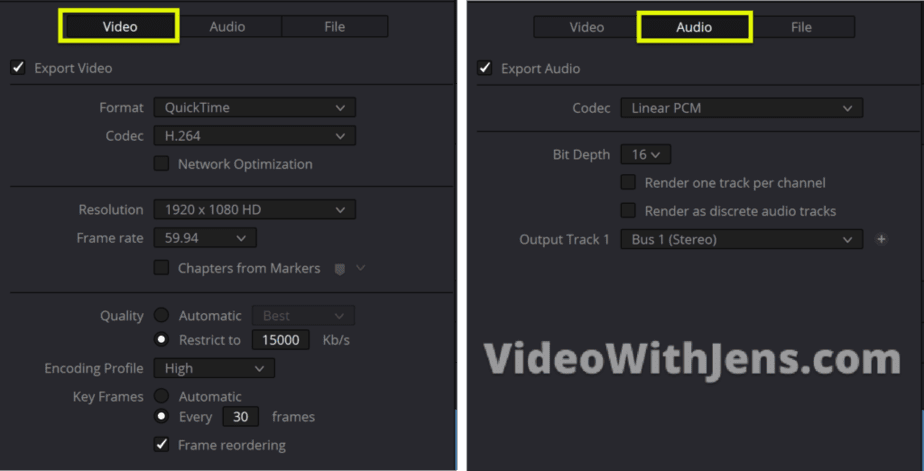
Here’s what following YouTube’s recommendations for a 1080p, 60 fps video would look like: (I recommend a higher bitrate)
(The only difference is that it’s in a MOV/QuickTime container, and the audio codec is “Linear PCM”)
Here’s an article explaining all the options inside the “Render Settings” tab.
What’s cool about using the QuickTime container is that you have more options for the audio.
Currently, MP4 files are restricted to the AAC codec in Resolve, which is not bad. But you can’t go higher than 192 Kb/s, while YouTube recommends 384 Kb/s for stereo sound.
The same is true using AAC for MOV files; however, now you have other audio codecs to choose from!
Now you got Linear PCM, a lossless audio codec, meaning you won’t be restricted to quality worse than your source audio when exporting.
How to Export ProRes from DaVinci Resolve
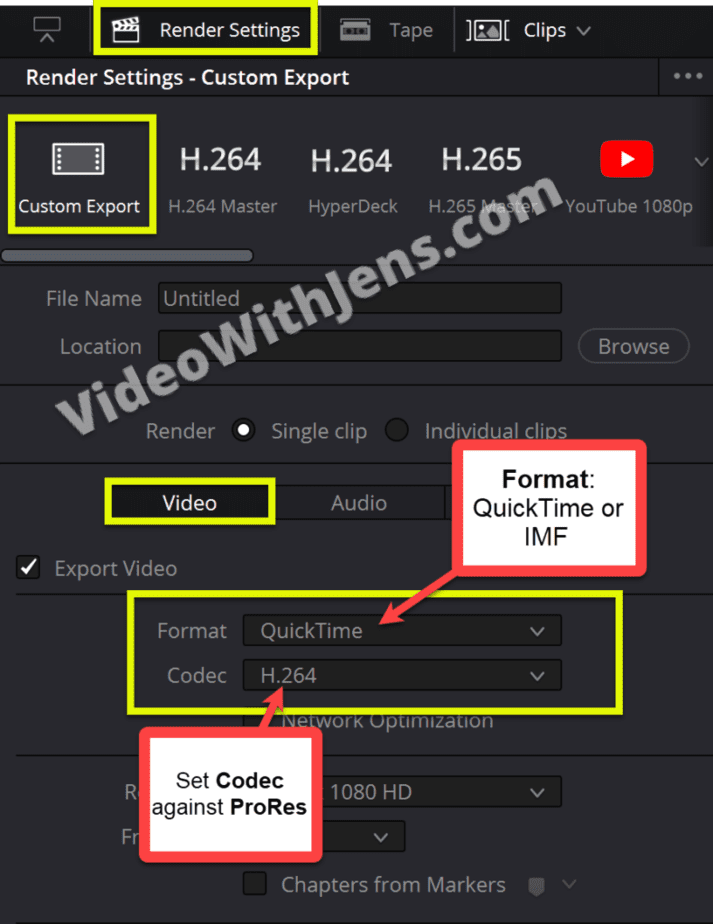
Encoding videos with ProRes in DaVinci Resolve is only available to macOS users. To export using the ProRes codec, open the “Render Settings” tab on the “Deliver” page. Then set “Format” against “QuickTime” or “IMF” and “Codec” against “ProRes.”
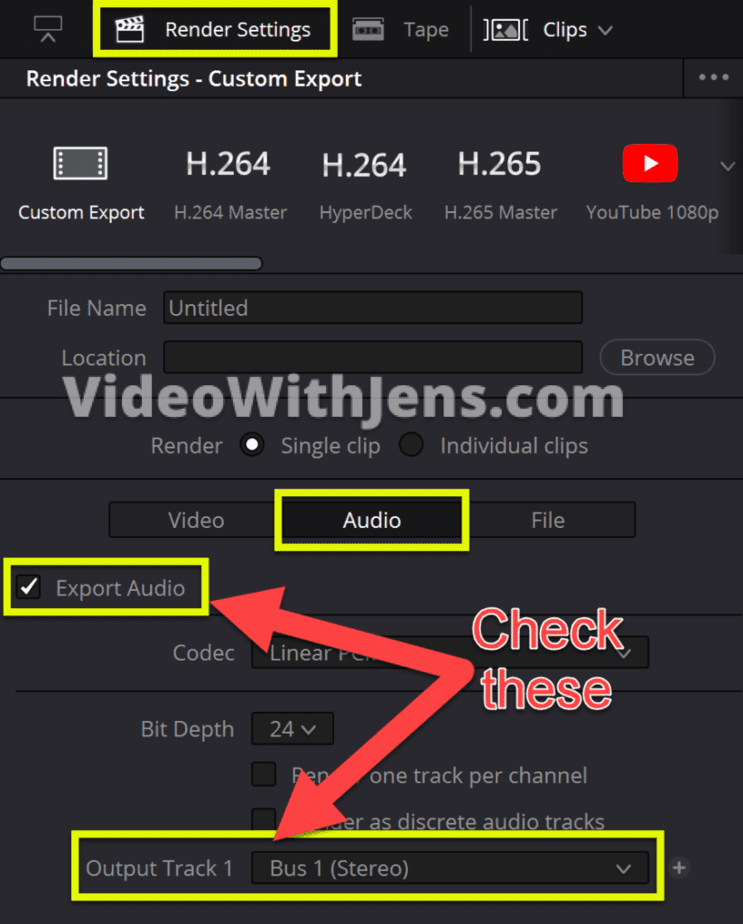
DaVinci Resolve: No Audio After Exporting MOV file
Some users have reported missing audio from their MOV file after exporting it out of Resolve.
This can happen if you have not enabled the “Export Audio” in the “Render Settings,” which you find in the “Audio” tab. Also, ensure that the “Output Track 1” is set to “Bus 1” if you don’t have any particular preferences.
Once you have enabled the option, export your project from Resolve again, and hopefully, you’ll be able to hear the audio.
Another reason might be that the media player you are using does not support the audio codec, or it could also be a bug in the Software. If that’s the case, you can try using another media player.
Did you know DaVinci Resolve also has a built-in transcoder? That’s what we are going to explore next.
How to Convert MOV to MP4 in DaVinci Resolve
There are two ways you can convert MOV to MP4 in DaVinci Resolve; either by exporting the MOV files out of Resolve in an MP4 container, or you use the built-in transcoder!
Method 1:
To convert MOV to MP4 in DaVinci Resolve, add the clips to the timeline and go to the “Deliver” page. Next, open the “Render Settings” and under “Video,” set “Format” against “QuickTime.” Then, click on “Add to Render Queue” and “Render All” in the “Render Queue” window.
Method 2:
I did not know about this method until recently; however, it’s excellent!
Now we are going to use the transcoder inside DaVinci Resolve.
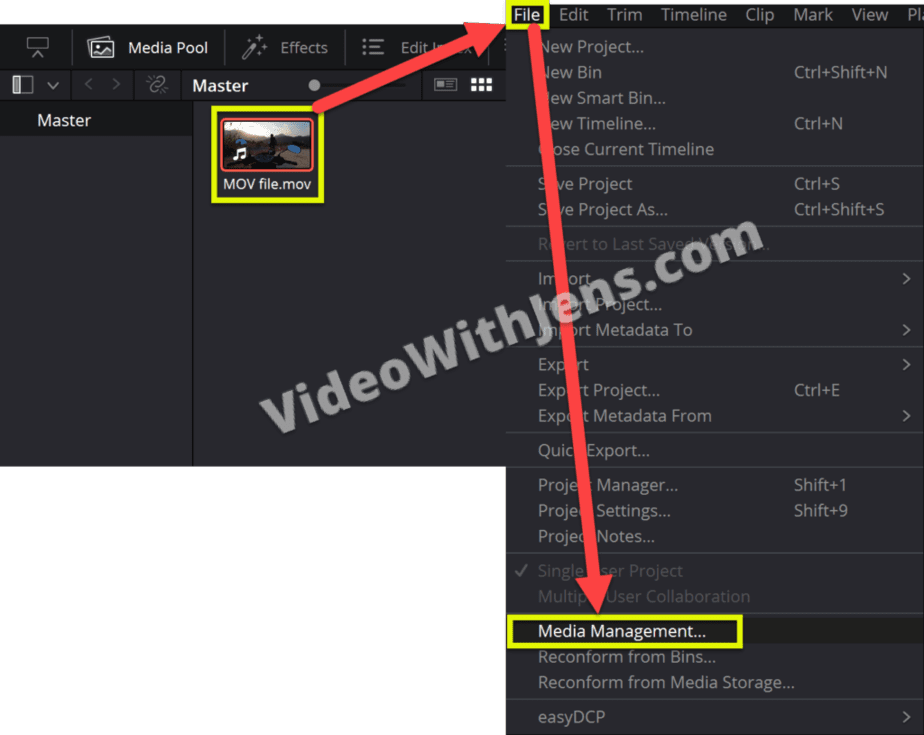
To do this, open the “Media Pool” and select the MOV files you want to convert.
Then click on “File” in the upper left-hand corner of Resolve, and select “Media Management”:
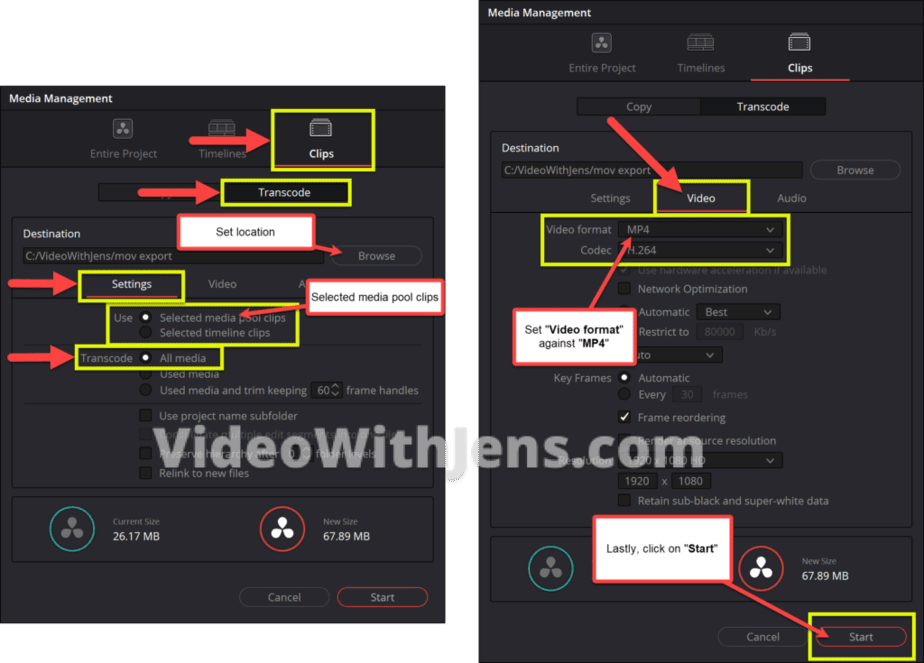
Inside the window that pops up, open the “Clips” tab, and select the “Transcode” sub-tab.
Next, click “Browse” and set the location where you want the MP4s to be saved.
Now open the “Settings” tab; here, you want to use the “Selected media pool clips”, and transcode “All Media.”
Switch from the “Settings” tab to the “Video” tab, and set “Video format” against “MP4”.
Once that is done, click on “Start”:
If you want to know the best export settings for MP4 files, check out this article.