Export MP4 in DaVinci Resolve (Best Settings, fix issues..)
In this guide, I will show you exactly how to export MP4 files in DaVinci Resolve.
And you’ll also learn the best settings (for you) to use AND fix export-related issues.
Let’s get started.
- Can DaVinci Resolve Export MP4?
- How to Export MP4 in DaVinci Resolve
- Best Render/Export Settings for MP4: DaVinci Resolve
- ISSUES:
- How to Convert MOV to MP4 in DaVinci Resolve
Can DaVinci Resolve Export MP4?
DaVinci Resolve can export videos in the MP4 container format encoded with H.264, H.265, or AV1 codec. However, AV1 encoding is currently only available for Windows users, according to the “Supported Formats and Codec” manual by Black Magic Design.
How to Export MP4 in DaVinci Resolve
- Go to the “Deliver” page.
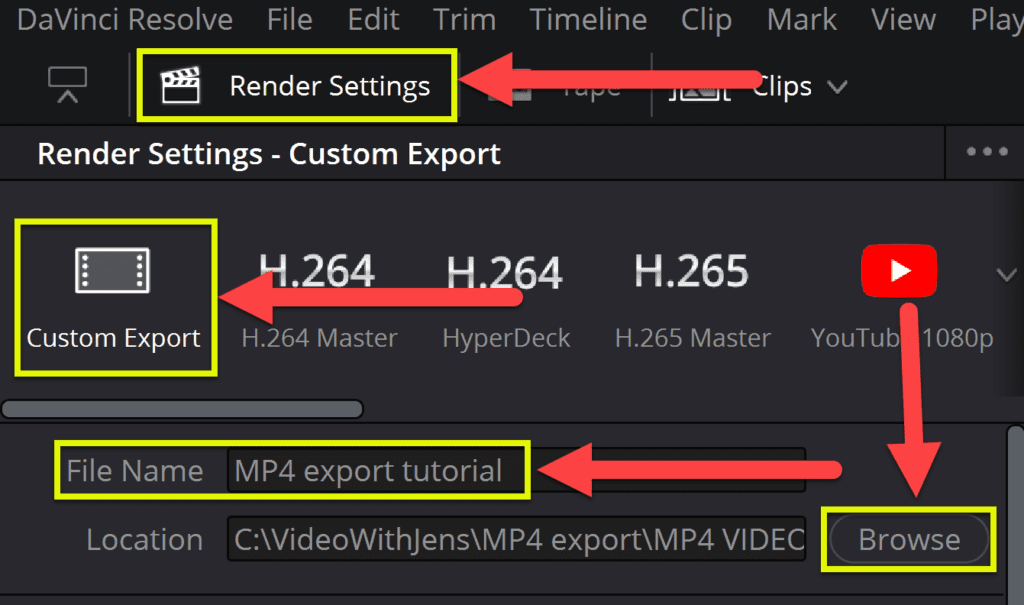
- Select “Custom Export” in the “Render Settings” tab.
- Choose a “File Name” and “Location. “
- Set “Format” against “MP4. “
- Click on the “Add to Render Queue” button.
- Then in the “Render Queue” tab, click on “Render All.”
- Once it’s finished rendering, you have exported your project in an MP4 container.
- That’s all!
To go to the “Deliver” page, click on the rocket icon at the bottom of Resolve:

Then go to the “Render Settings, “select “Custom Export, “give the file a name, and set the location:
Next, make sure that the “Single Clip” is enabled.
Under “Video,” make you want to set “Format” against “MP4 “.
When it comes to the codec, your options vary a bit.
You can choose H.265 or H.264.
However, it should also be possible to export using the AV1 codec according to Black Magic’s “Supported Format and Codecs” manual. Scroll down to the “Latest Support Notes” to find the manual on their website.
ANYWAYS just go with the H.264 if you don’t have any particular preferences. This is a good codec for finished videos and is widely supported.
You can enable “Network Optimization” if you want. This places the metadata at the beginning of the file, making it possible to decode the video while downloading it. In simple words: Whoever is downloading your video can watch it while downloading it.

That’s all you need to export to an MP4 file. However, I will not simply leave you there since there are a BUNCH of other settings you should get right as well! So continue reading to learn about those.
Anyways, if that’s all you need, just go ahead and click on “Add to Render Queue, “and then click on “Render All” in the “Render Queue” tab.
Now let’s get to the good stuff:
Best Render/Export Settings for MP4: DaVinci Resolve
We have set the “Format” to be “MP4 “and decided which codec to pair. Then, finally, we are ready to make the final adjustments on how our video will turn out!
How to Set and find MP4 Resolution in DaVinci Resolve
Usually, you set this to the resolution in which your video is shot.
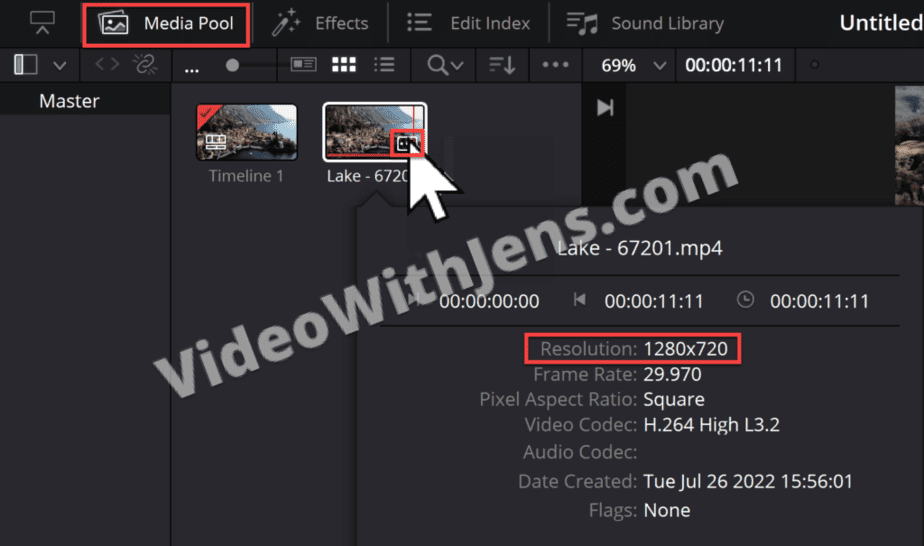
To check your video clip’s resolution, go to Resolve’s “Edit” page. Then open the “Media Pool” in the top left-hand corner. A little white square icon should appear if you now hover your cursor over the clip. Click on this one. Then in the menu that shows up, you’ll find “Resolution. “
This is the resolution we want to set the export settings to.
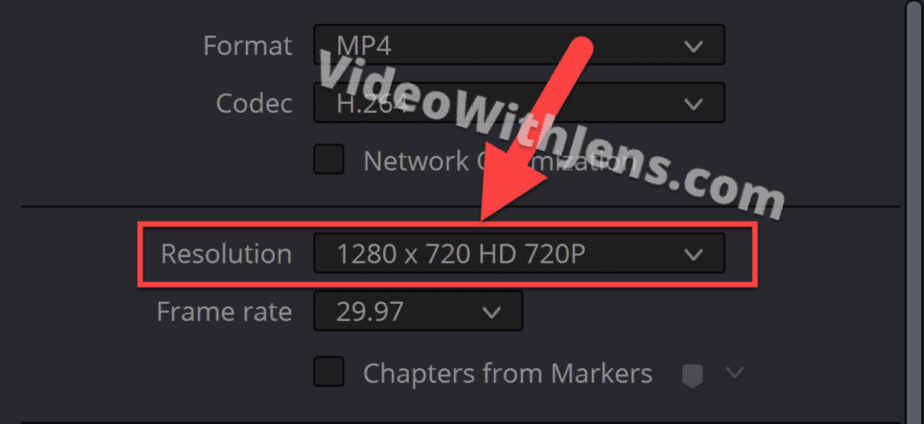
Match the “Resolution” in the “Render Settings” tab:
Frame rate
Usually, you want to match this one with the frame rate of your video. An exception is if you are creating some slow-motion effect.
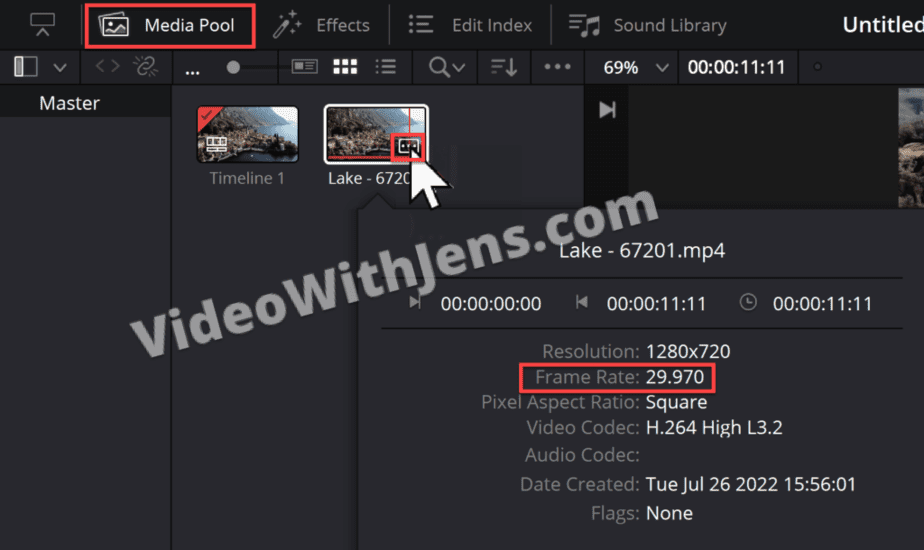
How to check the frame rate of your video in DaVinci Resolve:
- Go to the “Edit” page inside Resolve.
- Open the “Media Pool” located in the left-hand corner.
- Hover over the video and click on the square in the right-hand corner.
- You can see “Frame Rate “in the menu that pops up.
Here’s an image of what that would look like:
We want to match this to the frame rate in the render settings:

What to do if the frame rate is wrong & you can’t change it
If the frame rate in the “Render Settings” tab is wrong (that sometimes happens), we need to create a new timeline.
In the “Media Pool” right-click the one that’s called “Timeline 1” (by default) and select “Create New Timeline Using Selected Clips“:
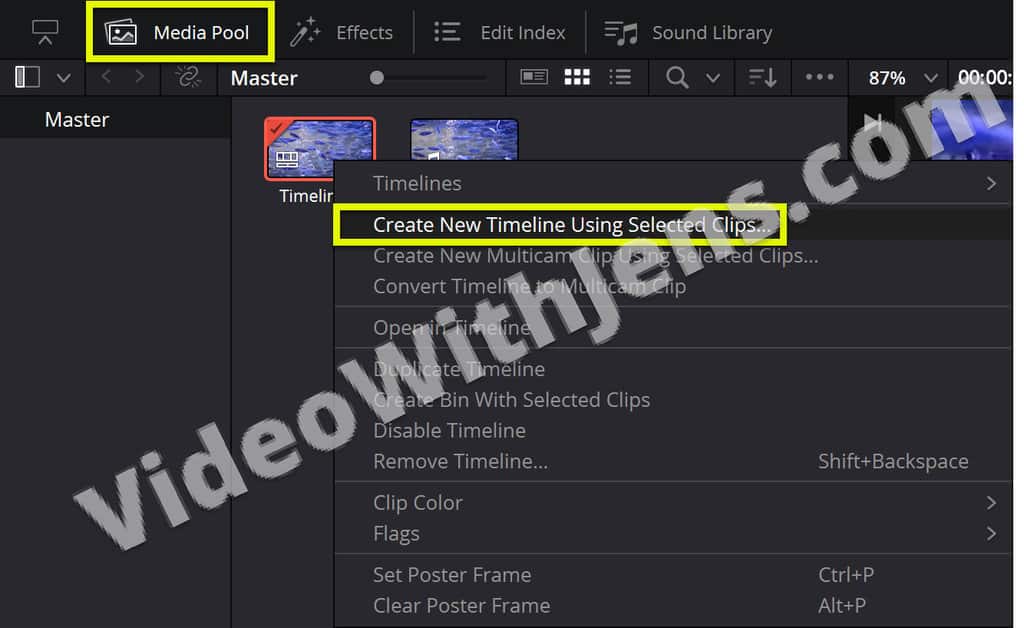
In the window that pops up, uncheck the “Use Project Settings,” and then open the “Format” tab.
Set the “Timeline Frame Rate” to the same as your source clips, and click on “Create.”
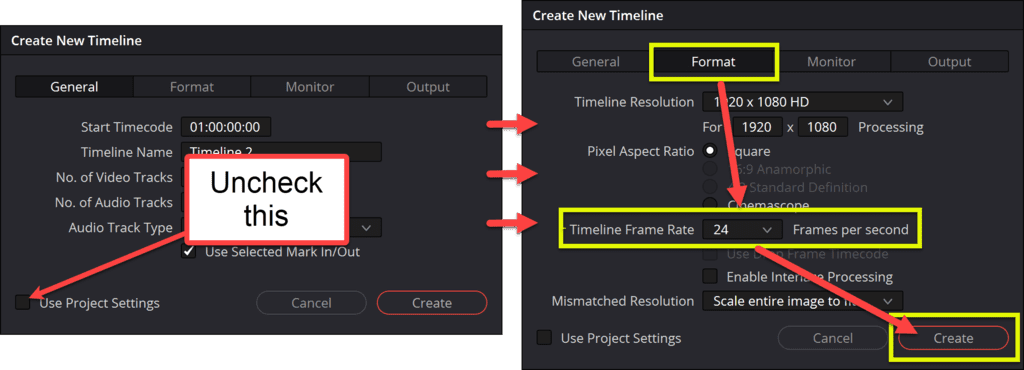
Then, make sure the new timeline is opened by clicking on “Timeline 2” in the “Media Pool.”
Once that is done, the “Frame Rate” in the “Render Settings” tab should be correct.
Quality (Bitrate)
This may be the most important render setting for most people (except resolution etc. ofc.)
The bitrate controls the quality of your video as Resolve says it.
Bitrate is the amount of data encoded in each second of your video, typically measured in Kb/s or Mb/s. Meaning more data=better quality until you have reached the amount of data necessary to represent your video… Increasing it further than that will only increase file size.
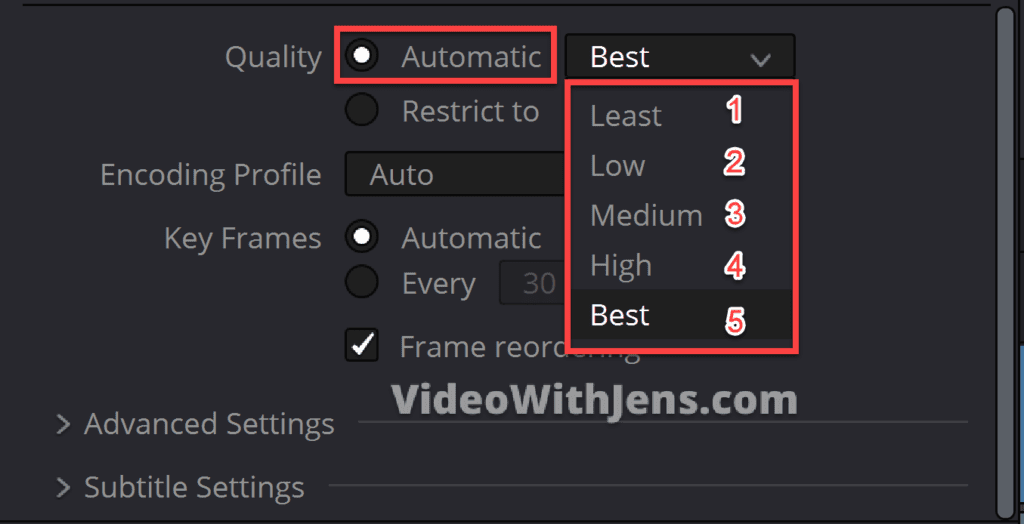
For MP4 rendering, you have six options using the free version of Resolve.
The first way is to use the “Automatic” bitrate. Here you have five alternatives:
- Least
- Gives the least amount of data.
- Low
- Little more data.
- Medium
- Hight
- Best
- Gives the highest possible bitrate possible (in Resolve!).
I did some testing and downloaded this video in 4k from Pixabay (a great place to find footage, btw.)
Then I cut the video to 5 seconds in VLC to not affect the bitrate, imported it to DaVinci Resolve, set the proper settings for the timeline, and rendered it in the different bitrates. Below is an image of the various files and their file sizes—more data=bigger file size:

The image below is a metadata comparison between the original file and the render using “Least “.
As you can see the “Least” option actually ended up doubling the bitrate of the original file!
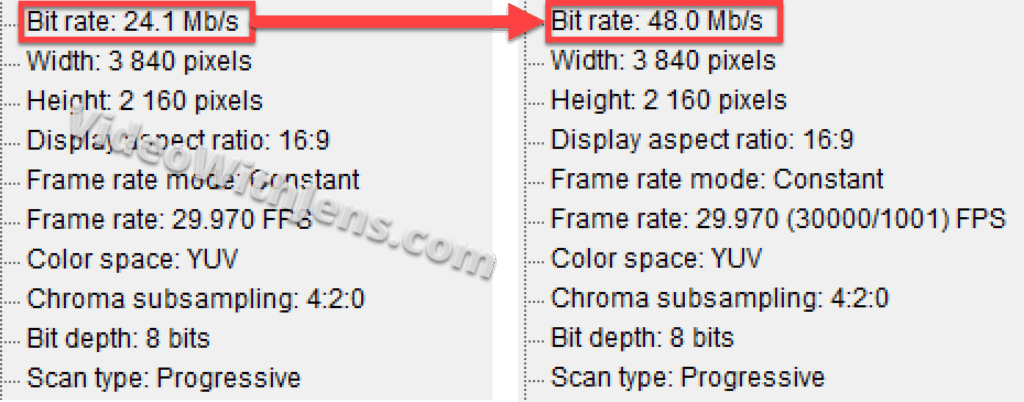
Since the average bitrate of the original file was 24.3 Mb/s, I tried using the “Restrict to” function as well. I set this against 30.000 Kb/s = 30 Mb/s.
This is the 6th way to change bitrate btw.:
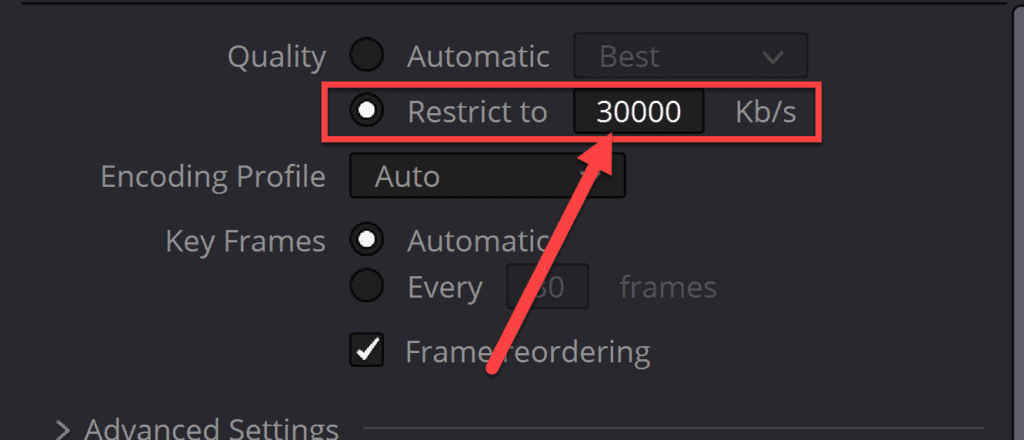
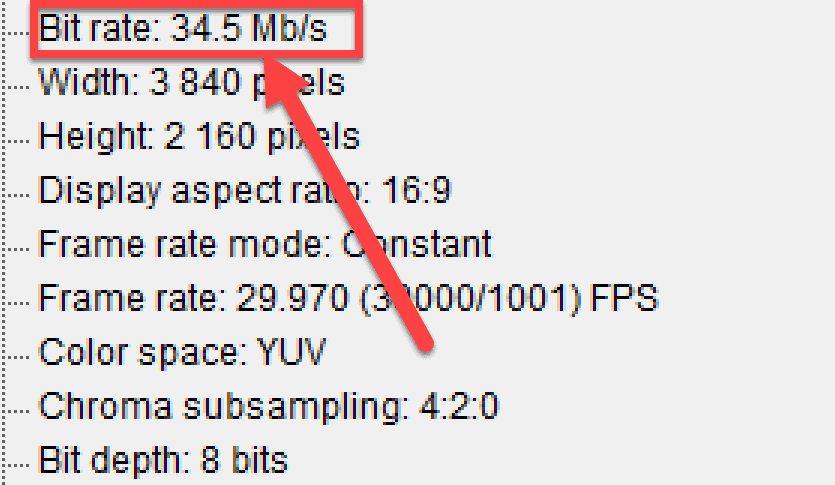
This gave me a bitrate of 34.5 Mb/s. So, this option got me the closest to the original file’s bitrate:
YouTube’s Recommended Bitrate:
If you want to upload your MP4 to YouTube, here’s a link to their recommended settings.
Check out this article for the ultimate export settings for YouTube!
Personally, I have a fast computer and internet connection. So I’ve just uploaded my videos with the “Best” option and let YouTube take care of the rest. YouTube will re-encode your video anyways.
The most important thing when uploading to YouTube is that you don’t upload a video with a lower bitrate than its source. Preferably, a bit higher, for a “compression buffer”, which you can read more about here.
By using the automatic option “Best,” you can be sure the bitrate is now too low. Often times it might be way more than you actually need.
If you are uploading a regular full HD video (1080p) without a bunch of fusion compositions and graphic design etc., you could probably roll with the “Medium” as well! Test it out yourself, and check if you can see any difference!
Enough with the bitrate; now it’s time to look at the rest of the settings:
Encoding Profile
The encoding profiles are different amounts/types of compression applied to the video.
If you choose to go with the H.264 codec, you’ll be presented with four options: (for H.265 there is only one)
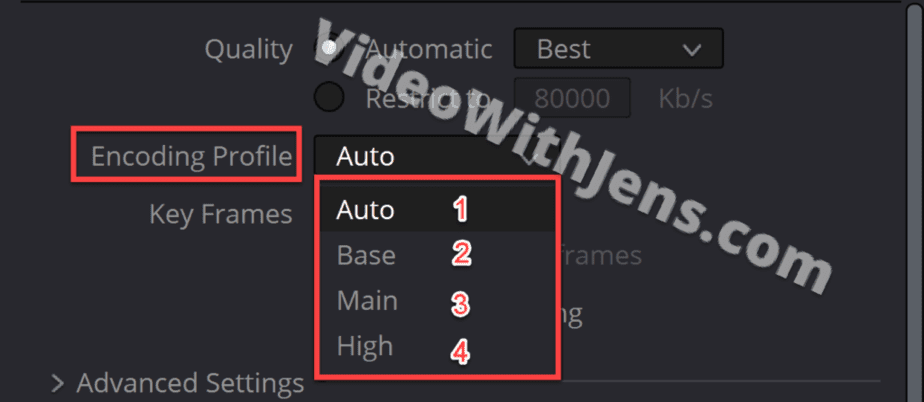
- Auto
- This is the one most recommend, and you’ll rarely get any problems choosing this one.
- Base
- Less advanced compression and easier to decode.
- It does not utilize B-frames, which saves a lot of space.
- Choose this one if you will play the video on any older mobile device.
- Main
- More advanced compression and better quality for its file size.
- Modern devices should be able to decode this profile.
- High
- Most advanced compression. Computer intensive to decode.
- Gives the best quality packed into smaller/same file size.
- Excellent for storing long-term, or if you’re only going to play it on PC, Mac, Blu-ray, etc.
There you go.
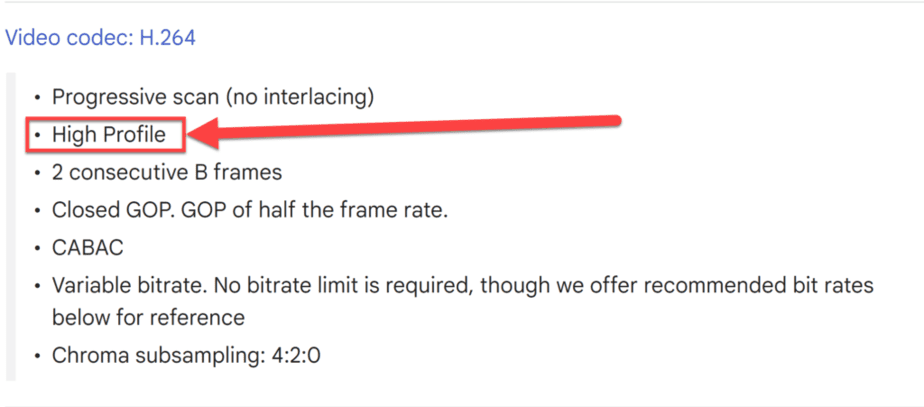
If you plan to upload your MP4 file to YouTube with an H.264 codec, you should use a high-encoding profile. This is what they recommend; you can read more about that here. Or check the image below:
Key Frames
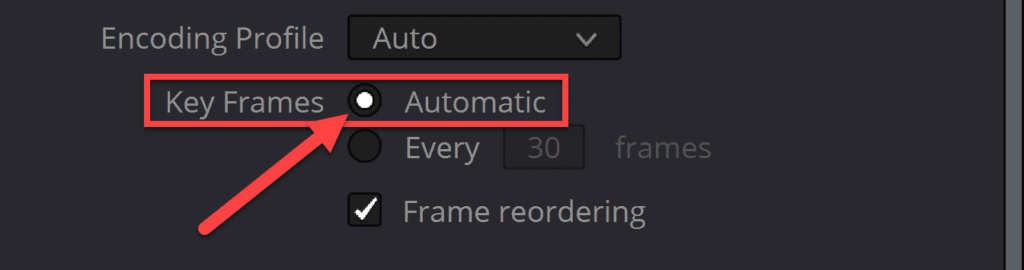
Not the same as the animation keyframes you may be familiar with from editing.
Now we are talking about the real deal—the frames. You could not get far without them. However, you could with those other animation keyframes… Joking.
(I’ve included a little explanation for the nerds below the recommendation).
Recommendation:
I think leaving this option to “Automatic” is fine, then Resolve will decide where it’s wise to add a new keyframe. Of course, if a client wishes for a specific number, you should use that one…
A short explanation of key frames:
As you probably know, a video consists of a bunch of images played after one another.
However, if you think about how large a regular PNG (image) file is and then multiply that by 24, 30, or 60 (depending on your framerate) each second, you can imagine how large these files get.
Therefore, we have something called delta frames, which are either a P- or B-frame. However, that’s for another article… What you need to know, is that delta frames are not typical images; instead, they only contain what’s changing in the video.
For example:
A video starts with a normal KEY frame (I-frame) showing a person standing in front of a wall. While the person’s face and body position may change, the wall usually does not. Therefore instead of playing a bunch of full key frames every time. The delta frames only contain the parts of the person which are changing (maybe some arm movement)…
And that’s how you save TONS of disc space!
Frame reordering

I had to dig into the manual a bit to understand this one, other than the fact that it can improve the video quality.
So to my understanding, by enabling this option, you get the B-frames as discussed in the section above about KEY frames. Again, something that helps improve video quality on a smaller-sized file.
If you go with the “Encoding Profile” against “Base, ” this option does not do anything. ” However, to be on the safe side, I suggest turning it off if you are going to play the video on an older device or mobile phone with less CPU power.
Otherwise, there should be no harm in keeping this option enabled! Instead, a huge plus.

Advanced Settings
For this tutorial, we are not going to change these. This is because they are, for most people, correct by default.
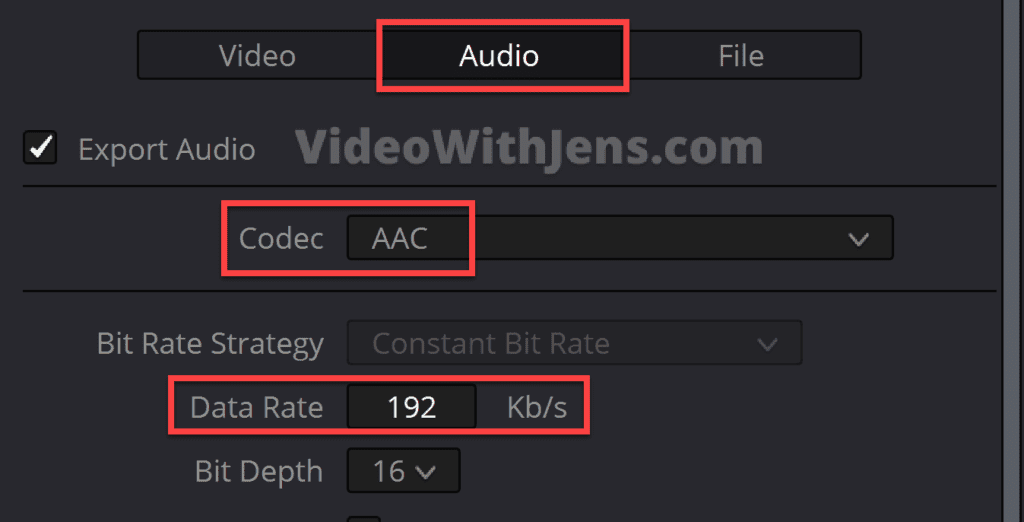
Audio Export Settings
If you are having audio problems, skip to this section.
When it comes to the export settings for MP4 audio, there really isn’t that much to choose from in Resolve.
You can only choose the “AAC” codec; however, it’s a good pick. It performs better than the MP3 format, which most people are satisfied with.
Unfortunately, there are some restrictions when it comes to the bit rate or what’s called the “Data Rate.” The maximum here is 192 Kb/s unless you use some plugin. I have not checked this enough. However, if you are an audiophile, I guess it’s something to research further!
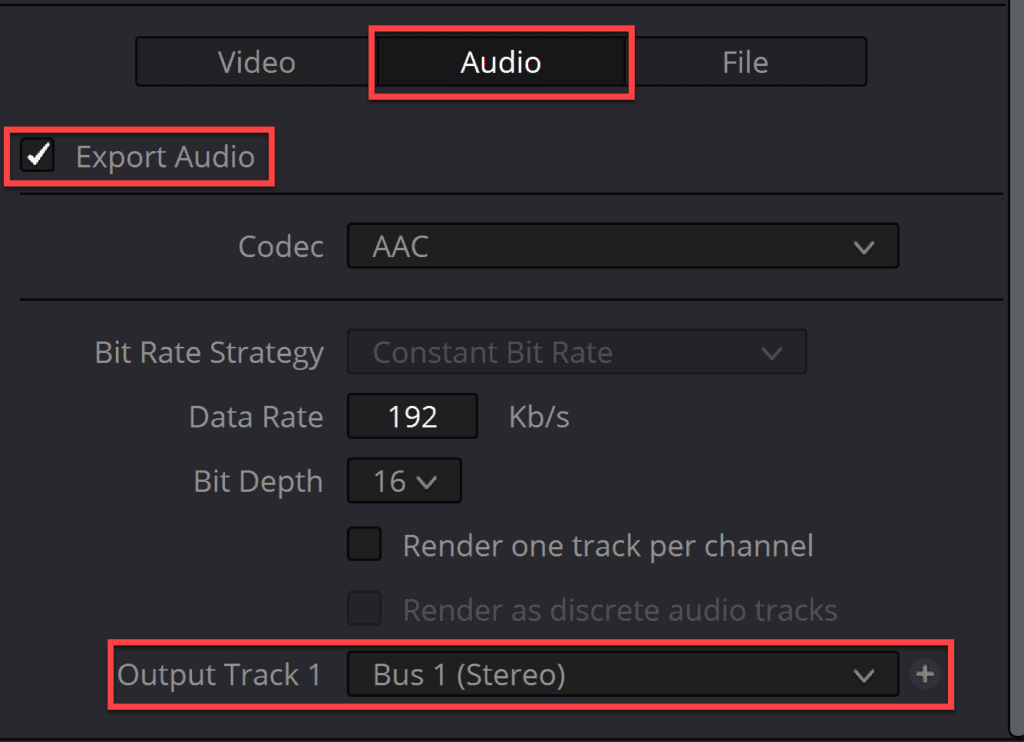
DaVinci Resolve: Exported Video is Missing Audio
If your rendered video from Resolve is missing audio, ensure that the box next to “Export Audio” is checked off in the “Render Settings” menu. To find this option, you must first click on “Audio” in the render settings. Also, make sure the “Output Track 1” is set against “Bus 1 “.
Export MP4 in Small File Size: DaVinci Resolve
The most effective way to reduce the file size of an MP4 in Resolve is by lowering the bitrate. In addition to that, using the H.265 (HEVC) codec instead of H.264 (AVC) can produce smaller file sizes of the same quality.
I did some testing with different bitrate settings, and will let the results speak for themselves:
The most interesting part is that all the exports look just the same; no loss of quality!
Why? Simply because the original file has a lower bitrate than Resolve is able to export using the “Automatic” option. Read more about that here.
Therefore, if you want smaller MP4 export, try lowering the bitrate until you can visually see the quality is dropping! Then you get the smallest file size possible, without sacrificing quality.
If you choose the H.265 codec, you will get even better quality for the same file size!
How to Convert MOV to MP4 in DaVinci Resolve
Converting a MOV file to an MP4 in DaVinci Resolve is done by rendering your project to an MP4. Simply, add the MOV file to the timeline, and head over to the “Deliver” page. Then in the “Render Settings” tab, you simply set “Format” against “MP4,” and click on “Add to Render Queue” > “Render All.”
FAQ:
How to Export MP4 in 60 FPS: DaVinci Resolve?
To export a video in 60 FPS using Resolve, you need to set the “Timeline frame rate” against 60 FPS. By doing this, you’ll be able to set the “Frame rate” in the “Render Settings” tab against 60 FPS. Then click on “Add to Render Queue“> “Render All.”
What’s the best bitrate for MP4 files in DaVinci Resolve?
To get the best bitrate for an MP4 file in DaVinci Resolve, set the “Quality” in the “Render Settings” against “Best. “