Fix MP4 Importing Issues in DaVinci Resolve (5 Solutions)
Issues related to importing MP4 files to DaVinci Resolve are pretty common.
It’s also something most people will experience at some point if doing a bit of editing.
The most common issues are:
- Unable to import MP4 to DaVinci Resolve.
- No audio from the MP4 file inside DaVinci Resolve.
- No video is displayed from MP4 in DaVinci Resolve.
- MP4 showing a “Media Offline” error inside DaVinci Resolve.
Note: the MP4 has no problems before importing it to Resolve.
Hence it’s not the file that’s broken but a conflict between the MP4 and Resolve…
So let’s figure out what’s causing the conflict!
Does DaVinci Resolve Support MP4 files?
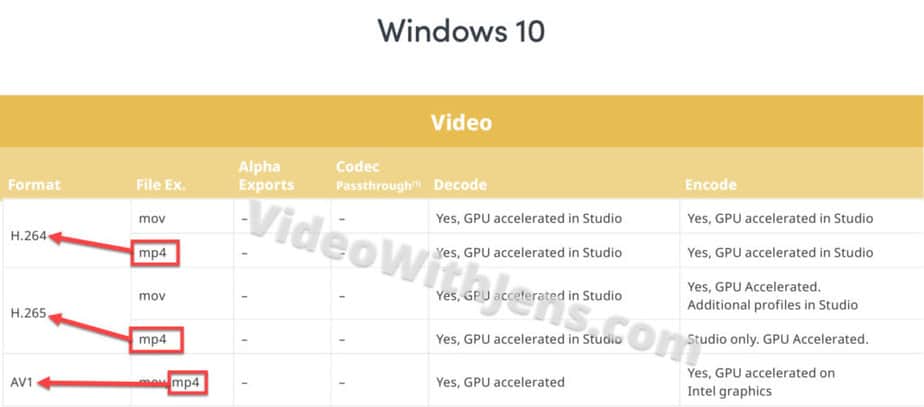
MP4 is a supported video format in DaVinci Resolve. However, it should be encoded with either H.264, H.265, or AV1 for Resolve to be able to decode it.
This is according to Black Magic Design‘s “Supported Formats and Codecs“.
I’ve included a couple of images from it showing you the supported codecs for MP4.
A quick summary:
The supported codecs for MP4 files in Resolve:
- H.264
- Also known as AVC or MPEG-4 (Part 10)
- H.265
- Also known as HEVC or MPEG-H (Part 2)
- AV1
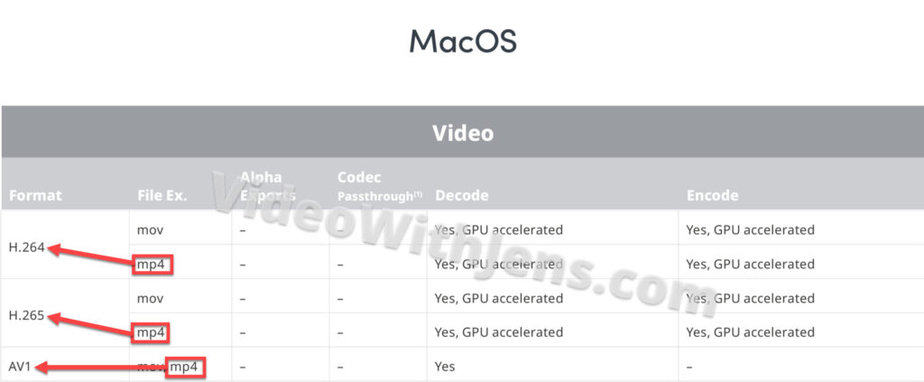
If your MP4 file is not encoded by any of those codecs, it might cause problems with importing and playback. I’ve written more about that down below.
However, before looking more into the issues, I just quickly want to cover how to import MP4 files into Resolve for those who are not familiar with that:
How to Import MP4 files to DaVinci Resolve
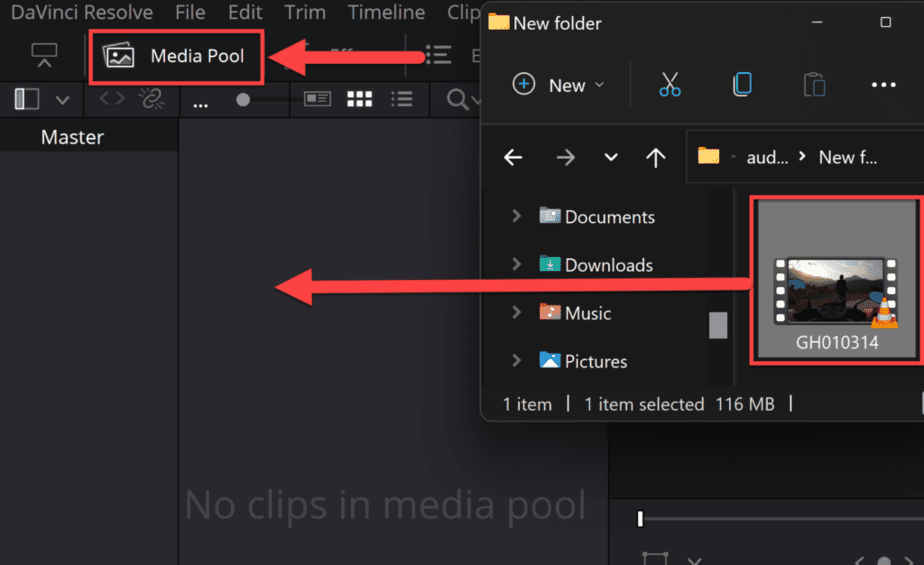
To import an MP4 file, drag it from your system folders and drop it in the “Media Pool” inside DaVinci Resolve. Alternatively, press the keyboard shortcut “CTRL + I” or “Command + I,“ select the MP4, and click on “Open.“
The “Media Pool” is located in the top left-hand corner of Resolve. You will be able to see it on the “Cut“-, “Edit“-, and “Fusion” pages.
If you prefer to use the shortcut to import, it will work on all the different pages inside Resolve!
Alright, now that everyone knows how to import files: We will look at common issues as to why you can’t import or are having general MP4 file-related issues:
MP4 Not Importing to DaVinci Resolve
If you cannot import an MP4 file to DaVinci Resolve, it’s probably due to some unsupported media data. Ensure it contains a supported codec and the frame rate is constant. Refer to the Black Magic Design’s “Supported Formats and Codecs” for more information.
The two images above show you what you need to know from the manual.
To check your MP4’s metadata, you need to use a third-party application. The one that most people will recommend is called “MediaInfo.“ It’s free to download as well!
However, if you are the type that prefers to use cloud-based software, there are many good alternatives for you as well. A very popular cloud-based option is metadata2go.com.
How to Check the MP4’s Metadata:
Whether you choose cloud-based or not, they work the same way!
Drag the file from your system folders and drop it on top of the application like this:
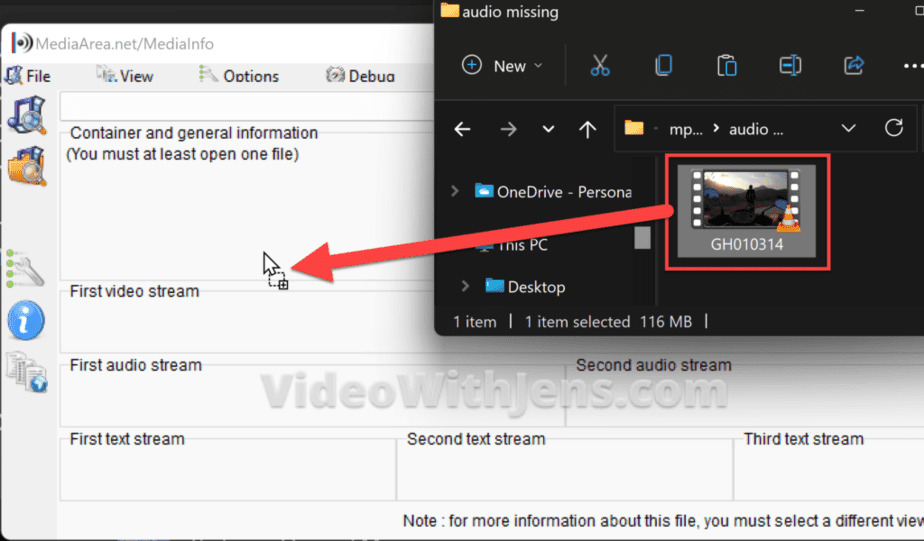
In the cloud-based version (metadata2go), you should be able to see the metadata right away.
If you are using MediaInfo, go to “View > Tree“:
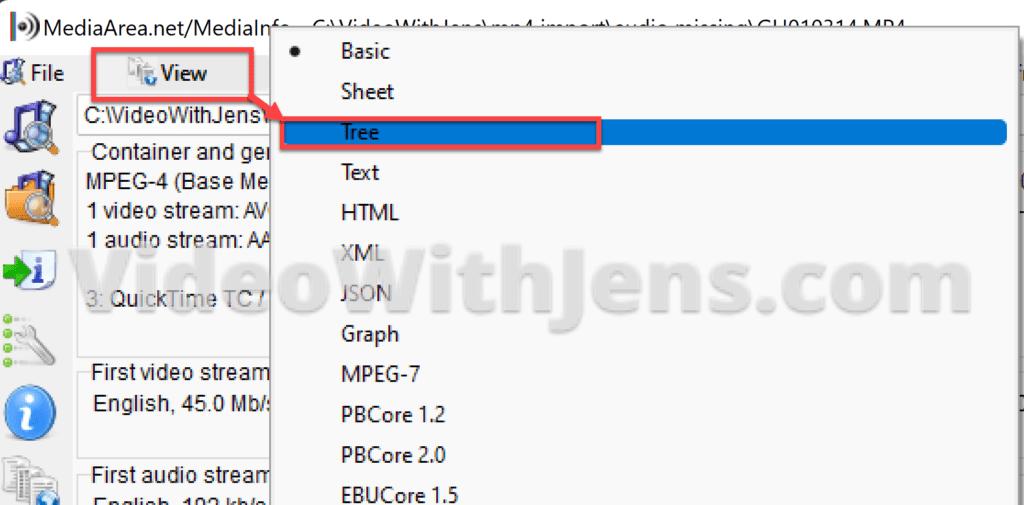
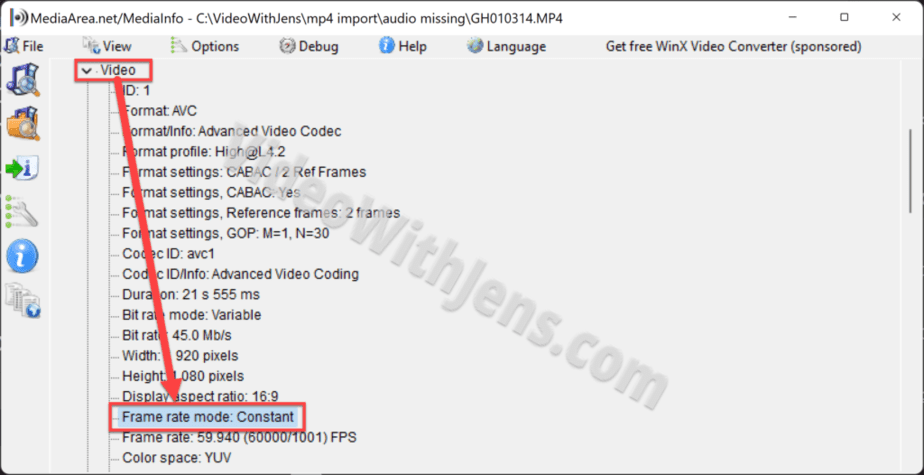
Under “Video,” you can see the codec. In the image below, you can see that my file is an AVC encoded MP4, which DaVinci Resolve offers support for:
AVC is the same codec as H.264, which is very common for MP4 files.
Further down, you can check the “Frame rate mode“; we want this one to be “Constant” as Resolve does not handle a ‘variable‘ frame rate very well.

If your MP4 did not pass the test, you can quickly fix this by transcoding the file:
How to Transcode your MP4:
Some software to use for transcoding is HandBrake and Shutter Encoder which are both free alternatives.
I’ll show you how to transcode using HandBrake:
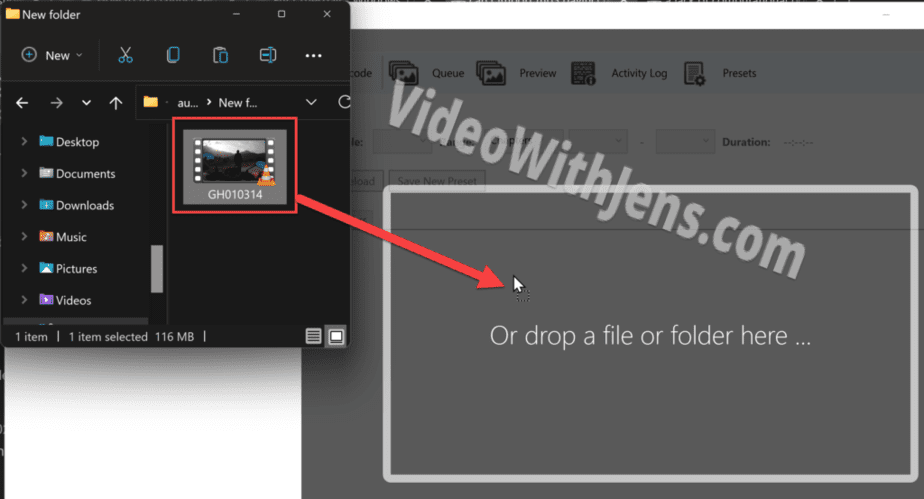
Drag the MP4 from your system folders and drop it on top of HandBrake like this:
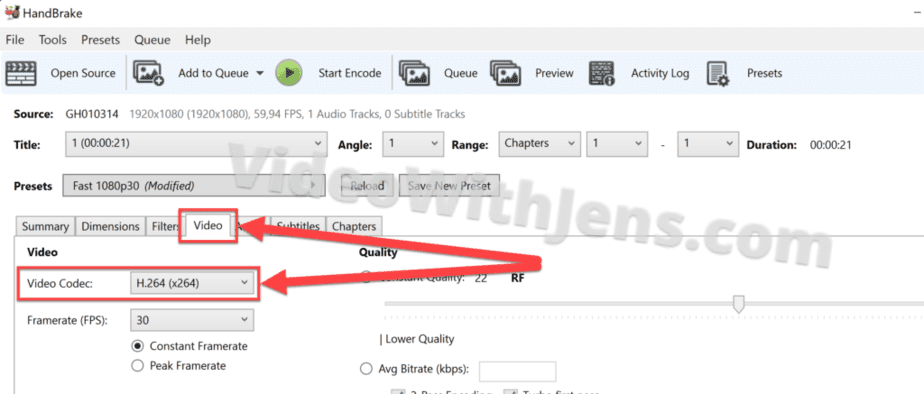
To change the codec, click on “Video” and set the “Video Codec” against “H.264 (x264)“:
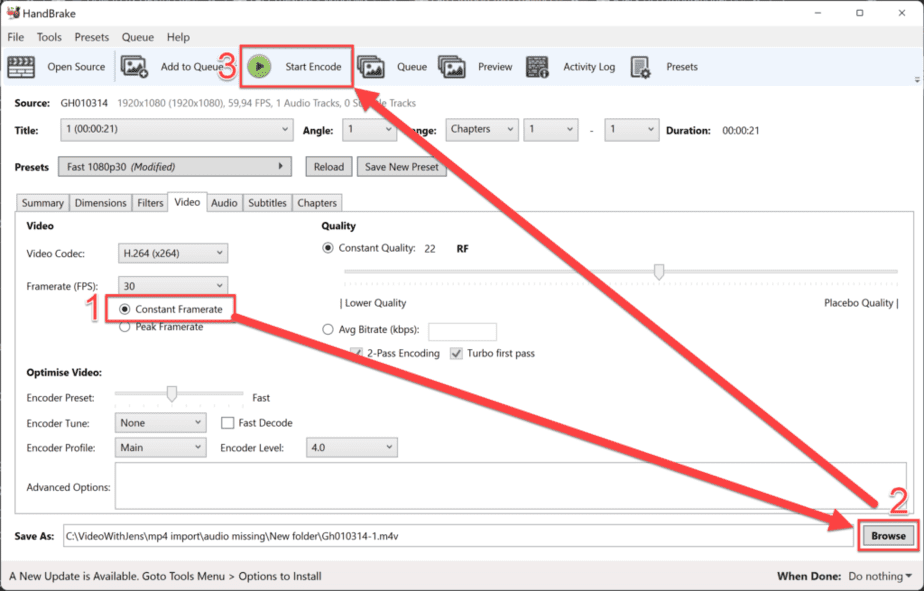
Then set the frame rate mode to “Constant Framerate” (see image below).
Click “Browse” and set the location where you want the transcoded MP4.
Next, click on “Start Encode“:
Once it’s done transcoding, it’s time to import your MP4 to DaVinci Resolve!
Another common problem is that the imported MP4 is missing audio… So here’s the solution to that:
MP4 File Missing Audio in DaVinci Resolve
If your MP4 file has no audio inside DaVinci Resolve, it probably contains some unsupported media data. Ensure that the audio format inside the MP4 is supported by Resolve and that the frame rate mode is constant. If not, transcoding the MP4 might be necessary.
If you’re unsure how to check what audio format or frame rate mode your MP4 contains, don’t worry!
That’s what I will show you know:
Check that the file’s media data is supported by Resolve:
To check your MP4’s metadata, you need to use a third-party application. The one that most people will recommend is called “MediaInfo.“ It’s free to download as well!
However, if you are the type that prefers to use cloud-based software, there are many good alternatives for you as well. A very popular cloud-based option is metadata2go.com.
Whether you choose cloud-based or not, they work the same way!
Drag the file from your system folders and drop it on top of the application like this:
In the cloud-based version (metadata2go), you should be able to see the metadata right away.
If you are using MediaInfo, go to “View > Tree“:
Next, you want to scroll down to the section called “Audio.“
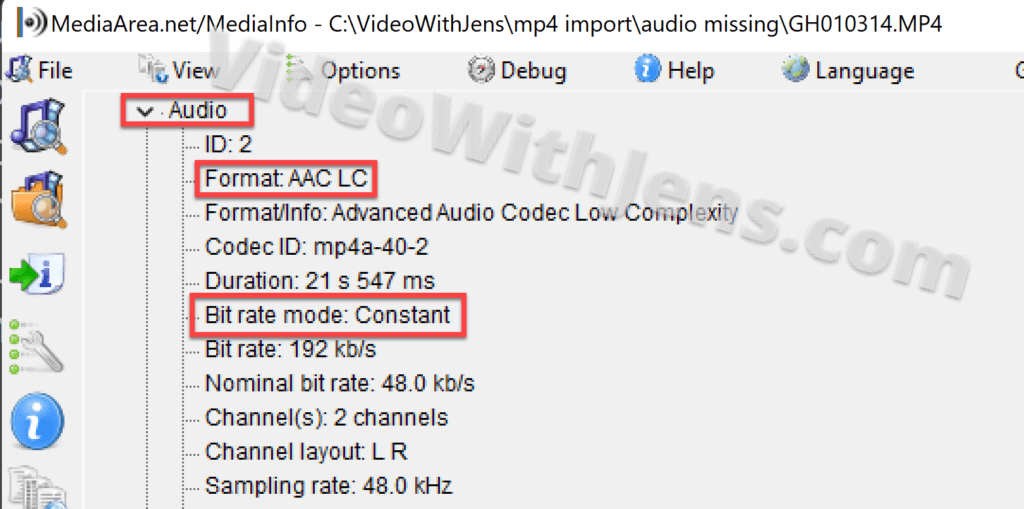
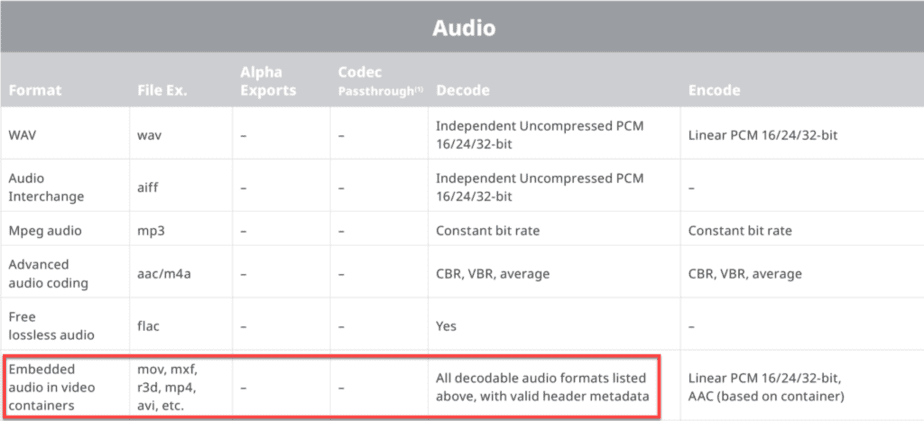
You first want to check the “Format,” which will show you the MP4’s audio format.
It’s important that the audio format is supported by DaVinci Resolve. I’ll get to that below the image.
In the “Supported Formats and Codecs” manual by Black Magic Design, we get to know which are supported by Resolve (check the image below for these).
If your audio format is:
- wav
- Do not go higher than 32-bit.
- aiff
- mp3
- Make sure that the “Bit rate mode” is “Constant“!
- aac/m4a
- flac
- MP4 does not support FLAC.
…one of those, your problem does not lay here. However, if your audio format is none of the above, transcoding might fix your issue (I’ll show you how to transcode below)
Also, notice that the MP3’s bit rate must be constant, not variable. Check the image above, where I show you how to check the bit rate mode.
And for the WAV format, make sure that it’s not 64-bit or any other unsupported versions (refer to the image below):
Another thing that might cause audio problems is if the framerate is variable. You can check that in “MediaInfo” under the “Video” section. As you can see, mine is “Constant,“ which works very well with Resolve:
If your MP4’s “Frame rate mode” is “Variable,“ I will show you how to fix that here.
Next up, I will show you how to transcode your MP4 if it’s in the wrong audio format:
How to transcode audio format:
There is a lot of software you can use for this.
However, if you don’t like downloading stuff from the internet, a cloud-based converter might be your answer. One I’ve used a couple of times is this free converter. However, it does not offer you all the audio formats you might need… (really easy to use tho).
However, for most people, this converter will do the trick!
Here’s how to use it:
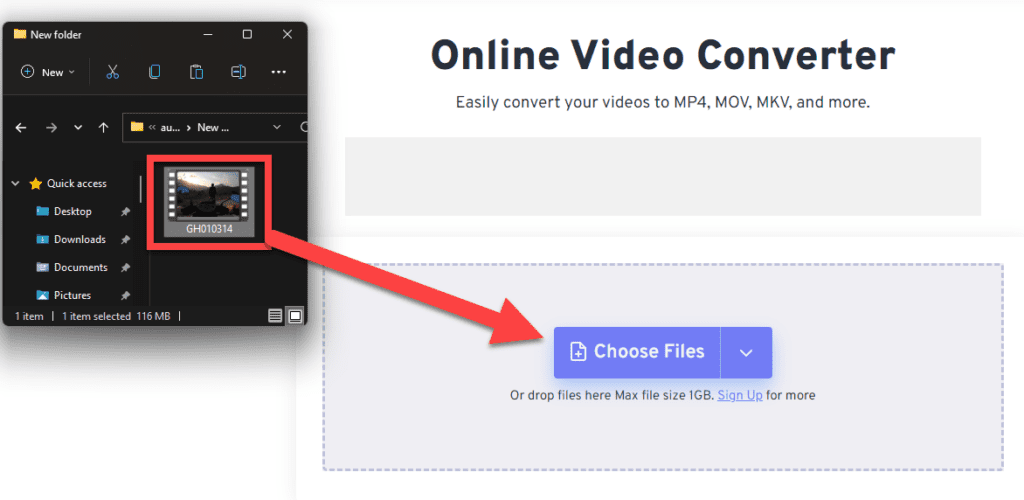
Drag the MP4 file from your system folders and drop it on top of the converter:
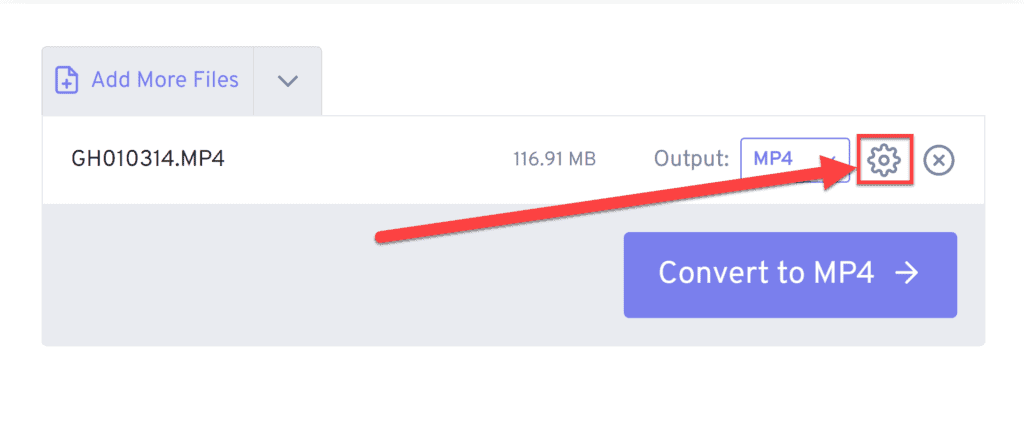
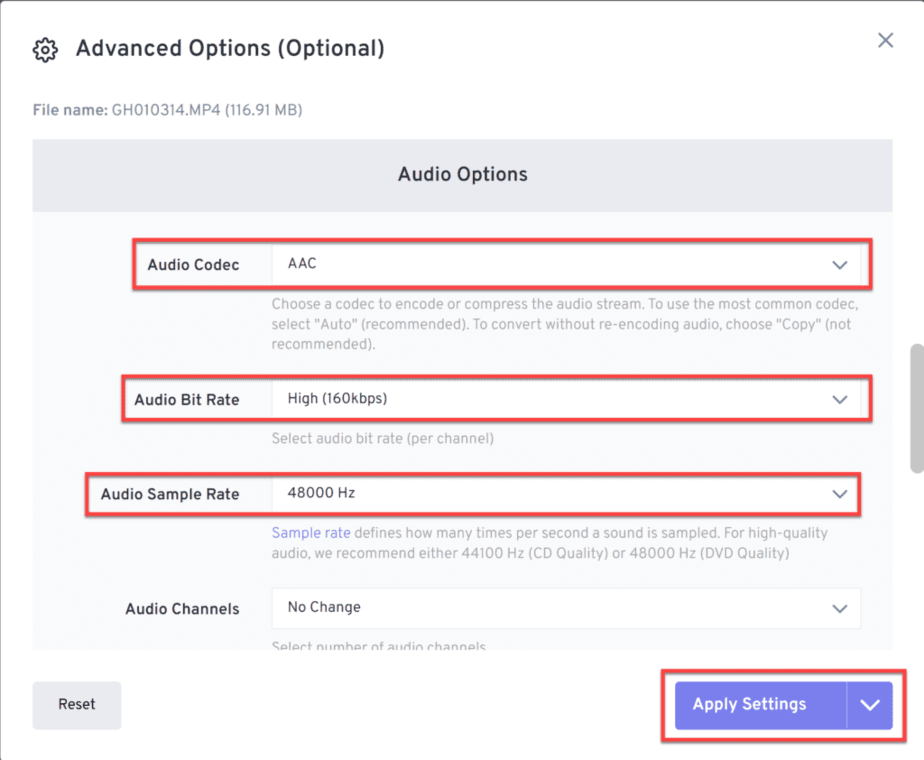
Next, open settings by clicking on the gear icon:
Inside the settings/option tab, scroll down to the “Audio Options.“
Here you want to change the “Audio Codec” to one of the formats DaVinci Resolve supports (refer to this list).
In this example, I will use the AAC codec, which works really well with MP4s.
Set the “Audio Bit Rate” to “High.“
And “Audio Sample Rate” to 48000 Hz (DVD Quality).
Then click on “Apply Settings“:
Next, click on “Convert to MP4“, and once it’s finished, click on “Download MP4“:
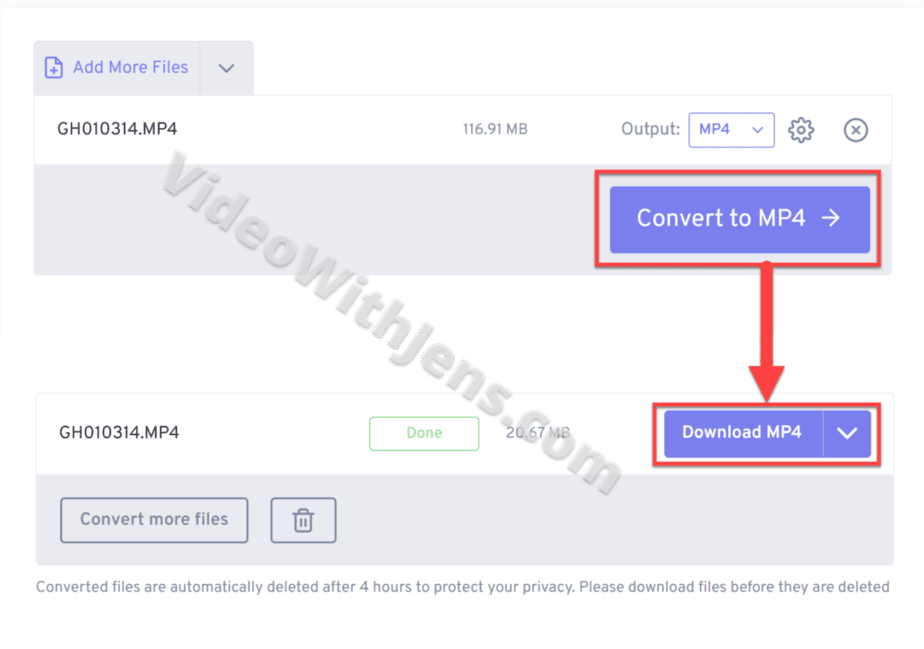
That’s it! Now it’s time to test the MP4 in DaVinci Resolve!
Another common problem is that there is no video displayed inside Resolve. Here’s a solution to that:
MP4 File Not Displaying Video in DaVinci Resolve
If the MP4 file is not displaying any video inside Resolve, it’s probably due to an unsupported codec. To fix this, simply re-encode the MP4 file with an H.264, H.265, or AV1 codec.
I’ve written a full guide on how to do this at the beginning of this article; click here to go to that part.
MP4 “Media Offline” Error in DaVinci Resolve
If MP4 files show the “Media Offline” error in Resolve, it may be because of an unsupported codec or due to a lack of computational power. Only macOS or DaVinci Resolve Studio users grant access to GPU acceleration which lifts some weight off your CPU.
Gladly, both of the above causes are easily fixed.
If your issue is codec related or you are unsure of it, I’ve written a full guide on how to check and fix that here.
HOWEVER, if the problem is due to a lack of CPU power…
There is a quick fix for you as well!
These methods will make the MP4 easier for your computer to decode. I’ve arranged them from the easiest to the most advanced:
Here’s an article I wrote on how to do this as well, for a bit more details.
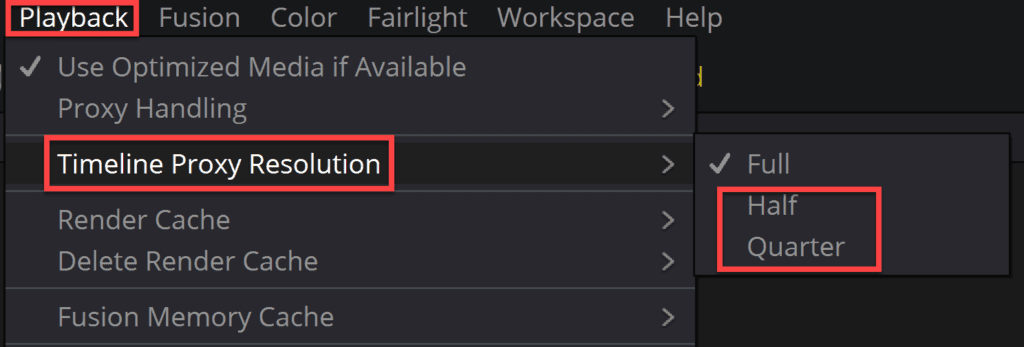
Method 1:
The first thing you can try is the proxy mode.
This will lower the resolution of the video in viewers without affecting how it will look when you export the MP4 out of Resolve.
Simply click on “Playback” in the menu bar at the top of Resolve, then hover over “Timeline Proxy Resolution” and choose either “Half” or “Quarter.“ The latter is the lowest resolution.
Method 2:
If method 1 didn’t do it for you, proceed to this method.
With this method, you will simply create a cache of the MP4s (files) in your timeline, meaning you won’t have to decode the files every time you play them = less CPU power is used.
Click on “Playback,“ hover your mouse over “Render Cache,“ and select “Smart“:
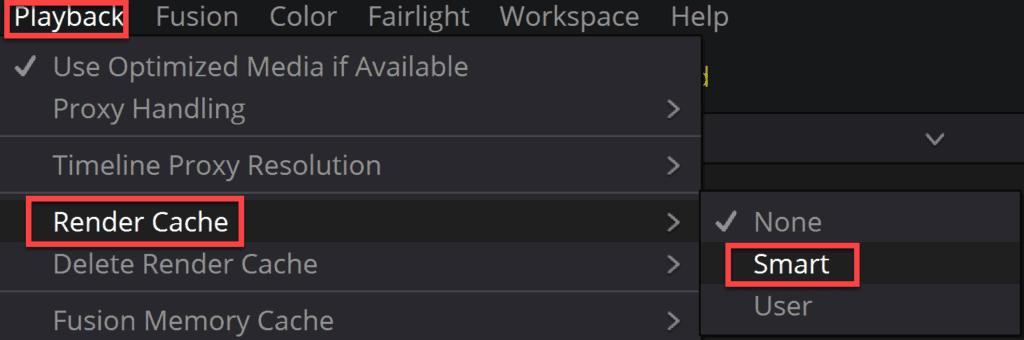
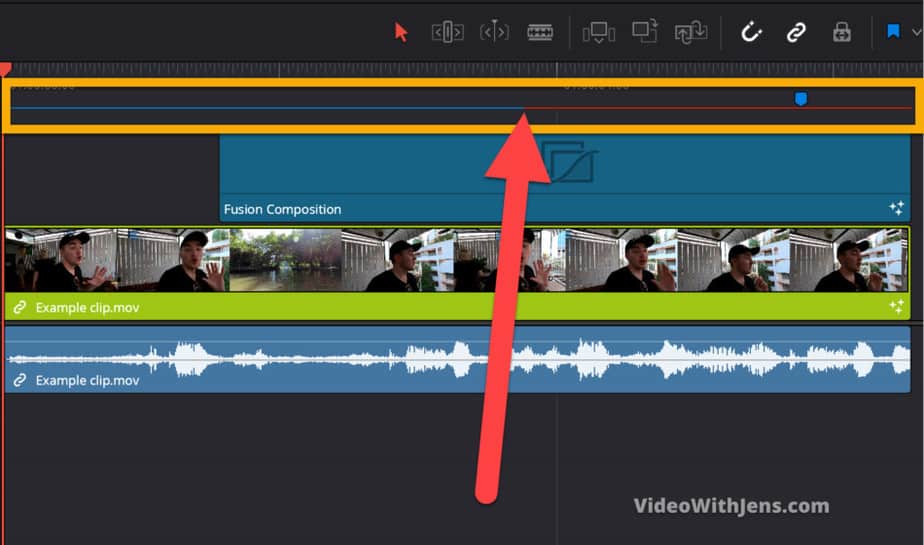
Yeah… So it makes a cache of the files which are added to the timeline. So make sure that the MP4 showing the error is added to the timeline.
First, you will see a red line above the timeline, and once it’s created a cache of them, it will turn blue:
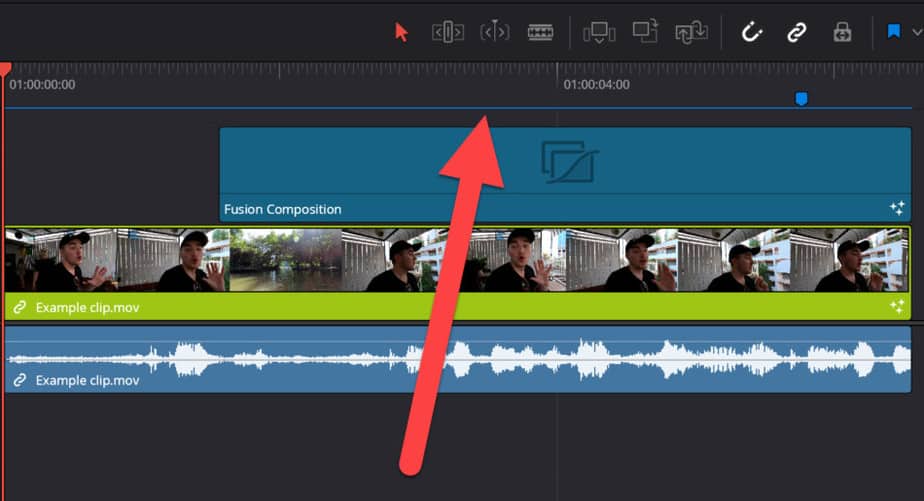
In the image below, you can see only a blue line, meaning the whole timeline is rendered:
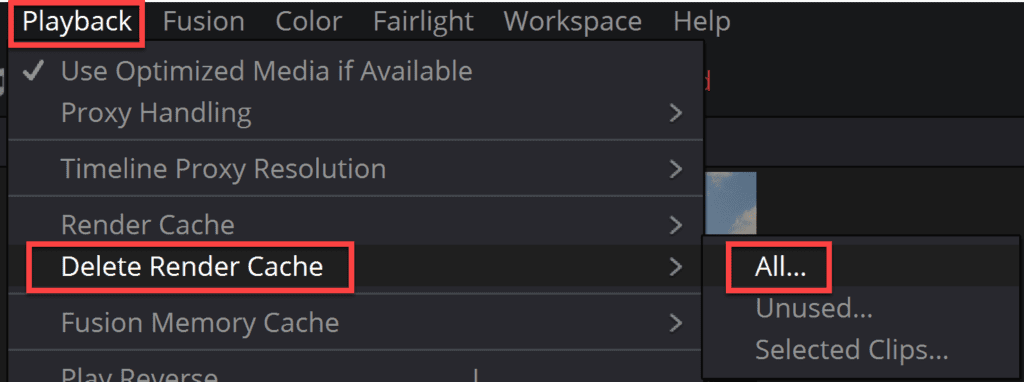
If this didn’t work, or once you are done editing, I recommend that you click on “Playback > Delete Render Cache > All…”. If not, after doing this a couple of times, chances are that there is not much disc space left on your computer…
Method 3:
If method 2 didn’t solve the problem, try this method.
This one is the most powerful of them!
By using this method, you’ll basically transcode the MP4 files into a file format that’s way easier for your computer to handle! Also, it may solve some MP4-related issues as well.
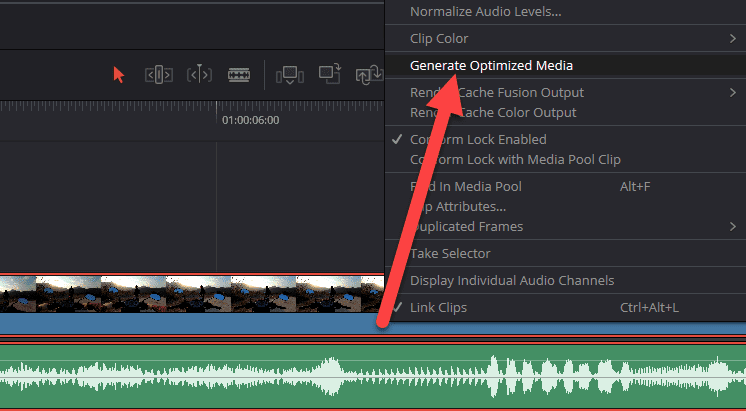
To do this, simply select the clips you are having problems with within the timeline.
Next, right-click one of them and click on “Generate Optimized Media“:
Then you’ll just have to wait. It may take some time…
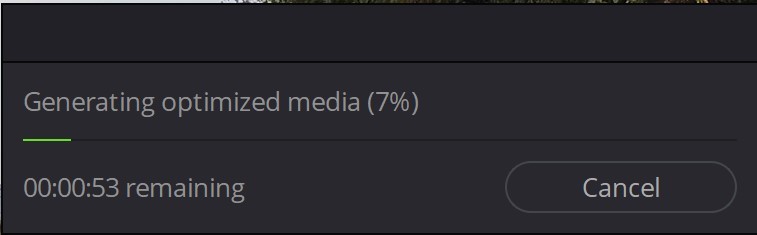
Once it’s complete, make sure that the “Playback > Use Optimized Media if Available” is enabled:

I hope one of these methods helped you with your problem!
Once again, when finished using the optimized media, I recommend that you go ahead and delete them to save space.
There is no button for this inside Resolve, but it’s quite easy:
How to Delete Optimized Media in DaVinci Resolve:
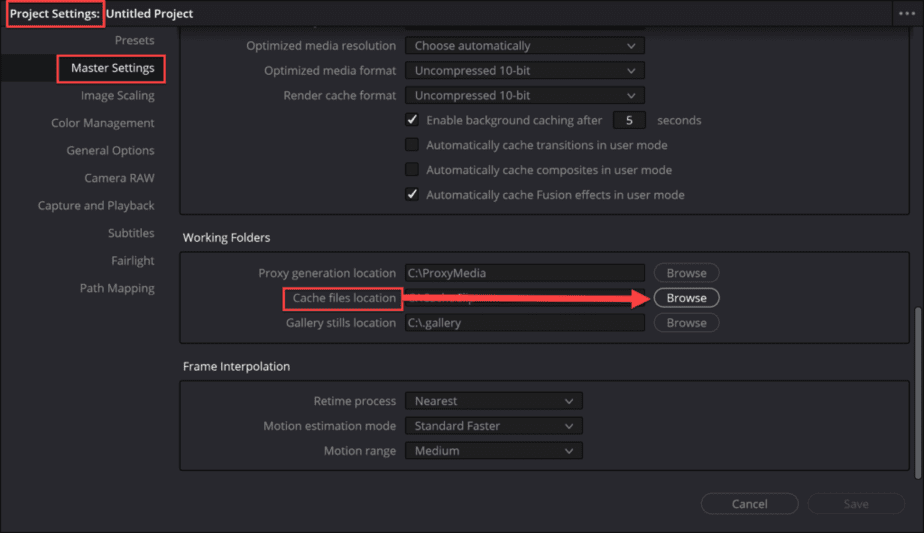
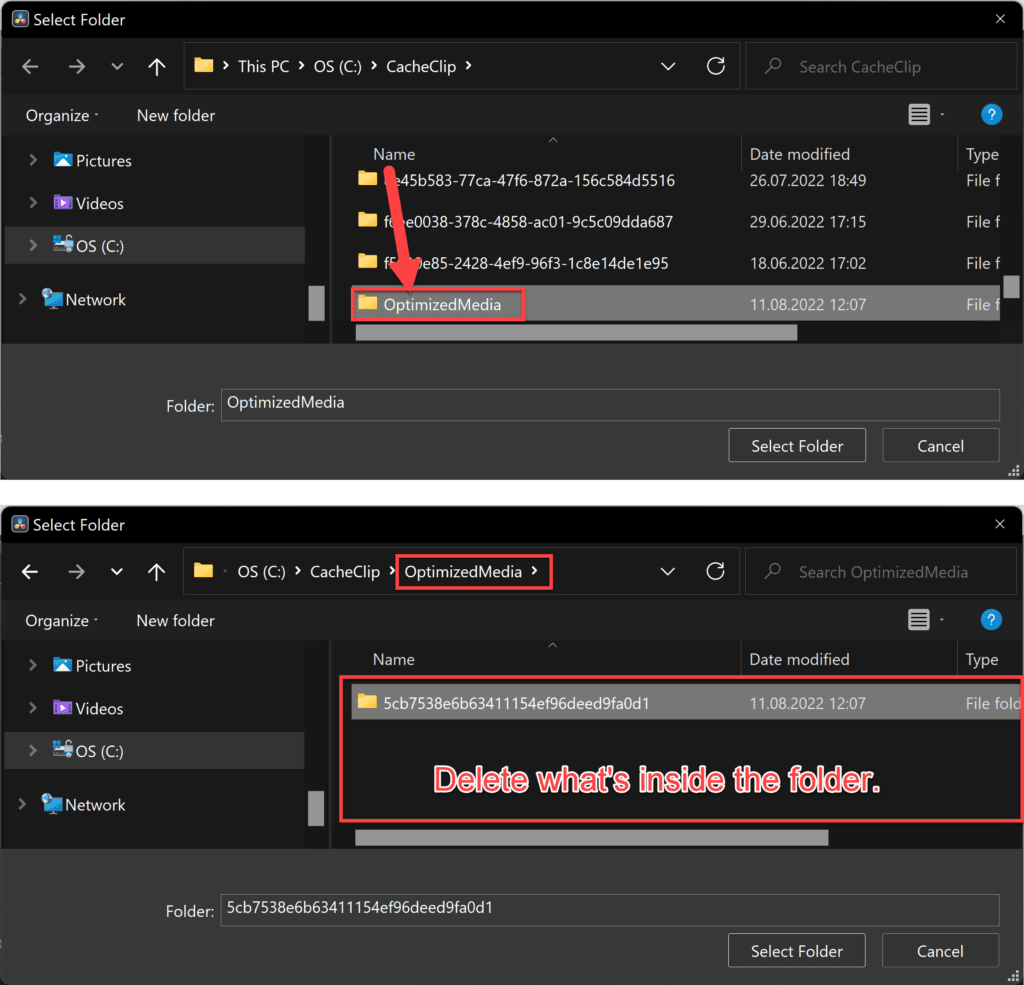
To delete optimized media from DaVinci Resolve, simply press the shortcut “Shift + 9” to open “Project Settings.“ Then go to Master Settings > Working Folders and click on “Browse” next to “Cache files location.” Locate and delete what’s inside the folder “Optimized Media“.
Watch the images below for a visualized explanation:
Here’s another article on what to do if you can’t import files to DaVinci Resolve.
If you want to know the best export settings for MP4 files, check out this article!
FAQ:
How do I get an MP4 into DaVinci Resolve?
To import an MP4 file into DaVinci Resolve, press the keyboard shortcut: “Ctrl + I” and select the files you want to import.