How to Export Frame as Image: DaVinci Resolve (Quick Guide)
Are you wondering how to export a frame as an image in DaVinci Resolve? This article will let you know how you can do that. So keep reading to learn more.
For those in a hurry, here’s a quick summary of how to do it:
To export a frame as an image from DaVinci Resolve, open the “Color” window. Next, right-click on the viewer and select “Grab Still.” Open the “Gallery,” right-click on the still, and click on “Export.” Choose the save location, name your file, select an image format to save as, and click “Save.”
Next, let’s go a bit more in-depth on how to do it and also how to get the highest possible quality on your image:
If you want to skip ahead:
Set the Timeline Resolution
Before exporting the frame as an image, you should first restore the timeline resolution to the original video resolution if you reduced it when setting up your editing workflow. If not, you can go to the next step in the tutorial here.
Here’s how to do that:
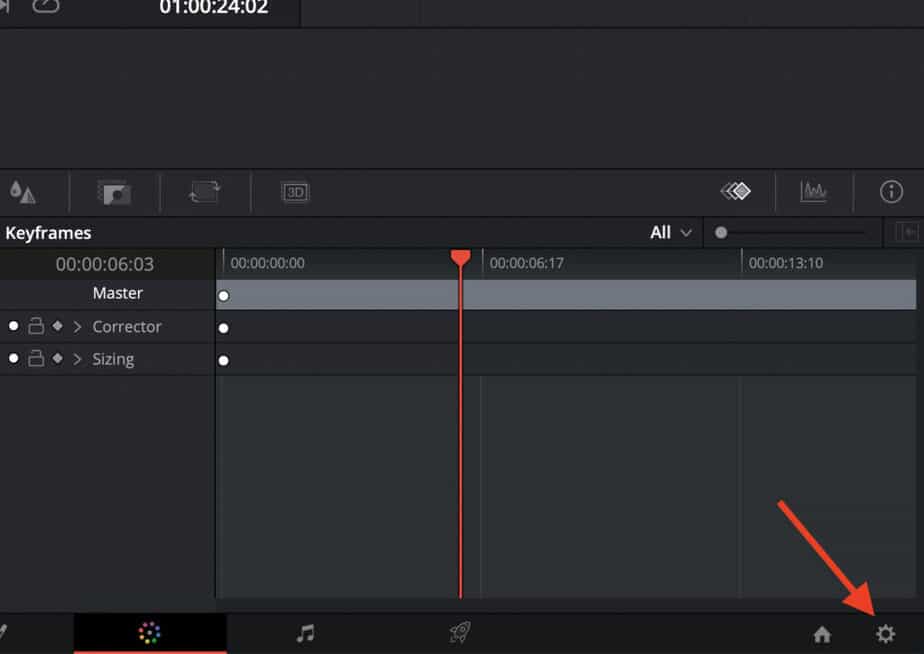
- If your project is already open in DaVinci Resolve, click on the settings menu (cog wheel in the lower right-hand corner):
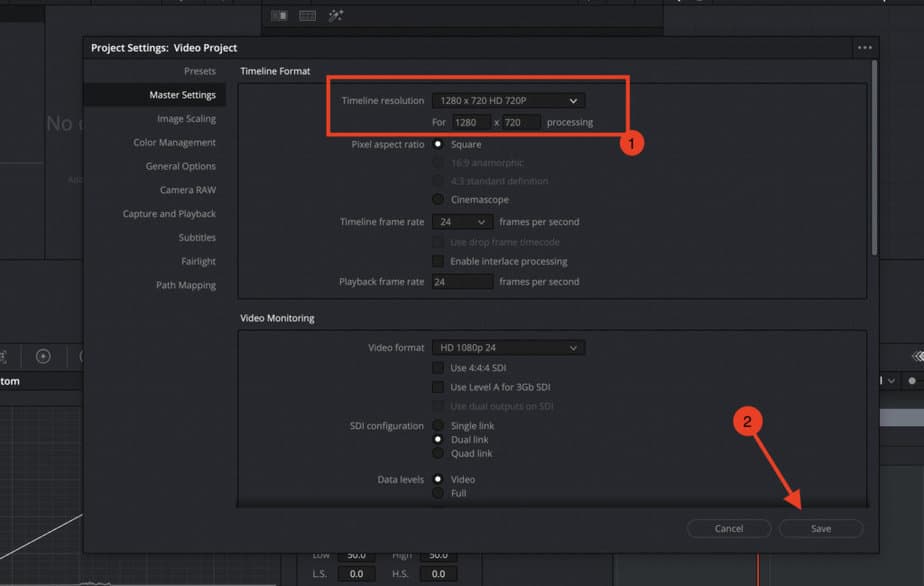
- Click Master Settings, and under Timeline format, open the Timeline resolution drop-down and select a lower resolution, and click “Save“:
It is common for people who use slightly underpowered computers to reduce their timeline resolution from 4K to 1080P or 720P for smoother editing.
When exporting the image, and the timeline settings are left at a lower resolution, the image will lose its 4K quality and be exported in 1080P or 720P quality.
Therefore, if you come to a frame when editing your video and want to save it as an image, you should revert your timeline settings to the native resolution that you captured your video at, such as 4K if the video was shot in 4K.
With that out of the way, let’s export our image!
Method 1: Export Images Using the “Fusion” Tab
If you are into motion graphics and visual effects, Fusion is your baby. And not surprisingly, you can also save images in full quality using the Fusion page!
Here’s how to do that:
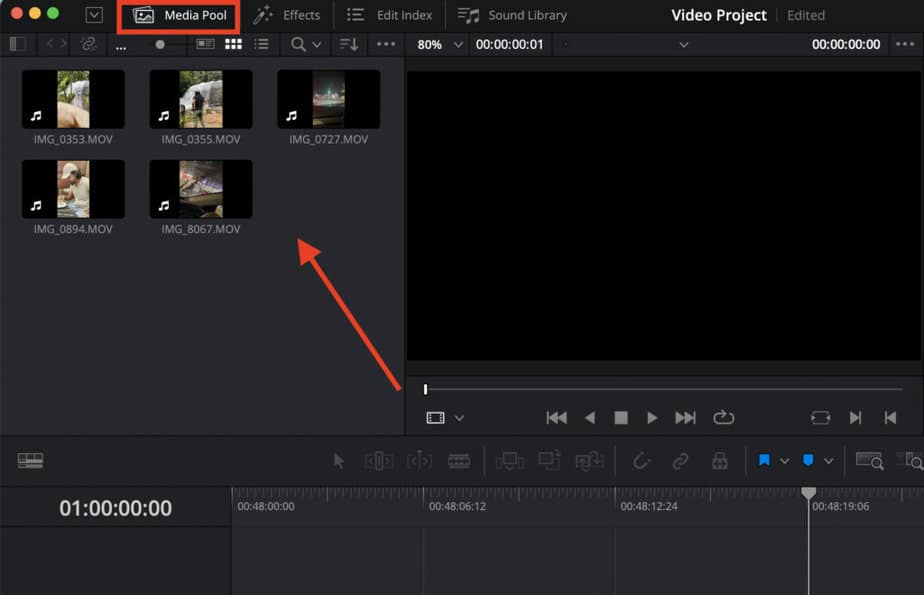
- Open DaVinci Resolve, go to the “Edit” page, and import all your selected video files into DaVinci Resolve’s Media Pool.
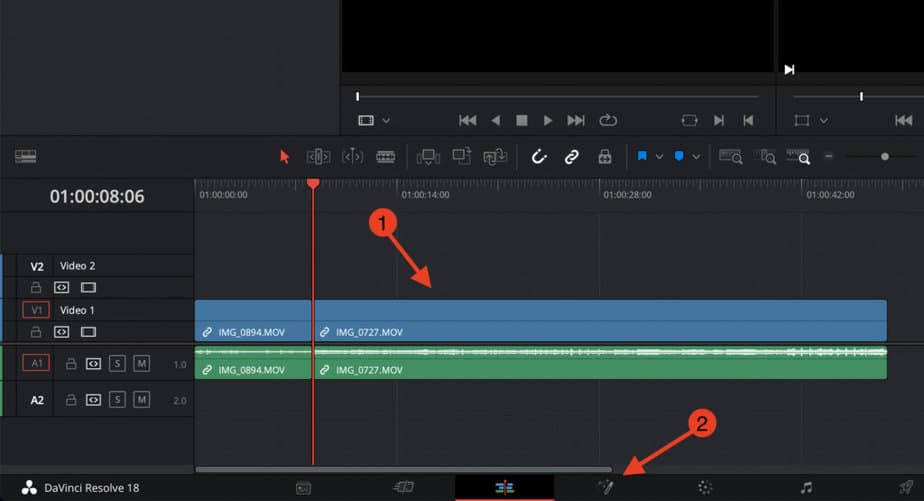
- Now drag your video files from the Media Pool to the timeline.
Place the playhead in the timeline (red time marker) on top of the clip you want to capture an image.
Then, open Fusion by clicking on the fourth icon from the left (it will be designed as a paintbrush with stars):
- Now select which portion of the video you want to save as the image.
Next, move your mouse cursor to the timeline viewer, right-click and select the option “Save Image”:
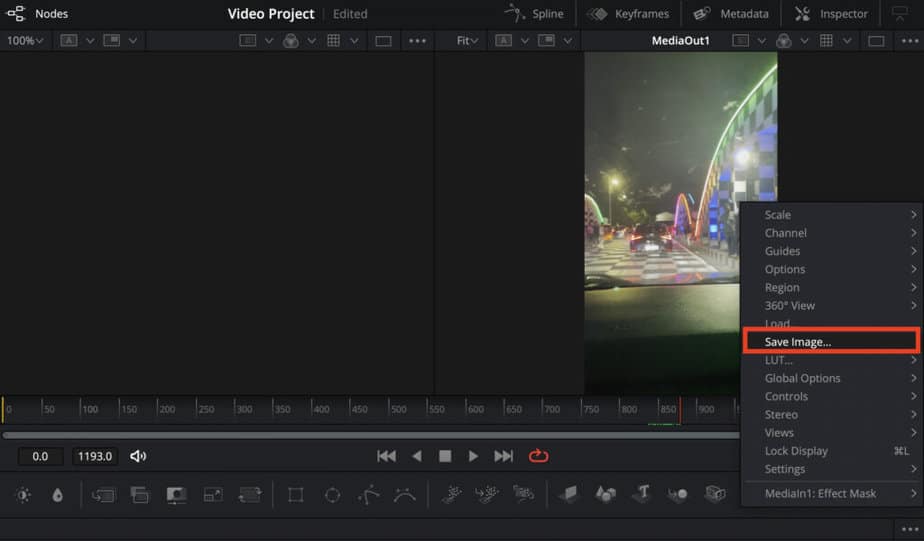
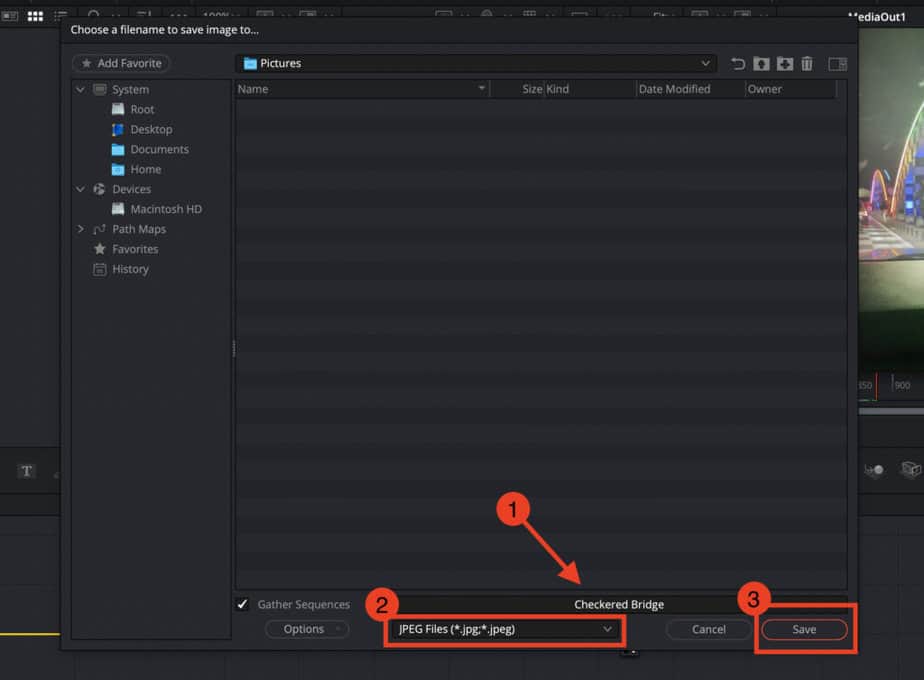
- A Windows pop-up will open. Name your image, select the location where you want to save the image, select the format you want to save the image in (PNG or JPEG), and then click on “Save”:
- PNG= High quality, lossless compression, bigger file size.
- JPEG: Lower quality, lossy compression, smaller file size.
You can use this method to export as many images as you want!
Once you have done the steps above, you can find your images by opening the location where you saved them.
If this seemed great, here’s another way to save images using DaVinci Resolve:
Method 2: Save the Image Using the “Color” Page
Did you know that you can also save images from the “Color” page? Yes, you heard it right.
If you believe your video requires color correction before exporting as an image, you can easily do so and then export the selected frame as an image.
Here’s how to do it:
- Repeat step 1 of the previous method (Import media to Resolve)
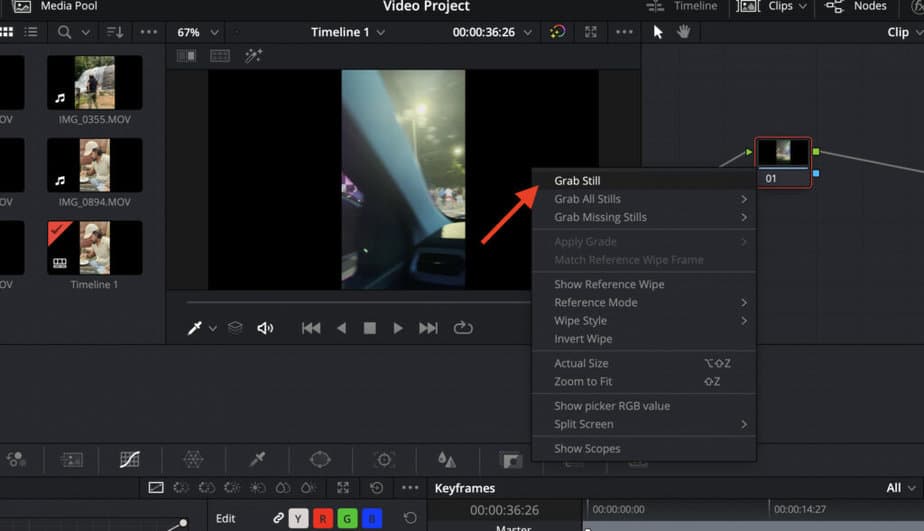
- Drag your media to the timeline. And then head over to the “Color” page (next to the Fusion page).
- You can now add some color grading to your video files. Then, click on the timeline viewer, and select “Grab Still”:
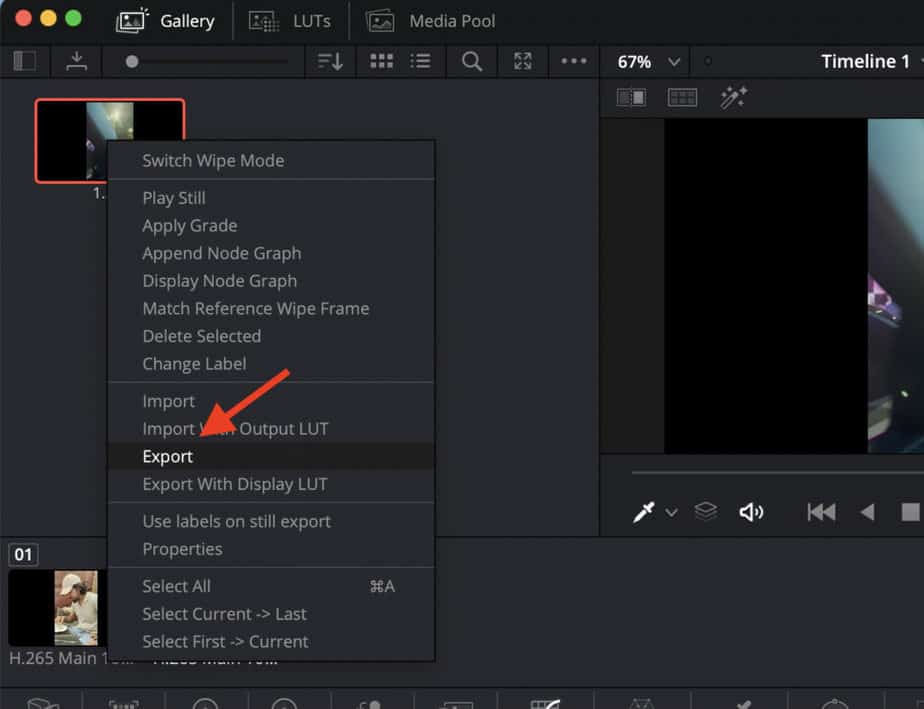
- The “Gallery” should automatically open. If it didn’t open, move your mouse cursor to the top-left side and you will find the “Gallery” option, click on it to open:
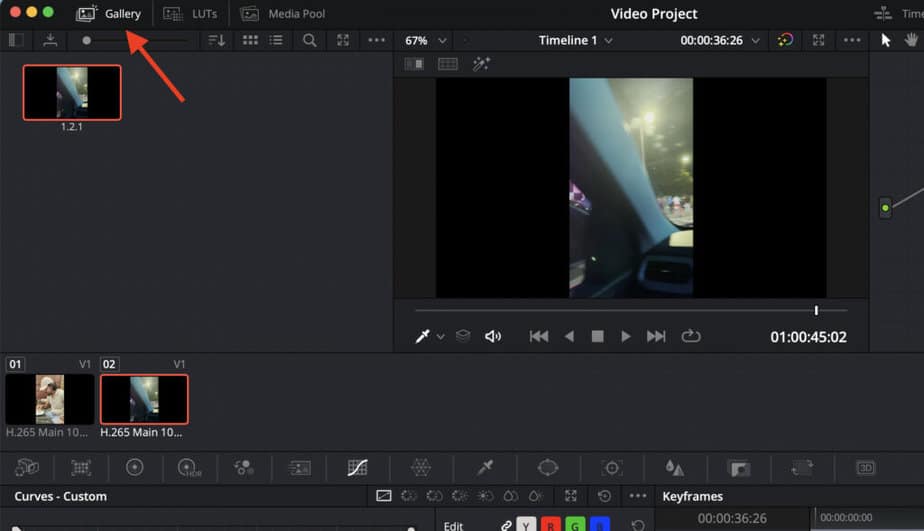
- Right-click the thumbnail and choose “Export” if it’s a single still or “Export With Display LUT” if you applied LUT and want it with LUT effects.
If you want to export multiple stills, press CTRL+A and select “Export” or “Export With Display LUT.”
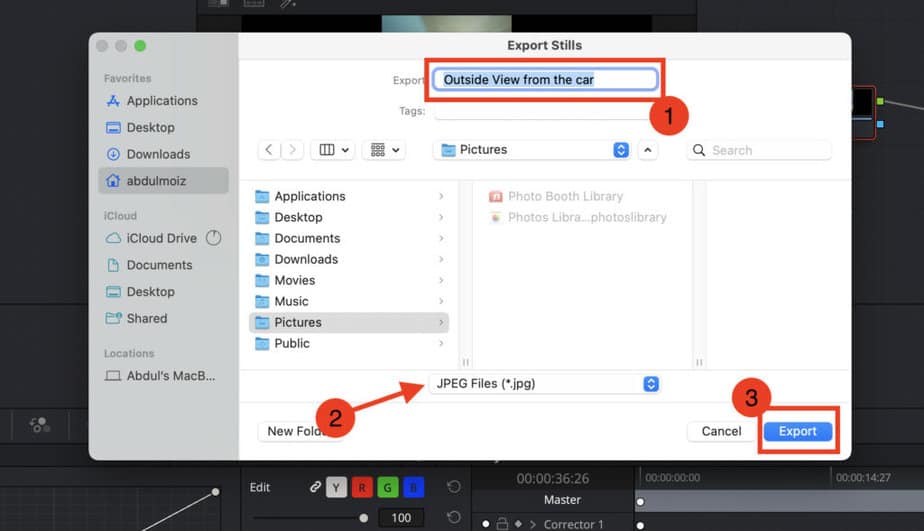
- Select the destination where you want the images to be saved. Then, name your images and choose the file type (PNG or JPEG) for which you want to save the stills.
Check out the table below where I’ve compared the PNG and JPEG! - Once that’s done, click on “Export.”
Should I Select Only PNG or JPEG as the Image Format?
PNG is a superior image format that uses lossless compression and doesn’t lose image data during the compression of the image. As a result, the quality of the image files is not changed or degraded despite editing and saving the image file multiple times.
On the other hand, JPEG captures all the details and colors and compresses high-quality images that are larger into small file sizes.
If you are confused between PNG and JPEG, both have their pros and cons:
| Image Format | Pros | Cons |
| JPEG | Smaller image file sizewidely acceptedFlexible compression options | Lossy compressionTransparent backgrounds are not supported. |
| PNG | Lossless compressionImage details are retainedsupports transparent backgrounds (for logos and other purposes). | Large file sizeisn’t appropriate for printing. |
DaVinci Resolve also exports the stills in different formats, but PNG and JPEG are the ideal choices for most users.
If you know what format you want your image in, you can select it from the drop-down selection when exporting the image.
You can save the stills that are exported from DaVinci in the following image formats :
- DPX Files (.dpx)
- Cineon Files (.cin)
- TIFF Files (.tif)
- JPEG Files (.jpg)
- PNG Files (.png)
- PPM Files (.ppm)
- BMP Files (.bmp)
- XPM Files (.xom)
What Are the Uses of Different Image File Formats?
There are numerous image file formats, and each has its purpose: JPEG, PNG, HEIF, TIFF, GIF, and so many more.
Now, let’s look at the image formats DaVinci Resolve exports the image, their pros, cons, and use cases.
DPX Files
Digital Moving-Picture Exchange, also known as DPX files, is a lossless and uncompressed image format used in the film and VFX industries.
Film frames are scanned individually and are kept in a lossless digital format in raster files, which are made up of pixels. Each DPX file represents one single frame; hence, they are often exported as a stream.
Since DPX files are lossless and uncompressed, users have lots of flexibility in editing them and don’t lose any information from the footage.
BMP Files
BMP, short for the bitmap image, is an uncompressed format that stores high-quality images. But since they are uncompressed, the file size of a bitmap image file is comparatively larger than JPEG and other file formats that compress the image file. The other upside is that users can edit BMP files and won’t lose their quality.
TIFF Files
The TIFF image format is the photographer’s favorite. Tag Image File Format, also known as TIFF, is an uncompressed format suitable for editing without losing image details or storing your artwork in high quality.
TIFF is a universally accepted file format and is often more prominent in size. Unfortunately, this makes it challenging to share TIFF files via email or other services that cap the size of the data you can upload in an email.
PPM Files
The Portable Pixmap Format, also known as PPM, isn’t widely used anymore. However, the PPM format made sharing images easier across different devices in the 80s. Each PPM file stores information about a specific image in text form.
This image format is rare to come across these days, and not every device can open these files. You will need specific applications to open PPM files. They are uncompressed, so they are large in size and only store basic color information.
FAQ
Can you edit photos in DaVinci Resolve?
You can edit your photos in DaVinci Resolve. It is not a full-fledged photo editing software, but you can use it to enhance your photos.