How to Make a Circle: Davinci Resolve (3 Easy Ways)
Making a circle in your video is the perfect way to draw attention to something.
Therefore, using Davinci Resolve, I will show you 3 methods to make one, as you can make it exactly how imagined it!
- Go to the “Fusion” page.
- Click on the “MediaIn1” node to select it.
- Click on “Background” in the toolbar, to create a node.
- Select the “Background” node, and click on “Ellipse” in the toolbar.
- Select the “Ellipse1” node, then open the inspector tab.
- Uncheck “Solid” and increase the “Border width“.
That’s just a quick explanation of one of the methods if you are in a hurry.
But, don’t worry… I’ve also written a detailed guide on how to do this down below. Where you also learn how to control the duration and size of the circle, and even how to make it move!
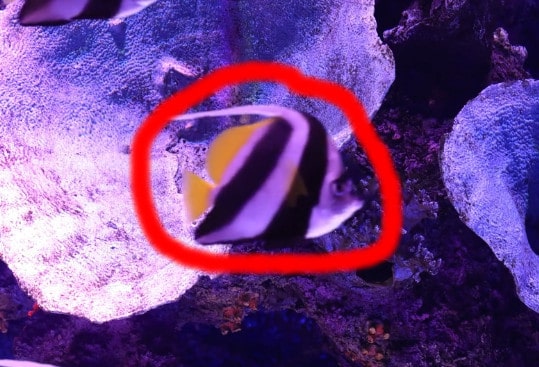
Watch the two pictures below for a general idea of what the circles CAN look like. However, they are highly customizable, and you can make them EXACTLY how you want them following this tutorial.
If you want to draw your circle by hand/mouse, go with method 2. Click on the picture to skip directly to that part of the article. If you want the other type just read from here!
Let’s not waste anymore of your precious time, and get to it:
How to Make a Circle in Davinci Resolve (Method 1)
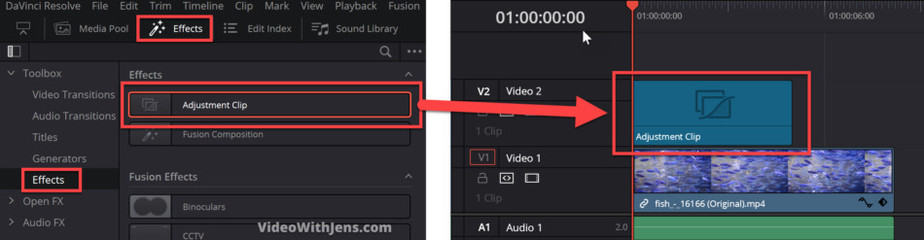
On the “Edit” page inside Resolve, click on “Effects” in the left-hand top corner, then go to “Effects” again.
From here go ahead and drag an “Adjustment Clip” on top of your video in the timeline, like this:

Make sure that the timeline cursor (red line, showing where you are at the time of video) is placed on your “Adjustment Clip“. Like in the picture above.
Then go to the “Fusion” page:

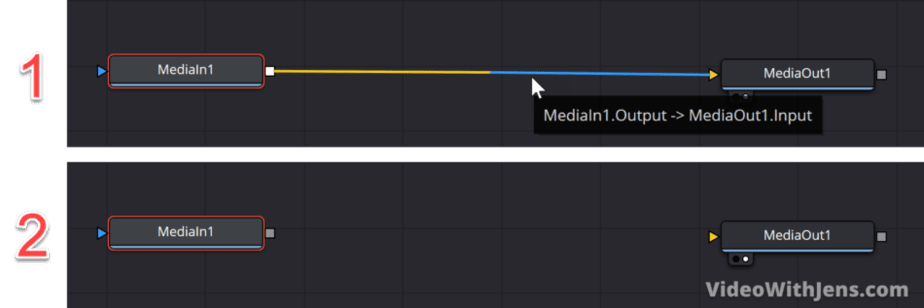
The first thing you’ll see on the “Fusion” page is the node graph with the “MediaIn1” node and the “MediaOut1” node. If you cannot see them, click on “Nodes” in the left-hand top corner to open the node graph.
What you want to do now is to break the connection between the two nodes.
To do this, hover your mouse over the string between them, until it’s colored yellow and blue, then just click on it. Watch the image below:
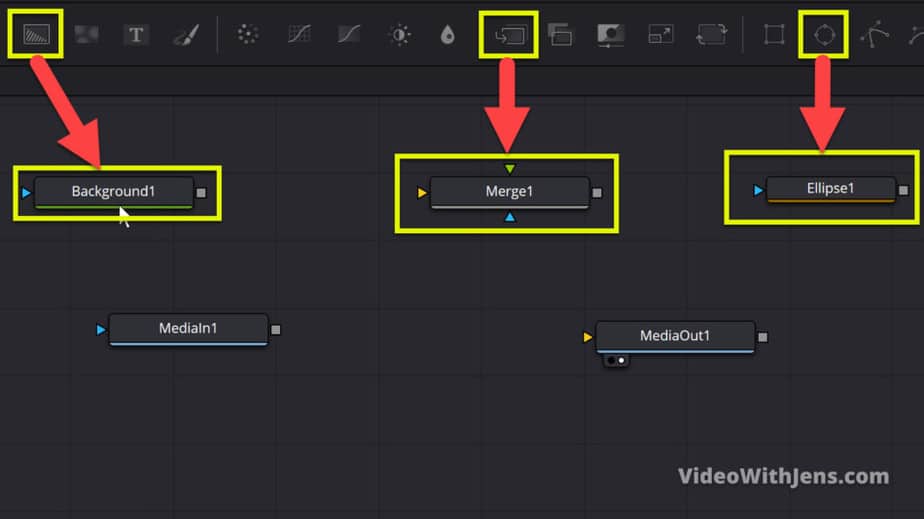
Now we are going to add three new nodes, which we need to create the circle.
All of these nodes are located in the toolbar/node bar above the node graph.
We want a “Background“, a “Merge” and an “Ellipse” node.
To create these, just click on their icon in the toolbar, and they will show up in the node graph. Watch the picture below to see what they look like:
Next, we are going to connect all these nodes in the right order!
If you are not familiar with how to connect nodes:
- Gray square: Always on the right end side of nodes. You can think of this one as a wire coil, where you pull the wire out of the node and connect it to one of the triangles on the other nodes.
- Blue triangle: This one is used to connect masks. For example, if you have a green background and mask it with a circle, the final result is then a green circle.
- Yellow triangle: This is the main input, this one has to be connected in order for the node structure to work!
- Green triangle: This is a secondary input, so by connecting to this, you add additional information to the main flow.
Alright, that’s all you need to know for this tutorial!
The image below is an illustration of how to connect nodes (using the wire).
All you have to do is to click and hold the gray square and drag it to one of the triangles, in this case, the input (yellow triangle):
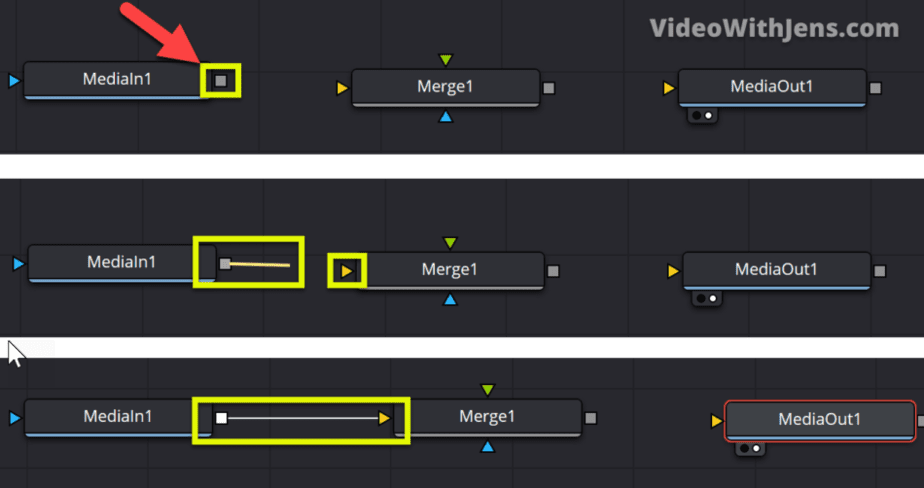
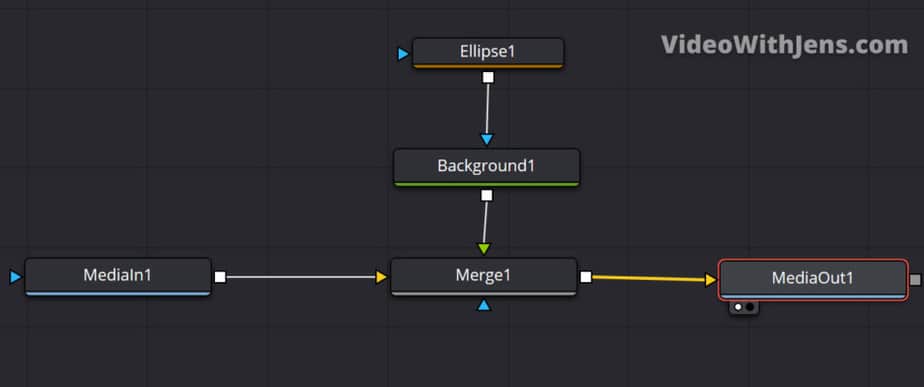
Now, connect all the nodes like this:
“MediaIn1” to the yellow triangle on “Merge1“, then “Merge1” to the yellow triangle of the “MediaOut1“.
Next, connect the “Background1” to the green triangle (foreground/secondary input) of the “Merge1“.
Lastly, connect “Ellipse1” to the blue triangle of the “Background1” (mask):
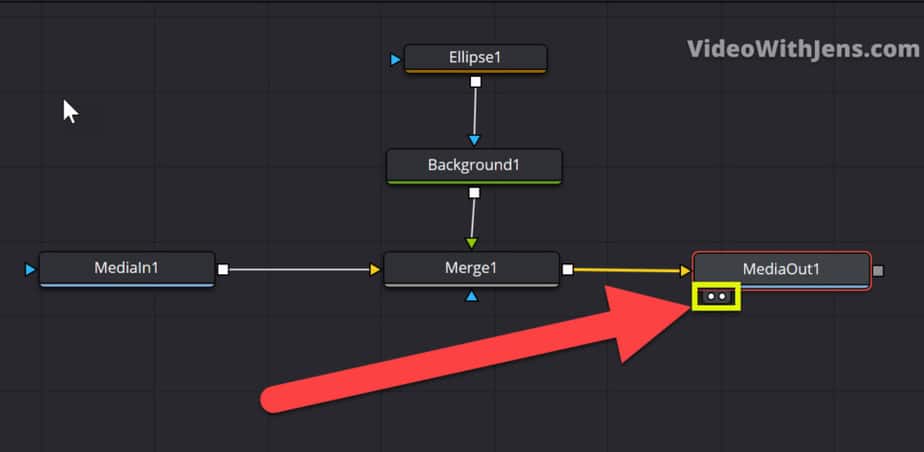
Once they are connected, hover your mouse over the “MediaOut1” node and click on both the dots on the downside of it, like this: (this is just for simplicity of the tutorial)
Then make sure you only have one video preview. If not, click on the icon shown in the picture below, located above one of the video previews:

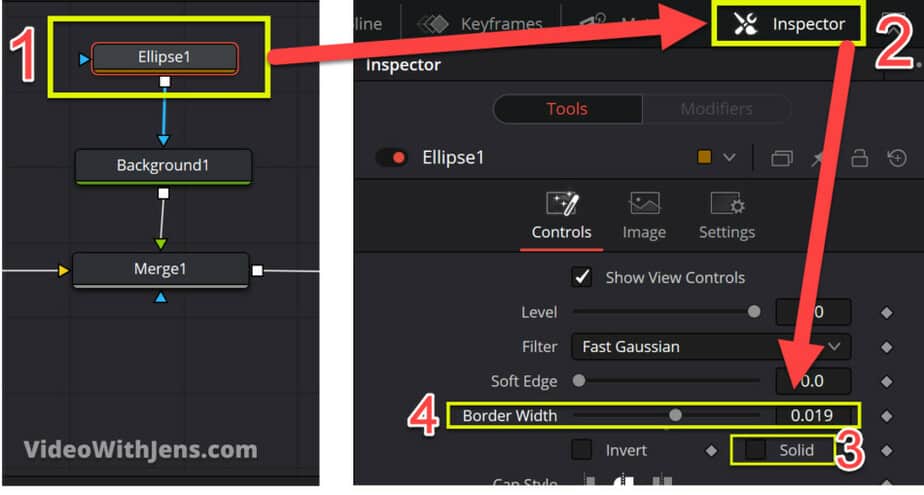
Next, click on the “Ellipse1” in the node graph.
Then go to the “Inspector” tab.
In the “Inspector” you can see an option called “Solid“, uncheck/unable the box next to it.
Then increase the “Border Width” to an amount you are happy with while watching your circle!
Boom.
You’ve now created a black circle!
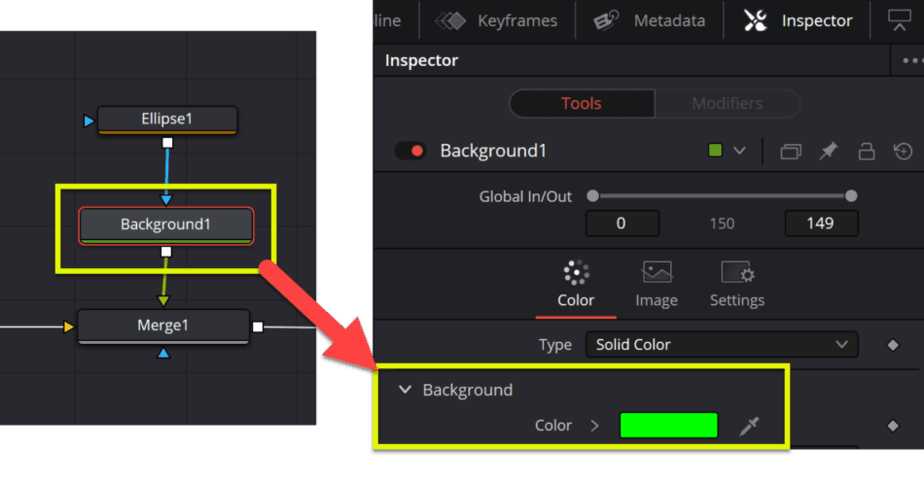
If you wish to change the color of it:
Click on the “Background1” node and go to the “Inspector” tab.
Under “Background” you can see a colored box.
Click on the box and change it to the color you want your circle and click “OK”:
To change the size of the circle is really easy.
Just click on the “Ellipse1” node in the node graph to select it.
Then in the video preview, you can pull on the edges of the circle to shape it. Try adjusting it from different points of your circle, as this affects the circle differently.
To move the circle around click, hold and drag that little square in the middle of it.
Watch the illustration GIF below on how to do this:
If you want to know how to make GIFs like the one above with Davinci Resolve, I’ve written a tutorial on that here (opens in a new tab 🙂
Your next question might be:
How do I make the circle move? Or follow something that moves?
As this was quite hard to explain in writing, I made the video below explaining this:
How to Draw a Circle in Davinci Resolve (Method 2)
Welcome to method 2 of this tutorial, showing you how to draw a circle in Davinci Resolve!
Here’s a quick version of how to do it:
- Go to the “Fusion” page.
- Click on the “MediaIn1” node.
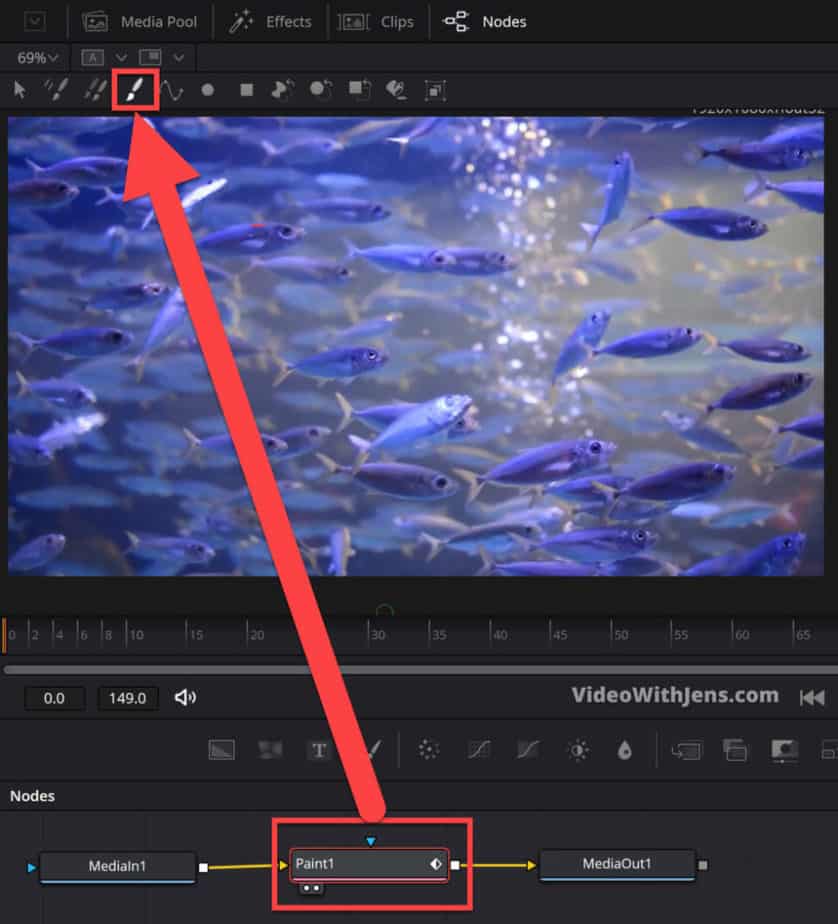
- Click on “Paint” in the toolbar on the left-hand side.
- Select the pencil called “Stroke” above the video preview.
- Hover your mouse over the video preview, and draw a circle.
The first thing you want to do is to add an “Adjustment Clip” to your timeline.
So make sure to be on the “Edit” page, click on “Effects” in the left-hand top corner, then open “Effects” here as well.
Now, click, hold, and drag the “Adjustment Clip” on top of your other video, like in the picture below:
Make sure that the timeline cursor (red line, showing where you are at the time of video) is placed on your “Adjustment Clip“. Like in the picture above.
Then go to the “Fusion” page:
Here the first thing you’ll see is the node graph with the nodes called “MediaIn1” and “MediaOut1“.
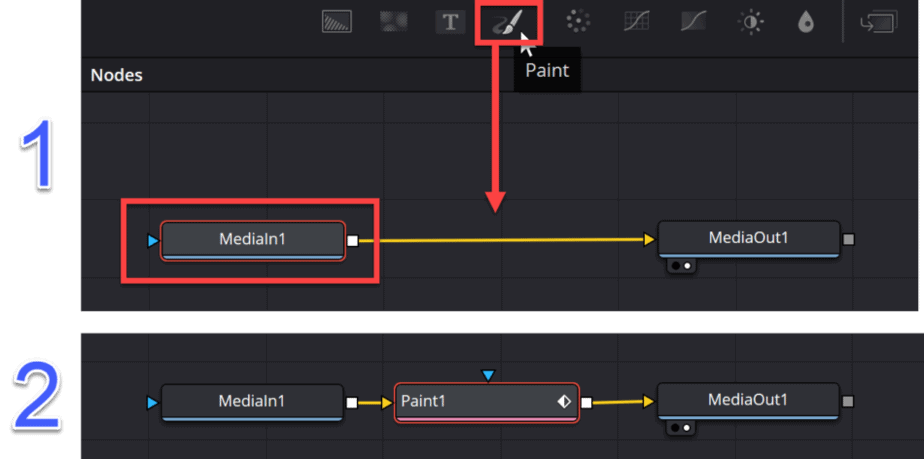
Now, go ahead and click on the “MediaIn1” node to select it.
Then click on the brush called “Paint” in the toolbar above the node graph to create a new node.
Try to move the freshly created “Paint1” node to make sure it’s connected between the two others! If not hit CTRL+Z or Cmd+Z (on a mac), then try again…
Then hover over the “Paint1” node and click on the first dot beneath it as it turns white like this:

Next, if you have two video previews we want to set this to one instead, for the simplicity of this tutorial.
If only have one video preview, you can skip this step…
However, if you are seeing two, go to the preview that says “Paint1“, and click on the two rectangles as it looks like this:
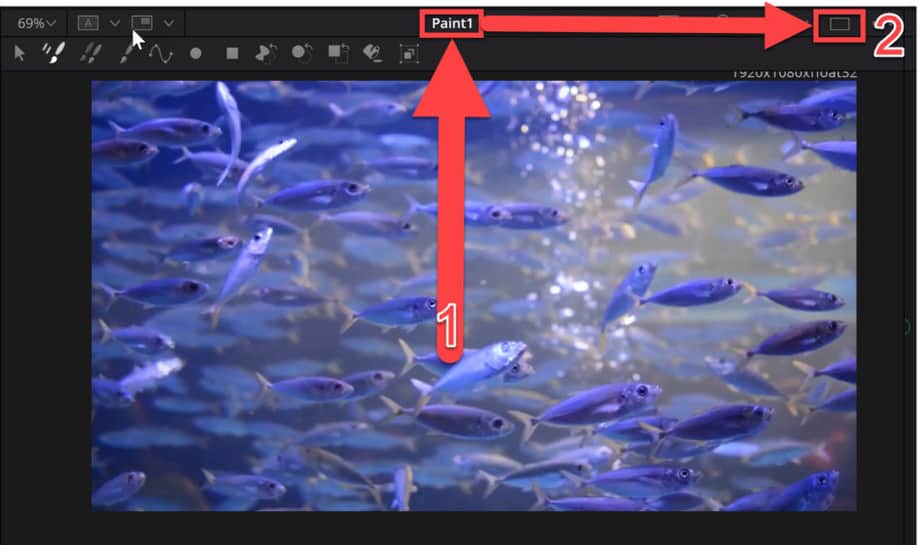
Now, go ahead and click on the “Paint1” node in the node graph to select it.
Then above the video preview, you should be able to see a bar like the one in the picture below.
Here you want to select the single brush called only “Stroke” when you hover over it:
Now you are ready!
It’s time to draw this circle of yours!
To do this, just hover your mouse over the video preview, click, hold and drag to draw.
Watch this illustration GIF below:

And just for clarity, I made that circle look bad on purpose…
If you want to learn to make GIFs using Davinci Resolve check out this article (opens in a new tab).
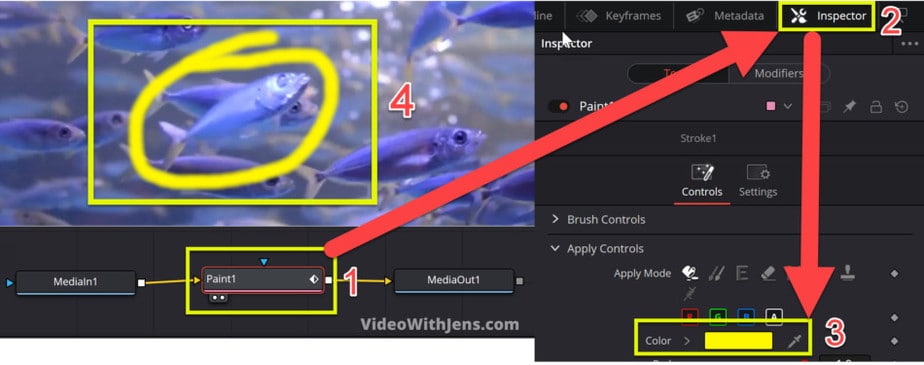
Next, we are going to change the color of it!
Select the “Paint1” node, then open the “Inspector” tab located on the right-hand side of the “Fusion” page.
Then go down to the white box on the side of “Color“.
Click on the box, set the color you want, and hit “OK“.
Voilà!
Now, we are going to add a cool draw-on effect to it!
To do this…
You are going to use the “Inspector” tab again.
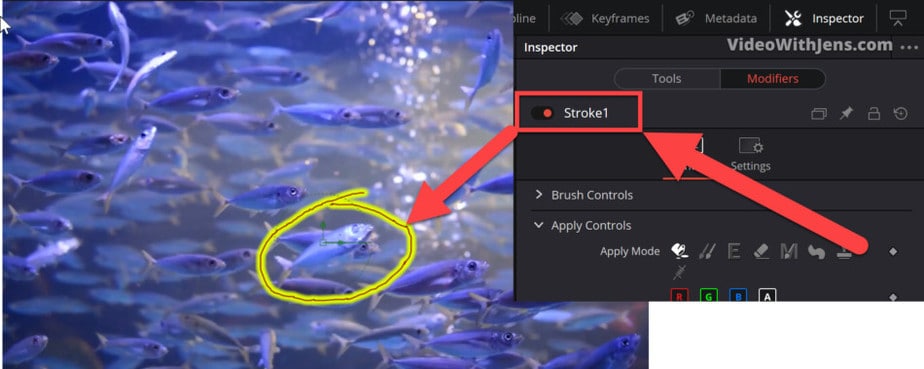
However, this time, at the top of the menu change it from “Tools” to “Modifiers“.
Then click on the name “Stroke1“, make sure to not be in “Stroke 2″!!
It should look like this:
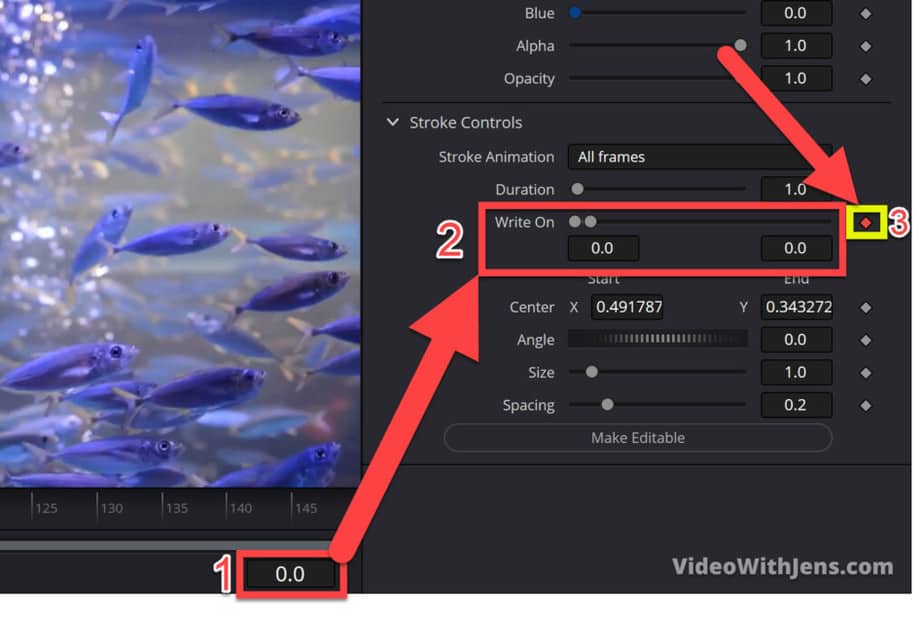
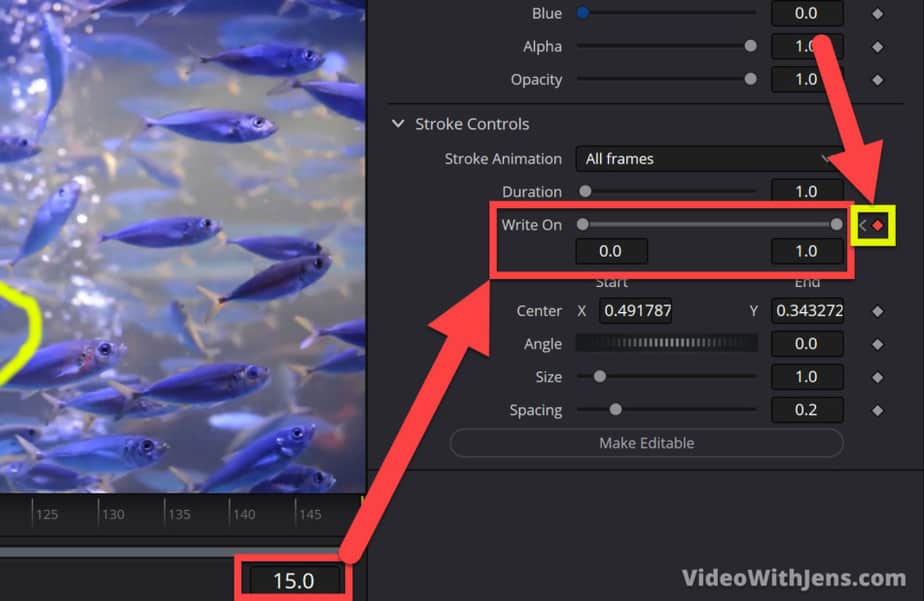
Then at the bottom of the “Inspector” open the “Stroke Controls“.
Now go to the place of the video where you want the circle to start drawing/appearing. In the picture below you can see I set it to start at frame “0”.
Next, decrease the “Write On” value to “0.0” (both values should be 0.0).
After that, create a keyframe, to do that click on that little diamond as it turns red.
Watch the picture below:
Then go to the place of the video where you want the circle to be fully drawn.
Then set the “Write On” value to “1.0” or the right dot on the line maxed out to the right side (a new keyframe will be automatically generated this time).
You can see in the picture below, that I want it to end at frame 15. Meaning the drawing effect takes 15 frames (frame 0-15). Remember the circle will not disappear after this, just the effect:
Ok, now we have made the drawing effect.
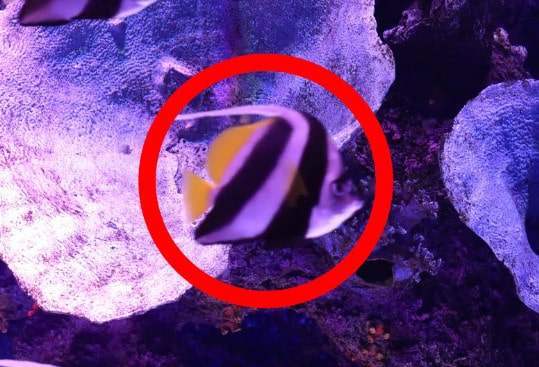
However, I have a fish that is swimming in my video…
So I want my circle to follow the fish.
I will show you how to do this now. I have a video on how to do it, a little further down the page, if you want to watch that instead.
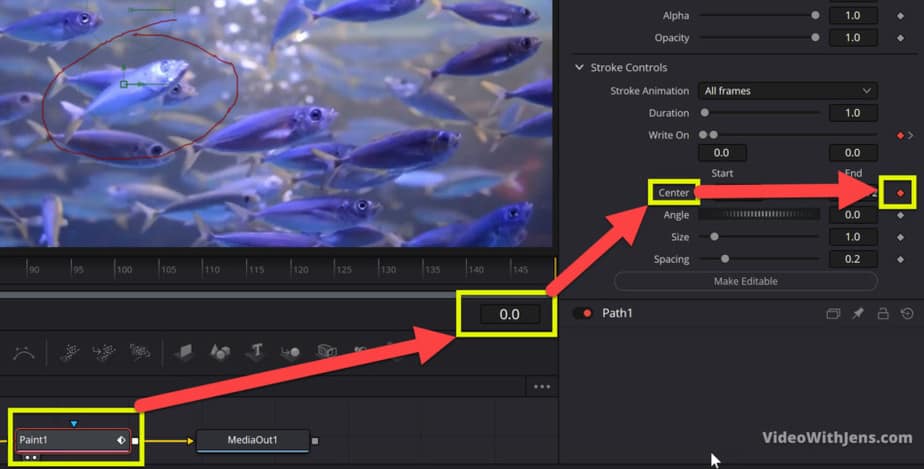
Select the “Paint1” node in the node graph, then go to the frame where you want the circle to start moving (in my case frame “0.0” as you can see).
Then go to the “Inspector” > “Modifiers” > “Stroke Controls” > and now locate the “Center“.
Make a keyframe for the “Center” (click on the diamond as it turns red).
When you activate the keyframe, the tab inside the “Inspector” will change to “Path1“, just double-click on “Stroke1” (at the top of the inspector) to get back!
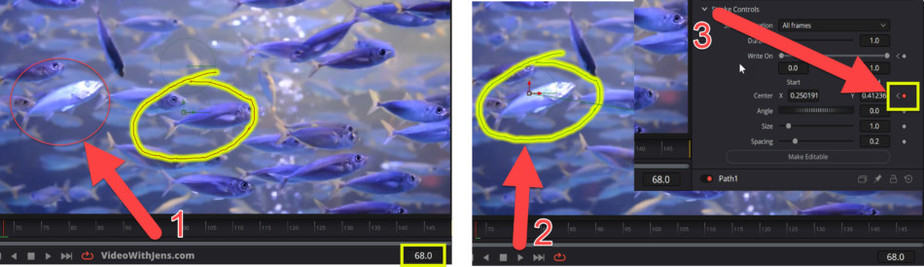
I will now play the video to watch the video swimming outside the circle, then stop and drag the circle on top of the fish in the new position. To drag, grab the little square in the middle of the circle on the video preview.
If you can see the square to drag the circle, you’ll have to click on the “Paint1” node in the node graph.
If you do this as well, notice that it’s automatically created a new keyframe on the “Center” value (you only have to set the keyframe once, the next time is automatic).
Watch before and after I adjusted the position of the circle:
Here’s the video version which I promised:
Then, it’s the last and maybe the simplest method:
How to Add a Circle to Your Video In Davinci Resolve (Method 3)
For this method, you don’t have to make the circle yourself, because I’ve already made one for you to use!
It’s a basic circle which you can see pictures of down below, and it has a transparent background, meaning you just add it on top of your video, and adjust the size on the “Edit” page.
No need for fusion! Yay?
I’ve uploaded it on dropbox for you to download for free here. You don’t have to sign-up or anything, just X out that popup window, and download.
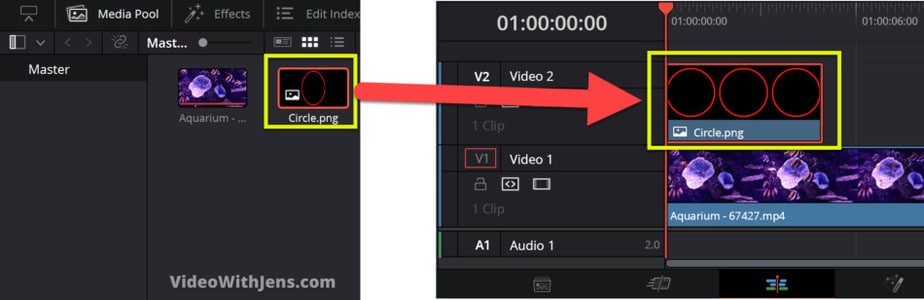
Next, go to the folder where you saved it on your computer (by default this will be in “Downloads“), then drag it from the folder to the “Media Pool” in Resolve.
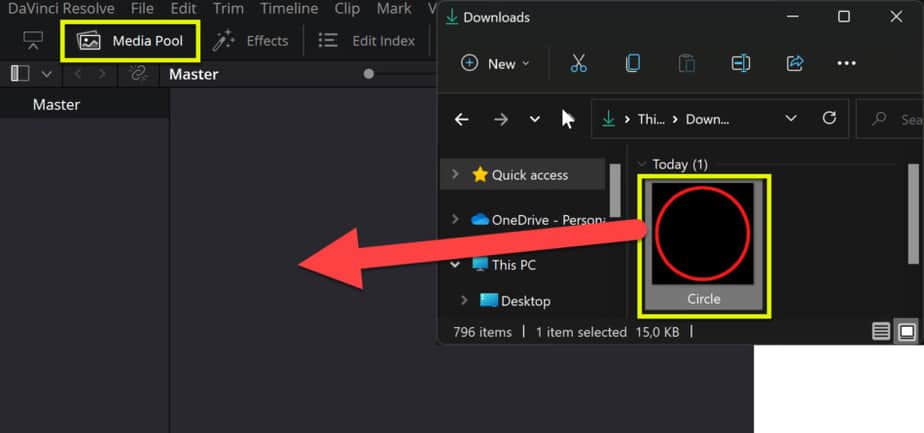
Then you can drag it from the “Media Pool” to the timeline.
Add it on top of the other video like this:
Next, to change the duration of the circle (how long it lasts), just hover over the edge of the clip in the timeline until you see the symbol in the illustration below, click, hold and drag it to the side like this:
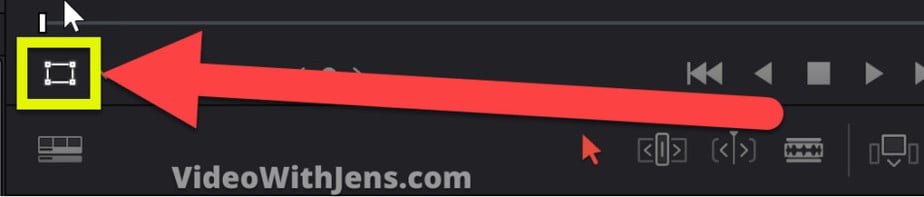
To adjust the size, the way I recommend doing it is by simply enabling the “Transform” mode.
It’s located in a drop-down menu on the left side below the video preview.
Select the one that’s called “Transform” by clicking on it. The icon looks like this:
Then you should be able to adjust the size of the circle, by clicking and dragging on the dots around it in the video preview like this:
If you want to make the circle move or follow something, I explain how to do that in this video:
If you wish to have the circle available for every project, instead of having to drag it into Resolve every time. You can do this by just dragging it into a “Power Bin“.
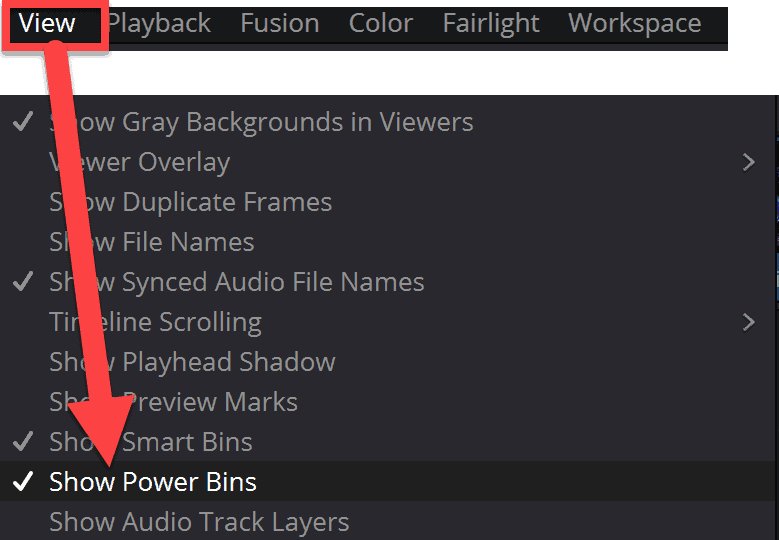
To enable these, go to “View” and click on “Show Power Bins” at the bottom of the “View” window:
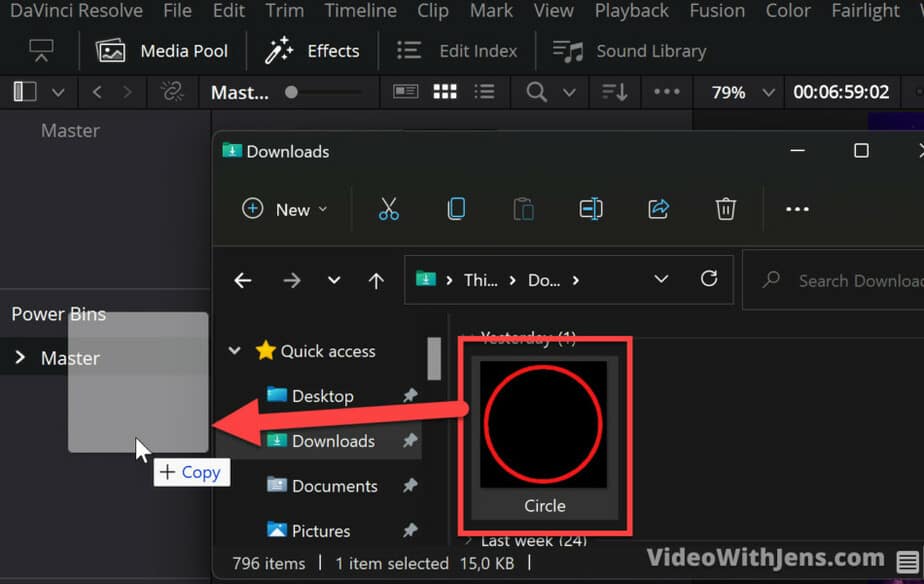
Then you’ll see the “Power Bins” in the “Media Pool“.
Just drag the circle from the folder where you saved it into the “Power Bins” like this:
If you haven’t already set up a way to save yourself from disaster if your computer were to crash in the middle of a project, I strongly recommend you to read this short article.
That’s it for this time!
I hope you found what you were looking for!
Best regards,
Your friend, Jens.