How to Make TikTok Videos in DaVinci Resolve (Full Guide)
This is a complete guide on how to make TikTok videos in DaVinci Resolve
To succeed on TikTok, you must make your video stand out.
Every single day, it’s uploaded millions of videos to TikTok… However, by using a professional editing software like DaVinci Resolve, you are already one step ahead of most people.
The only downside is that these types of software can be pretty intimidating at first glance.
Luckily for you, I’ve written everything you need to get started in this tutorial, so let’s get to it!
Can You Make TikTok Videos in DaVinci Resolve?
You can easily make TikTok videos in DaVinci Resolve. It’s among the most powerful editing software in the world with a wide variety of functionalities, making it an excellent choice for creating TikTok videos.
The requirement for software to create TikTok videos is that you can make the videos vertical and export them in a format following TikTok guidelines.
However, what makes DaVinci Resolve unique, is that not only can you edit and add text to the videos. It’s also these different pages (almost like their own software) inside the program dedicated to fast editing, color grading, sound design, motion graphics, and more!
Enough with what’s possible!
Let me show you how to set everything up and create TikTok videos that stand out from the crowd.
We have to start the technical stuff:
What Resolution to Use for TikToks in DaVinci Resolve?
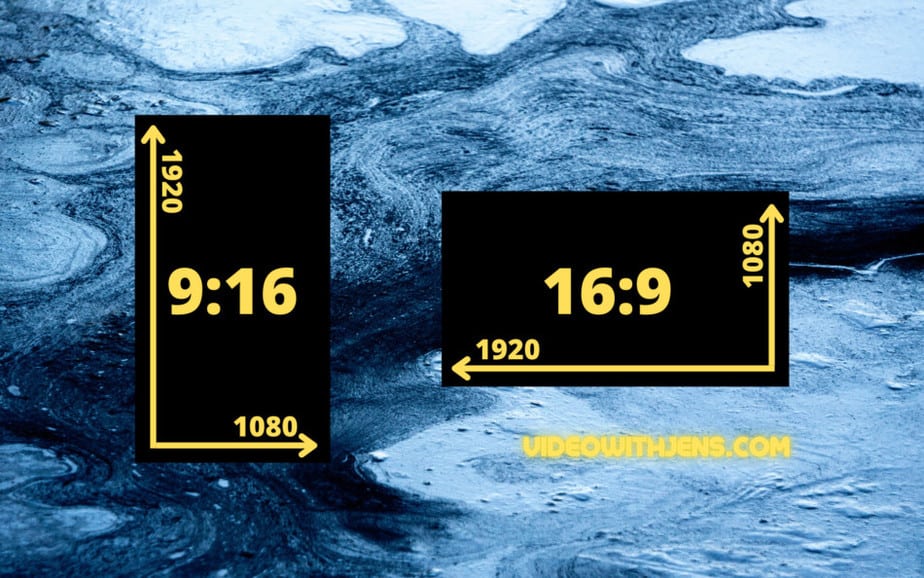
The maximum resolution for TikTok videos is 1080×1920; this is what you should aim for to get the highest quality possible. Uploads of higher resolution will get resized, and anything below it will remain the same.
You may think that the 1080×1920 sounds a bit odd if you are used to watching videos on platforms like YouTube, where the resolution is commonly 1920×1080.
This is because YouTube videos are what’s called horizontal videos, while TikTok videos are vertical and standing:
Luckily for us, changing the resolution in DaVinci Resolve is easy!
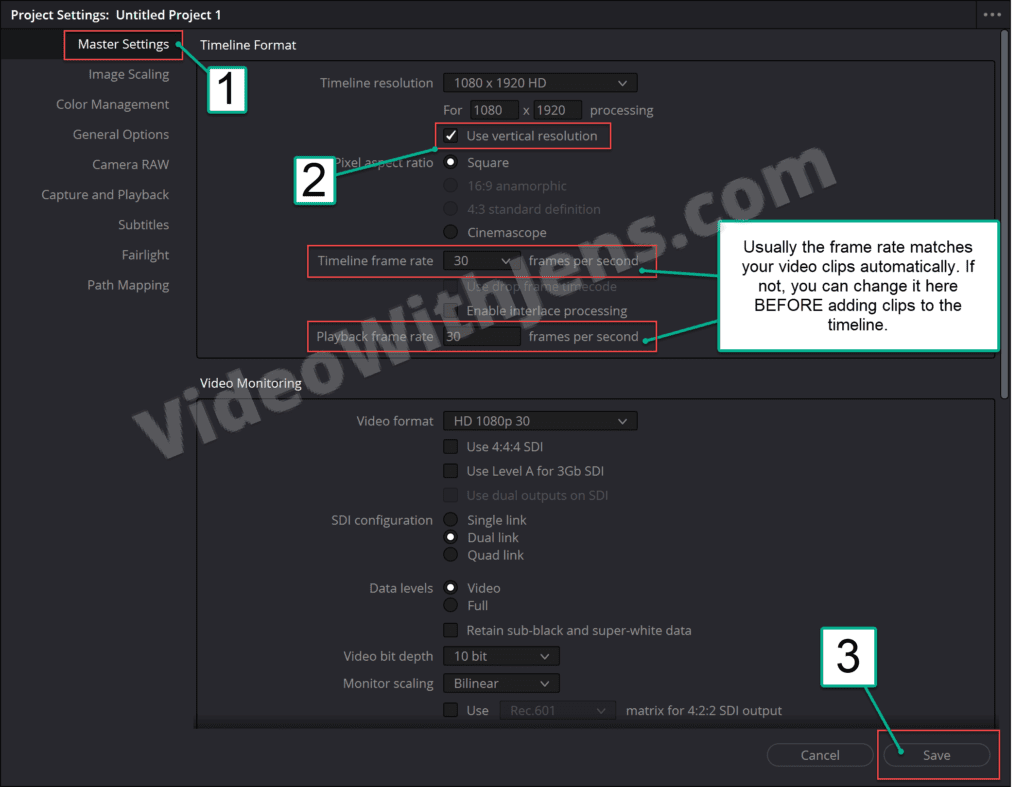
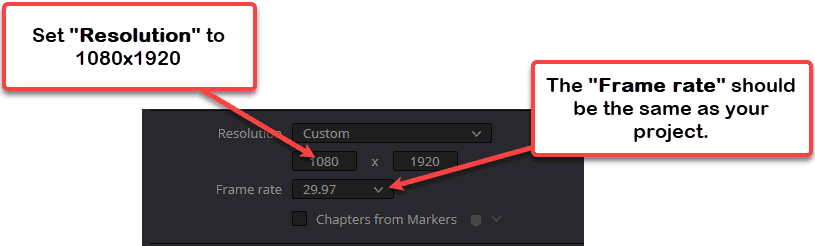
Simply press “Shift + 9” on your keyboard, or click on “File” > “Project Settings” > “Master Settings.”
Here we are going to change the “Timeline Resolution,” you won’t find “1080×1920” in the drop-down menu, so we have to type that into the boxes beneath manually.
Once you’ve set the resolution to “1080×1920,” click on “Save” in the lower right-hand corner.
Another thing that’s important to get right is the frame rate:
What Frame Rate for TitkTok Videos in DaVinci Resolve?
The maximum frame rate allowed for TikTok videos is 60 FPS, while there seems to be no lower limit. On the free version of DaVinci Resolve, you can export 16-60 FPS. However, for TikTok videos, it’s best to stay within 24-60 frames per second for a good viewer experience.
Okay, but what’s best between 24 FPS and 60 FPS, you might wonder?
This depends; if you already have the video clips with which you want to make the TikTok, you should match the project settings against these.
However, if you’re still in the planning phase, thinking about what frame rate to shoot in is a good thing.
There’s more to frame rate than you might think:
- 24 FPS has been used in movies for years and is something we associate with movies without even knowing. So using 24 FPS will give your viewers that cinematic feeling.
- 30 FPS is used in reality TV and the news, a bit faster, phased, and energetic.
- 60 FPS is suitable for action clips where there is a lot of movement. The clips also tend to feel a bit more “real,” like seeing real life through a mirror.
We are going to set the project’s frame rate while importing:
How to Import the Clips to DaVinci Resolve:
There are many ways you can import your videos to DaVinci Resolve. However, I will show you the best and easiest one! (I’ve been using it for years).
First of all, you need to open DaVinci Resolve, and once it’s running, head over to the “Edit” page by clicking on this icon:
(You’ll find it among the tabs at the bottom inside Resolve)

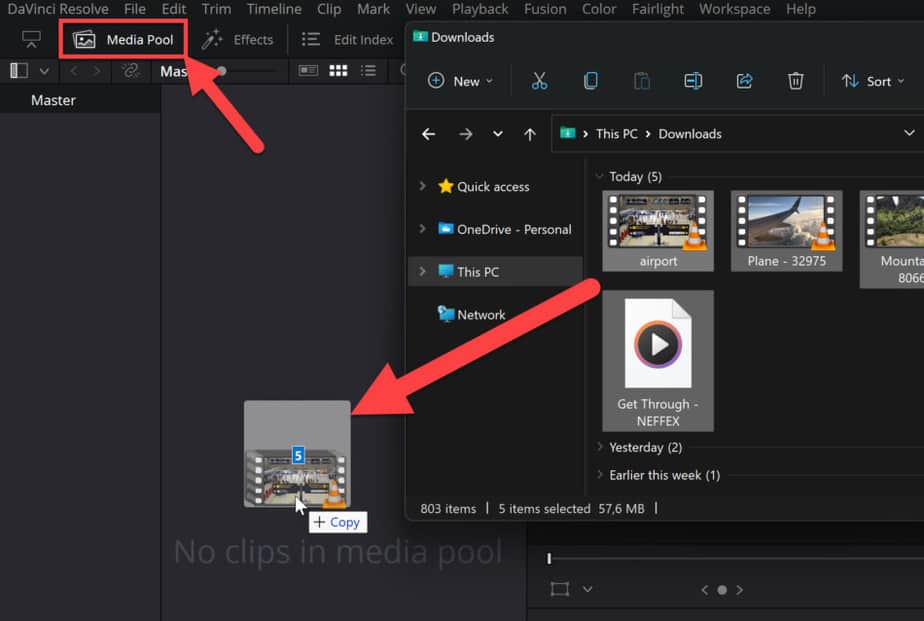
Once you are on the “Edit” page, open the “Media Pool” in the top left-hand corner by clicking on it.
Next, locate the videos you want to use in your system folders on your computer. When you have found them, select the clips you want to import and drag them into the “Media Pool” in Resolve:
- If you experience any issues when importing, read this article.
(You are going to get a popup message once your drop them, I will explain this in the next step)
By clicking on “Change” in the popup message, you are changing the project’s frame rate to match the clips you are importing. This is the best and easiest way to set the frame rate.
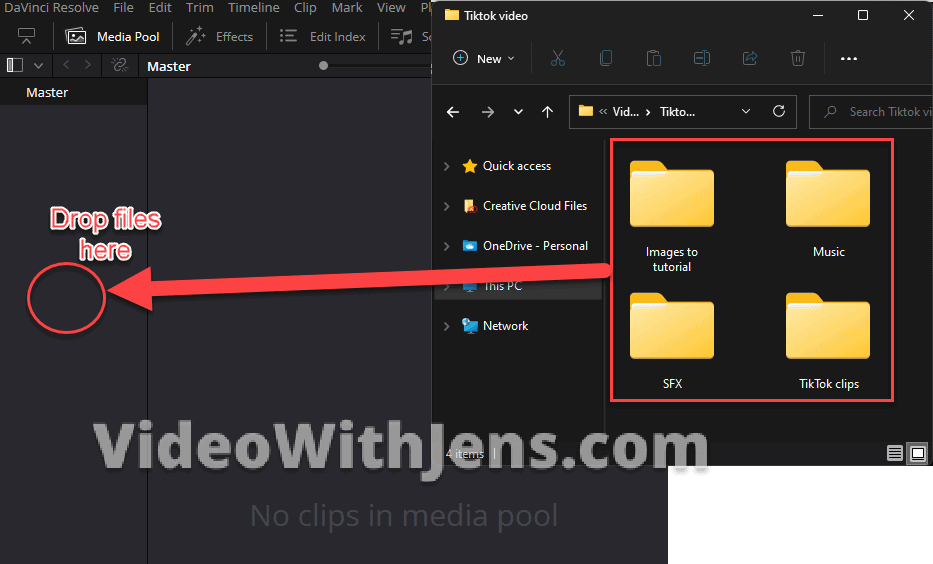
BONUS TIP: If you are working with many files, like videos, music, sound effects, etc. You can import the folders into DaVinci Resolve!
- Select all the folders you want to import, then drag and drop them on the inner left side of the “Media Pool” in the same row where “Master” is. Please refer to the image below:
Add the Clips to the Timeline
Only a few more steps until we can start editing our TikTok!
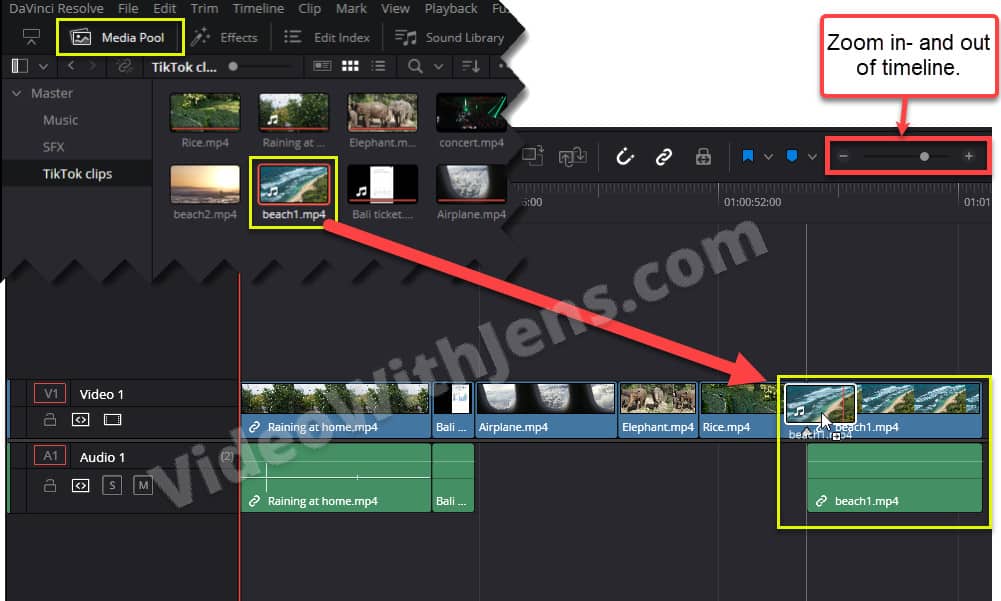
Now you have to decide in which order the clips will be played and then add them to the timeline accordingly (you can re-arrange them later if you want).
To add the clips to the timeline, you simply drag them from the “Media Pool” and drop them in the timeline. Again, I recommend adding them one by one in the correct order; simply drop them on the right side of each other.
It might be easier to do this if you zoom in a bit or out. To do this hold down “Ctrl” (Windows) or “Command” (Mac) on your keyboard, and then press “+” or “-” to zoom in or out. Alternatively, use the zooming feature above the timeline (watch the image below).
Check out this article to learn the best ways of adding clips to the timeline, something that helps edit faster.
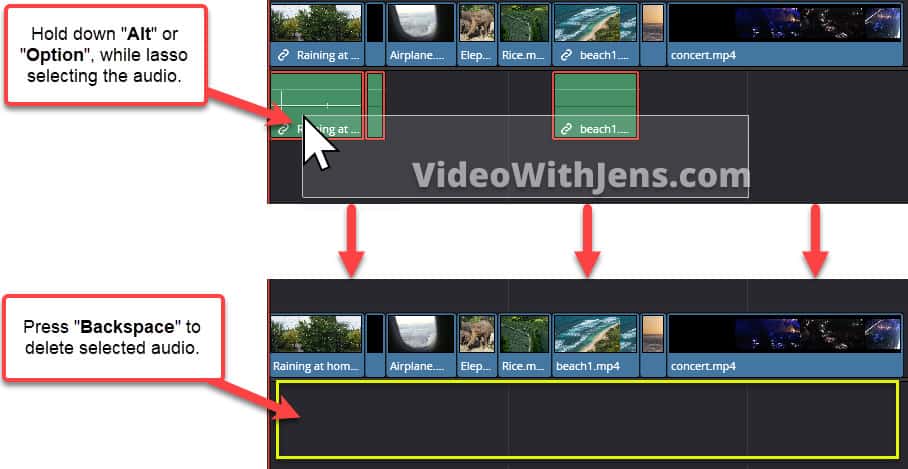
If you don’t need the audio part of your clips, you can delete it by pressing “Alt” or “Option” on your keyboard while simultaneously lasso selecting the audio. Make sure to release the mouse button before “Alt” or “Option” for this to work.
When ONLY the audio is selected and not the video part, hit “Backspace” on your keyboard to delete it. Here’s a guide on how to do this and how to do it more effectively if you are interested.
Before we edit the video, I want to show you how to change the layout on the “Edit.” This will be very handy to know when editing.
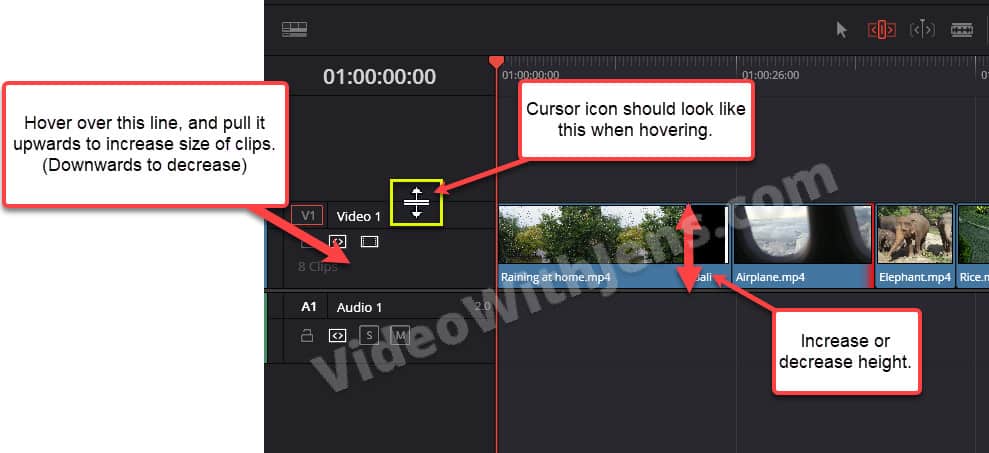
How to Change the Layout on the “Edit” Page
The first way is to make room for the viewer (video preview). Simply hover your cursor over the horizontal line between the viewer and the timeline, and drag it downwards to make room for the viewer and vice versa to make room for the timeline.
Check out this illustration GIF on how to do it:
Once there is more room for your viewer, you can zoom into it to make it bigger.
To do this, hover your mouse cursor above it and scroll on the mouse wheel; if you are using a laptop, stroking with two fingers up and down should do the trick.
You can also change the track heights in the timeline to make the video clips bigger or the audio.
I highly recommend doing this to the audio track when you edit while watching the audio waves (you’ll get to that soon).
Anyways to do this, hover your cursor over the black line on top of the “Video” track, on the left side of the timeline (watch the image below):
Next up, we are going to make the videos fit the vertical frame; if you shot your videos vertical (Phone standing up), then you can skip the next step:
Make video fit vertical frame
This step only applies if your videos are shot horizontally (phone lying down/landscape).
A horizontal video does not fit in a vertical frame, and you’ll get these black bars on top and bottom of your video.
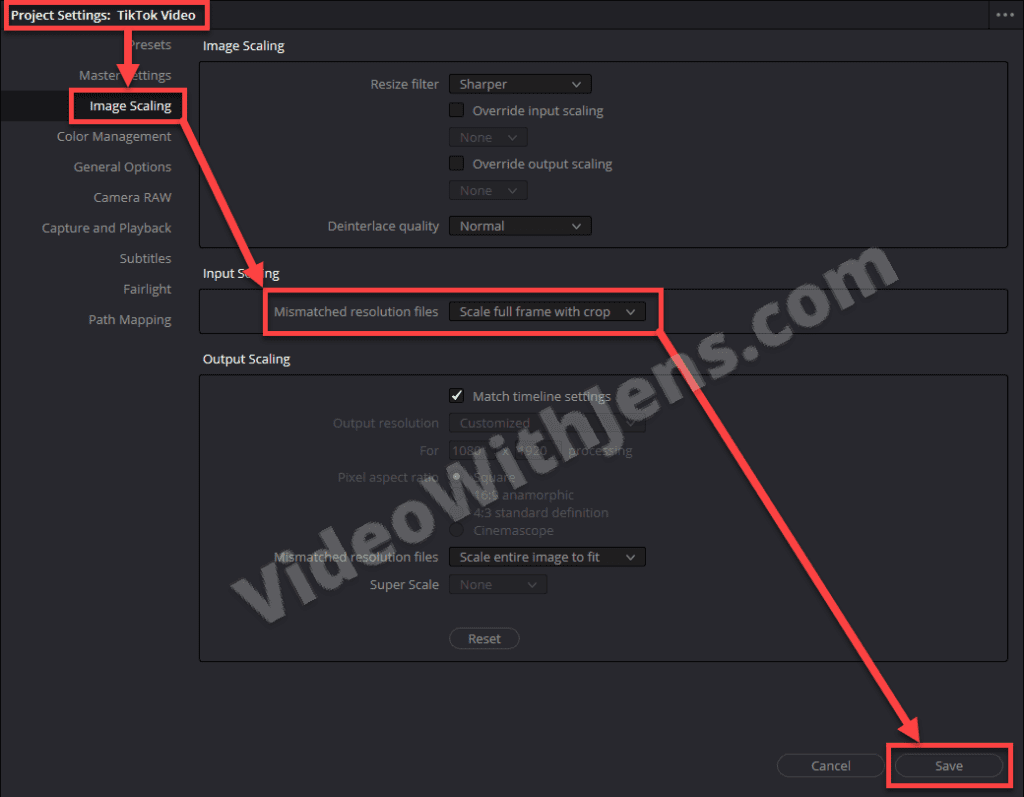
To fix this, press the keyboard shortcut “Shift + 9” and open the “Image Scaling.” Alternatively, click on “File” (upper left-hand corner) > “Project Settings” > “Image Scaling“.
Under “Input Scaling,” set the “Mismatched resolution files” against “Scale full frame with crop” and click on “Save” in the lower right-hand corner.
I know, quite impressive, right?!
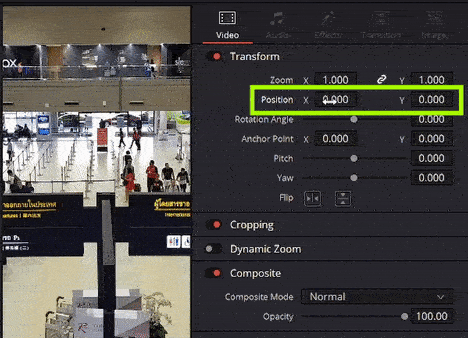
Since parts of the video are not shown when using a vertical frame, you’ll have to adjust what part of the video is visible. To do this, select the video in the timeline by clicking on it.
Then open the “Inspector” tab in the top right-hand corner of Resolve, and adjust the “Position’s” x-value to move it sideways. Then, hover over the box, click, hold and drag it to either side.
Watch the illustration below on how to do it:
Before we start to edit the videos, I’ll show you how to add music to the timeline and adjust it up properly:
Adding Music to the Timeline
Music is an essential part of TikTok videos; however, you can make them with only dialogue as well.
In this tutorial, I’ll show you how to do it with music, but the principles for editing audio are the same regardless.
BTW, If you need a place to find non-copyright music, I highly recommend checking out YouTube’s audio library, which is free to use! (I do believe some creators want you to give them credit. I would check that out).
- Check out this article on how to save music in Resolve for other projects.
- If you are having problems importing an MP3 file, read this.
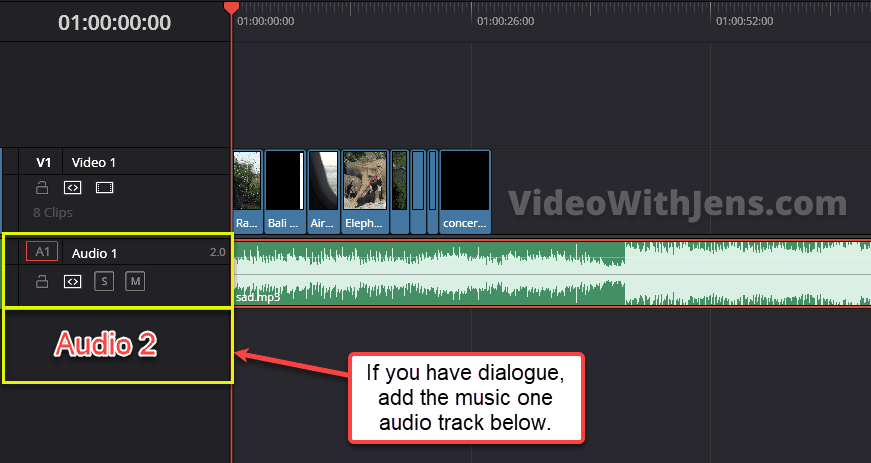
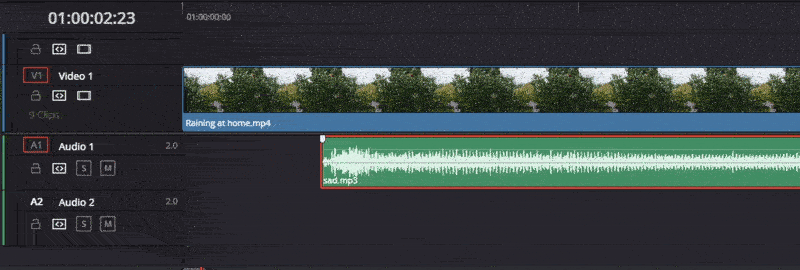
However, you add audio to the timeline just like with the video. The only difference is that you must drop it in an audio track below the videos!
If you have dialogue in the timeline, add the music one track below the dialogue in an “Audio 2” track.
Often the music doesn’t start playing instantly when you hit play.
Which is not ideal for TikTok videos where you want to grab the viewers’ attention immediately.
Gladly, it’s an easy fix; zoom in to the timeline at the beginning for music to see the empty part. Then enable the “Blade Edit Mode” (razor icon in the toolbar), or click shortcut “B.”
Then click on the audio right before the audio waves start to cut. Then, click shortcut “A,” or click on the cursor icon in the toolbar to go back to “Selection Mode.”
Once you are in “Selection Mode,” click on the cut-out part of the audio and hit “Backspace” to delete it.

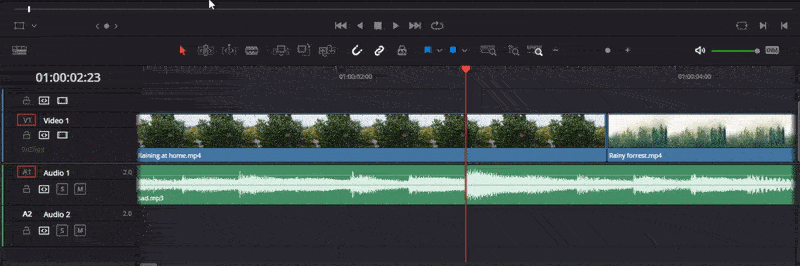
Next, drag the audio clip to the beginning of the timeline like this:
With that out of the way, let’s start editing our video clips!
How to Edit TikTok Videos In DaVinci Resolve
In the following “chapters” of the article, I will show you everything you need to make your TikTok stand out from the crowd!
Let’s get to it:
Trim and Cut Clips
Now it’s time to bring out the artist and get creative. Remember, your goal is to tell a story!
If you are making a cinematic video, editing the clips to the beat of the music is a great idea. However, if that’s not for you, the exact trim and cut principles are very effective.
- Here are different techniques to trim and split video, that will increase your editing tempo a lot.
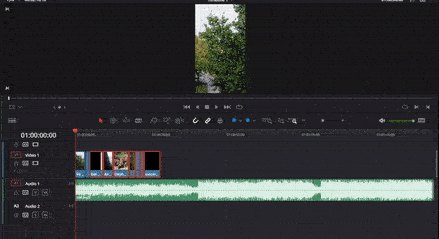
This is the moment I recommend increasing the height of the audio track to see the beat a bit better in the audio waves.
How to do it:
- Listen to the music to find a good beat.
- Place the playhead where the beat is in the audio wave.
- Activate “Trim Edit Mode” in the toolbar above the timeline (shortcut “T”).
- Grab the edge of a clip (the ending), and trim it to make it end on the beat.
- Then the following clip will start on the beat.
- The clip should snap to the playhead (time marker).
- If not, make sure that the “Snapping” (magnet icon) in the toolbar is enabled (shortcut: “N”).
Watch the illustration on how to do it:
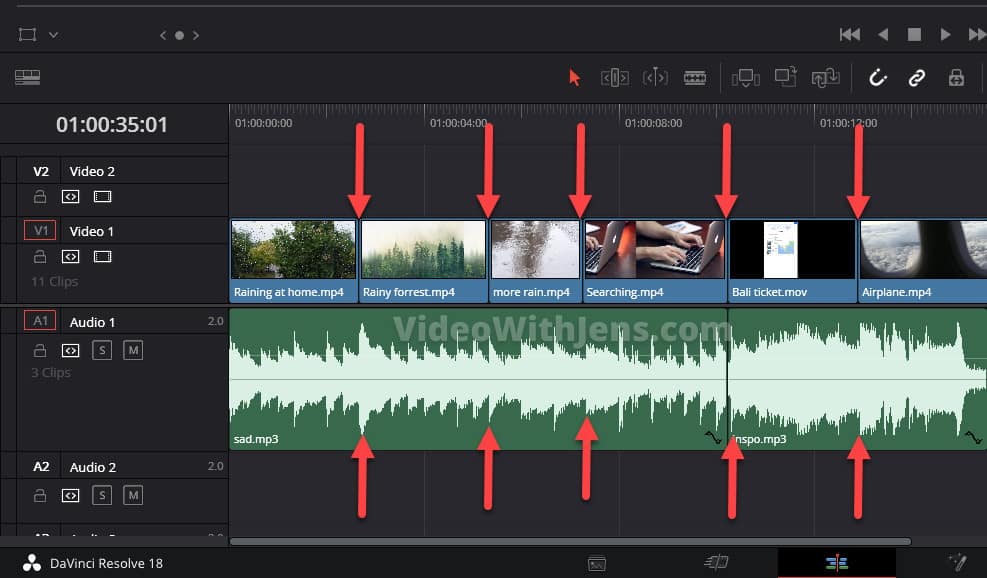
Once you have trimmed all your clips, it should look like in the image below. As you can see, all the clips starts on a beat/audio spike (or simply a nice place to change the clip).
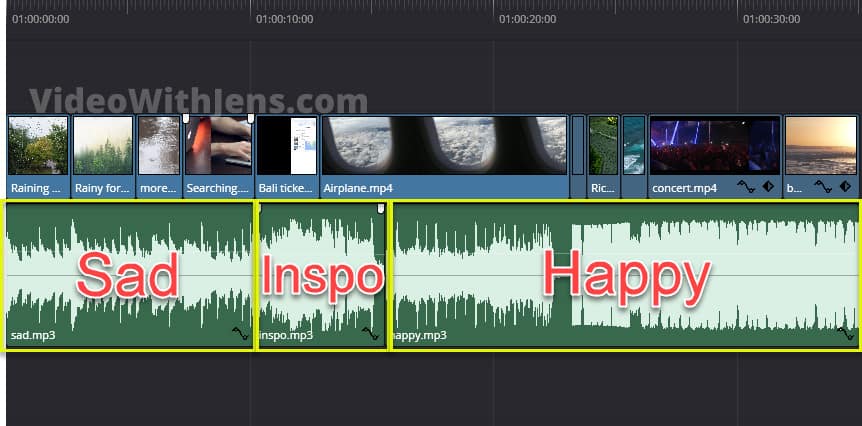
Another thing, when telling a story, I recommend using multiple songs, depending on the mood you are trying to create! This is a powerful thing.
Set Audio Levels
To adjust the audio, I like to use the normalize function.
Select the main audio clips; if you have dialogue, that’s the main audio; if you only have music, that’s the main audio.
With the clips selected, right-click one of them and click on “Normalize Audio Levels”:
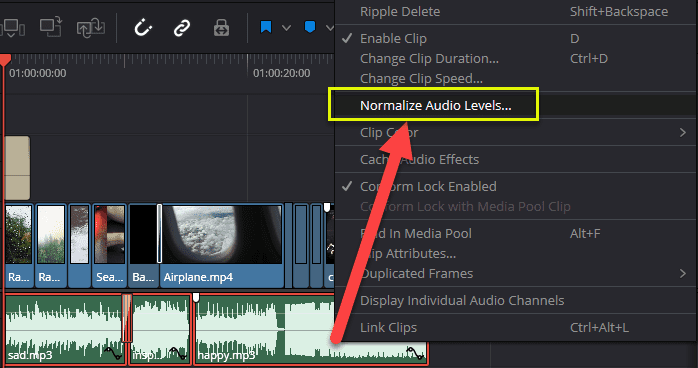
Then the normalize window should pop up.
Set the “Normalization Mode” to “Sample Peak Program”, and “Target Level” to “-2.0 dBFS”.
Aiming for 0 dBFS is a good idea (max volume before distortion) to grab TikTok viewers’ attention. However, setting it to -2.0 will give us some room if it peaks above.
Then click set it to “Independent,” and click on “Normalize”:

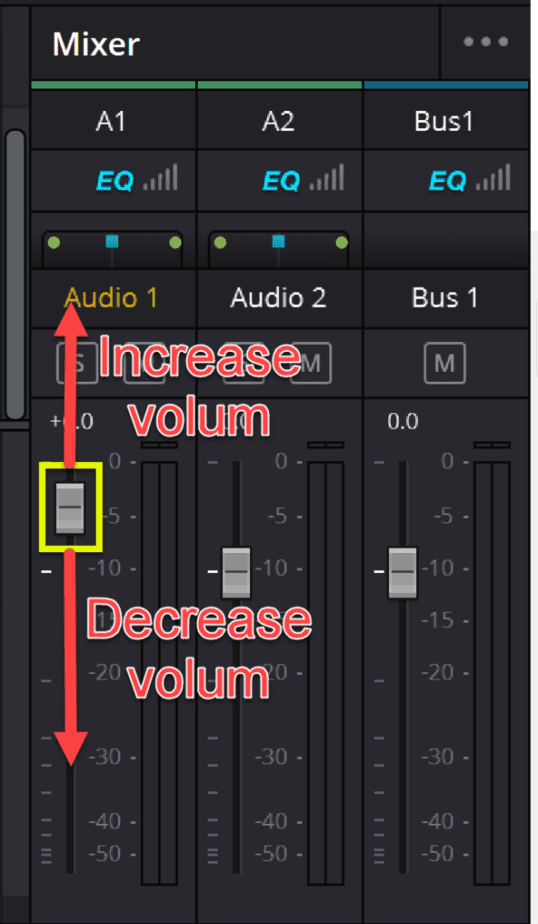
If you have dialogue and music, you should ensure that the music is neither too high nor too low.
When playing through the video in the timeline, you can check the “Mixer” on how the audio levels are doing:
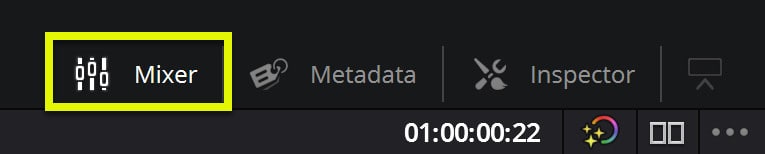
The most important thing is that the “Bus 1” never peaks above 0 dBFS!
“Audio 1” is the first audio track in the timeline, and “Audio 2” is the second track.
Set the music to about -10 to -20 dB lower than the dialogue. You may have to adjust the dialogue after normalizing as well.
Check out this article for more methods to adjust audio levels.
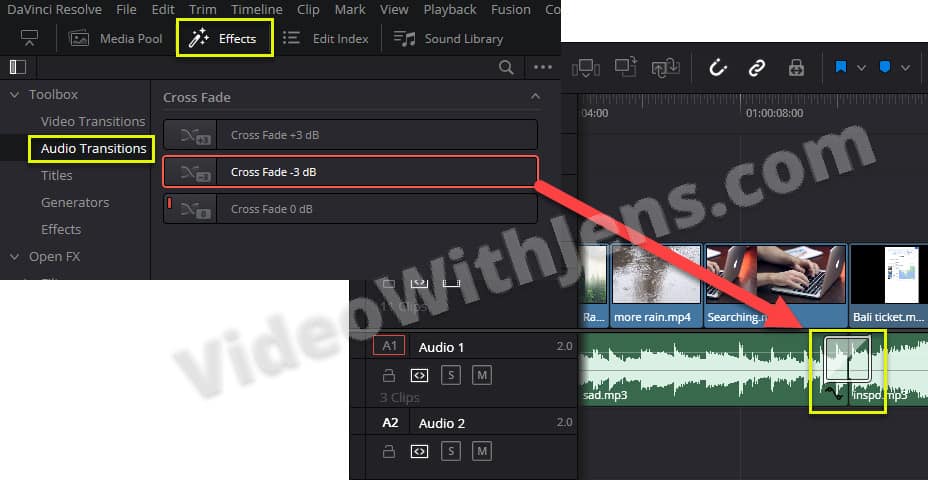
If you have multiple melodies to set the mood, I recommend using an audio transition to make the transition from one melody to another smoother!
To do this, open the “Effects” tab in the top left-hand corner of Resolve, and then “Audio Transition” under “Toolbox.”
Next, drag the “Cross Fade -3 dB” into the timeline, and drop it between two melodies!
TIP: Zoom into the timeline to see the transition more clearly.
- Hover over the edge of the transition and drag to change its duration.
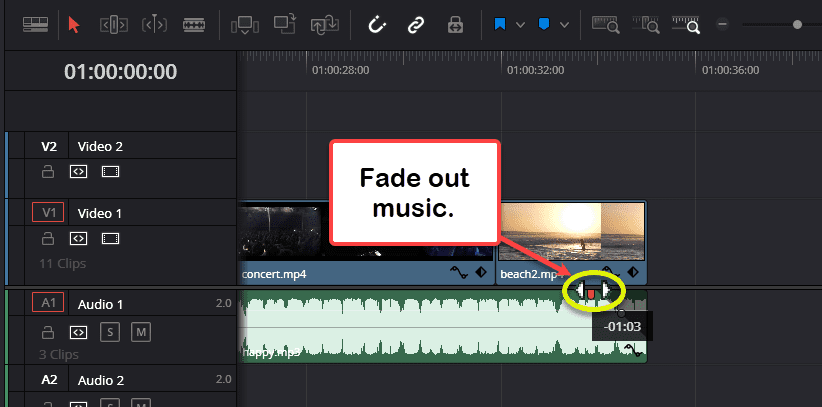
At the end of the video, you can fade out the audio to make it more smooth.
Simply, hover over the top right corner of the audio clip in the timeline, and drag the handle that appears against the right. Watch the image below:
Check out this article for more information on how to fade audio.
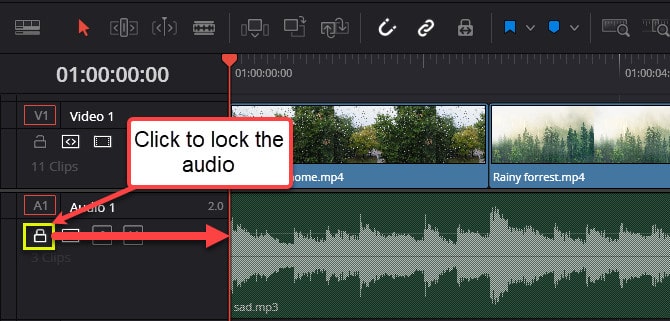
BIG TIP: When editing further, click on the locker icon on the left side of the timeline to avoid messing up the audio. This will lock the timeline and prevent it from getting messed up by accident.
Show how to move clips
Error! Filename not specified.
What Length Is a TikTok?
A TikTok video can be a maximum of 10 minutes; however, to get the best results, you should stick to between 21-34 seconds, according to data.
I recommend keeping the TikTok fast-phased and short. This is because people watching TikTok videos has no patience and will scroll further the second they are slightly bored.
If you are famous, you can probably get away with longer TikTok videos; however, until then, stick to making short and engaging videos for TikTok.
Adding Effects (Make the Videos more Engaging)
The importance of making engaging and visually entertaining videos to succeed on TikTok continue to rise.
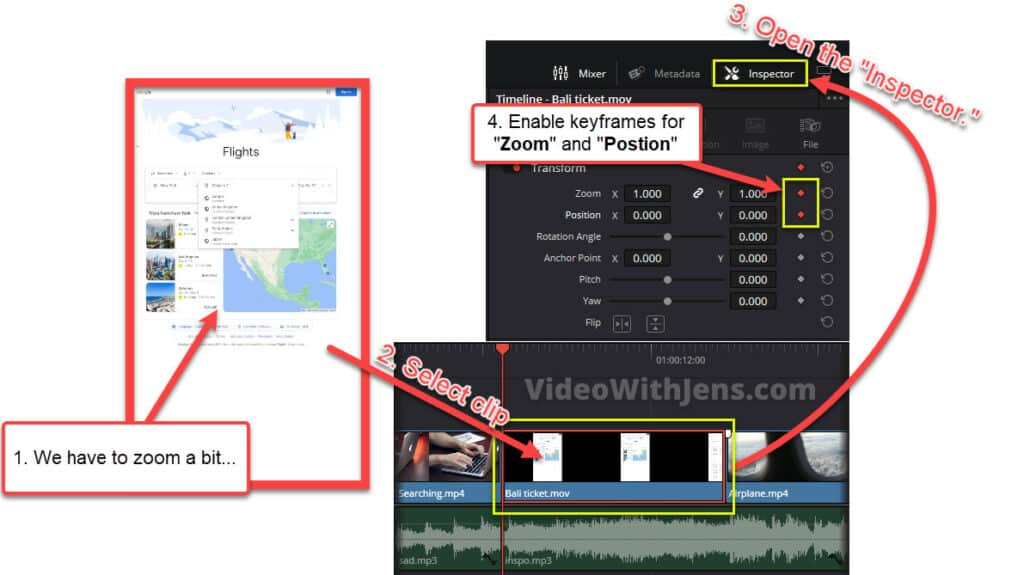
Now, I’ll show you how to add extra movement to your videos, keyframing the position and zoom values.
For example, in the image below, you can see I’ve included a photo of google flights. This is a clip in the TikTok I’m creating.
However, as you can see, it’s way too zoomed out and does not make sense. However, as you’ll soon see, the clip has a lot of meaning.
Here are the first steps:
- Place the playhead (time marker) where you want the zoom/movement to start.
- Select the clip in the timeline.
- Open the “Inspector” tab.
- Under the “Transform” options, click on the diamond icon next to “Zoom” and “Position” to enable keyframing.
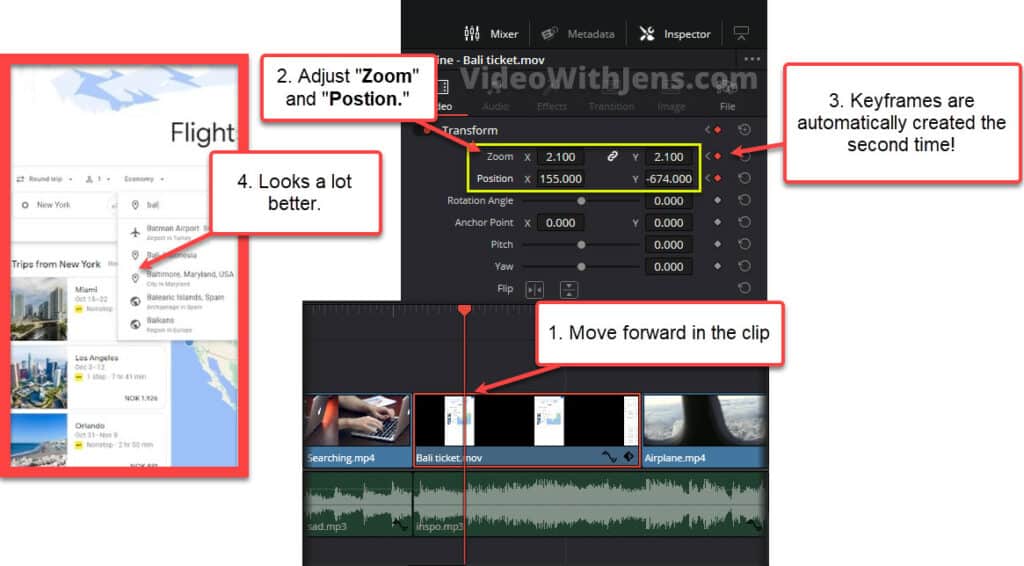
(Steps continue below)
- Place the playhead in the timeline where you want the zoom/movement to stop.
- For example, where you are fully zoomed in.
- It must be on the same clip for keyframes to work properly.
- With the clip selected, open the “Inspector” tab again.
- Change the “Zoom” and “Position” values.
- Keyframes will automatically be generated.
As you can see in the image below, my google flight image makes sense as it’s possible to see what’s going on + we have a smooth zoom-in effect.
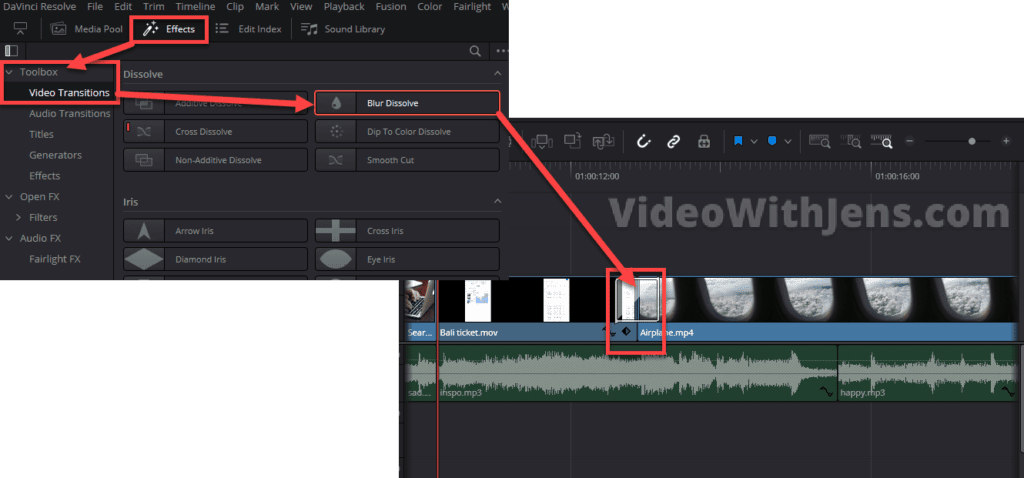
Another way to make the transition between the clips more engaging is by using “Video Transitions.”
You’ll find these in “Effects” > “Toolbox” > “Video Transitions.”
I’m going to add a “Blur Dissolve,” so I’ll drag it to the timeline and drop it between two clips.
If you want to adjust the duration of the transition, hover over the edge of it in the timeline, and stretch it to adjust the length.
To select the transition, click on the edge of it in the timeline. Then you can adjust it in the “Inspector” tab. Like adding it to only one of the clips etc.
Fix issue transition issue: If the clips are not trimmed, the transition will not work correctly.
- You need to trim the ends where you want to add the transition.
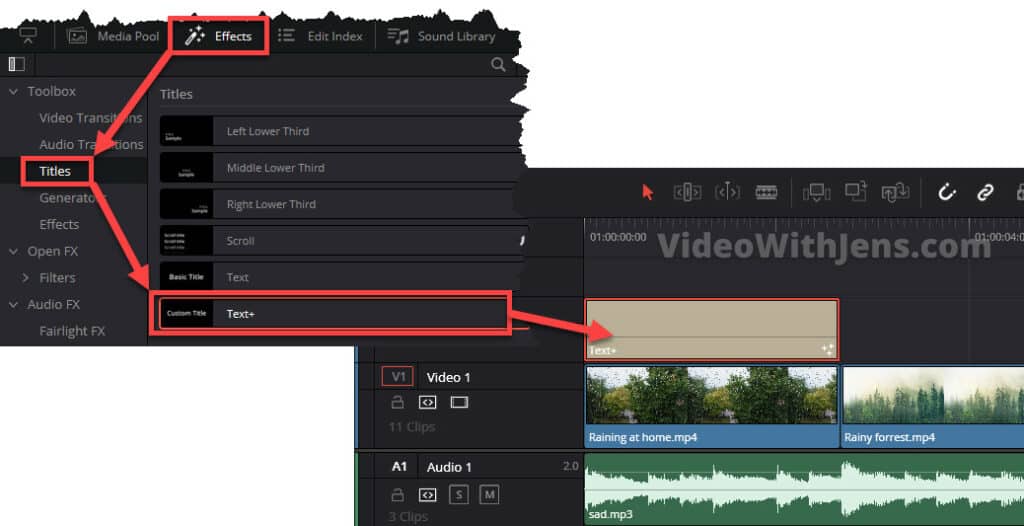
How to Add Text to TikTok Videos DaVinci Resolve (+ Cool effect)
Text is a huge part of TikTok videos and something that will help you go viral.
Gladly, it’s really easy to add good-looking text in Resolve.
Start by opening the “Effects” tab in the top left-hand corner, then click on “Toolbox”> “Titles”.
Drag and drop the one called “Text+” in the timeline; you must drop it one track above the video clip:
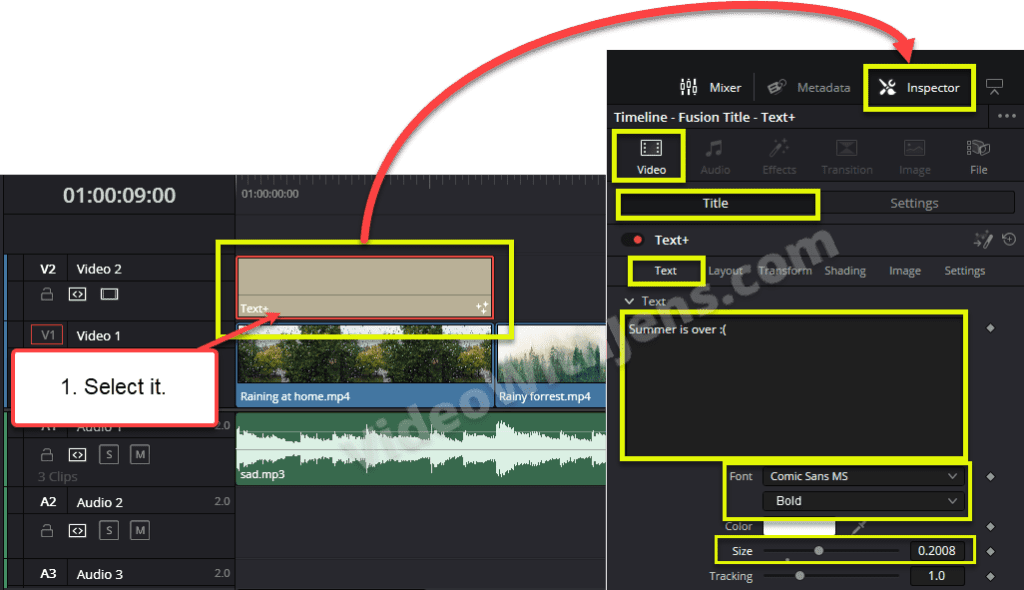
Next, click on the text in the timeline to select it and open the “Inspector.”
Inside it, open “Video”> “Title”> “Text”; now, you should be able to see a textbox where you can type in the text you want to show in the video. For example, in the image below, I’ve written: “Summer is over :(”
Then:
- Set “Font” against “Comic Sans MS”, and make it “Bold.”
- Set “Size” to what looks best on your video.
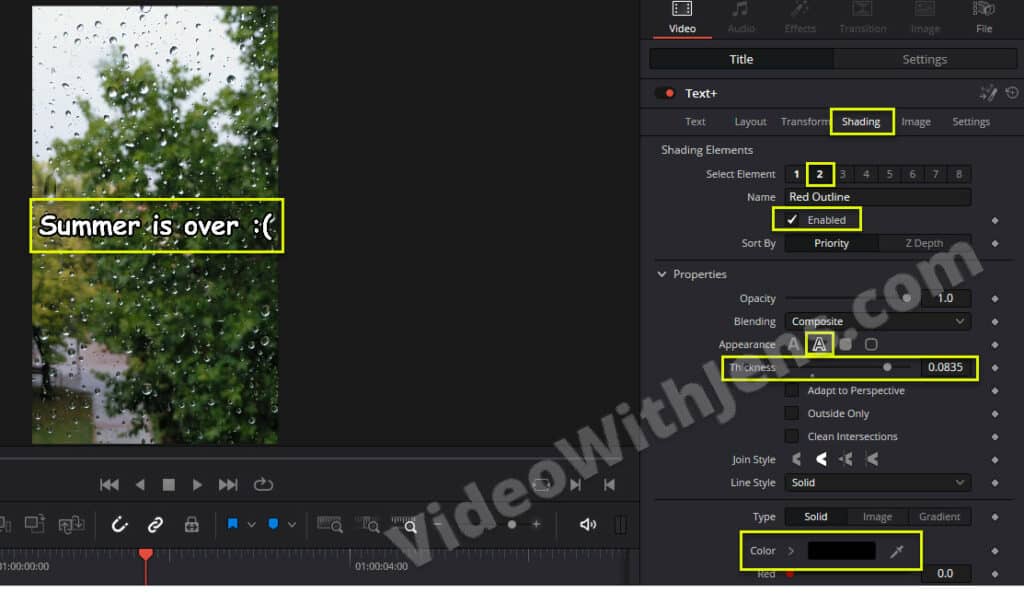
Now, go to the sub-tab “Shading”.
Then on the right side of “Select Element,” click on “2,” and check off the box next to “Enabled.”
Next, under “Properties,” select the outline icon (it may be activated by default, and adjust the “Thickness” to make it look good!
Lastly, set the “Color” to black:
Create Write-On Effect
Next, I’ll show you how to do the write-on effect to your text.
This will make it look like your text is getting written in the video.
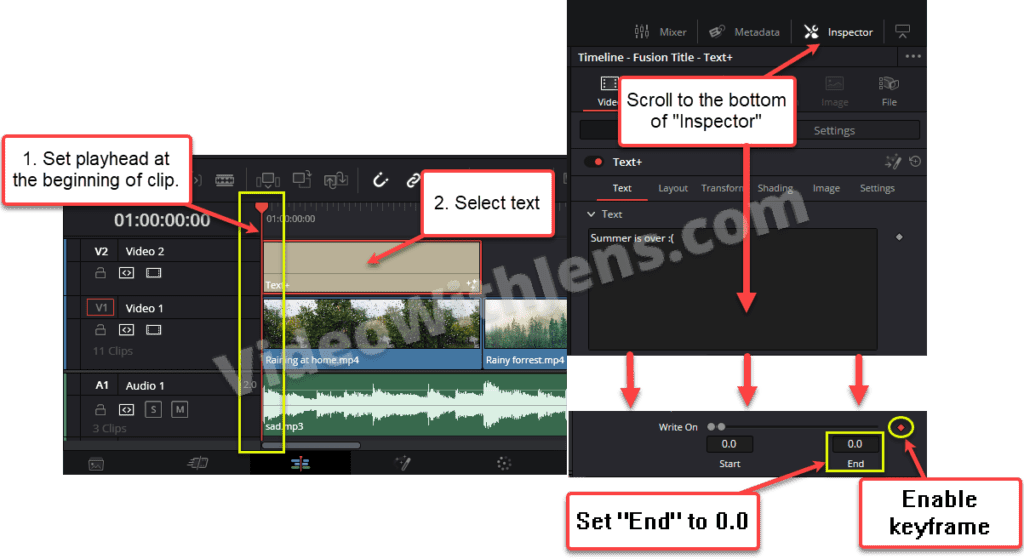
Start by placing the playhead at the beginning of the “Text+” template in the timeline, and then click on it to select it.
Next, open the “Inspector” tab, scroll down, and locate “Write-On”. Now, click on the diamond icon to create a keyframe, and set the “End” value to “0.00” (Watch the image below).
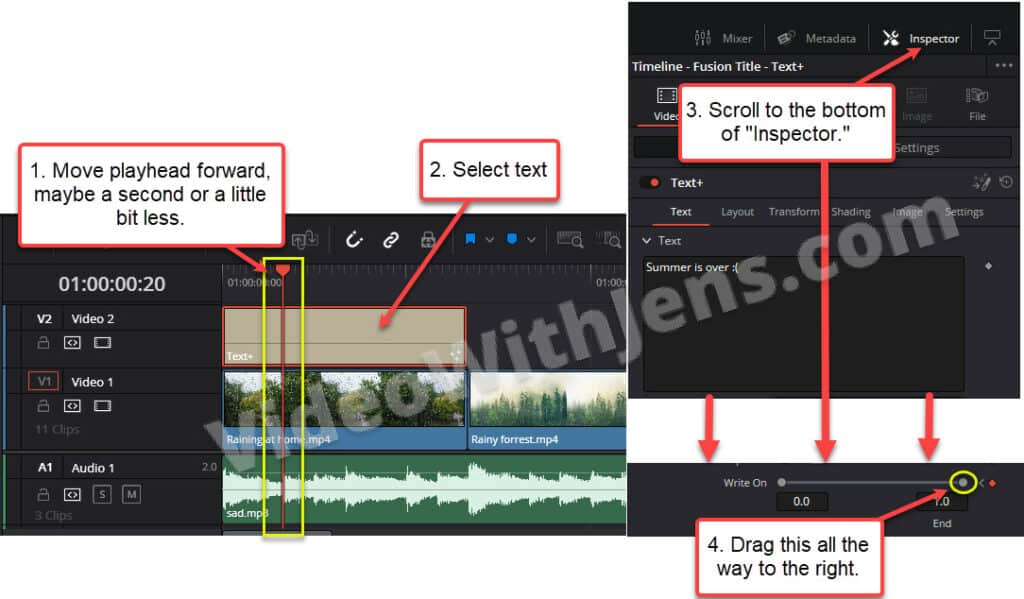
Grab the playhead, place it where you want the text to be fully written, and click on the “Text+” template to select it.
Once again, open the “Inspector” tab and scroll down to “Write-On.” This time all you have to do is to increase the write-on to the max by dragging the gray dot to the right side or set “End” to “1”:
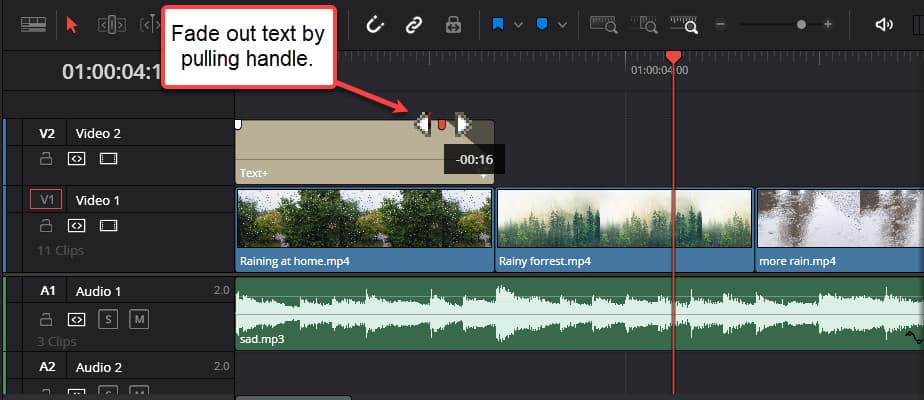
If you play through the video, it should look like the text is being written in real time! This is an excellent way to make the video more interesting.
To complete our awesome-looking text, hover over the right corner of the text template in the timeline, and drag the handle that appears a bit to the right side to fade out the text:
Next, we’ll make your video’s colors pop, which is a great way to stand out from the crowd on TikTok:
How to Color Grade TikTok Video in Resolve
I’m going to show you a simple yet effective way of color grading using what’s called an “S-curve.” This is a great way to create a bit more contrast and stronger colors.
I’ve written an entire article on this here if you want a bit more details.
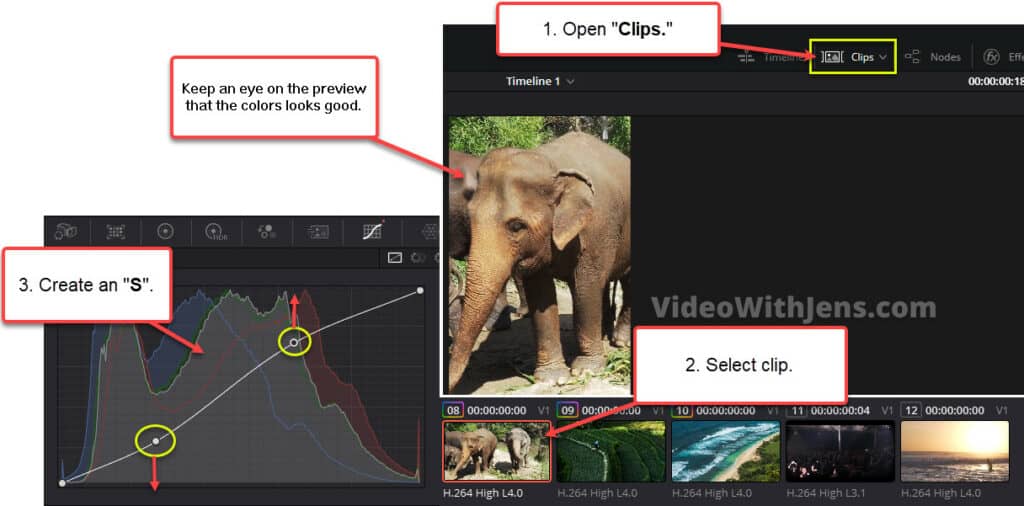
Anyways, to get started, head over to the “Color” page of Resolve:

In the top left-hand corner of Resolve, make sure that the “Clips” tab is open; it’s located in the middle of the “Color” clips, containing all the clip’s thumbnails.
In the “Clips” tab, select the clip you want to color grade, then open the “Curves” tab.
The curves control the luminance/brightness of all your colors. Simply click and drag on the diagonal line to bend it. Then, gently try creating an “S” shape, like the one in the image below.
Watch how it’s affecting the video while doing this.
Alright, that’s it for the editing!
Next, I’ll show you the best export settings to use for TikTok to get the highest quality video possible:
How to Export TikTok Videos in DaVinci Resolve
- Open the “Deliver” page, and click on “Render Settings.”
- Select “Custom Support,” give a “File Name,” and set the “Location.”
- Change “Format” to “QuickTime” and “Codec” against “H.265.”
- Set “Resolution” to “1080 x 1920.”
- Set “Quality” to “30.000 Kb/s.”
- Click on “Add to Render Queue.”
- Click on “Render All” in the “Render Queue” window.
Don’t worry if that was confusing; I’ll explain everything in detail now.
Make sure that you are on the “Deliver” page of Resolve:

Then in the “Render Settings” tab, you want to choose “Custom Export.”
Next, give the video a “File Name” and click “Browse” to set the location where you want it to be saved.
Also, make sure that the render “Single clip” is enabled, NOT “Individual clips.” This would export all the clips in the timeline as their own video…

In the “Video” sub-tab, make sure that “Export Video” is checked off, and set “Format” against “QuickTime” and the “Codec” to “H.265”; read more about why here.

Next, set the “Resolution” to «1080 x 1920,» a full HD vertical video!
- In DaVinci Resolve v.18.1 and above, you simply can check off the box next to Use vertical resolution!
The frame rate should be the same as your timeline, so there is no need to change that one.
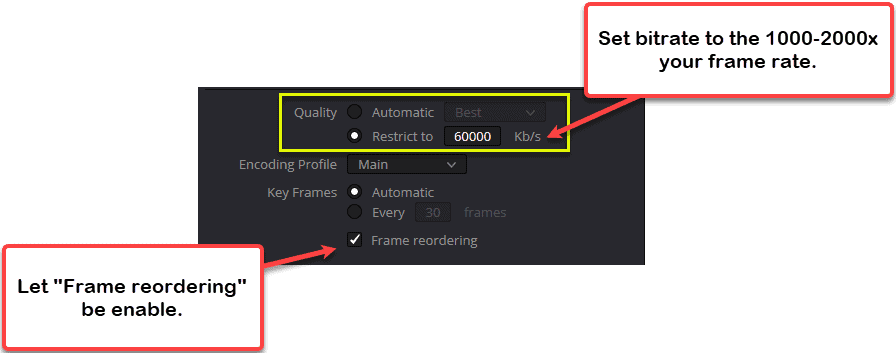
Next, for the “Quality,” you want to choose the “Restrict to” option.
To calculate the amount of bitrate, multiply your frame rate by 1000 (for pretty good quality) and 2000 if you want the absolute best quality. On the other hand, multiplying with 2000 will make twice as big a file for a minor improvement (the choice is yours).
Example:
My frame rate is 30 FPS, and 30 * 2000= 60.000=60.000 Kb/s.
Also, ensure that “Frame reordering” is enabled, giving you slightly better quality.
You can read this article to learn more about the export settings in Resolve.
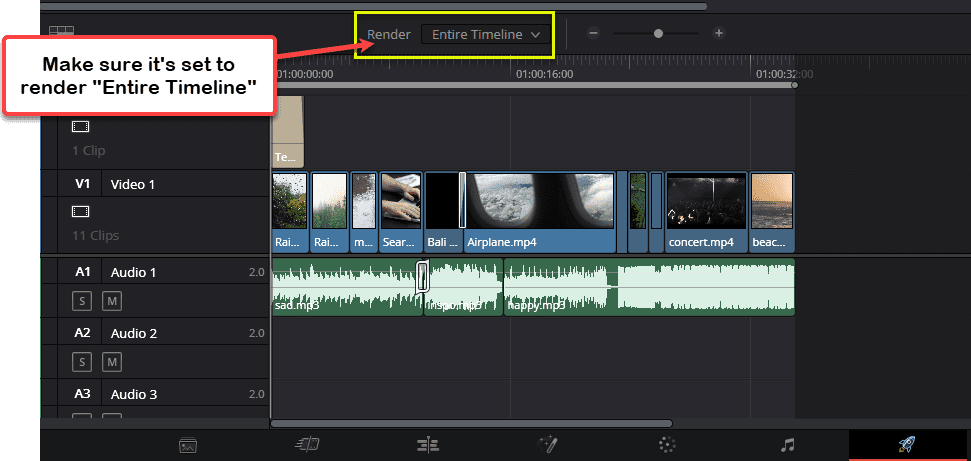
Above the timeline, ensure that render is set to “Entire Timeline”; if not, you will suddenly only export part of your project.
It’s time!
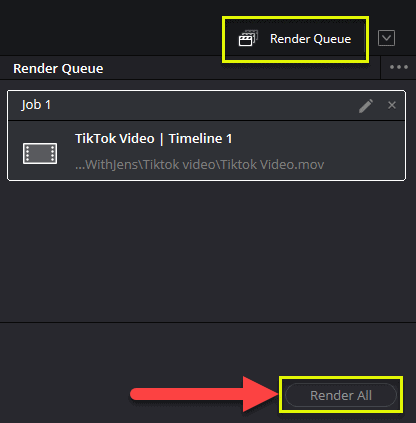
It’s time to click on the big “Add to Render Queue” button at the bottom of the “Render Settings” tab.
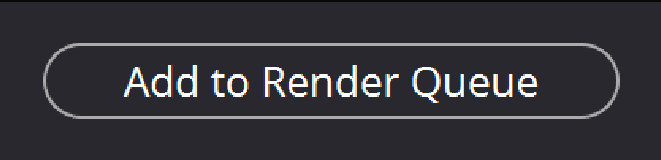
Once you have done that, the project should appear as a “Job 1” in the “Render Queue” on the right side of the “Deliver” page.
Next, click on “Render All”:
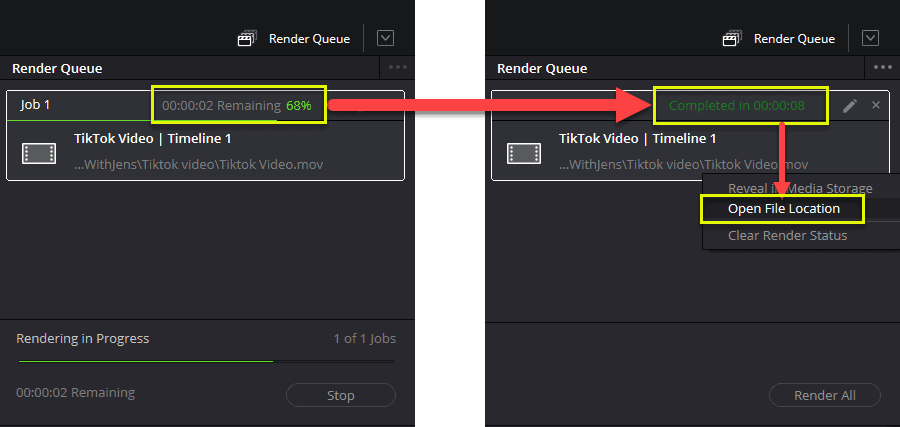
The render time depends on the file size; once it’s complete, you can right-click “Job 1” and then click on “Open File Location”:
How to Export from DaVinci Resolve to TikTok
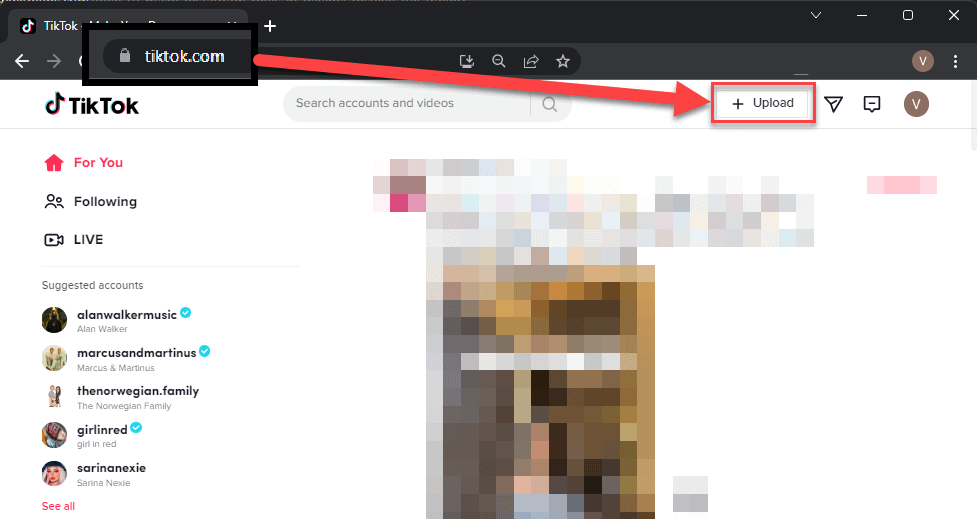
You can’t directly upload to TikTok from DaVinci Resolve. The best way is to export the video to your hard drive and then upload it on TikTok’s official website in your browser, which is accessible from desktop.
Uploading Video to TikTok
Open your web browser, search for “tiktok.com,” or click this link.
Then, in the right-hand corner (at the time of this writing), click on “Upload.”
If you’re not signed in to any account, you will get asked to do so.
Then, drag the file you exported from DaVinci Resolve into TikTok and drop it in the “upload rectangle,” as I’m illustrating in the image below:
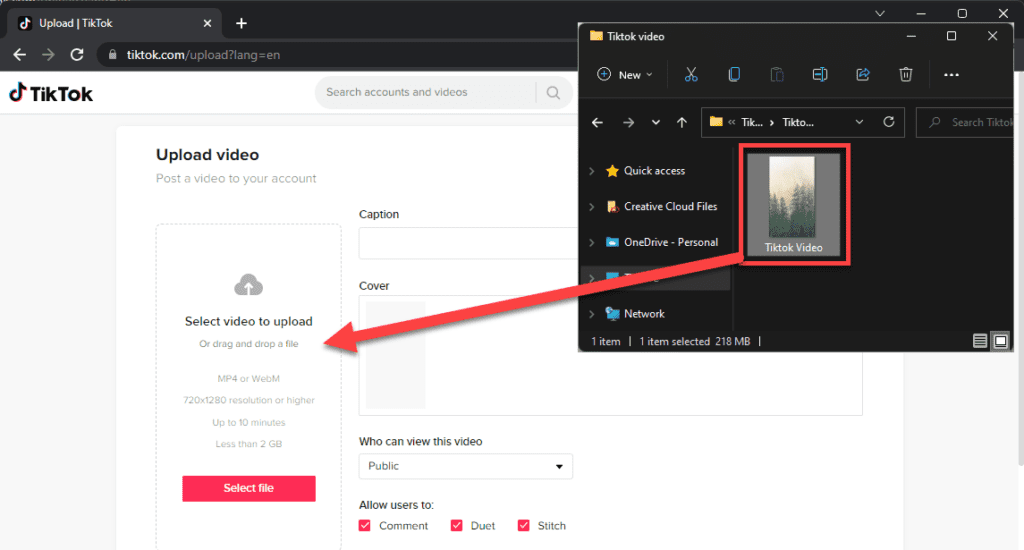
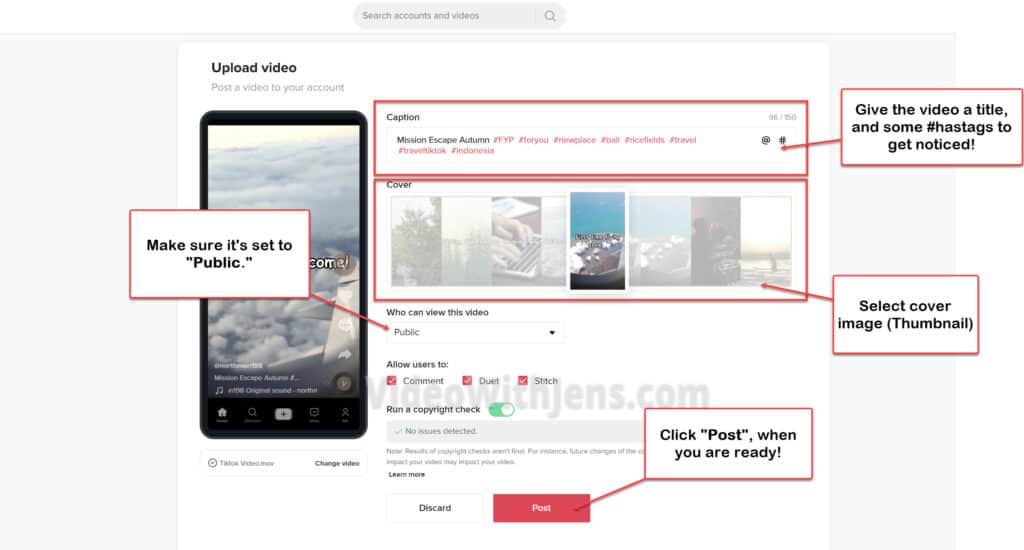
Now you will want to give the video a title, which you write into the box beneath “Caption.” Finally, you should include some famous hashtags to make the video visible to more people.
Then, under “Cover,” you can choose the thumbnail of your TikTok video. This is the image people will see before playing your video (very important!).
Set the visibility to “Public,” and click on the “Post” button once you’re ready to show your TikTok to the world! (Fingers crossed you get a bunch of views)
Best Export Settings for TikTok (A Case Study)
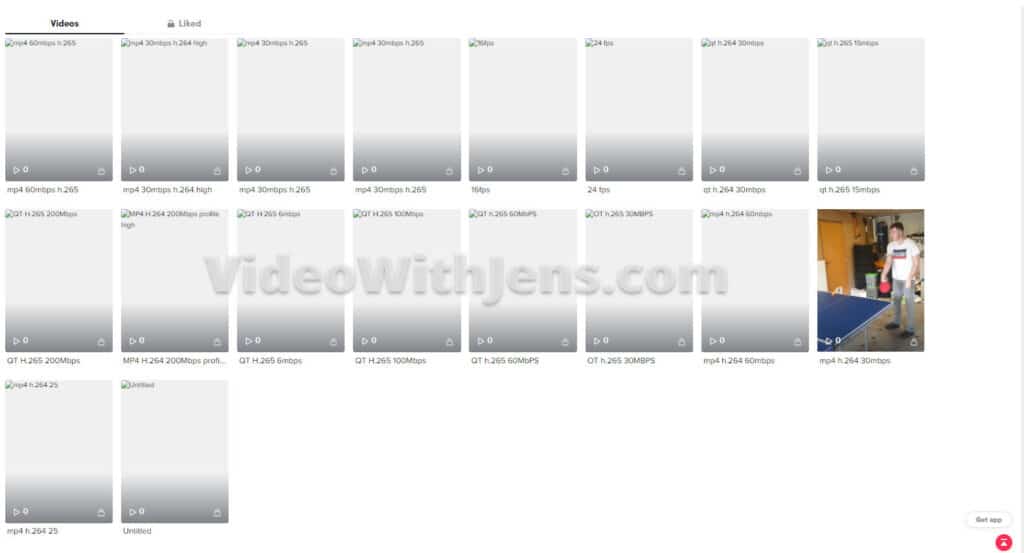
After doing A BUNCH of testing, exporting, and uploading nearly 20 different format variants from Resolve to TikTok, I’m delighted to share the results with you.
Here are the questions I wanted an answer to:
- Is MP4 better than QuickTime on TikTok?
- What’s the best codec to use for TikTok videos?
- What’s the best bitrate to use for TikTok videos?
- Is uploading in the WebM format worth it?
To answer those, I exported many MP4s and QuickTime files in different bitrates and compared the H.265 and H.264 codec.
Here’s what my TikTok profile looked like: (Only test videos)
Did I figure it out? Yes.
Was there a HUGE difference between the uploads? Yes, and no.
The conclusion:
- There is no quality difference between the MP4 and QuickTime when uploading to TikTok.
- H.265 gives you a little bit more details than H.264, especially where there is motion.
- When calculated in Mb/s, the bitrate should be the same as the frame rate or higher.
- Resolve measures bitrate in Kb/s, so if the frame rate is 30, I recommend setting the bitrate to a minimum of 30.000 Kb/s and a maximum of 60.000 Kb/s.
- Uploading in WebM is not worth it; it gave the worst quality.
- I had to export the video from Resolve in a lossless codec and transcode it to WebM in HandBrake as Resolve does not support WebM.