How to Speed Ramp in DaVinci Resolve (+ Tips and Tricks)
Creating a speed ramp is the perfect way to create highlight something in an epic way!
Gladly for us, this is an effortless thing to do in DaVinci Resolve.
So let’s get to it!
First things first: Make sure that you have added your clip to the timeline inside Resolve.
You also want to be on the “Edit” page:

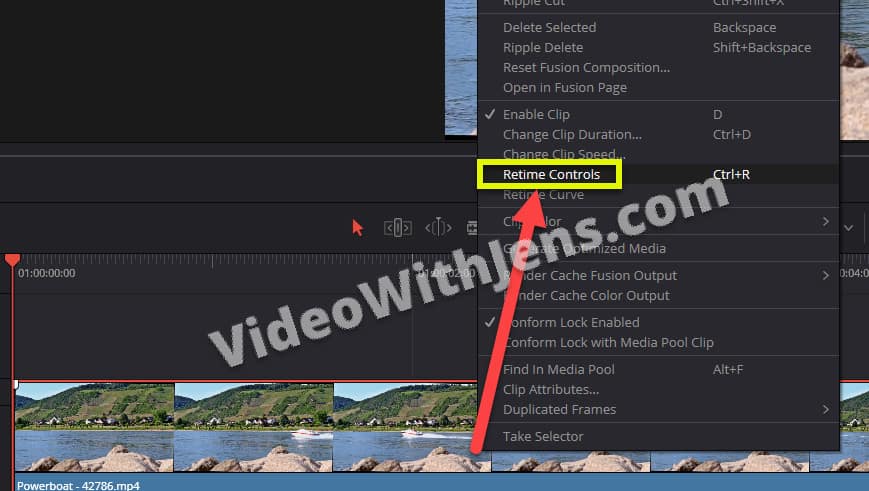
Then right-click the clip you want to speed ramp, and select “Retime Controls“:
Now your clip should look slightly different in the timeline with a bunch of triangles on it.
This indicates that the retime controls are enabled!
In this example, we will create a speed ramp effect on a driving boat. We will speed the clip up, slow it down, and up again. However, the same principle applies if you want to do it another way!
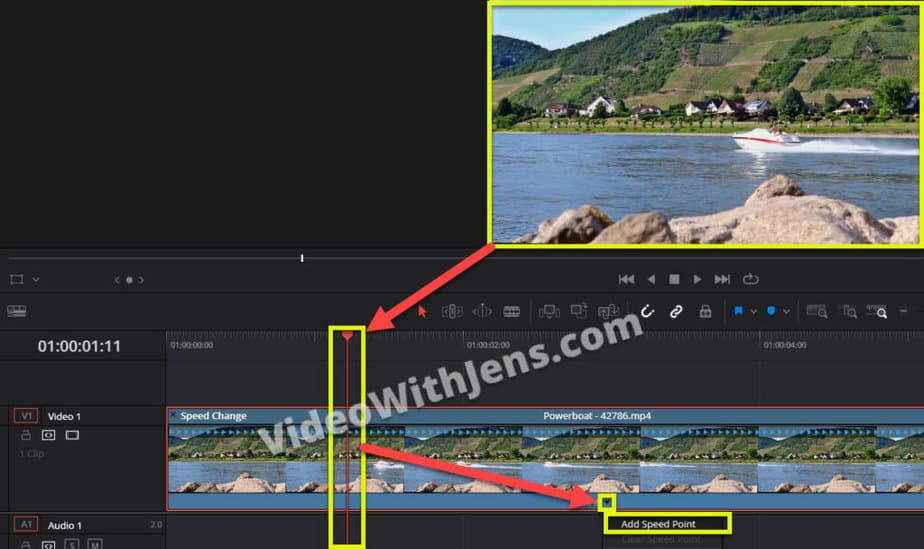
Now, play your video in the timeline, and stop where you want the speed ramp to start.
Then click on that little triangle located at the bottom in the middle of the clip, and click on “Add Speed Point“:
Create another speed point where you want the speed ramp to end:
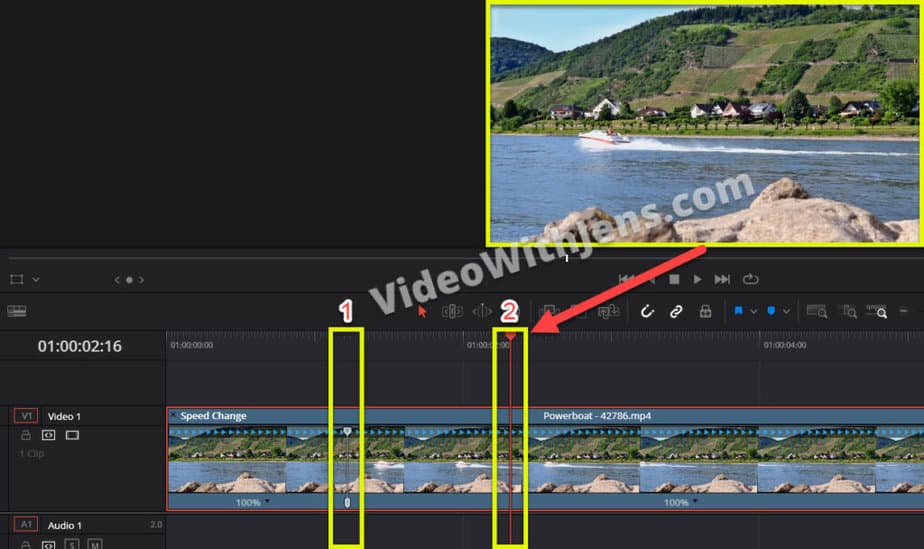
Now we have created two speed points. This leaves us with three different parts of the clip we can change the clip speed off.
Go ahead and click on the triangle again; this time, choose “Change Speed,” then select how fast you want that part of the video to be:
I’m going to make the beginning of the clip play eight times faster= 800%
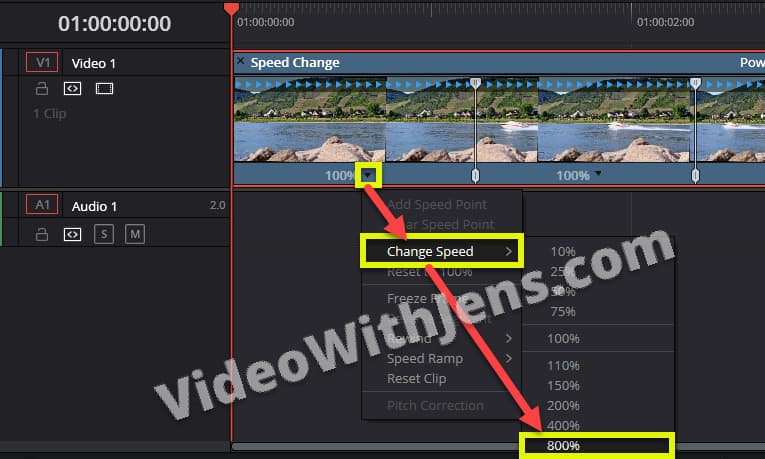
I’ll also set the last part of the clip to 800%:
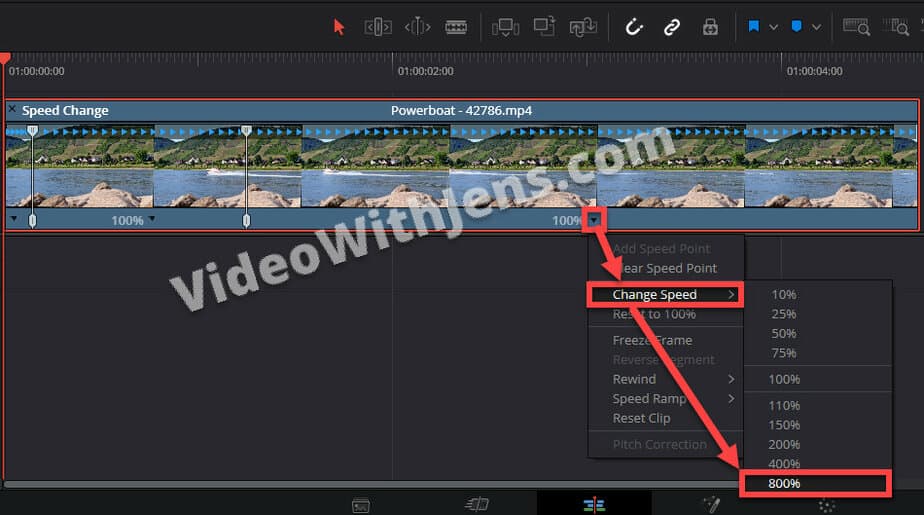
Now the three parts of my clip/speed ramp are 800% – 100% – 800%.
Meaning that it’s first really fast, then slows down to highlight the boat, and then really fast again.
Watch the illustration image below:

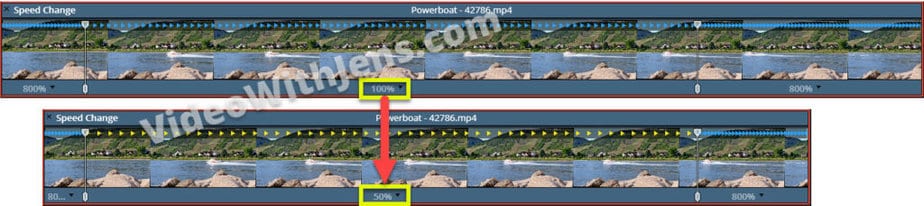
We could also change the 100% (normal speed) to 50% to draw extra attention to our object (boat):
Next, we will make the speed ramp look much better with more gradual transitions.
First, a quick tip:
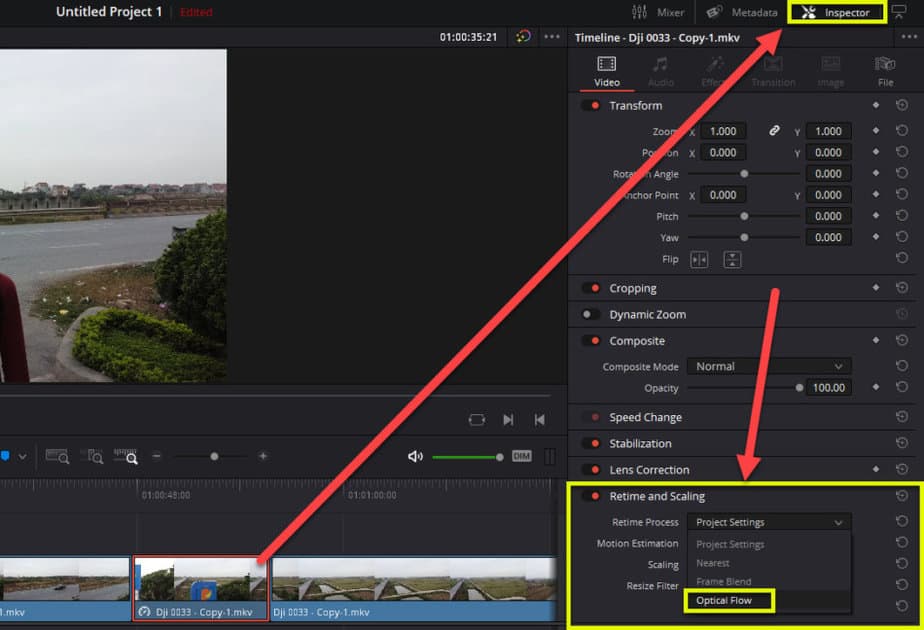
If you decide to set your clip to below 100%, I recommend activating “Optical Flow” to avoid your video getting laggy (if it’s not shot at a higher FPS than the main footage).
To do this, simply select the clip in the timeline > “Inspector” > “Retime and Scaling“, and set “Retime Process” against “Optical Flow“:
(Do not mind the clips in the image below, as it’s from another tutorial…)
Create Smooth Speed Transitions
Alright, so instead of going instantly from 800% to 100%, we will make it more gradual and smooth.
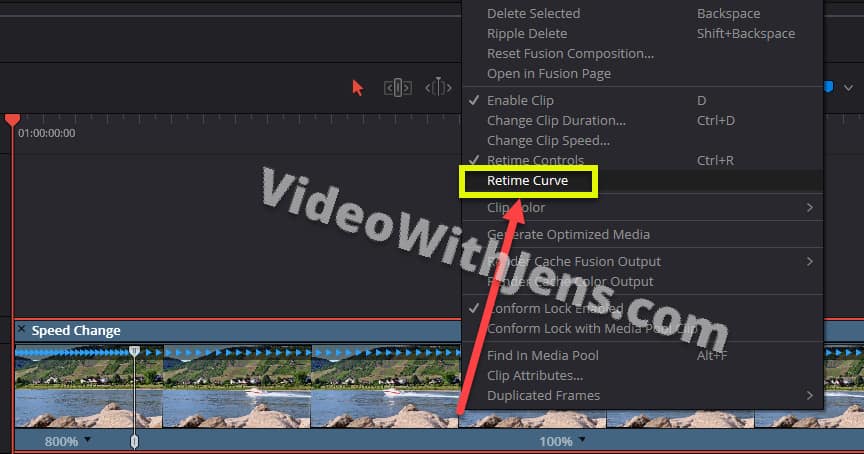
To do this, right-click the clip in the timeline and select “Retime Curve“:
Then you should see the curve below the clip in the timeline.
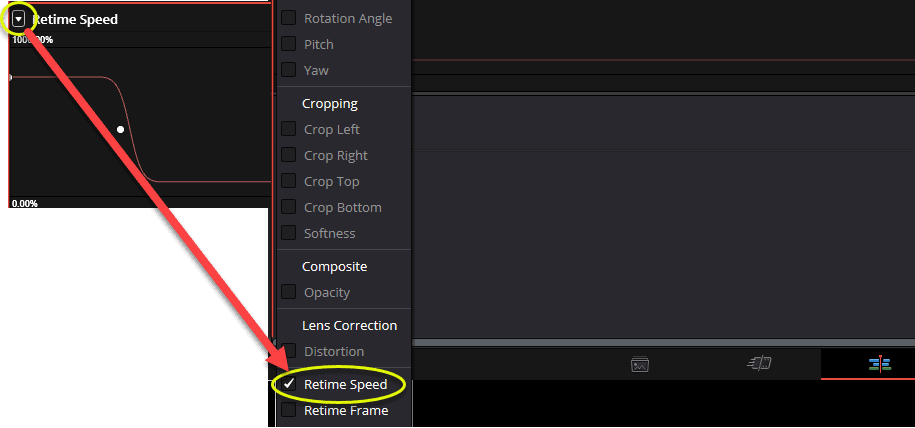
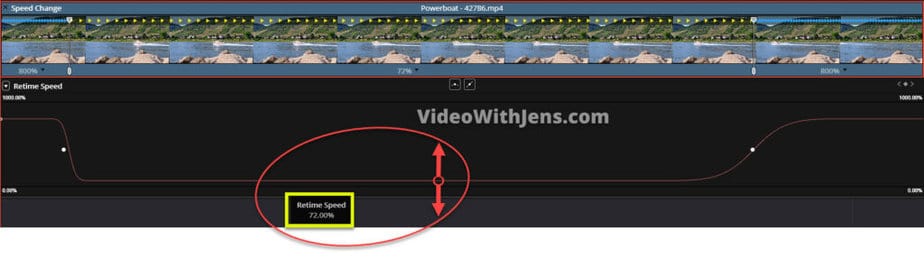
Now you want to click on the triangle in the upper left-hand corner of the retime curve window, and then un-check “Retime Frame” and check off “Retime Speed” instead:
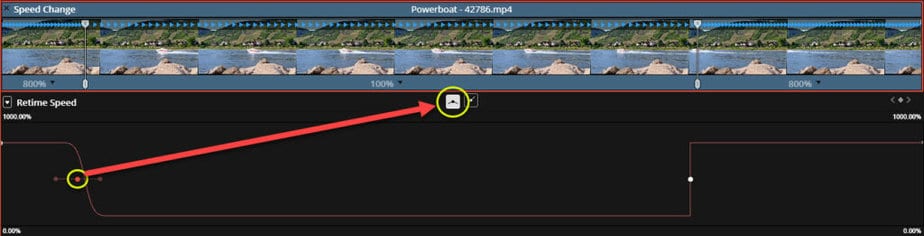
Once that is done, click on the line/curve in the retime curve window to select it.
Now you should be able to see the speed points, which are represented by the white dots on the line.
Click on the white dots to select them, and then click on the curve line icon above the retime curve (watch the image below):
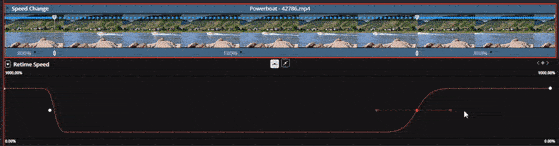
Once you have “curved” all the speed points, when clicking/selecting them, you should be able to see two additional dots appear. These dots work as a handle, which you can drag to the sides to make the curve more smooth.
You can see the GIF illustration below on how to do this.
The more you pull the “handle,” the more smooth the transition from one speed to another speed will be. You can also make the transition faster by making the curve steeper.
It’s also possible to change the clip’s speed using the curve.
To do this, hover your mouse over the line, click, hold and drag it downwards to slow the clip down and vice versa. Watch the image below:
Alright, now it’s time to give it the BOOM effect:
Add Special Effects
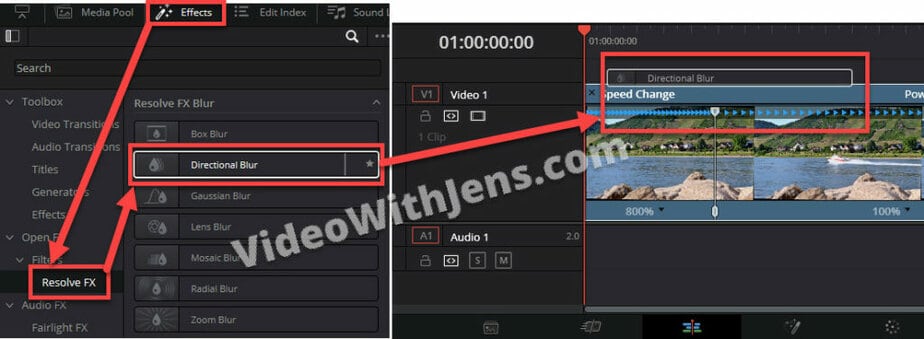
For this example, we will add some motion blur to it!
To do this, go to “Effects” > “Open FX” > “Filters” > “Resolve FX” and then drag the “Directional Blur” to the timeline and drop it on top of the clip with the speed ramp (Refer to the image below.)
With the effect applied, we have to do some adjustments.
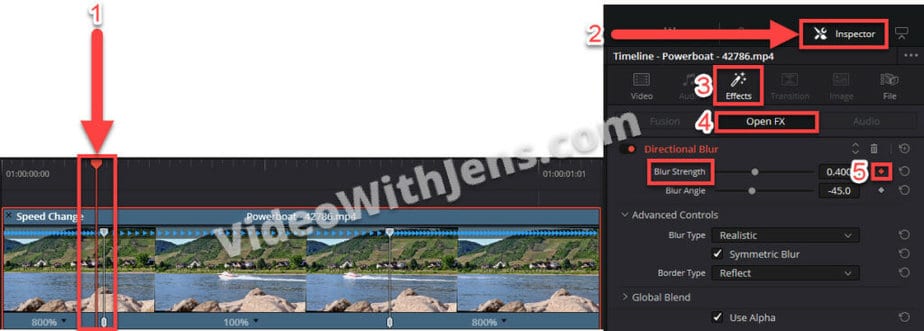
Select the clip with the effect to select it and open the “Inspector.” Then open the “Effects” > “Open FX“.
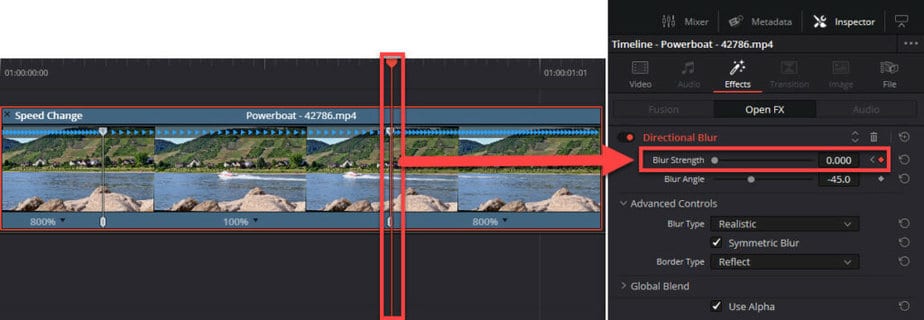
Now go to the part of the clip where the speed ramp starts, and then go one frame backward by using the arrow key to the left (on your keyboard).
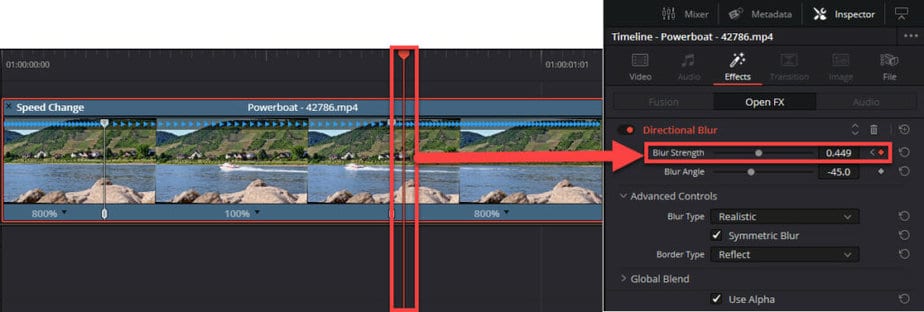
Then click on the “diamond/small rectangle” next to “Blur Strength” (where I’ve written “5” in the image below).
The diamond should then turn red which indicates it’s enabled:
Next, use your arrow keys and go one frame to the right. Then set the “Blur Strength” to 0:
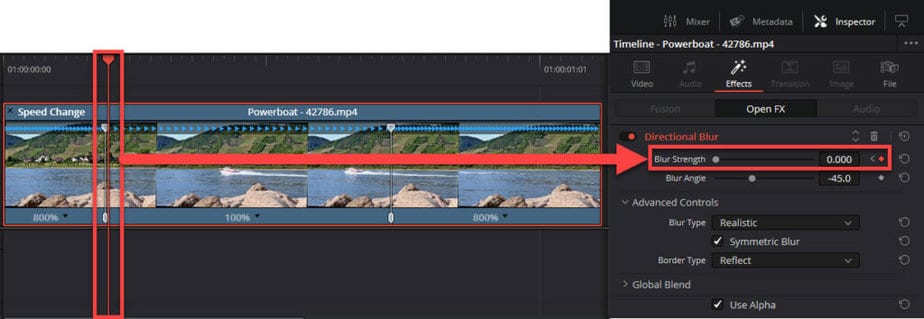
Now, go to the point where the speed ramp is about to speed up again and set “Blur Strength” to about 0.4-0.6:
Then go one frame to the right and set the “Blur Strength” to 0:
By now the speed ramp should look pretty dope.
TIPS: You can also change the “Blur Angle” if the movement goes upwards instead of sideways.
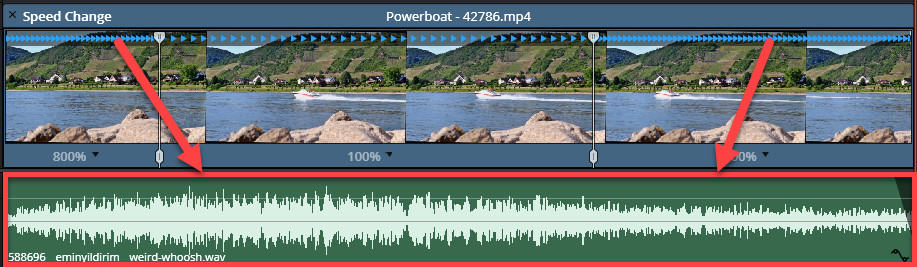
The last thing you should do is add some audio that fits the effect or movement.
I went to FreeSound.org and searched for “Woosh.” I found this one, by the way.
You’ll have to cut it as it fits the movement!
Alright, that’s it!
If you want to learn about a BUNCH of different tips and tricks to change speed in Resolve, I suggest you check out this article!