Fix MP3 Import Issues in DaVinci Resolve (4 Solutions)
In this article, you’ll learn how to import MP3 files to DaVinci Resolve.
AND what to do if you are having problems and can’t import the MP3.
Here’s a quick way to import MP3 to Resolve:
To import an MP3 file to DaVinci Resolve, open the “Media Pool” in the top left-hand corner of Resolve. Inside it, right-click on the gray background, and select “Import Media”. Then locate the MP3 file in your system folders, select it, and click on “Open”.
For more details, read on!
Does DaVinci Resolve support MP3?
DaVinci Resolve supports MP3 files with a constant bit rate. Simply, import the MP3 to Resolve by right-clicking on the gray area in the “Media Pool”, and selecting “Import Media”. Locate the MP3 file in your system folders and click on “Open”.
Down below are some pictures on how to import MP3 files to Resolve.
However, if you are experiencing problems with importing your MP3 file, you can click here to go directly to the solution for that!
Anyways, let’s continue:
How to Import MP3 Files in DaVinci Resolve
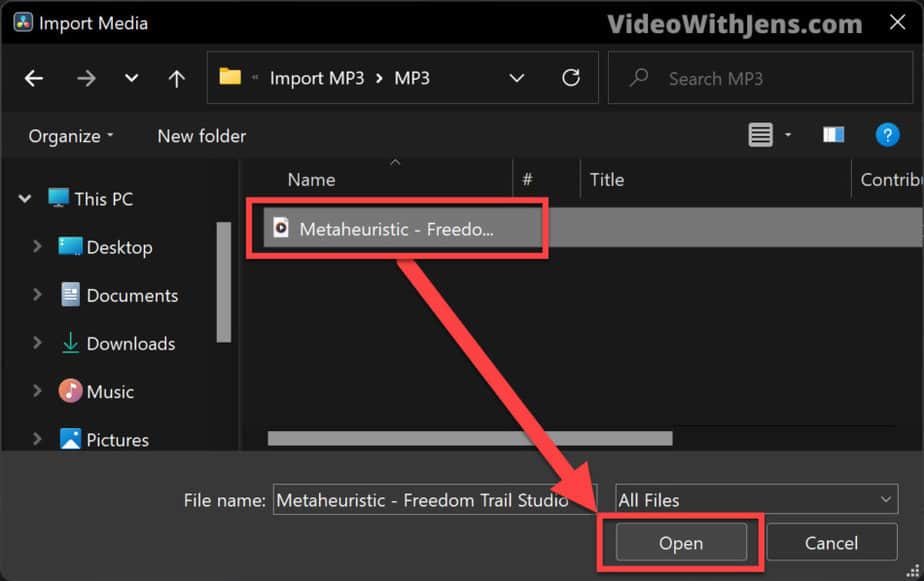
1. Open the “Media Pool” (top left-hand corner) inside Resolve.
2. Right-click on the gray area and click on “Import Media”.

3. Locate the MP3 file in your system folders, and click on “Open”.
If it’s multiple files, simply hold down CTRL (Command on MacBook) and select all the clips you want to import:
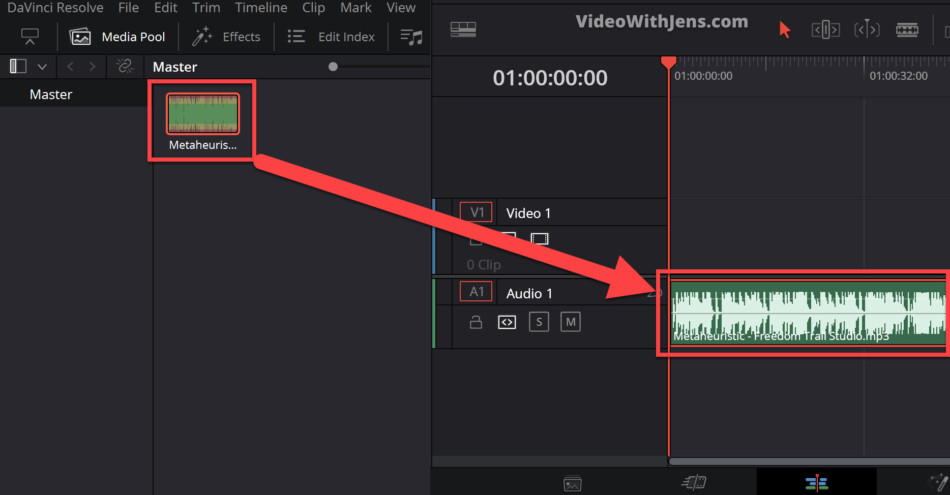
4. Drag the MP3 file from the “Media Pool” and drop it on the timeline.
There you go!
That’s a simple and effective way of importing files to DaVinci Resolve. The method above works for all file types as long as they are supported by Resolve.
However, not all file types are supported, which brings us to the next section of the article:
Can’t Import MP3 to DaVinci Resolve
To import an MP3 file to DaVinci Resolve it’s recommended the file has a constant bit rate (CBR). DaVinci Resolve does not support MP3s with variable bit rate (VBR), therefore converting the file might be necessary.
Down below is 4 different ways you can try if you can’t import your MP3 file to Resolve: (Including one which involves changing from CBR to VBR).
4 Ways to Fix MP3 Importing Issue in DaVinci Resolve
- Make sure you are adding the MP3 file to an audio track.
- Convert the MP3 to an MP4 file.
- Transcode Variable Bit Rate (VBR) to Constant Bit Rate (CBR).
- Convert MP3 file to WAV.
The first way of fixing this problem is very easy. It’s not really an importing issue either, the problem is that you can’t add the MP3 to the timeline. However, I’ve seen people doing this wrong, so I just want to mention it first:
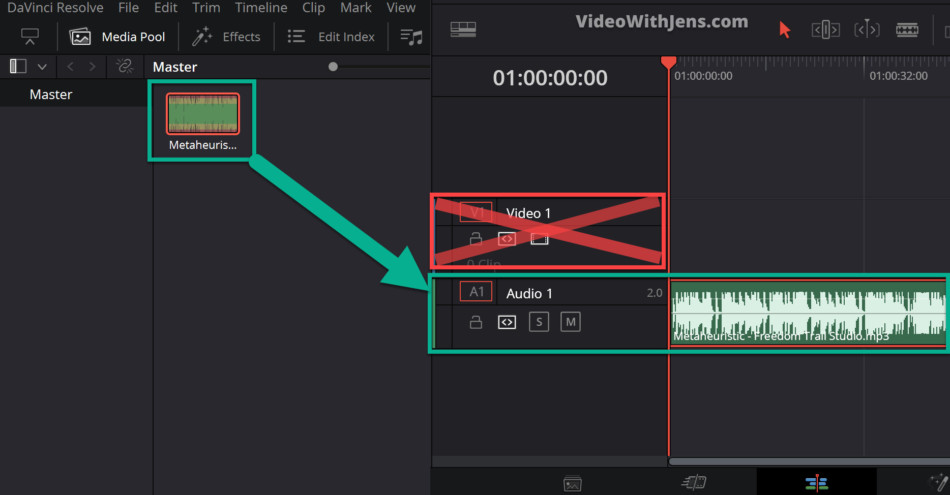
1. Make sure you are adding the MP3 file to an audio track.
When you drag the MP3 file from the “Media Pool” inside Resolve to the timeline, it’s possible to actually drop it in the wrong area.
Make sure, to drop it in the lower part of the timeline. Before you drop it you shall be able to see “Audio 1” pops up and your MP3 clip in the timeline. That’s when you drop it:
Ok, with that out of the way, it’s time to get to the next solution.
This one is quite genius:
2. Convert the MP3 to an MP4 file.
As you may know, MP4 is a container that gathers video and audio in it.
However, when you convert your MP3 file into an MP4 file, it will only contain audio, and it’s then treated as an audio file inside Resolve!
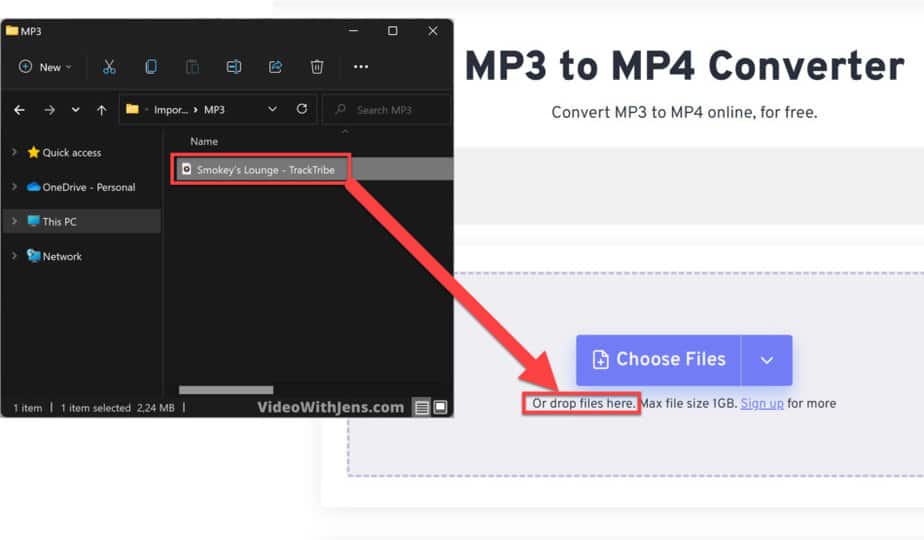
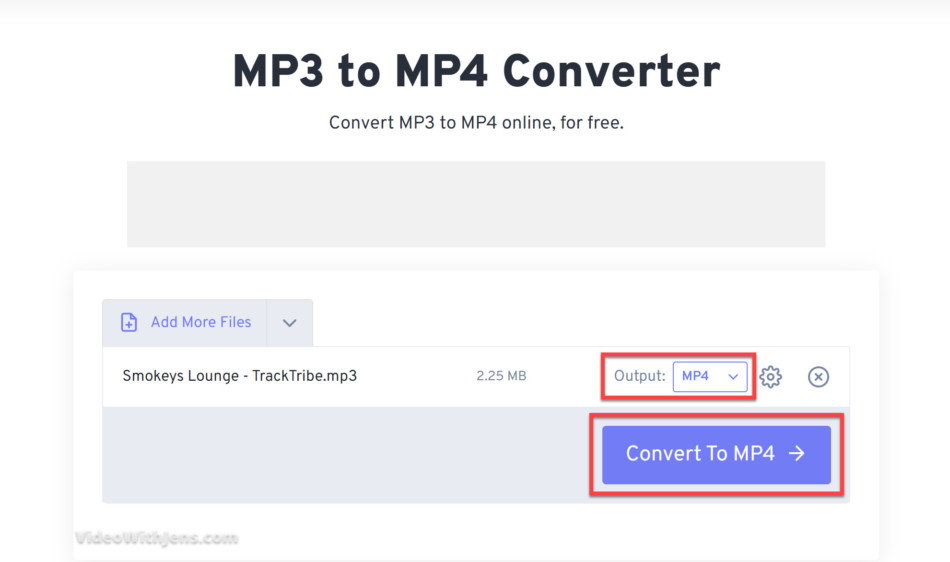
To convert your MP3 into an MP4 file, we are going to be using this free online converter (opens in a new tab).
Locate, the MP3 file(s) in your system folders, and drag it into the converter as shown in the image below:
Then, make sure that the “Output” is set to MP4 and click on “Convert To MP4“:
(changing the settings by clicking on the gear icon gave me some errors, so try first without doing so.)
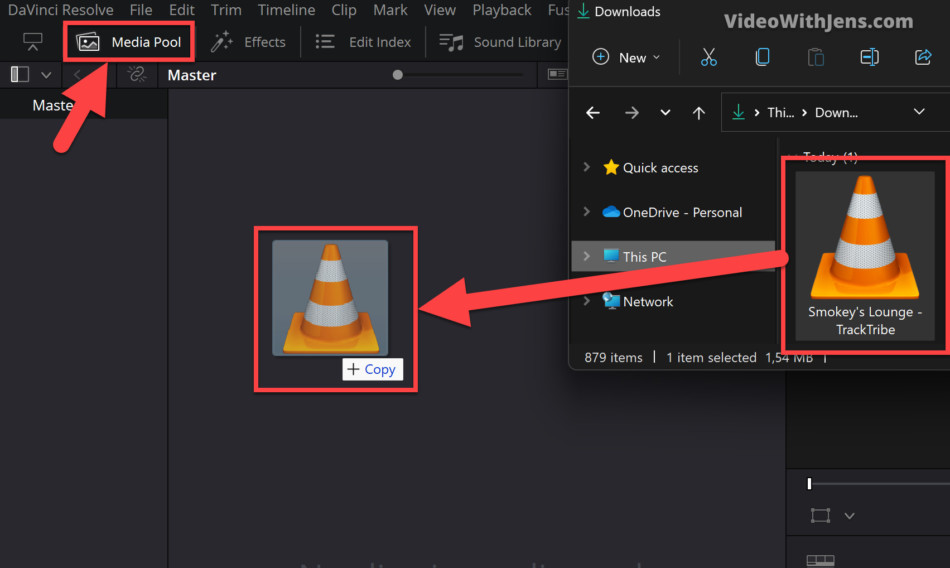
Once the file is done converting, go ahead and download it.
Then you will by default find the MP4 file in “Downloads” on your computer.
From here, simply drag the file into the “Media Pool” inside DaVinci Resolve, like this:
If you were able to import the MP3 now, fantastic! You can then add it to the timeline and start editing.
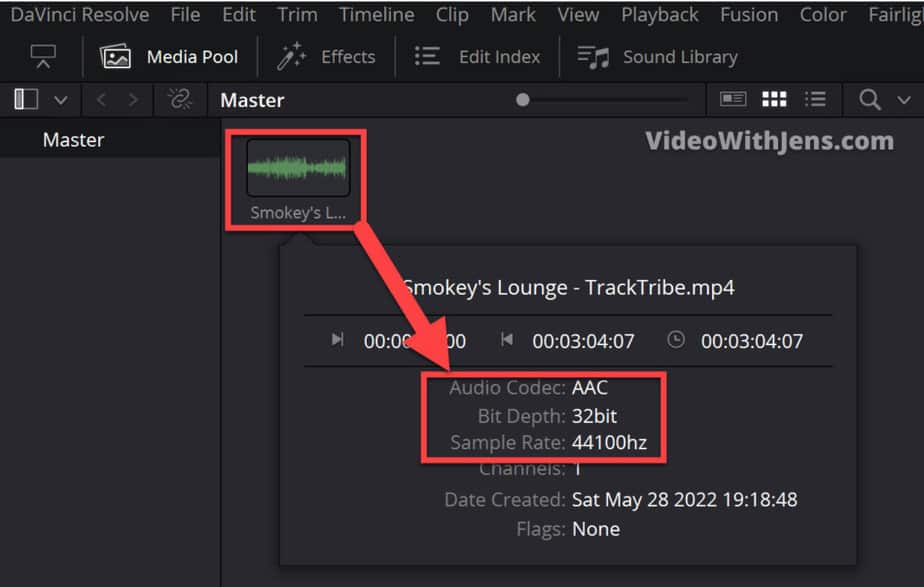
By clicking on the three dots in the lower right corner of the file in the “Media Pool” you should be able to see the properties of the file (like in the image below).
Notice that the codec has changed from “MP3” to “AAC“. This does not matter, as AAC and MP3 are very much the same in terms of size, however the AAC is said to have a bit better quality!
If your file has to be an MP3, you can export it out of Resolve as an MP3. Check out this article to learn about that.
In the next solution, we are going to keep the MP3 codec + increase the sample rate to 48kHz (44,1kHz is good too):
3. Transcode variable bit rate (VBR) to constant bit rate (CBR).
This solution is for those who have an MP3 file with a variable bit rate (VBR).
The reason is that DaVinci Resolve only supports a constant bit rate (CBR). Gladly, this is a quick fix, which I will show you exactly how to do.
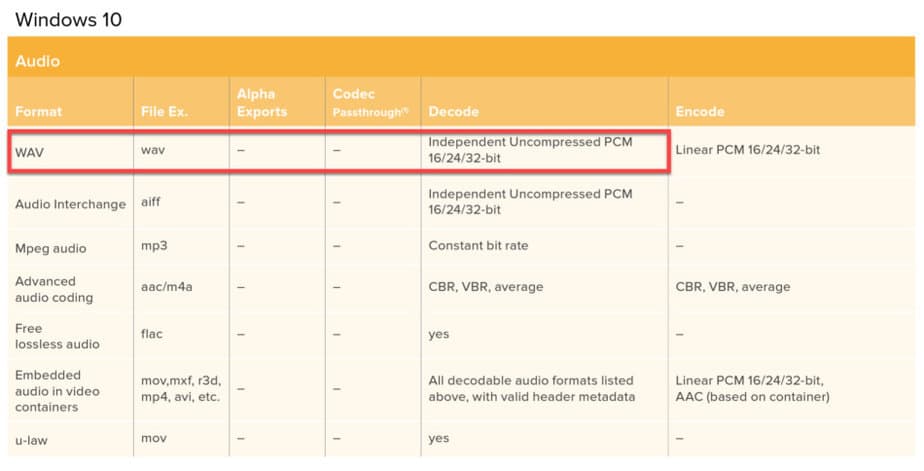
Here you can see the supported audio formats and codecs in DaVinci Resolve:
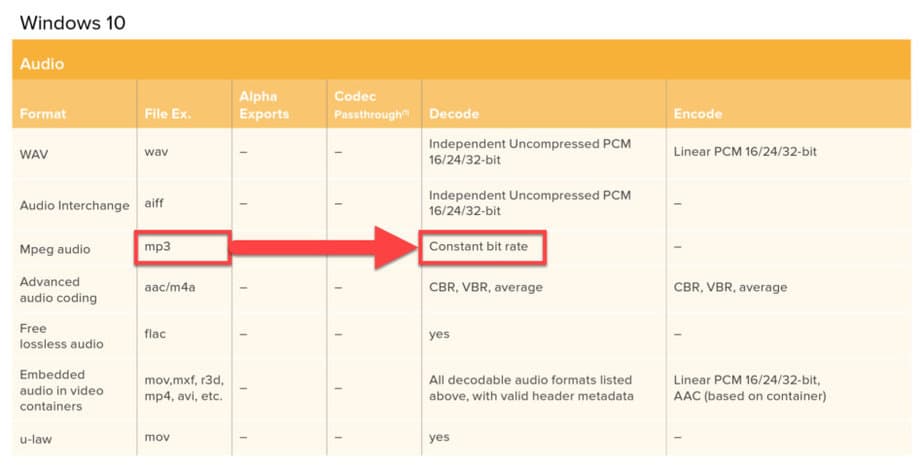
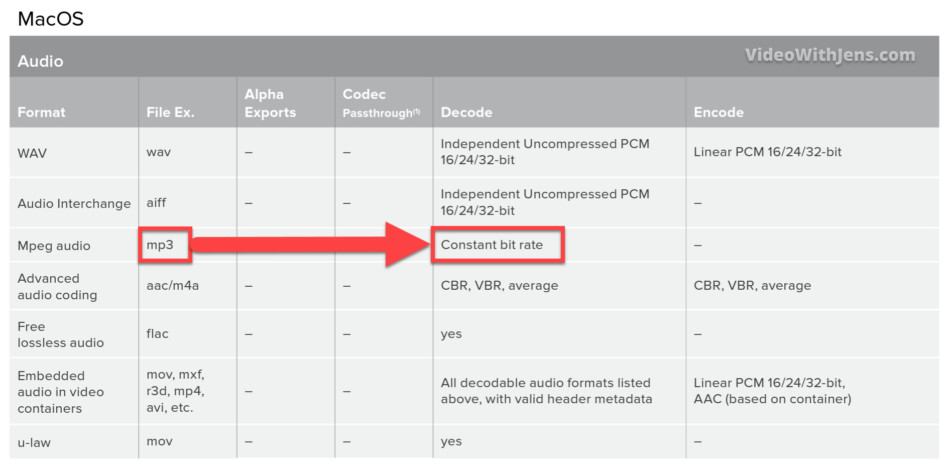
The tables in the images above are from the “DaVinci Resolve 16 Supported Codecs” manual, provided by Black Magic Design.
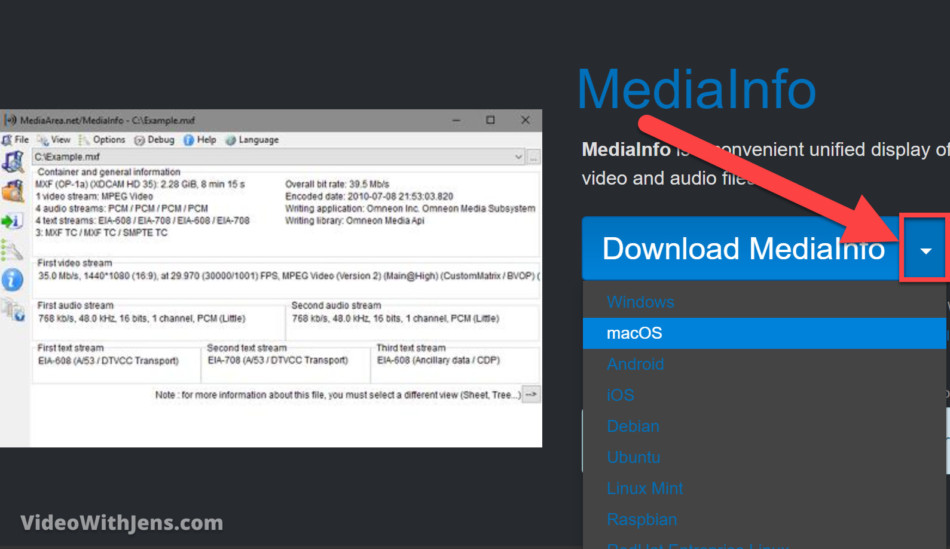
Next up I will show you how to check if your MP3 file has CBR or VBR. To do this you have to download free software called “MediaInfo”. It’s very clean and no mess and need for sign-up etc.
This step is not crucial. You can simply, skip to the part where convert the file here. As you can convert it without knowing what bit rate type it is.
To install MediaInfo, click here (opens in a new tab).
Then on the “Download MediaInfo” button click on the arrow on the right-hand side to expand the drop-down menu, and choose your operating system:
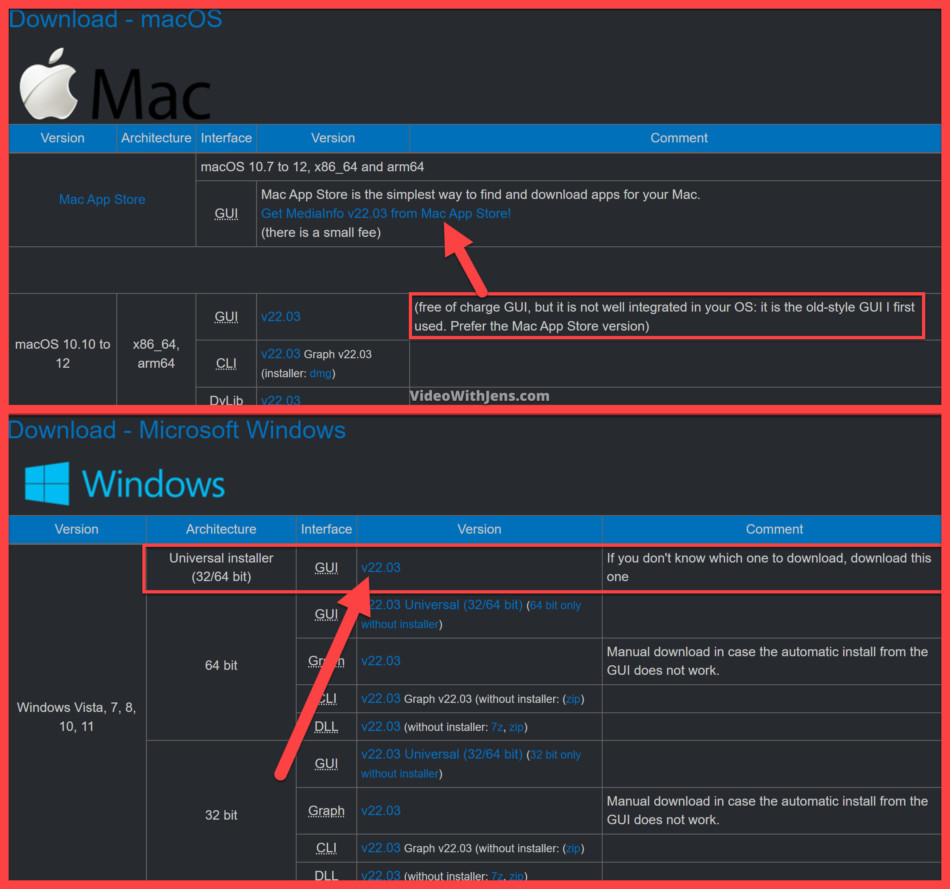
Download the version that’s recommended.
At the time of this writing, it’s recommended to download MediaInfo from the “Mac App Store” for Mac users.
For Windows users, it’s recommended to get the “Universal installer”:
Once you have downloaded and installed the software, it’s fairly straightforward.
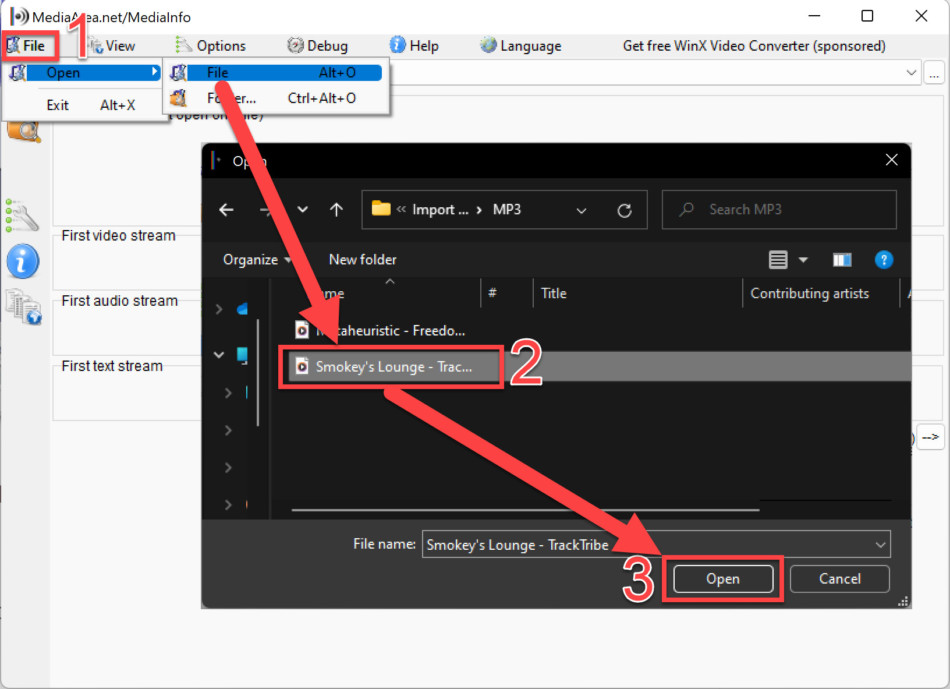
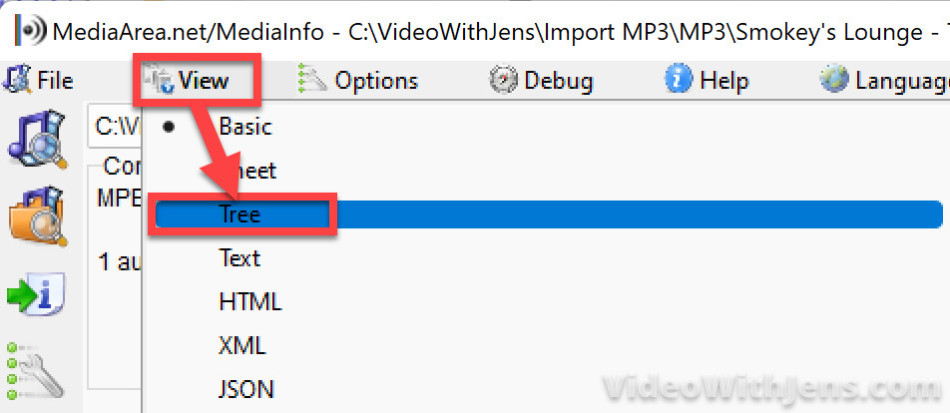
Click on “File” (left-hand top corner) > “Open” > “File“, then locate the MP3 file in your system folders, and click “Open“:
Then click on “View” and select “Tree“:
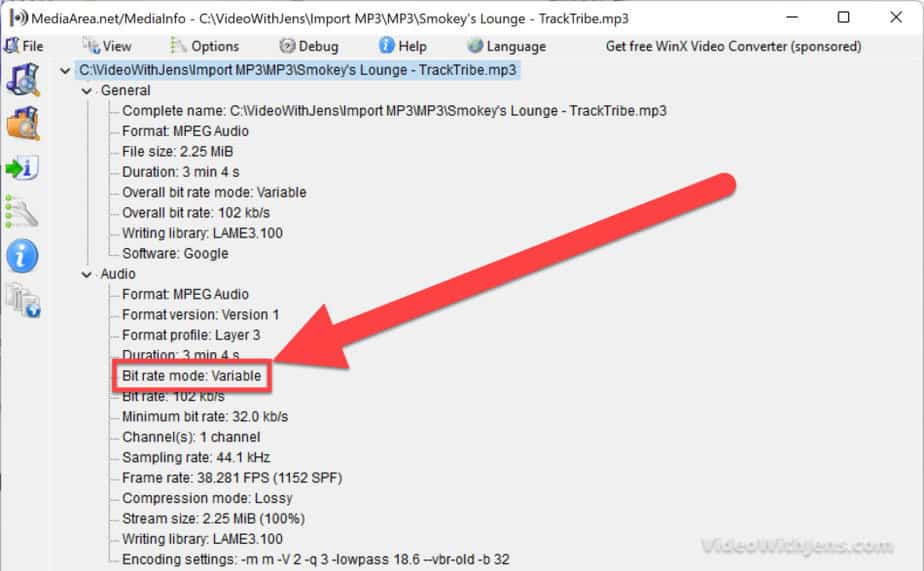
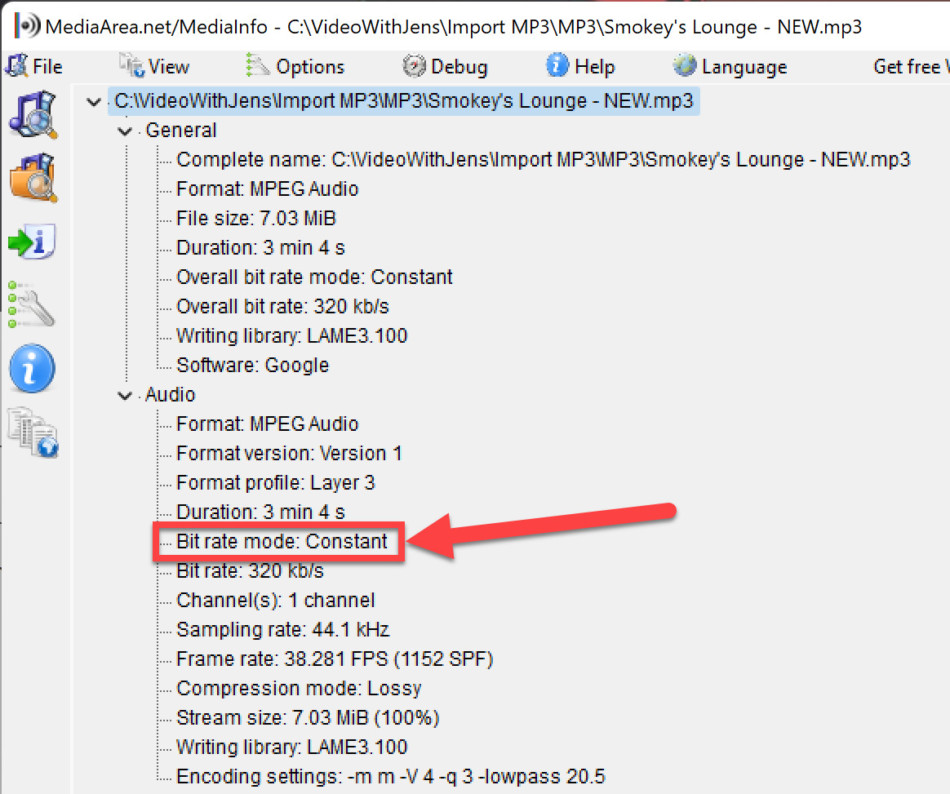
Under “General” > “Audio“, you should then be able to see the “Bit rate mode“. It’s either “Variable” or “Constant“.
If it’s constant, this is not what causes you problems with importing the MP3 to DaVinci Resolve. Therefore, you can click here to skip to the next solution to the issue.
Converting VBR to CBR:
Alright! Now it’s time to convert the bit rate mode from VBR to CBR.
To do this, we are once again going to use the free online converter (opens in a new tab) to convert for us.
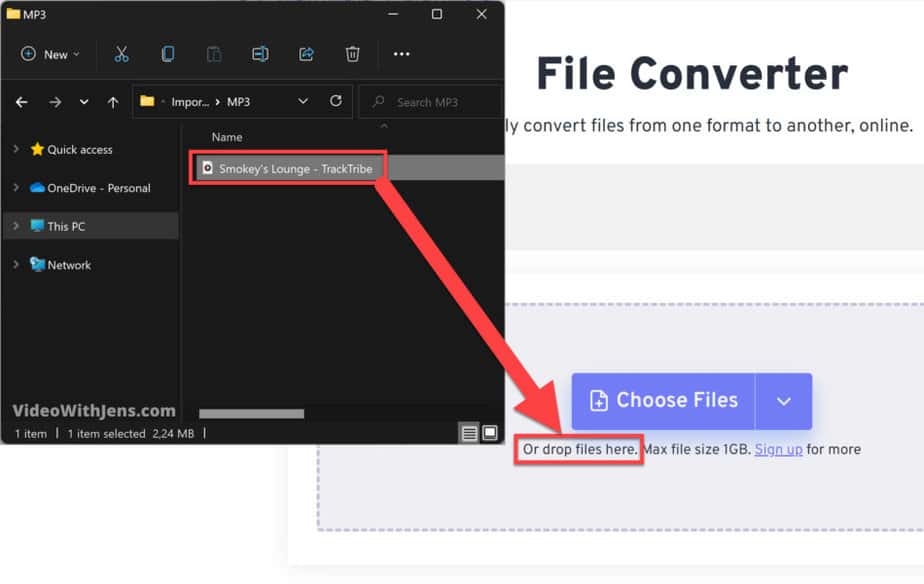
Locate the MP3 file in your system folders, and drag it into the file converter like this:
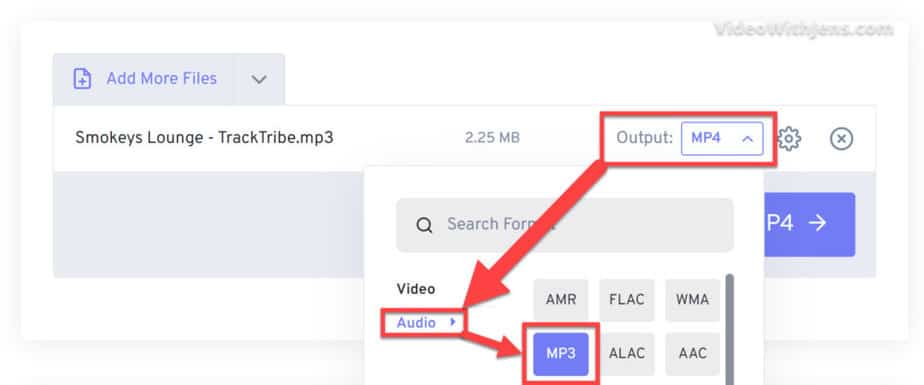
Then, change the “Output” to “MP3“:
Next, click on the gear icon to open the settings:
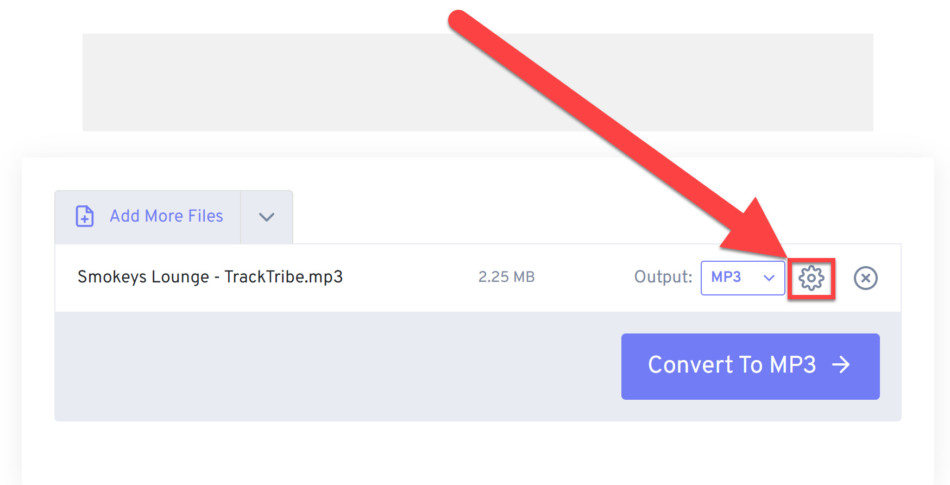
Inside the “Advanced Option” tab, set:
- “Audio Codec” to MP3.
- “Audio Rate Control” to Constant bit rate (CBR).
- “Audio Bit Rate” to High (320 kbps) for max quality…
- “Audio Sample Rate” to 48000 Hz.
Then click on “Apply Settings“:
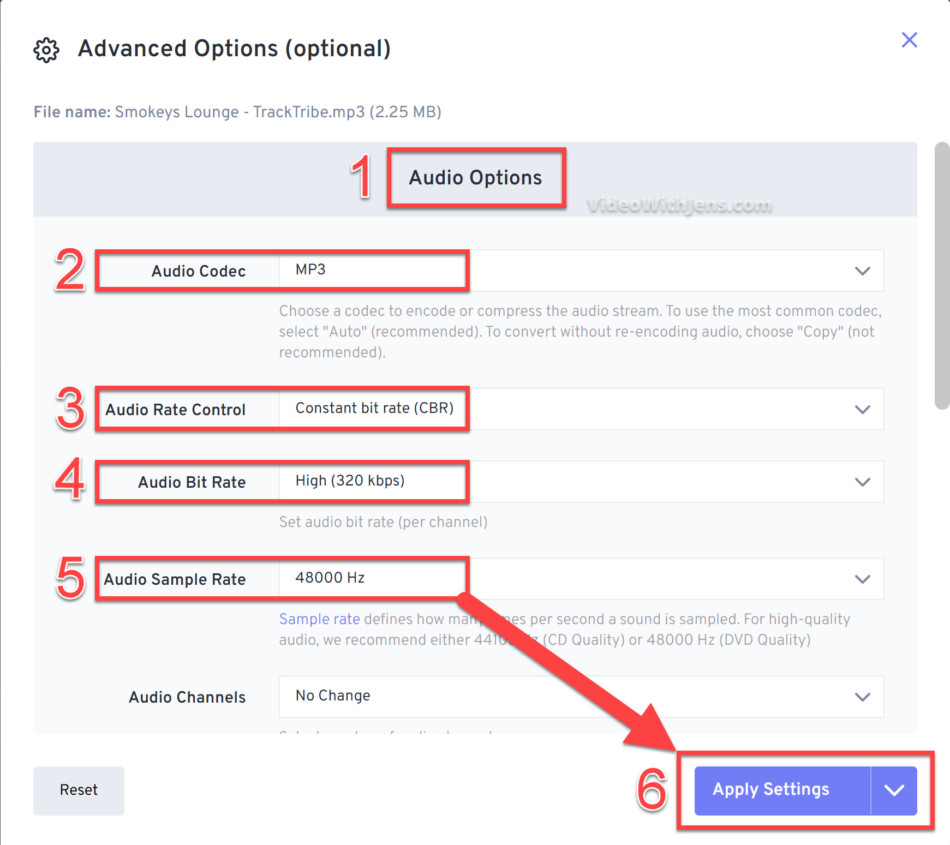
Next, click on “Convert To MP3“:
Once it’s converted, download it and import it to DaVinci Resolve.
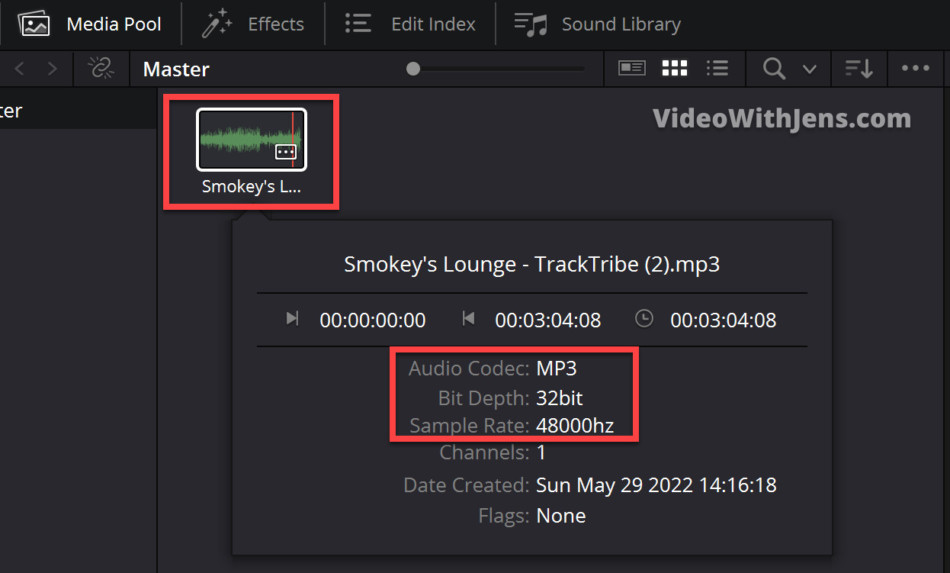
Here, you can see the properties of the file:
If this didn’t work, go to the next solution here.
It’s also possible to use Audacity to change the bit rate mode from VBR to CBR. Since this is also a free software with no strings attached, I will also show you how you can do it there:
If you’re not interested in Audacity go to solution 4.
Using Audacity to Convert VBR to CBR:
To download Audacity, click here (opens in a new tab).
Then just download it for which operating system you are using:
Once, Audacity is downloaded and installed, open it.
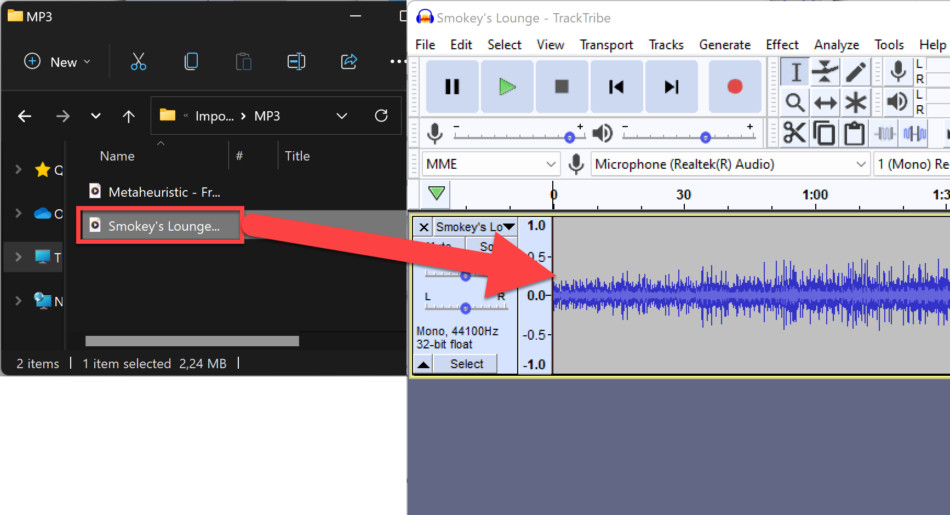
Then locate the MP3 file in your system folders and drag it into Audacity like this:
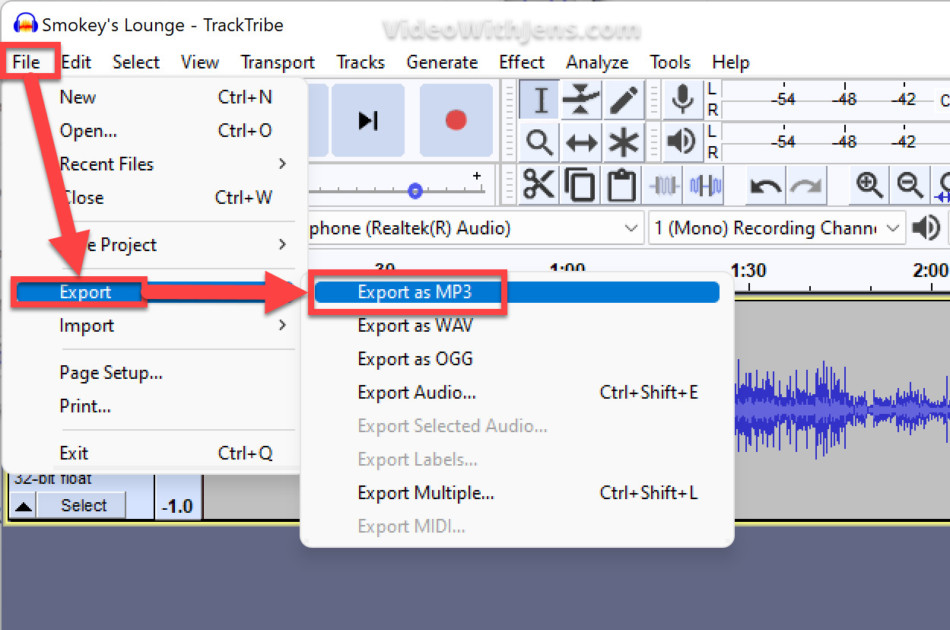
Next, click on “File” (upper left-hand corner) > “Export” > “Export as MP3“.
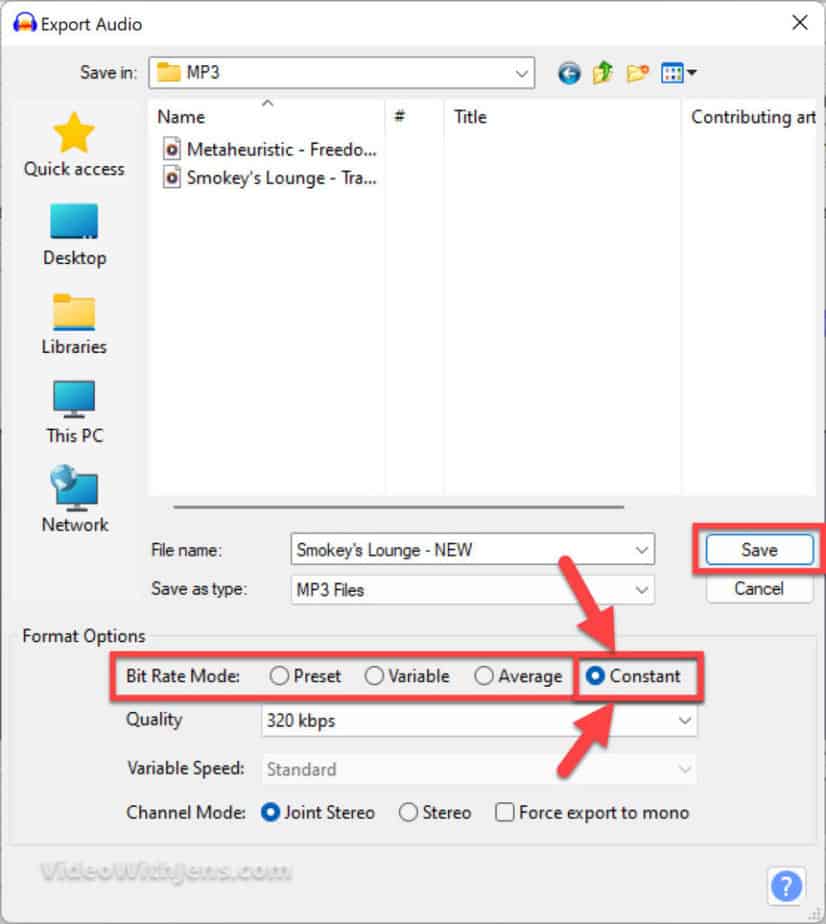
In the export window, set the location to where you want to save it.
Then, give it a name, and make sure “Save as type” is set to “MP3 files“.
Set “Bit Rate Mode” to “Constant” (Very important…)
Set “Quality” to whatever you prefer, 320 kbps is the best.
“Channel Mode” depends if you want your file to be stereo or mono. However, choose “Joint Stereo” over “Stereo“.
Once all of the settings are correct, click on “Save“. Then confirm, if another window pops up.
That’s it.
You can use MediaInfo to check the “Bit rate mode“. In the image, below you can see mine is now “Constant” (in the image below).
However, it’s not a must to check this. You can also just try importing the MP3 to DaVinci Resolve, and see if it works.
If not, go to the next solution.
4. Convert MP3 file to WAV.
If neither the CBR nor the MP4 conversion worked. The next thing I would try is converting it to a WAV file.
You can simply export the WAV from Resolve as an MP3 if that’s a requirement as well.
This is what most professionals tend to do. As WAV is way smoother than an MP3 file which is highly compressed. However, once compressed you don’t get all the information back by converting it to a WAV.
Personally, I mostly use MP3 files, so no judgment here…
You can see in the image below, that WAV is a supported format in DaVinci Resolve:
Head over to the free online converter (opens in a new tab).
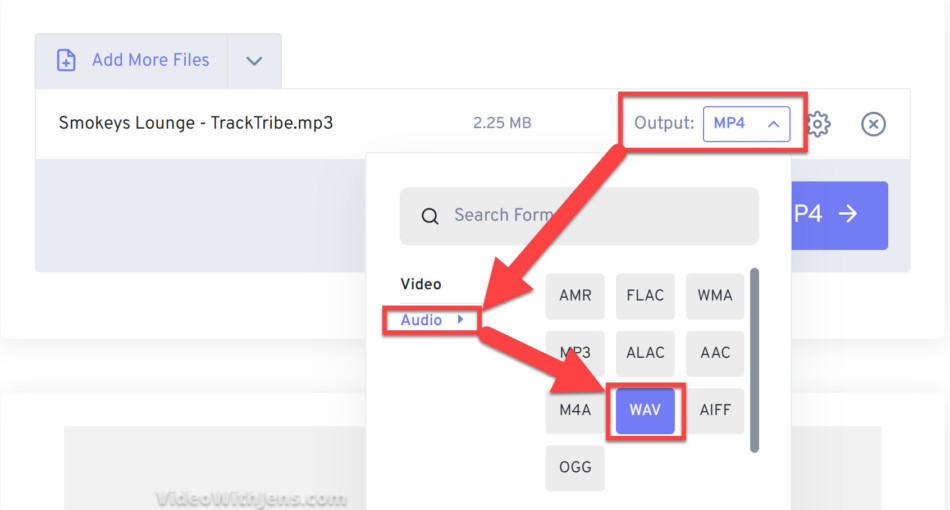
Then locate the MP3 in your system folders, and drag it into the converted like this:
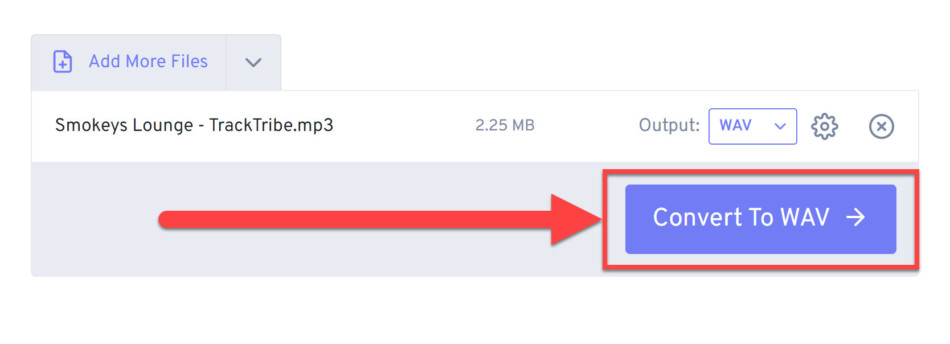
Next, set the “Output” against “WAV“, like this:
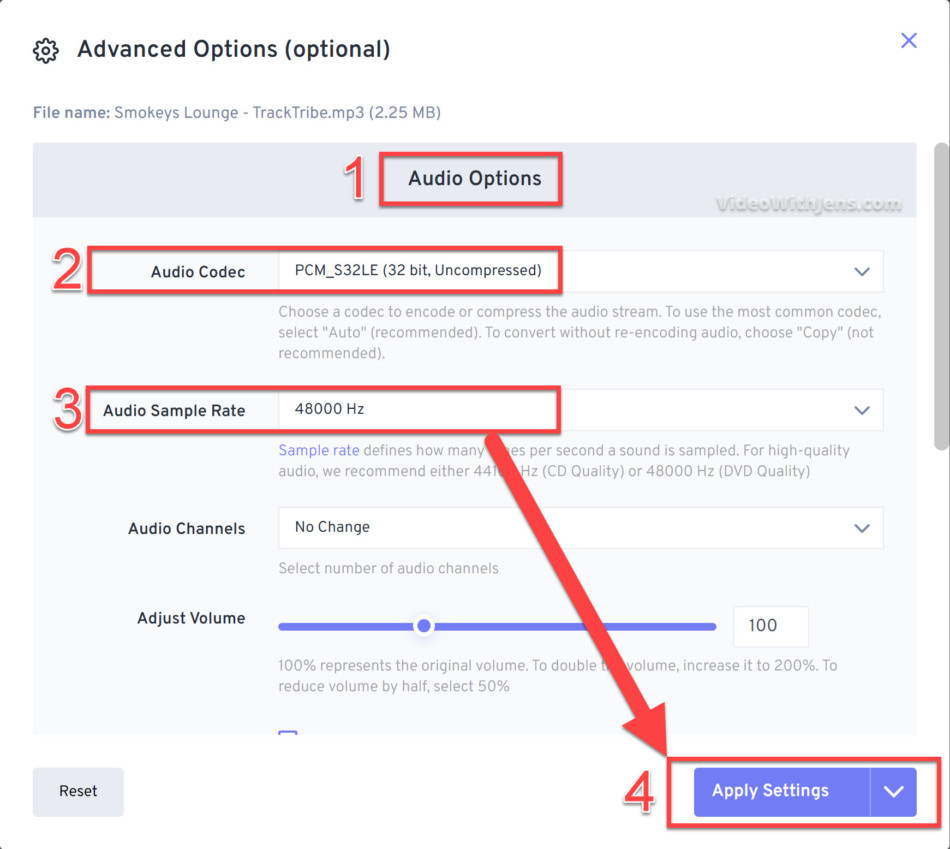
Then, click on the gear icon to open the “Advanced Options“:
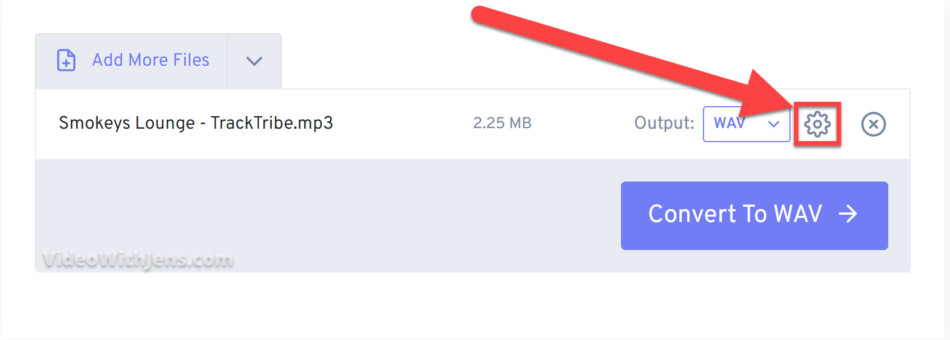
Under “Audio Options” we want to set:
“Audio Codec” to “PCM_S32LE (32 bit, Uncompressed)”.
As you saw in the table above from Black Magic Design‘s manual on supported codecs the highest quality WAV supported was 32-bit.
Then, set the “Audio Sample Rate” to 48000hz, or whatever you prefer of course.
Next, click on “Apply Settings“:
Then, click on “Convert To WAV“, and download it once finished converting.
Now, you can try importing the MP3/WAV to DaVinci Resolve!
To export the WAV as an MP3 file from Resolve, check out this article!
Lastly, I will quickly show you how you can convert the MP3 to a WAV file using Audacity.
Convert MP3 to WAV with Audacity:
Open Audacity, and locate the MP3 file in your system folders.
Then simply drag the MP3 file from the folder and drop it in Audacity to import it.
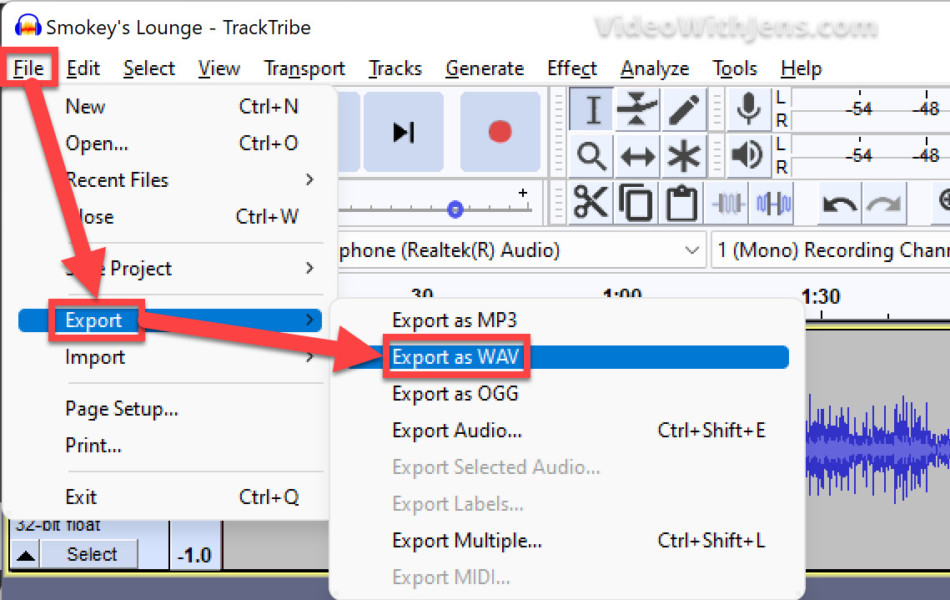
Next, click on “File” (upper left-hand corner) > “Export” > “Export as WAV“:
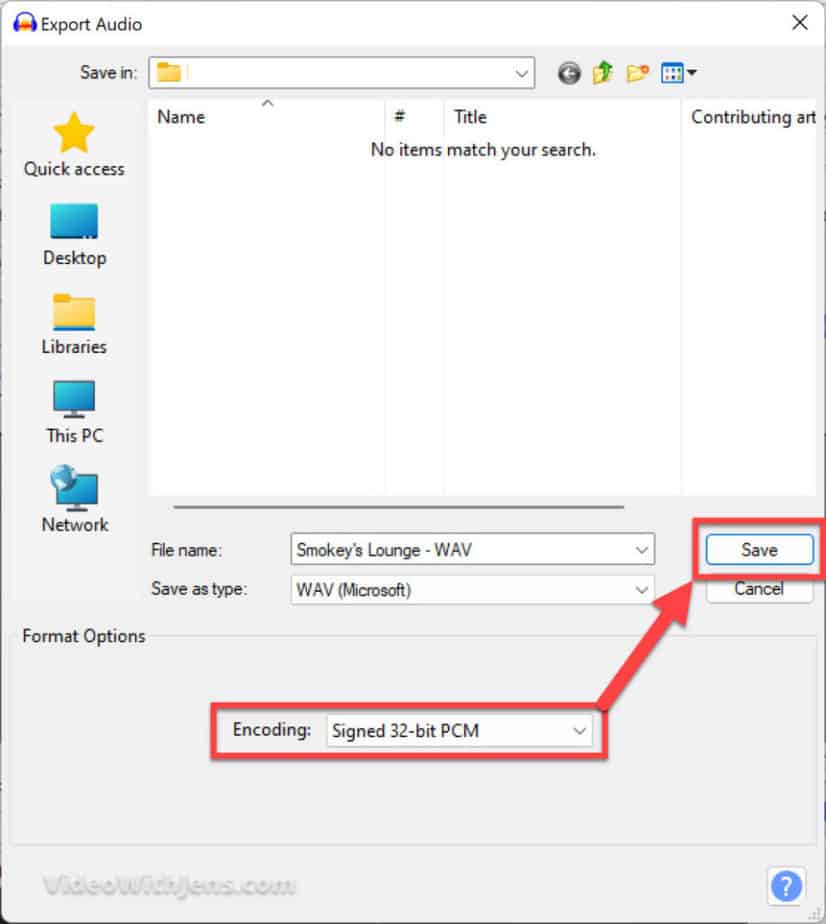
Then in the export window:
Set location to where you want the file to be saved.
Give the file a name, and make sure the “Save as type” is set against “WAV (Microsoft)“.
Set the “Encoding” to “Signed 32-bit PCM“, then click on “Save“:
Now you can try to import the file into DaVinci Resolve!
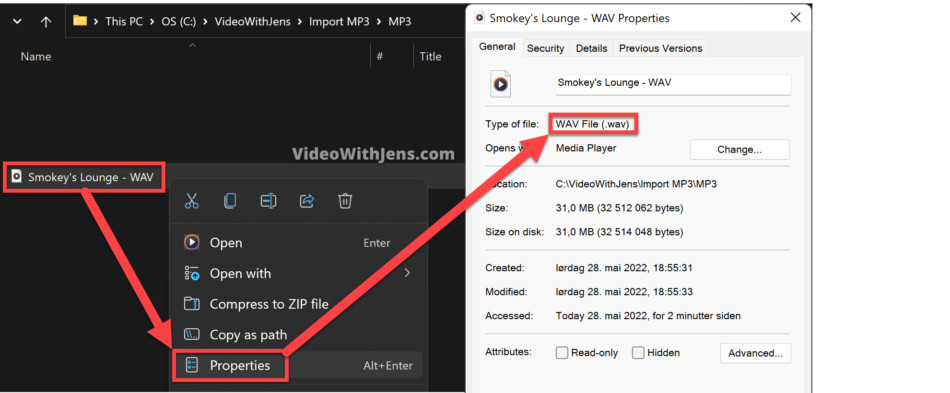
If you right-click the file in the system folder, then click on “Properties“, you can see you’ve successfully created a WAV file:
Here is an article on how to export MP3 files out of Resolve!