Why Premiere Pro Does Not Use Your GPU (& how to fix it)
I get your frustration! Premiere Pro is not using the GPU you have paid the big bucks for.
It might feel like a complicated thing to fix, but it’s not once you know what to look for.
Here’s what to do…
Make sure you are not a victim of any of the statements in the list below:
Why Does Premiere Pro Not Use My GPU?
- Premiere Pro Is Not Setup Correctly.
- The Hardware Is Not Meeting the System Requirements for GPU Acceleration.
- The Graphics Settings Are Not Properly Setup.
- The Format is Unsupported.
- The Graphics Card Driver is outdated, corrupt, etc.
1. Setup Premiere Pro Correctly
There are three settings that you need to get right for Premiere Pro to use your GPU’s full potential.
First, we want to ensure the renderer (Mercury Playback Engine) is GPU accelerated.
Here’s how to do that:
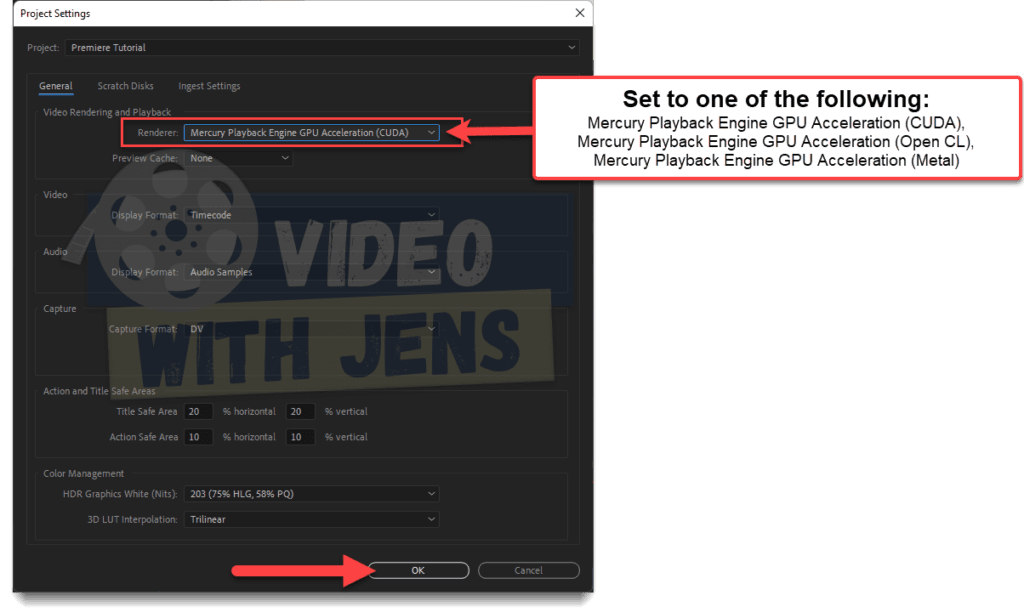
- Click on File > Project Settings > General.
- Set Renderer against either:
- Mercury Playback Engine GPU Acceleration (CUDA).
- Mercury Playback Engine GPU Acceleration (Open CL).
- Mercury Playback Engine GPU Acceleration (Metal).
- Click on OK.
Then, you want to set these two settings:
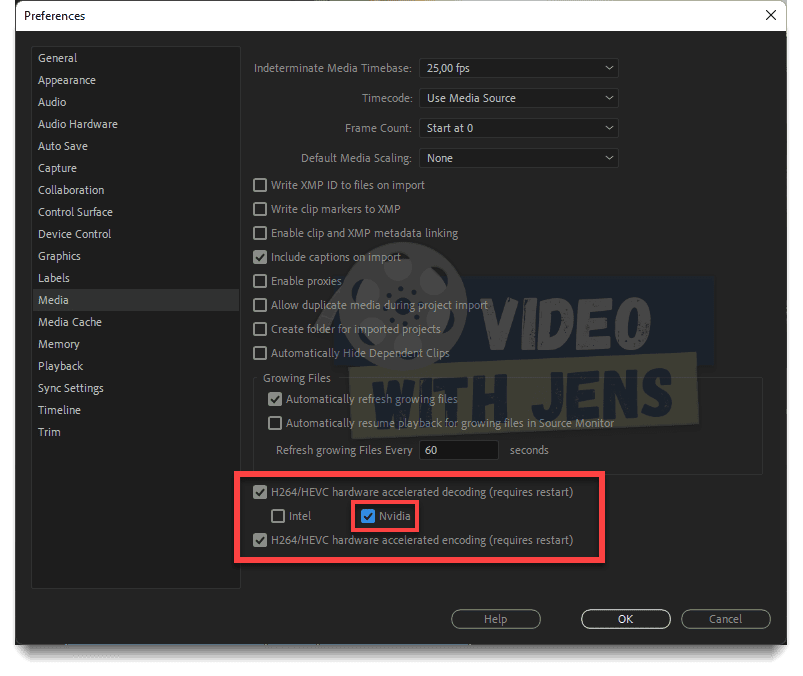
- Click on Edit > Preferences > Media.
- Enable:
- H.264/HEVC hardware accelerated decoding (requires restart).
- Selecting only the dedicated GPU may give you better results. Test it out if you have both options.
- H.264/HEVC hardware accelerated encoding (requires restart).
- H.264/HEVC hardware accelerated decoding (requires restart).
- Restart Premiere Pro.
If the settings are greyed out, check out the other solutions.
2. Meet the System Requirements for GPU Acceleration
Check out this list on Adobe’s website, and ensure you meet the “Hardware acceleration system requirements.”
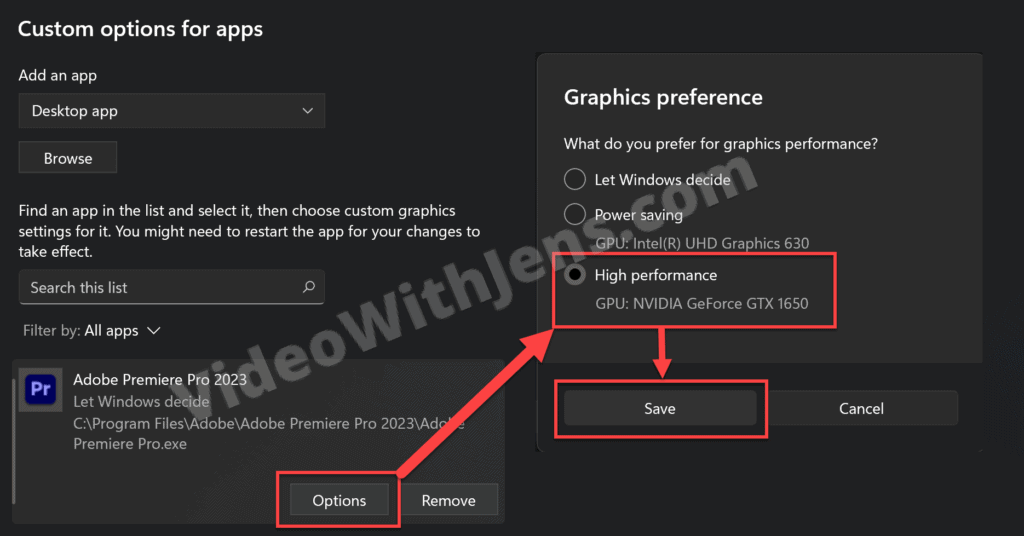
3. Adjust the Graphics Settings
Next, make sure your computer is prioritizing your dedicated GPU for Premiere Pro.
I will show you how to do this on Windows; here’s an article for Mac users.
- Press the Windows key > search for Graphics Settings, and open it.
- Click on Browse, and add Premiere Pro to the list.
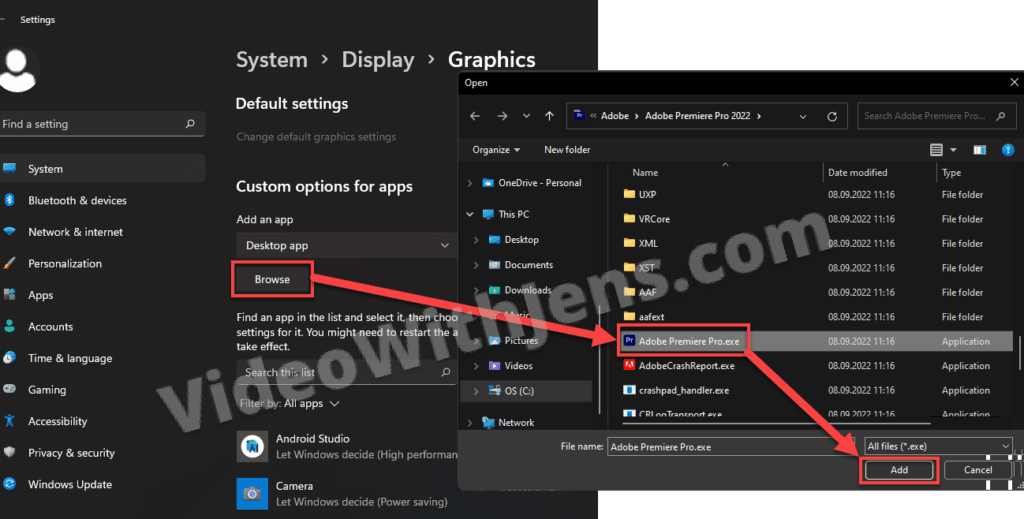
- Click on Premiere Pro in the list > Options > High performance> Save.
- Restart Premiere Pro.
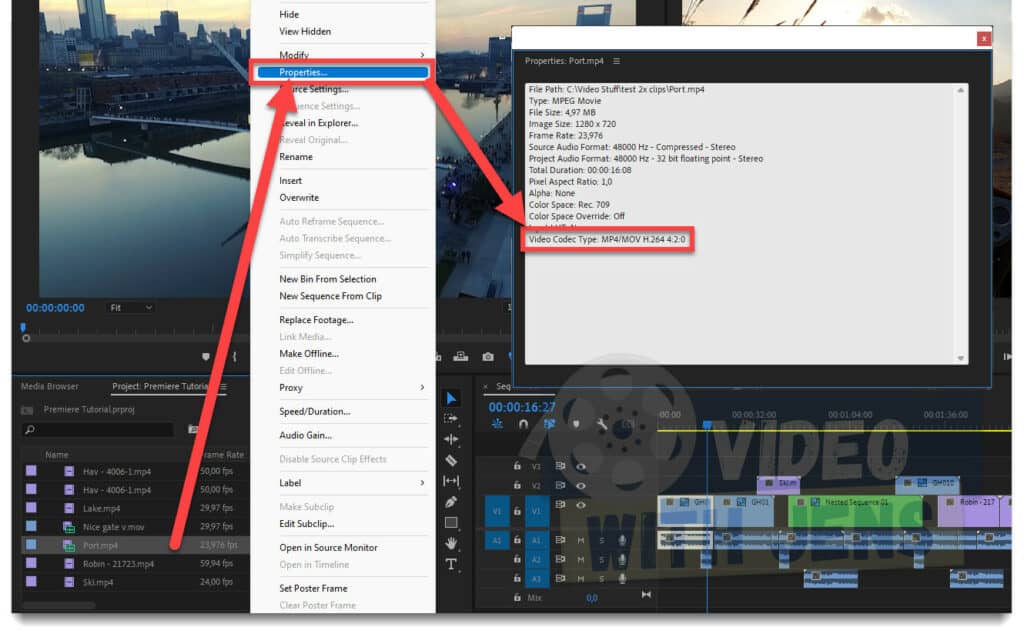
4. Use a Supported File Format
GPU accelerated decoding/encoding is limited to H.264 or HEVC (H.265) codecs—more information about this is below.
To check if your clips are supported, right-click them in the Project panel > Properties, and check if the Video Codec Type is H.264 or H.265.
If not, the clips are not supported for GPU-accelerated decoding/encoding. If you can’t see the Video Codec Type, they are also probably unsupported.
4.1 What to Do if Your Format Is Unsupported
Don’t worry if your format is not supported; there are many ways to fix this.
Below I’ve written what to do if your GPU is not used during encoding/export (solution 4.1.1) or decoding (solution 4.1.2).
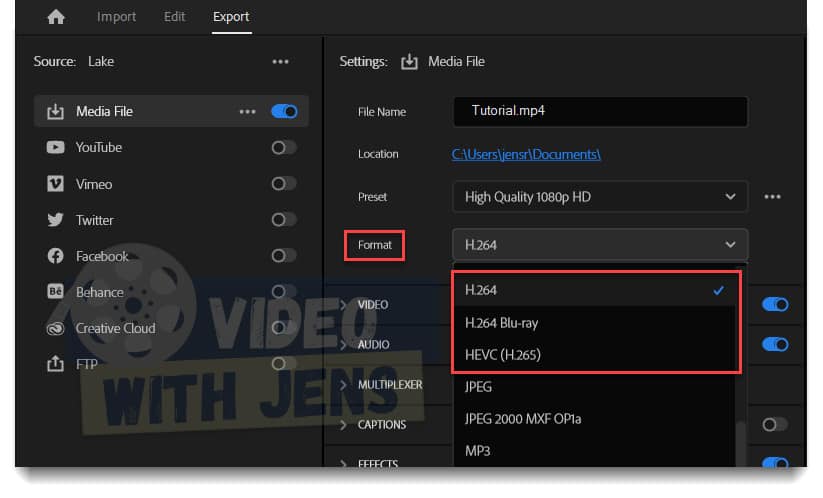
4.1.1 Encoding/Export
If exporting, set the Format against H.264 or HEVC (H.265). It does not matter if the source codec is another one.
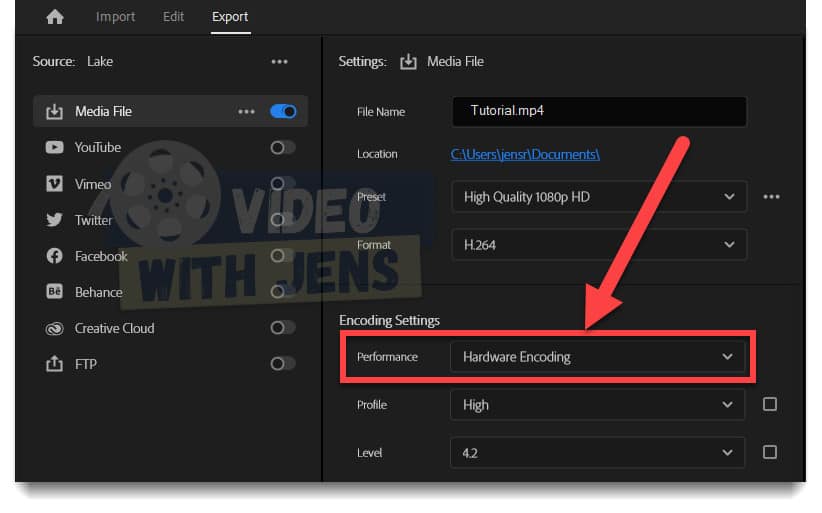
Also, make sure that Performance is set against Hardware Encoding.
- In the export menu, you’ll find this option under Video > More > Encoding Settings.
- This box will be greyed out if you have not set up Premiere Pro correctly, as shown in solution 1. It’s not available for VBR, 2 pass bitrate encoding.
4.1.2 Decoding
GPU-accelerated decoding is also only supported for H.264 and H.265.
HOWEVER, a cool trick shot solution, instead of transcoding all your files, is to create H.264 proxies.
These are only temporary files used while editing and can also enhance performance.
Here’s how to do it:
- Select your clips in the Project panel > right-click one > Proxy > Create Proxies.
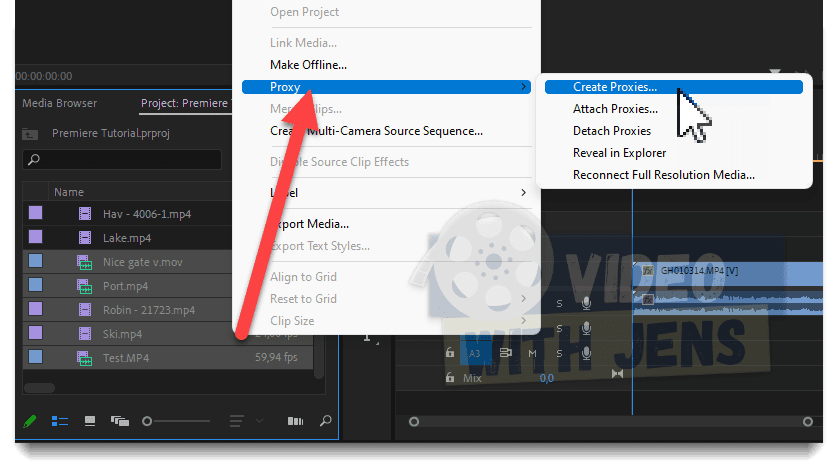
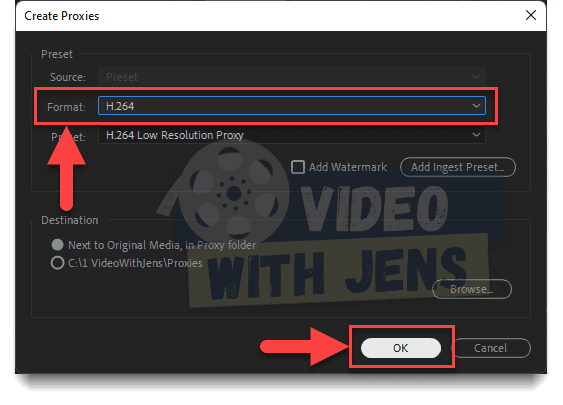
- Set Format against H.264, and click on OK.
- Adobe Media Encoder will automatically open and create the proxies.
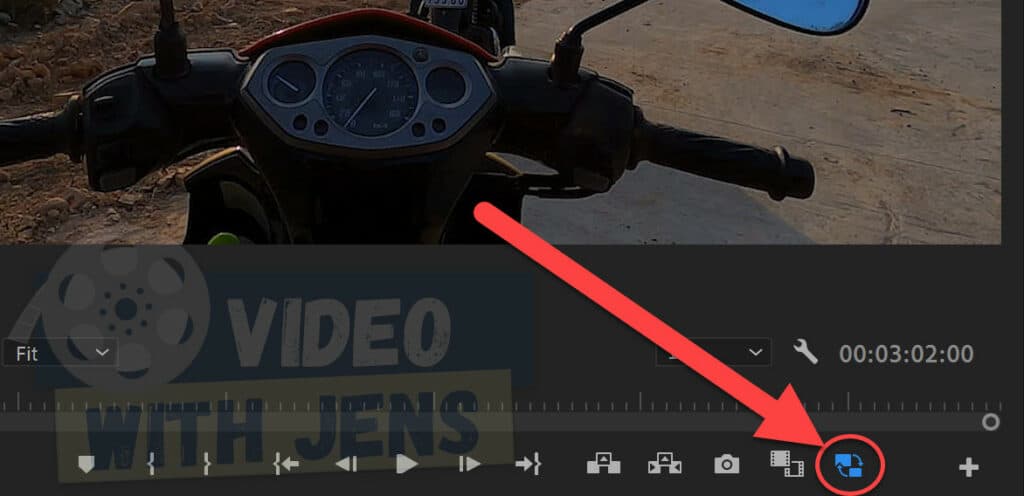
- Click the Toggle Proxies button below the Program Monitor once the proxies are generated.
5. Update Graphics Card Driver
Keeping your graphics card driver up to date is essential for Premiere Pro to be able to use your GPU.
It can also fix the driver if it’s corrupt.
You have two options for updating your GPU driver: Updating through Windows or manually downloading & installing the driver.
I will show you how to do both:
5.1 Updating Graphics Card Driver in Windows
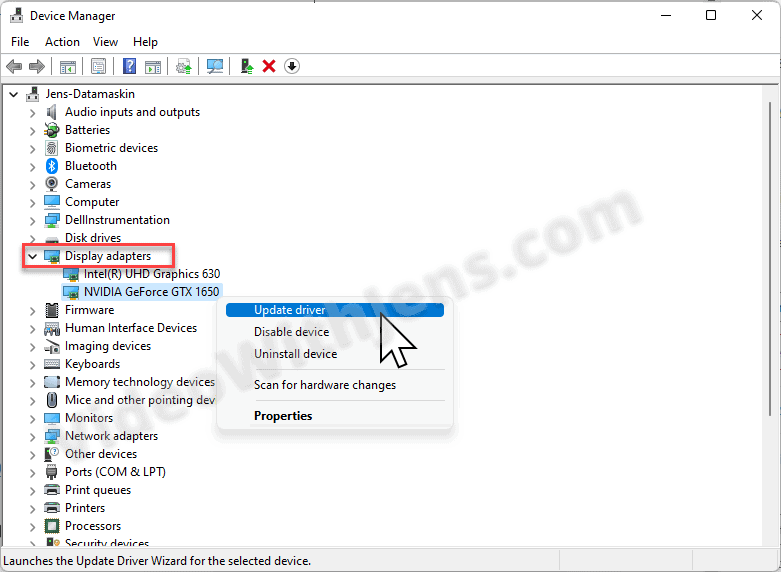
- Hit the Windows button, then search for and open Device Manager.
- Expand Display adapters > right-click the dedicated GPU > Update driver.
- If you can’t see your dedicated driver, go to solution 5.2.
- Click on Search automatically for drivers.
- If it’s already up to date, I recommend manually updating it, as shown below.
5.2 Manually Updating the Graphics Card Driver
To manually update your GPU driver, do a quick google search for your graphics card’s name, followed by “driver”.
Then, open the first result from your GPU manufacturer’s website, in my case that NVIDIA:
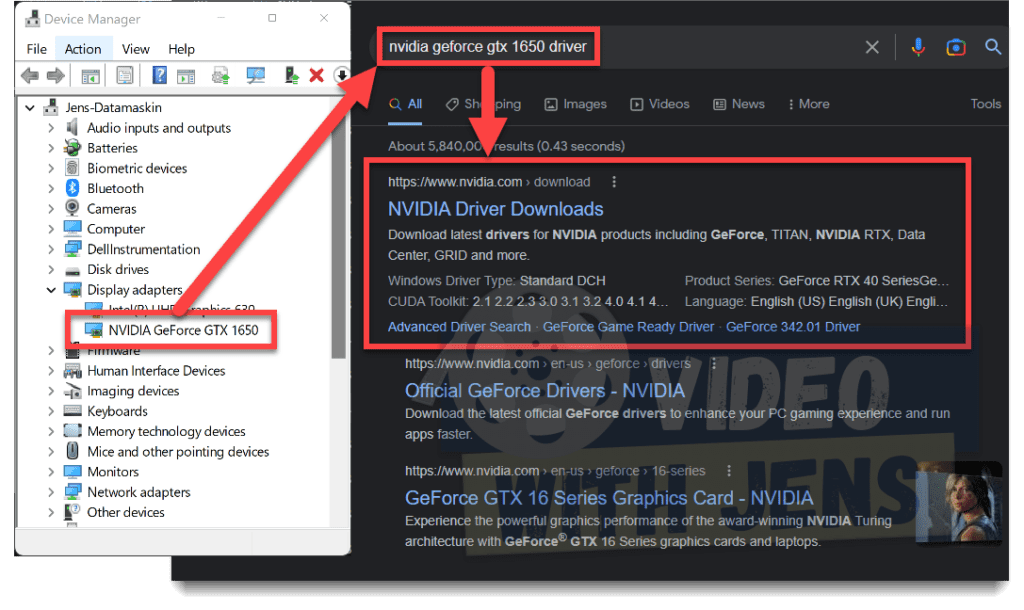
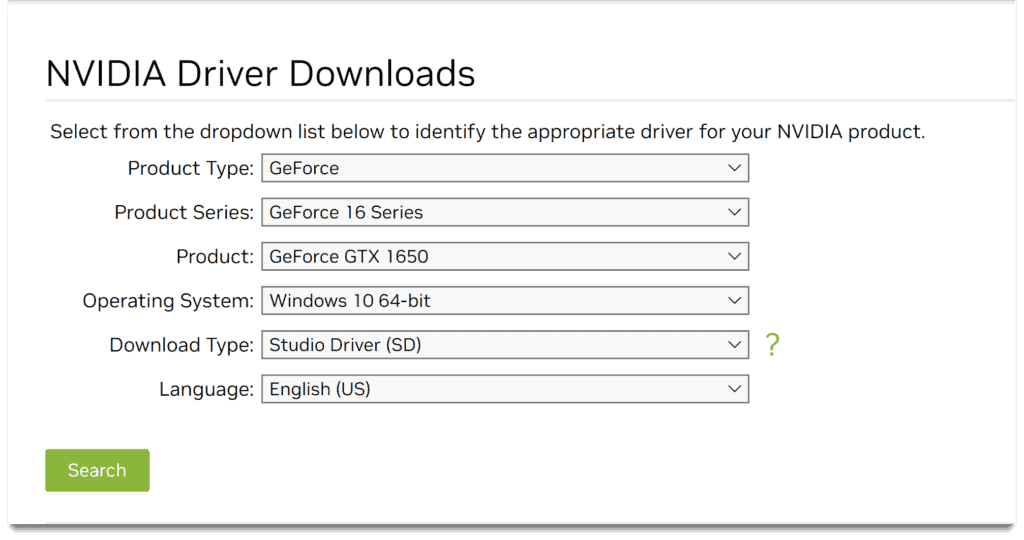
Next, you’ll have to fill out your graphics card’s specifications.
- For NVIDIA, make sure to download the Studio Driver.
Then, hit search and download the latest version.
Once it’s downloaded, you’ll, by default, find it in your Downloads folder, where you open it and follow the installation wizard.
That’s it! When it’s finished installing, you can try to open Premiere Pro. If it doesn’t immediately work, ensure you’ve done everything mentioned in the other solutions above.
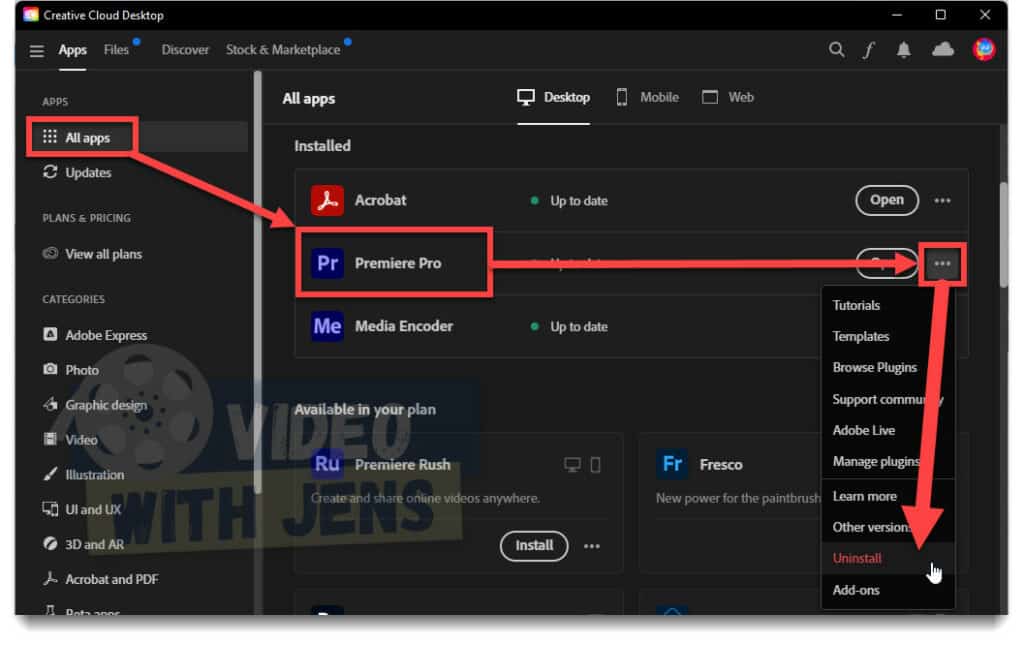
6. Reinstall Premiere Pro
Sometimes doing a quick reinstallation of Premiere Pro can work wonders as well.
Simply, open the Creative Cloud Desktop application > All apps, and click on the three dots next to Premiere Pro > Uninstall.
Then, under Available in your plan, install Premiere Pro again.
7. Additional Information
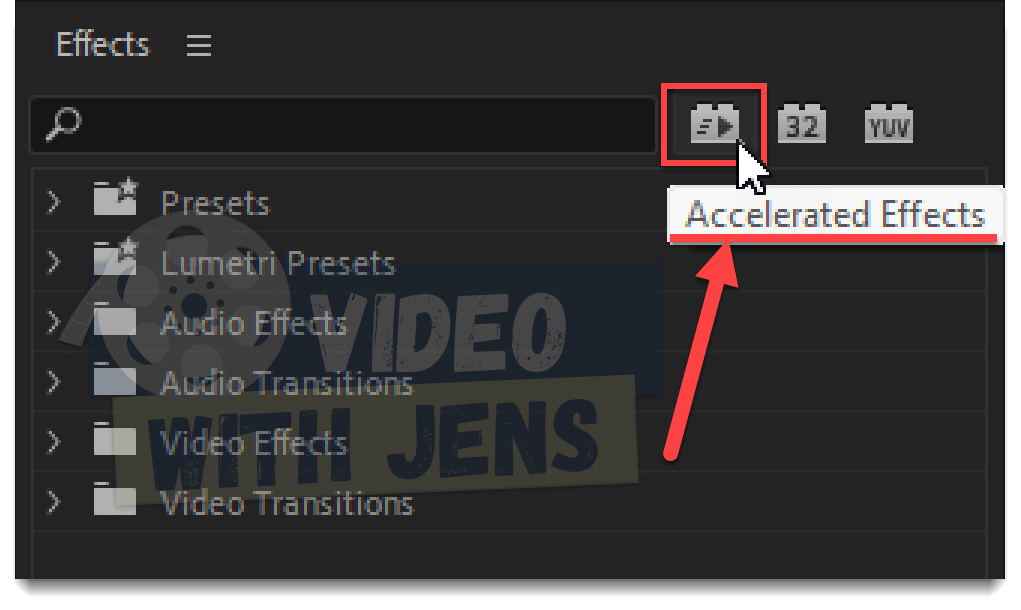
Sometimes your GPU may be working correctly, but it’s working so fast that it seems like it’s doing nothing.
GPU acceleration does not mean your GPU will do all the heavy lifting. Instead, it will accelerate your workflow by offloading some weight from the CPU when necessary.
Therefore, if your CPU is not using its max capacity, it might be doing fine on its own, resulting in less work for the GPU.
It may also be that your GPU is so fast that it completes all its tasks so fast that it looks unused.
You might see more of your GPU being used once you throw a bunch of accelerated effects on your clips:
![Premiere Pro Won’t Play Video [SOLVED by Adobe Expert]](https://videowithjens.com/wp-content/uploads/2023/03/premiere-pro-video-not-playing-768x432.jpg)