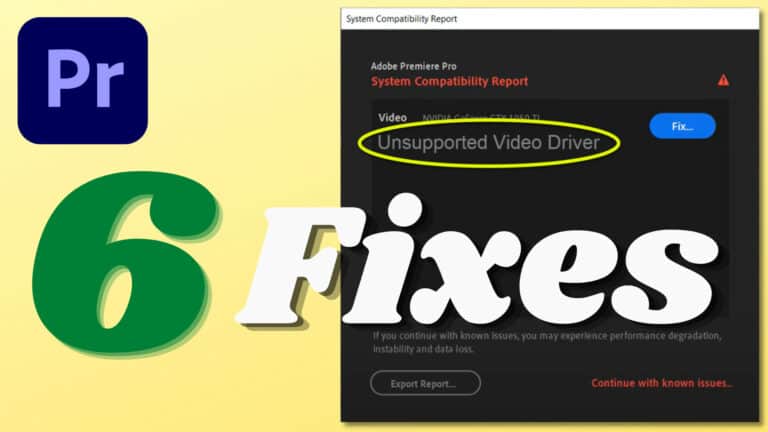
“Error Retrieving Frame” in Premiere Pro (15 Solutions)
Are you getting the “Error Retrieving Frame” message in Premiere Pro?
If so, you are not alone!
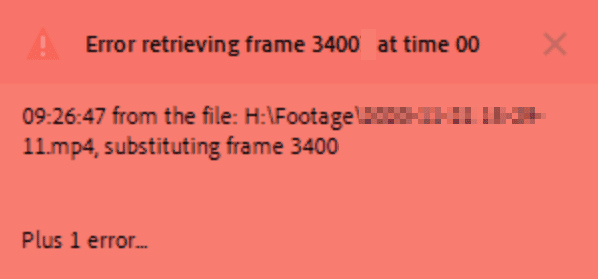
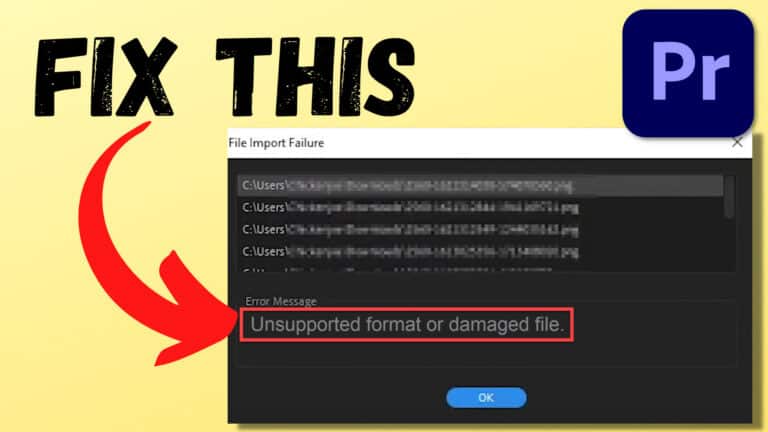
“Error Retrieving Frame” means that Premiere Pro cannot extract information about a specific frame; this results in a black frame. To fix this issue, you must troubleshoot and remove the obstacle causing it.
After doing tons of research, I’ve compiled a list of the most popular solutions to fix this error.
These solutions have helped thousands of people; check them out:
1. Reboot Computer
I always recommend that you start by restarting your computer, which is known to fix many bugs and errors.

2. Delete Existing Media Cache
Outdated or corrupt media cache files are a common issue, and deleting them is reported to have fixed the “Error retrieving frame.”
To do this, restart Premiere Pro and do not open any new projects.
Then, click on Edit > Preferences > Media Cache, and click on Delete under Media Cache Files:
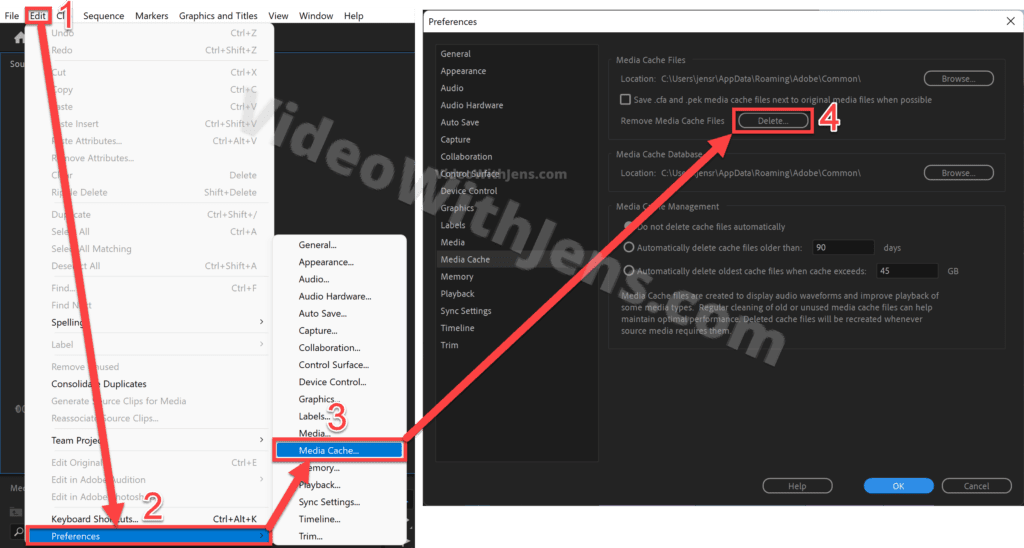
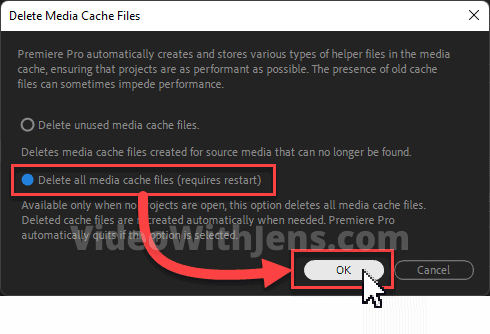
You’ll now be presented with two options; choose the last one.
Since you are experiencing the error on a project you are working on; the media cache is not “unused.”
Choose Delete all media cache, and click on OK:
(Premiere will automatically restart)
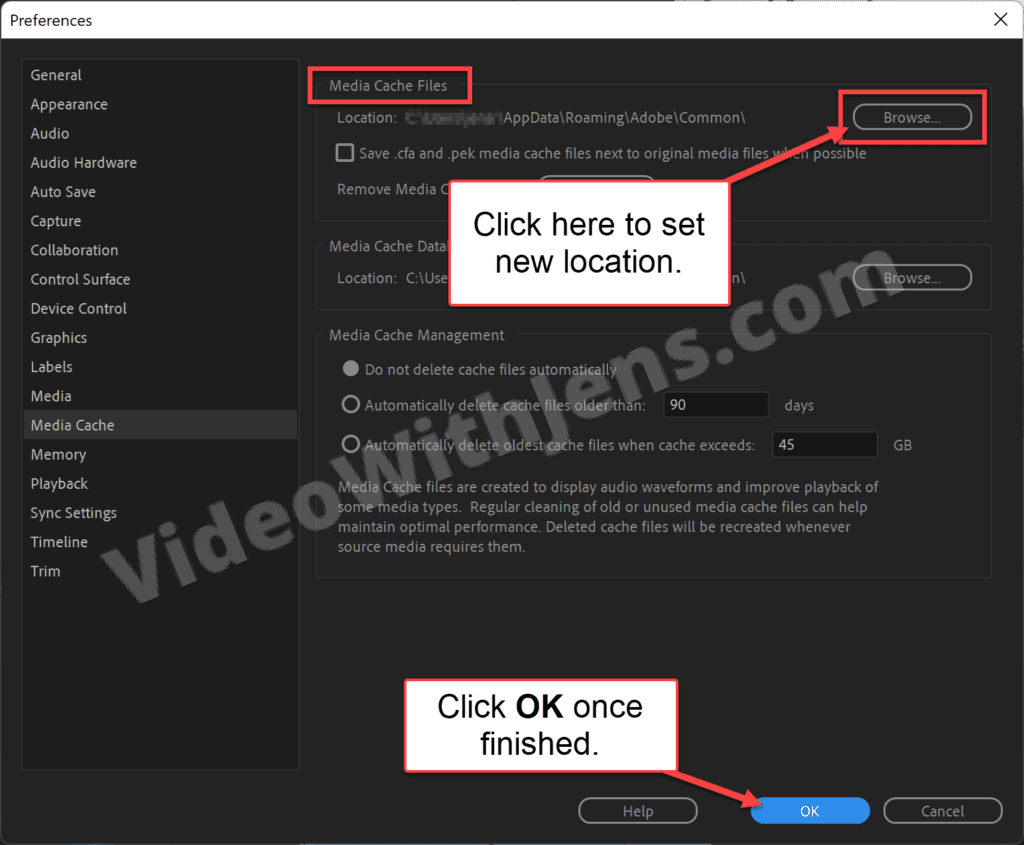
3. Set Media Cache Location to Dedicated Drive (If possible)
Another thing that might make it hard for Premiere to “retrieve frame” is that your media cache files are saved on a slow drive.
If you have the opportunity, try to change location to your “dedicated” faster drive.
Go to Edit (top left-hand corner) > Preferences > Media Cache.
Next, click on Browse, navigate to the dedicated drive, and confirm the location.
Once that’s done, click on OK:
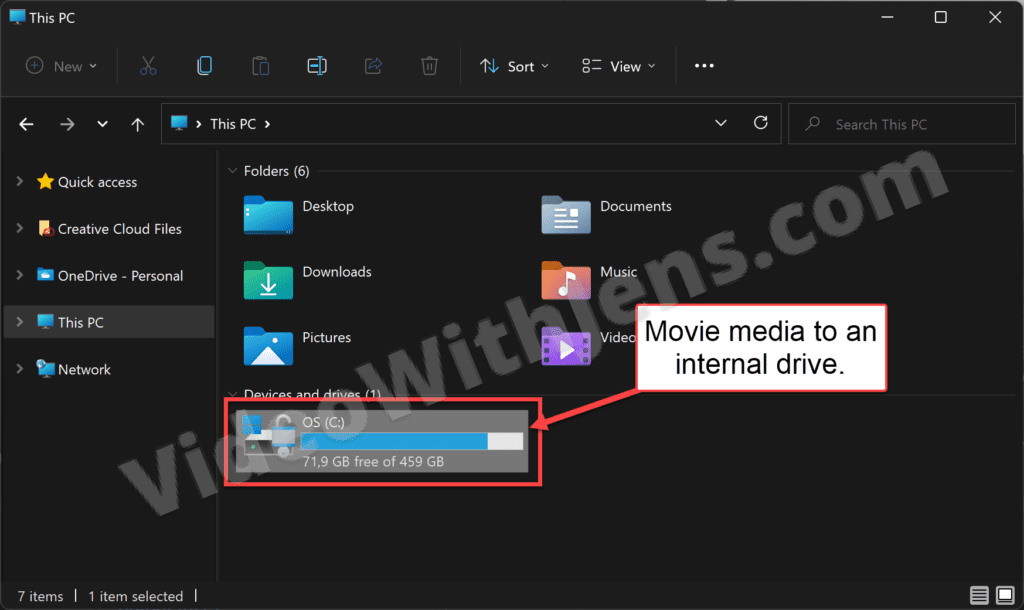
4. Move Media to an Internal Drive
A user in the Adobe community reported that after contacting Adobe customer service, they advised him to copy all his media to an internal drive.
Here’s how he fixed the error:
- Copy all the files on the external drive and paste them into a folder on his internal SSD.
- Move the folder on the external drive so the link between it and Premiere Pro breaks.
- Select all the clips in the Media Browser inside Premiere.
- Right-click one of the clips and select Link Media.
- Click on Locate, and navigate to the new folder.
- All clips in the same folder should be linked if you selected them in the Media Browser.
(Link to the community thread)
5. Update Premiere Pro
Since the developers of Premiere Pro are constantly striving to make us happy, they are continually monitoring and solving errors reported in the community.
Once they have solved the error, they will include the fix in the next software update.
Thus it’s essential to stay up-to-date with the latest versions. To do this, open the Adobe Creative Cloud application, go to Apps > Updates, and click on the Update button next to Premiere Pro.
- If you can’t see it, you should be up-to-date.

6. Transcode Into Another Format
Your file may contain some minor bugs or data not supported by Premiere Pro.
To fix this, a quick transcode will do wonders!
Two amazing free transcoders are Shutter Encoder and HandBrake. I recommend Shutter Encoder, as you can transcode to more formats.
However, if your video is captured using a screen recorder, like OBS, Fraps, etc., your problem may be a variable frame rate. In that case, download HandBrake (I’ve written more about this below).
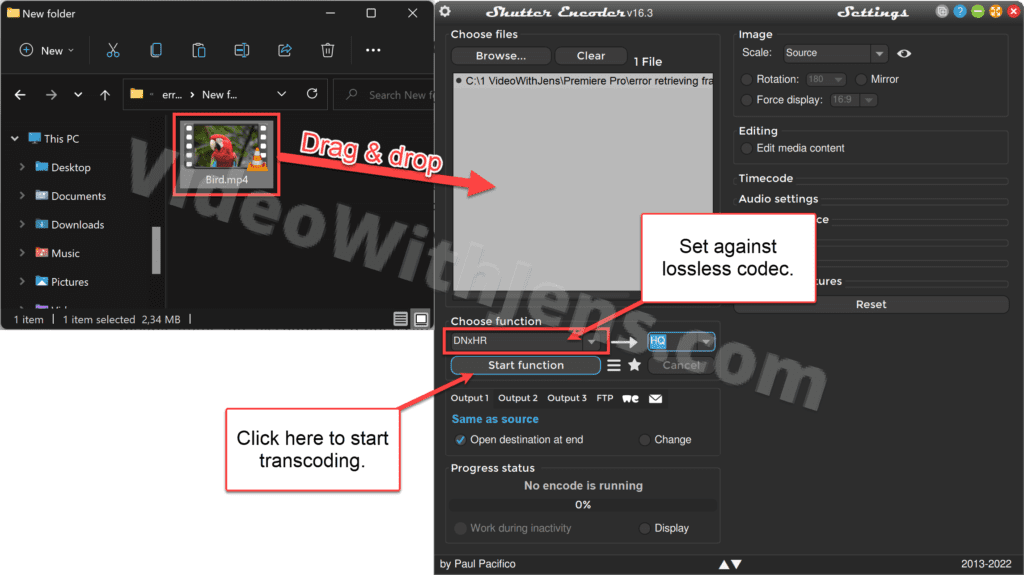
6.1 Transcode Using Shutter Encoder
- Import the clip(s) to Shutter Encoder.
- Under Choose function, select a lossless codec.
- DNxHD for 1080p and DNxHR for 4k is excellent.
- Click on Start function to transcode.
Once finished, you’ll, by default, find the clip in the same folder as the original.
6.2 Convert a Variable Frame Rate to a Constant Frame Rate
It’s been reported many times that Premiere Pro struggles with some variable frame rates. These are often seen in gaming videos, especially with high FPS games.
6.2.1 To check if your video has a variable frame rate:
- Import the clip(s) to Premiere Pro.
- Right-click the clip in the Media Browser and select Properties.
- Check if it says “Variable Frame Rate Detected.”
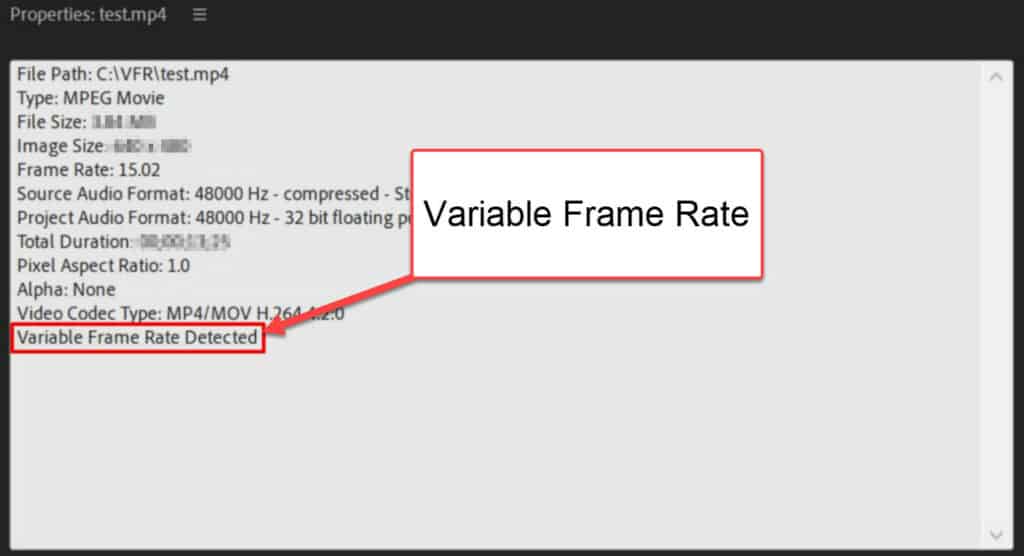
If it’s a variable frame rate, people have solved the “Error retrieving frame” by converting to a constant frame rate.
6.2.2 Convert Variable Frame Rate to Constant Frame Rate
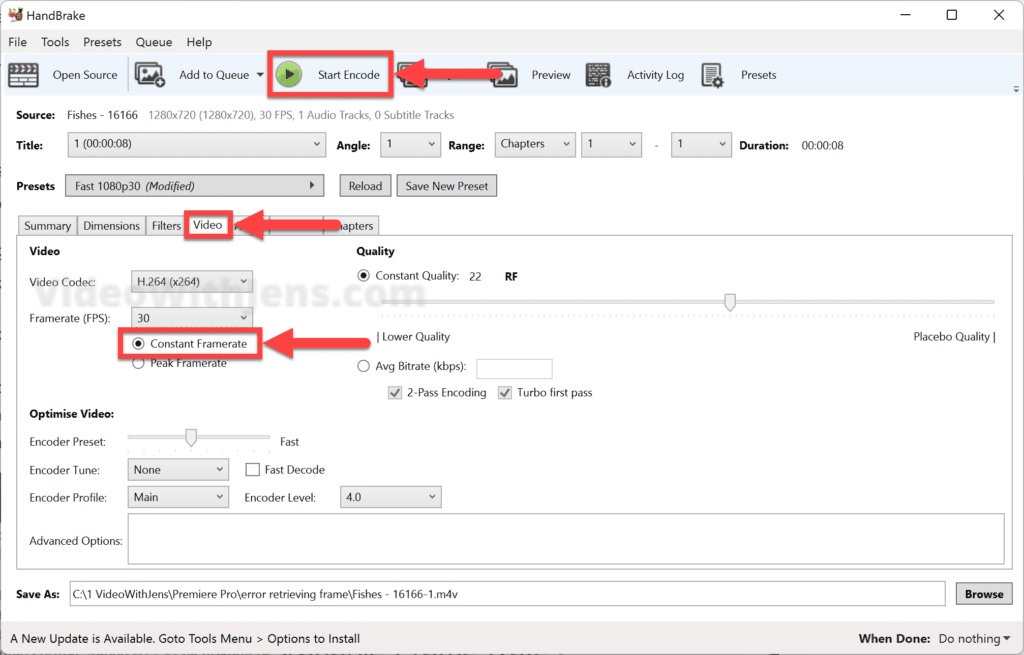
- Download HandBrake.
- Import the clip(s) to Handbrake.
- Go to the Video tab, and enable Constant Framerate.
- Set the location and click on Transcode.
- Import the clip to Premiere Pro.
7. Update Graphics Card Drivers
Many reported that they solved the “Error retrieving frame” by updating the graphics card driver.
I will show you two ways to do this; update through Windows and manually download & install the driver.
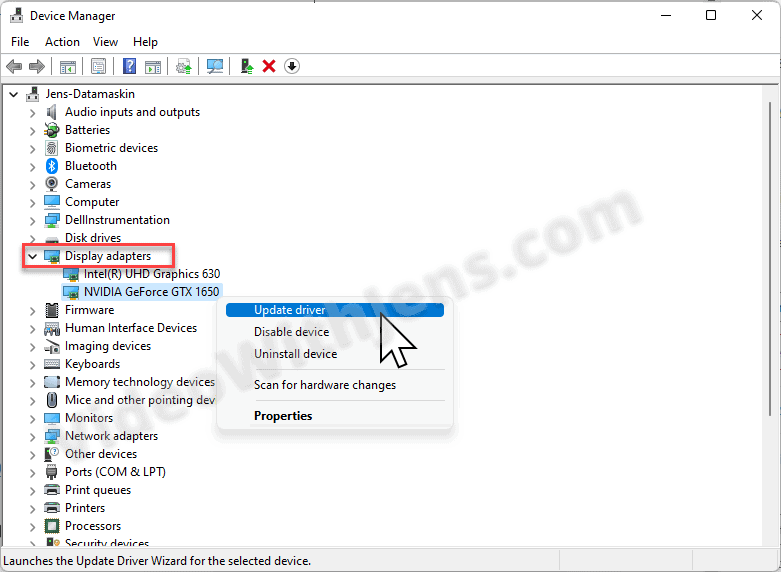
7.1 Update GPU Driver in Windows
- Click on Start in the Windows taskbar or the Windows button on your keyboard.
- Search for Device Manager, and open it.
- Expand the Display adapters.
- Right-click on the GPUs, and click on Update driver:
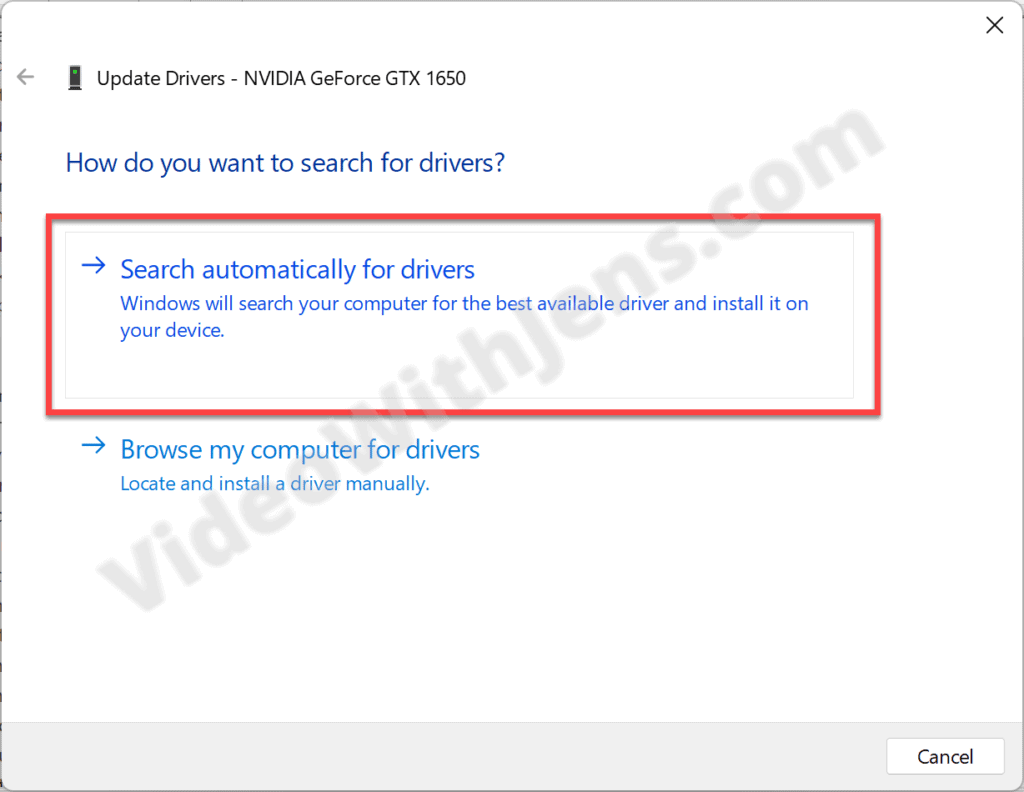
- Click on Search automatically for drivers.
If it says, “the latest driver is already installed,” I recommend manually updating.
7.2 Manually Update GPU Driver
To do this, you first need to know the name of your graphics card. You can find it in the Device Manager, as shown above.
- As you can see, mine is NVIDIA GeForce GTX 1650.
That means I must visit NVIDIA’s official website and find the driver suitable for that specific graphics card.
Here are links to the most common GPU manufacturers:
Download your driver, open the installation file and follow the installation wizard.
8. Create Proxies
If you are using a low-end computer with less computational power, creating proxies will help make the project easier to playback. Doing this might, in return, help the computer not to trigger the error.
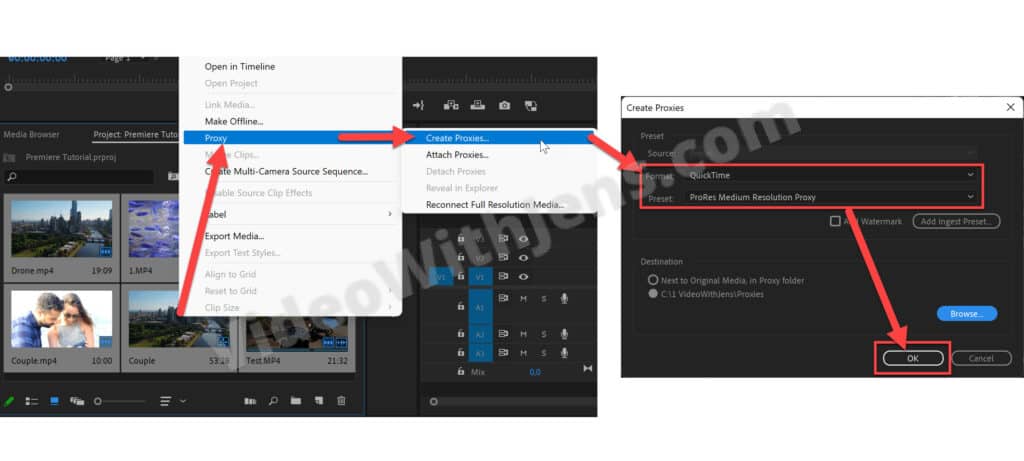
To do this, open and select all the clips inside the Media Browser, right-click them and click on Proxy > Create Proxies.
In the window that pops up, set the Format against QuickTime and the Preset against ProRes Medium Resolution Proxy.
Then, click on OK to start generating them:
Once they are created, you should see a button called Toggle Proxies (when hovered over) beneath the program monitor; when it’s colored blue, the proxies are active:

9. Workaround: Use Software Encoding/Decoding
Using software encoding/decoding is more of a workaround than a solution.
It has solved the retrieving error for many people, but if you work with H.264 or H.265, it will significantly increase render/export times.
Anyways, it may be a temporary fix, so here’s how to do it:
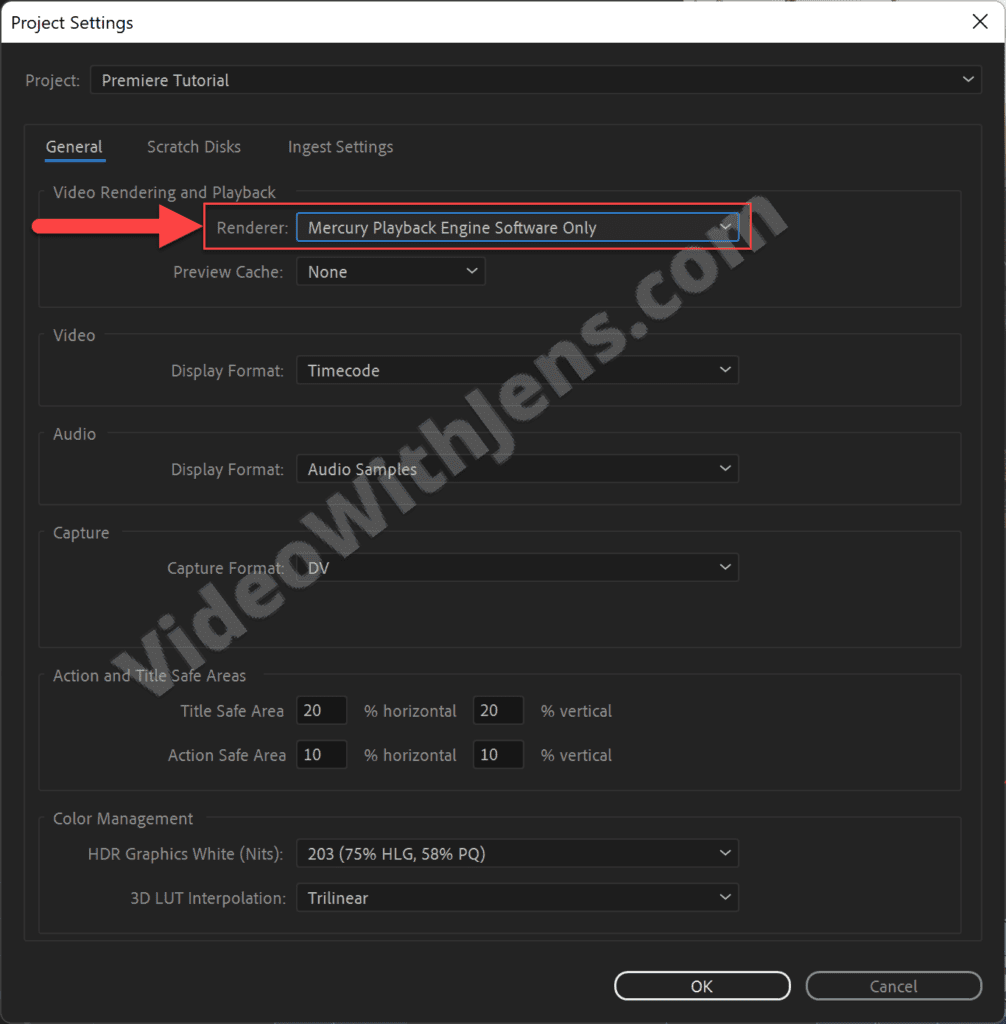
- Click on File > Project Settings > General.
- Set Renderer against “…Software Only.”
- Click on OK.
If that didn’t solve the error, try doing this as well:
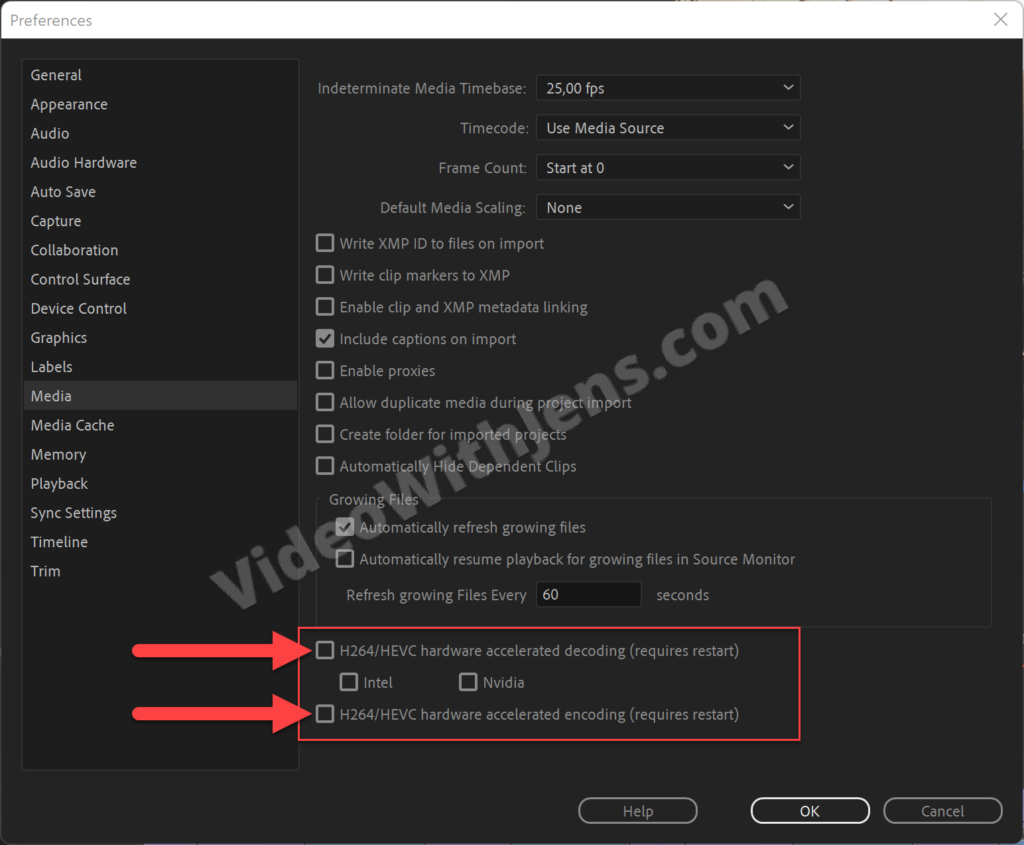
- Click on Edit > Preferences > Media.
- Uncheck H.264/HEVC hardware accelerated decoding.
- Click OK.
- Restart Premiere Pro.
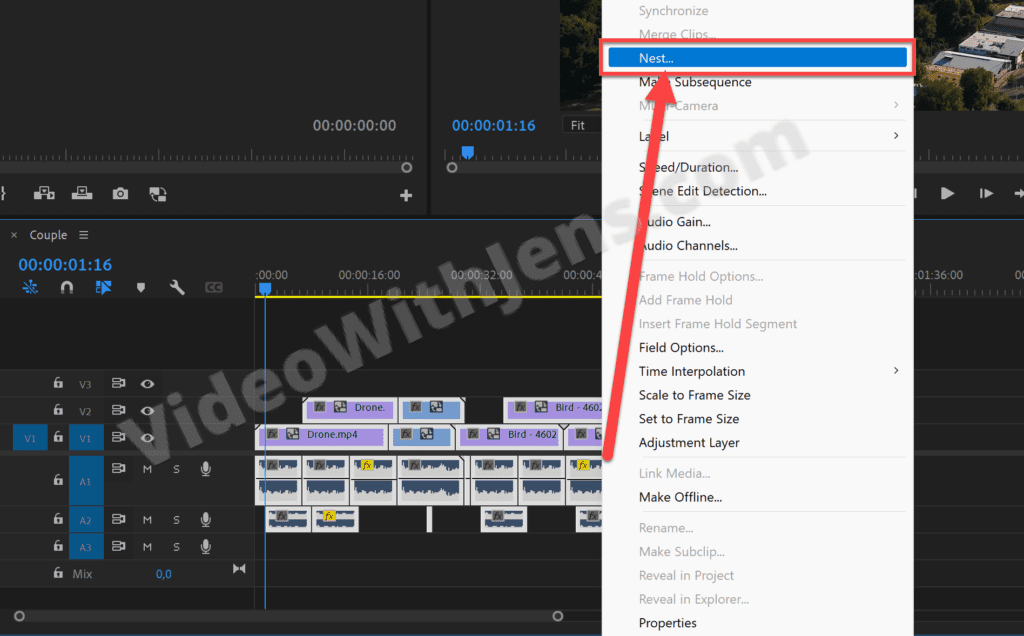
10. Nest Clips
Many users experienced this error after adjusting the clip speed or using effects.
They solved the error by nesting the clips and applying the effects to the newly created clip.
- Select the clips in your sequence.
- Right-click and select Nest.
- Click on OK.
- Apply the effect to nested clips.
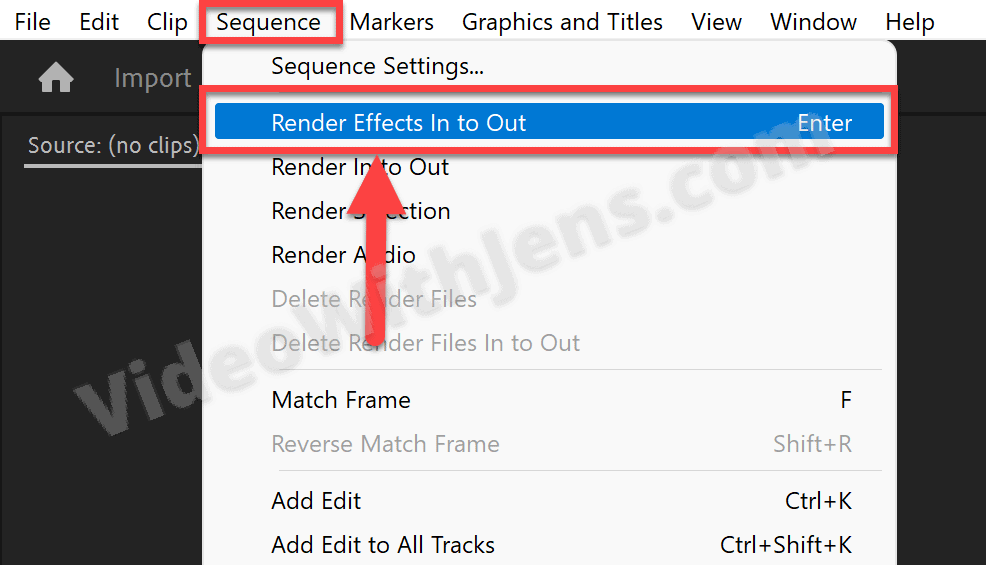
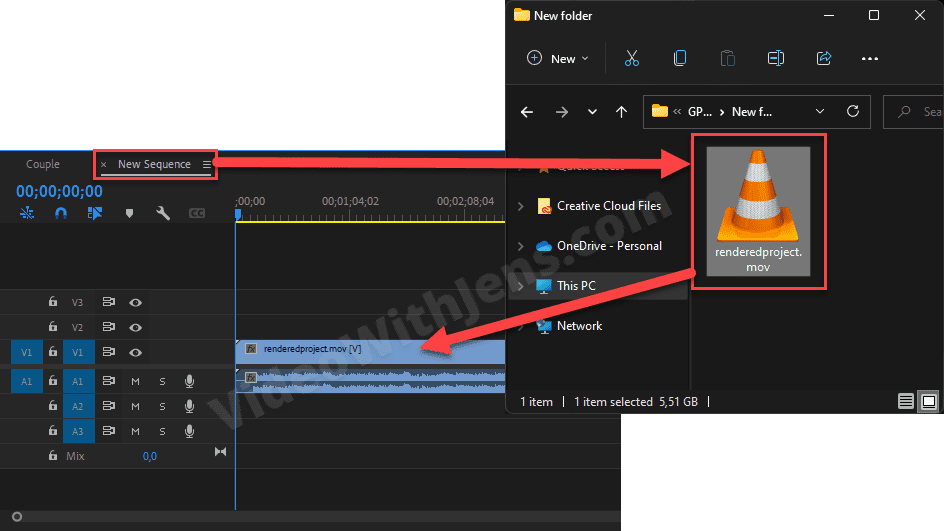
11. Render & Export Video Previews (Smart Rendering)
Another thing reported to work is rendering the sequence and creating video previews. Then, you can export using the previews as well.
- Select the Timeline panel.
- Click on Markers > Clear In and Out.
- Click on Sequence > Render Effects In to Out.
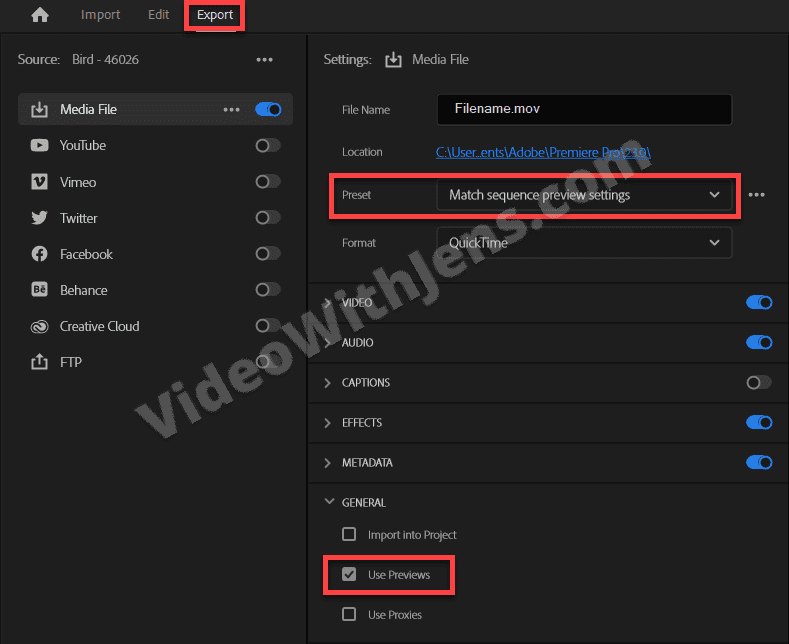
If you are getting the error while exporting, try exporting using the previews:
- Open the Export tab.
- Set Preset against Match sequence preview settings.
- Enable Use Previews under General.
13. Change File Name Extension
Another quick and easy fix is to change the file name extension name.
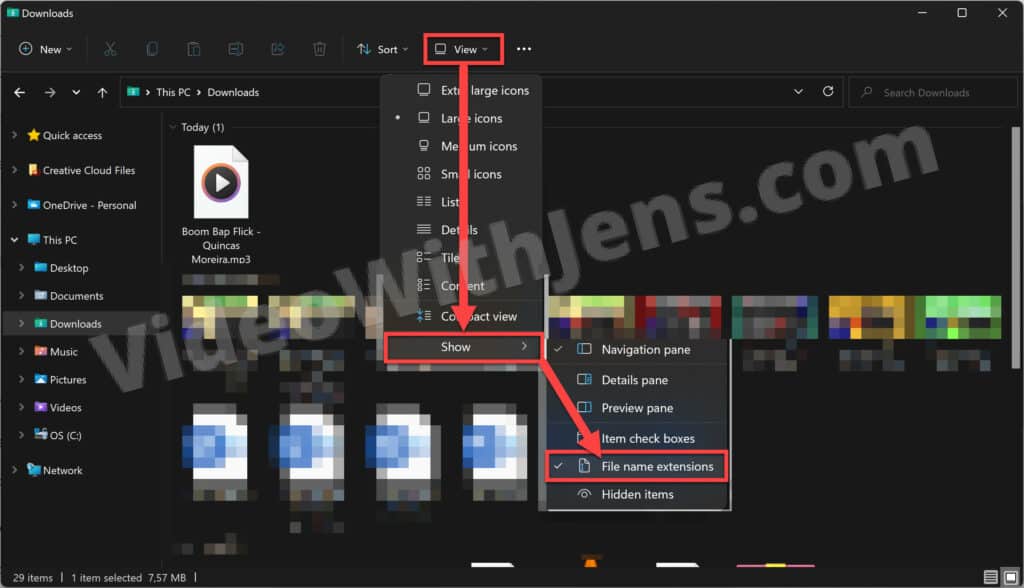
The file extension name does not show by default, so I will show you how to enable it on Windows; if you use macOS, read this.
Show file name extensions in Windows:
- Open the folder with your clips.
- Click on View > Show > File name extensions.
Change file name extension:
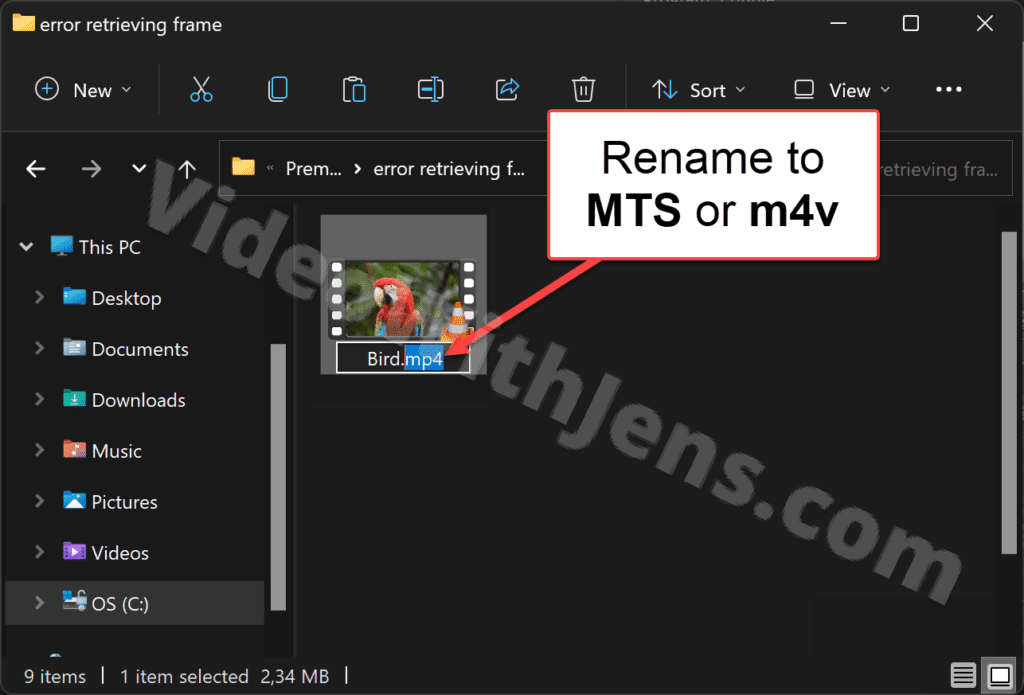
- Right-click the file, and select Show more options > Rename.
- Change the current filename extension to either “.MTS” or “.m4v”
- These are both reported to solve the “error retrieving frame.”
(More information below)
You’ll need to re-link the clips if you have already started editing; if not, simply import them.
The easiest way to re-link is by moving the folder containing the clips to another location on your drive; this will break the connection to Premiere.
Then, try to play them in Premiere, and you’ll get a popup window asking you to locate the missing clips.
- If not, select the missing clips in the Media Browser, right-click, and select Link Media.
14. Export to Another Format
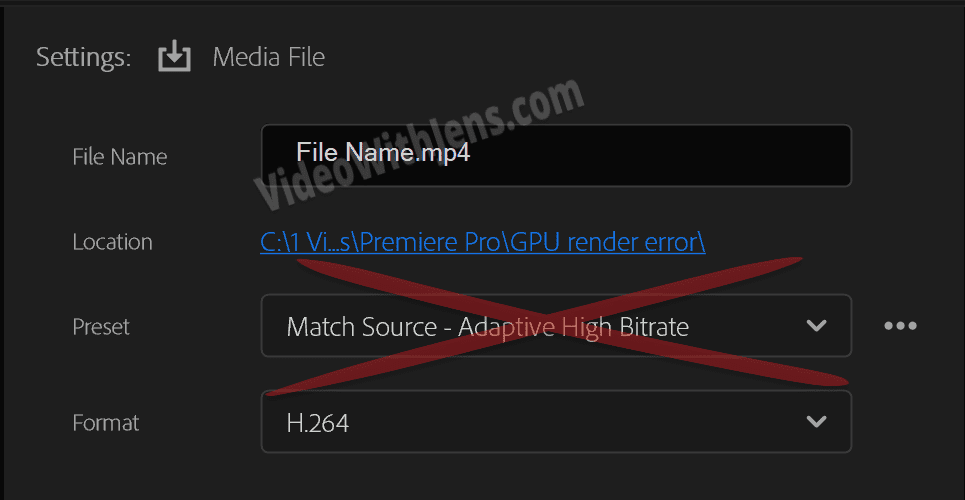
Some people got the error when they set the export preset against Match Source, and by changing it to another format, they could export successfully.
For example, if you are exporting ProRes 442 HQ with Match Source, try setting the Preset against ProRes 4444 instead. Then, transcode afterward.
15. Clean Export & Import again
If you are getting the error because of PNGs, JPGs, effects, graphics, etc., doing a “clean export” might solve your issue.
Here’s what I mean:
- Remove the effects and graphics from your sequence.
- Export the sequence with only the video clips.
- Import the exported file.
- Apply the graphics and export again.
If you are doing this, you must export to a high-quality lossless format the first time to avoid double compression. Exporting to an H.264 twice is not recommended, as it’s a final codec.
- DNxHx, ProRes 4444, etc., are lossless formats.
Other resources:
Here’s a thread in the Adobe community discussing the error.
Check out this complete list of all the most common errors in Premiere Pro and how to fix them.
- TIP: Bookmark the list to solve errors in the future quickly.