
Common Errors in Premiere Pro (& How to Fix Them)
You can probably face hundreds of errors in Premiere Pro, as with all other editing software.
Luckily, I’ve listed the errors you will likely face in this post and how to fix them.
Without further ado, let’s get to it!
What types of Errors Are There?
I’ve divided the errors discussed in this article into the following categories:
- Import errors.
- In Premiere, this category is called “File import failure.”
- Export/render errors.
- In Premiere called “Error compiling movie.”
- General errors.
Let’s start with the import errors:
“File Import Failure” in Premiere Pro (Import Errors)
This section will discuss the five most frequently seen import errors.
The “File Import Failure” errors are shown when Premiere Pro cannot read the file you are trying to import. Import issues generally happen due to an unsupported file format, corrupt files, or file path complications.
“There Was An Error Decompressing Audio or Video” in Premiere Pro
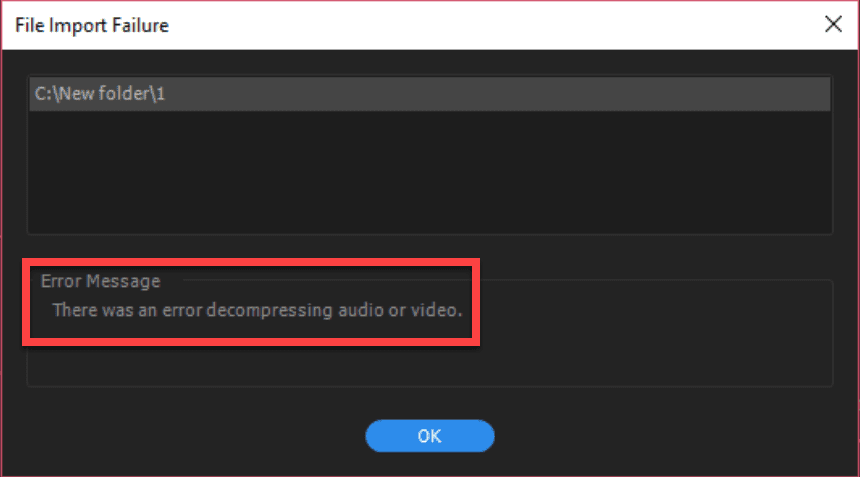
Many users have reported getting this error when trying to import MP3 files. However, it’s also seen for video files, as stated in the error message.
The most popular solution to this error is changing the file name extension. So, if you are dealing with a “.mp3”, change it to “.wav”.
Check out this article for more information about the error.
“The File Cannot Be Opened Because of a Header Error” in Premiere Pro
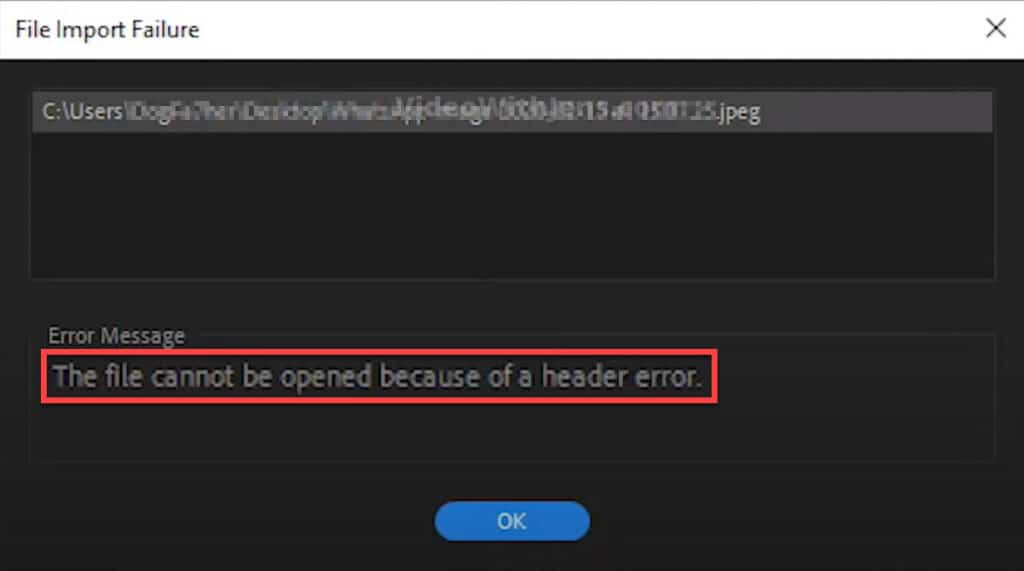
This error is mainly seen when trying to import image files.
Here are the three most popular solutions to the error:
- Change the file name extension.
- Re-export the image.
- Change the color mode to RGB.
Here’s more information about the solutions.
“The Importer Reported a Generic Error” in Premiere Pro
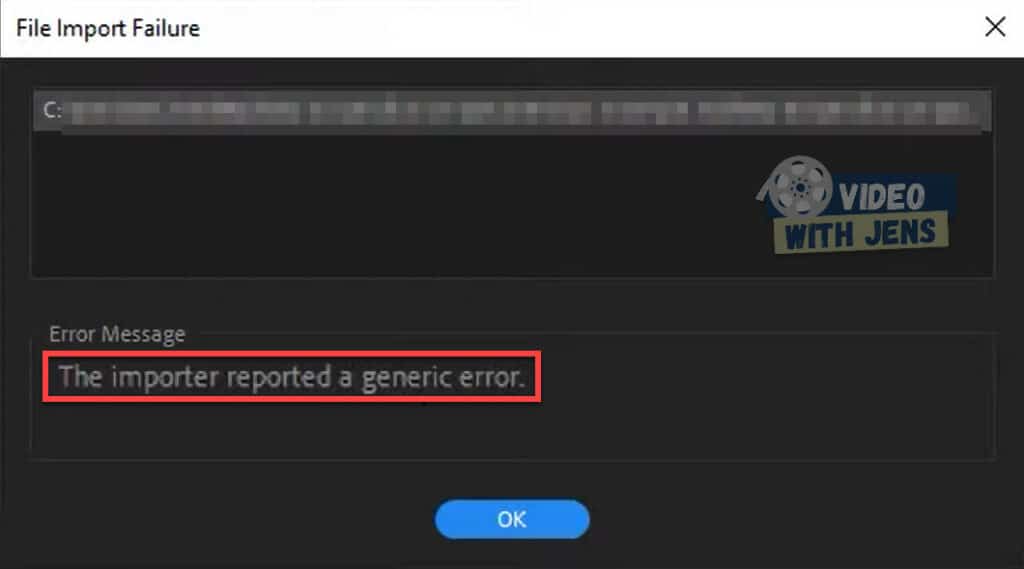
This error is difficult to diagnose as it’s been reported for several reasons.
Here are the most prevalent causes:
- The file format/codec is unsupported.
- Corrupt media cache.
- File location issues.
Check out this article for more information about the error.
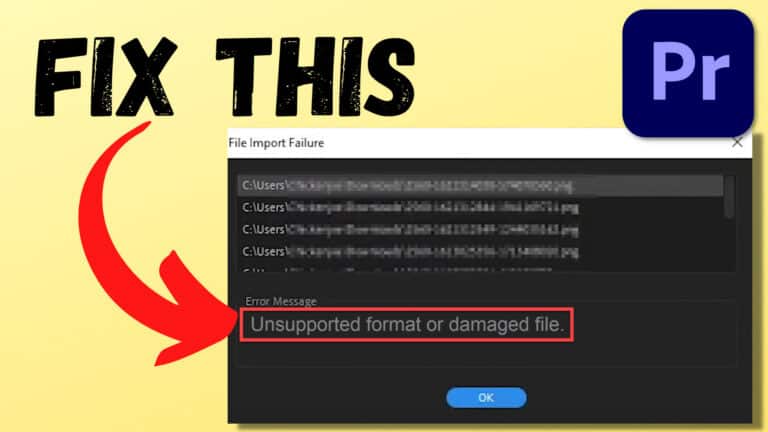
“Unsupported Format or Damaged File” in Premiere Pro
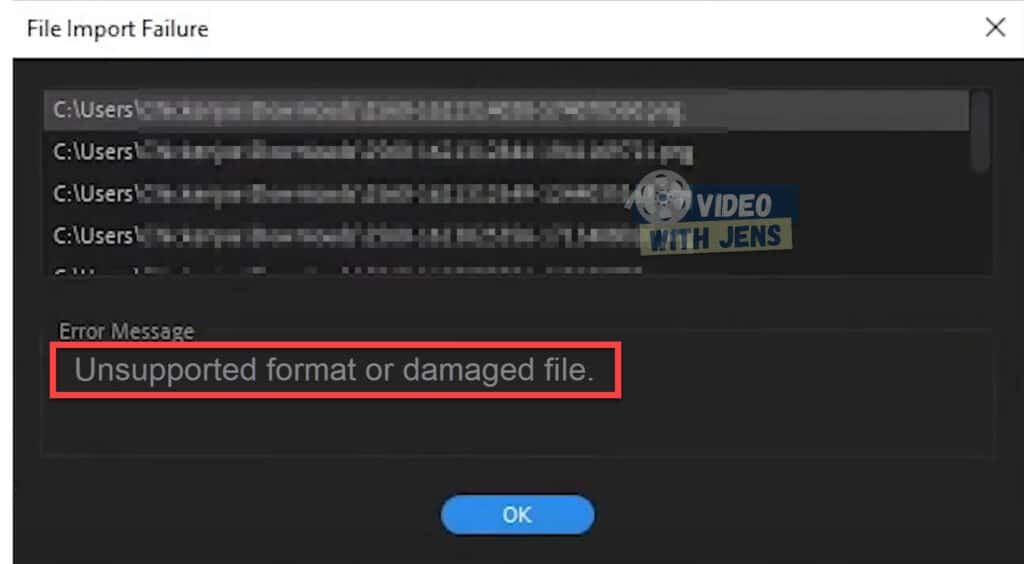
This error is mainly seen when the file format is not supported in Premiere Pro or if the file is corrupt.
Users have reported these solutions to fix the error:
- Change the file location.
- Change file name extension.
- Transcoding the file.
Here’s more information about the error.
“The File Has an Unsupported Compression Type” Premiere Pro
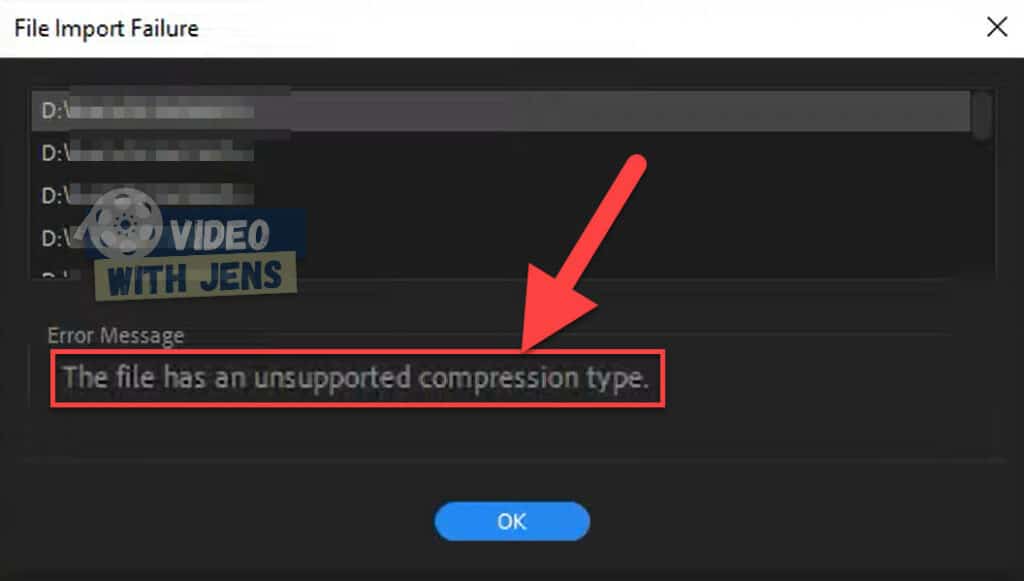
This error is thrown when Premiere cannot properly read the file, usually due to an unsupported format, corrupt files, or file destination issues.
These solutions have worked for most people dealing with the error:
- Delete media cache.
- Transcoding the file.
- Remux files in OBS studio.
- Changing the file location.
Check out this guide for more details about the solutions.
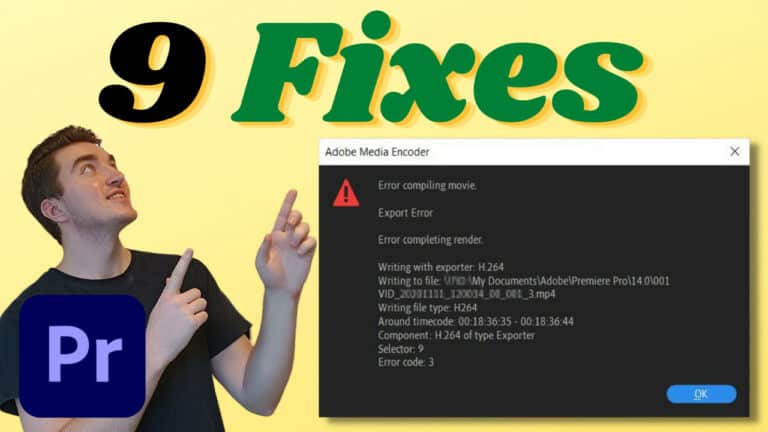
“Error Compiling Movie” in Premiere Pro (Export/render Errors)
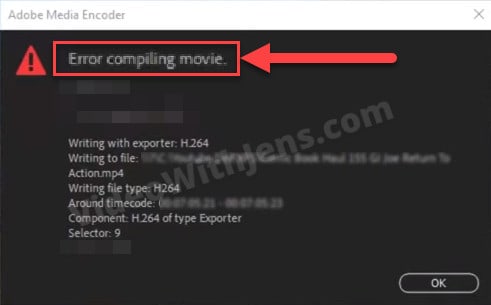
Oh! The Error compiling movie is a classic.
This is not a specific error but more of a category for all the export & render errors in Premiere Pro.
Luckily, all the export errors are closely related, meaning the same solutions work for most of the errors in this category.
Here are the most popular solutions to solve export/render errors:
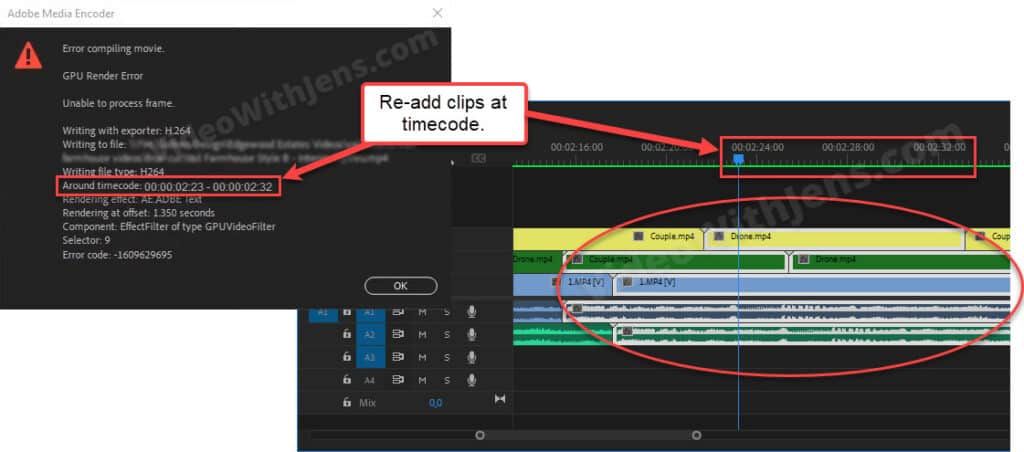
1. Check the Timecode
The timecode is the first thing to check when getting the Error compiling movie.
The timecode tells you where the error was triggered in the sequence, which gives you a lot of information!
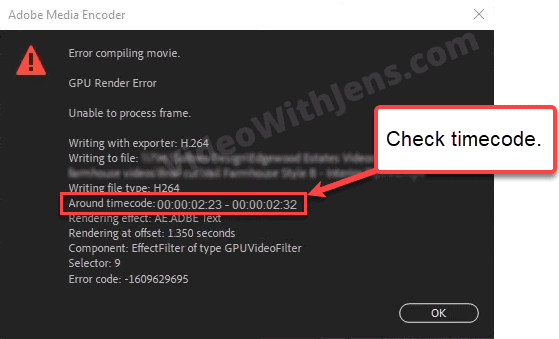
Check if there is anything that might trigger the error around the timecode.
Things to look for are:
- Corrupt clips: are there any clips starting around the timecode?
- Unsupported media: make sure the format and codec of the clips are supported in Premiere. Here’s a list of supported file formats.
- Make sure the clips have a constant frame rate.
- Color adjustments (lumetri): try exporting without it to troubleshoot.
- Effects.
- Sound design.
- Titles/Text.
- Transitions.
- Images.
A simple solution to try is re-adding all the clips that are located around the timecode.
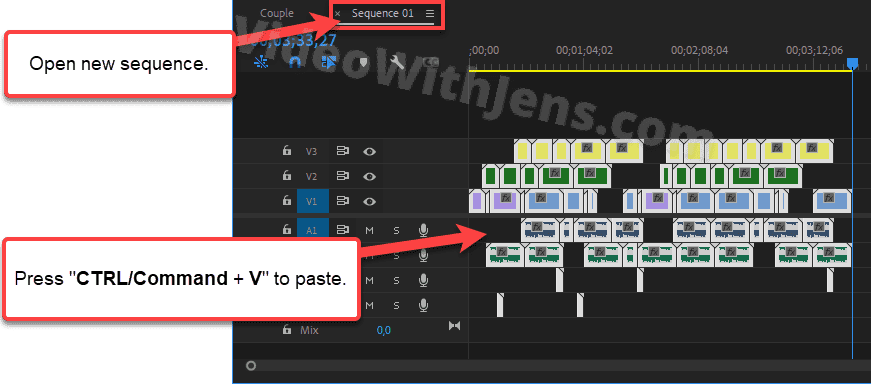
2. Copy Clips to a New Sequence
This is the most popular solution to solve the Error compiling movie, and has worked for hundreds of thousands of users.
All you need to do is create a new sequence and copy & paste all the clips.
- Click on File > New > Sequence > Choose Sequence Preset > Click OK.
- Open the old sequence > copy everything inside it:
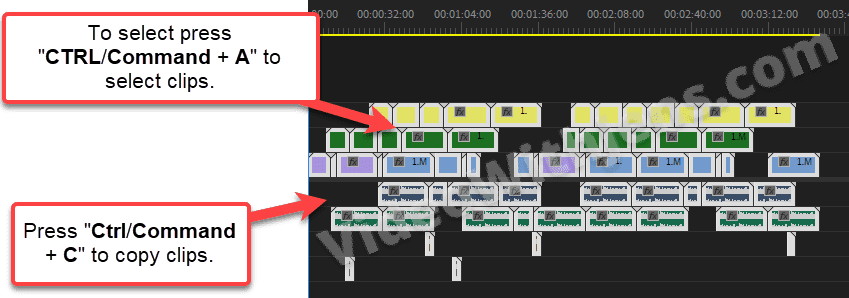
- Open the new sequence > press “Ctrl/Command + V” to paste.
NB! You might have to re-adjust the audio levels.
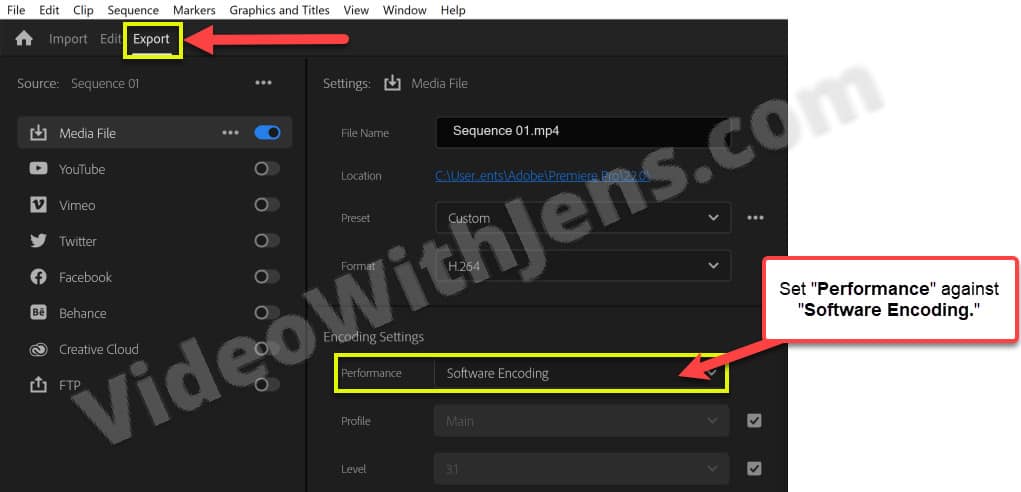
3. Use Software Encoding (Workaround)
This method seems to coupe with the error in 99% of the cases
However, it’s more of a workaround than a solution. The reason is that software encoding does not utilize your GPU and relies only on your CPU.
And leaving the GPU out of the equation will significantly increase render/export times. But it’s worth trying if you need to meet a deadline or something.
There are two ways to use software encoding, the first one is for exporting the video, and the second one is for rendering the sequence:
3.1 Exporting
- Open the Export tab inside Premiere Pro.
- Under Encoding Settings, set Performance against Software Encoding.
3.2 Rendering
- File > Project Settings > General > and set Renderer against “…Software Only.”
- Click on OK.
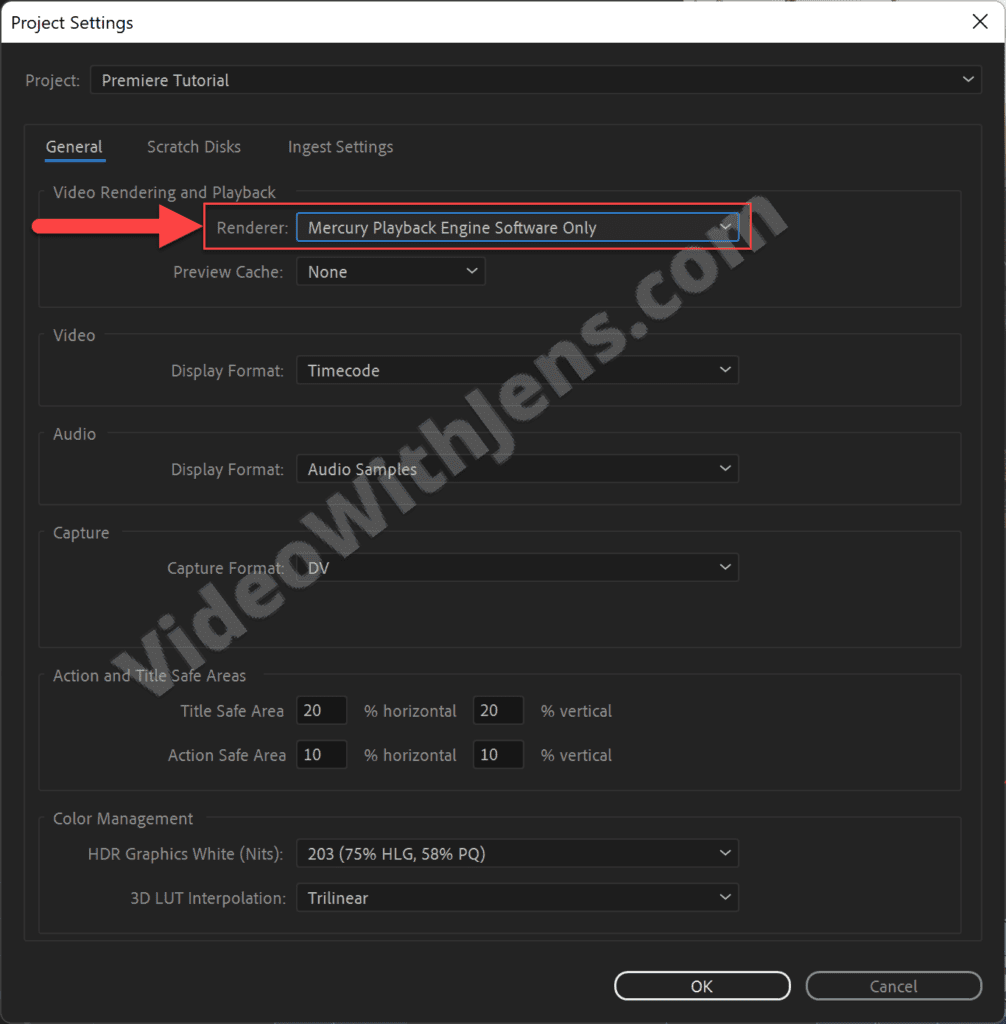
Sometimes only changing the Renderer is not enough. In that case, try this:
- Click on Edit > Preferences > Media, and uncheck Hardware accelerated encoding/decoding.
- Click OK & restart Premiere Pro.
4. Smart Rendering
Another popular solution to solve the Error compiling movie is using the smart render function.
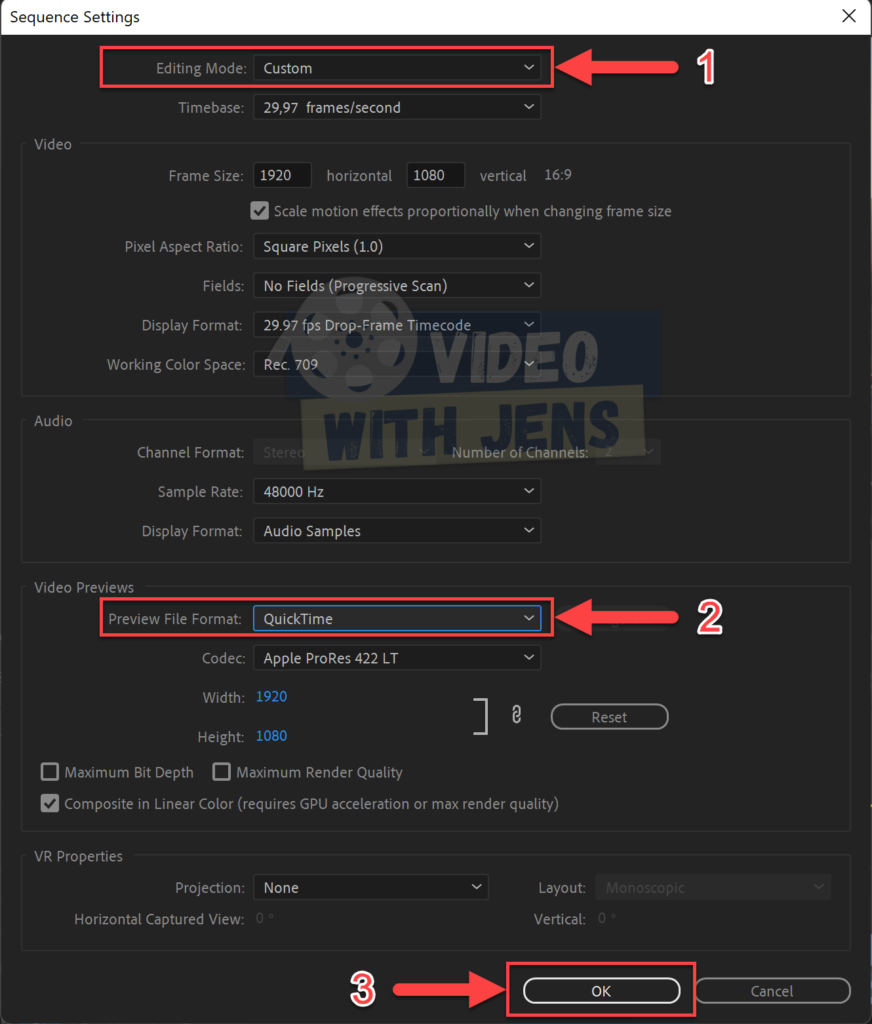
- Click on Sequence > Sequence Settings.
- Set Editing Mode against Custom.
- Set Preview File Format against QuickTime.
- All QuickTime codecs are Supported.
- Click on OK.
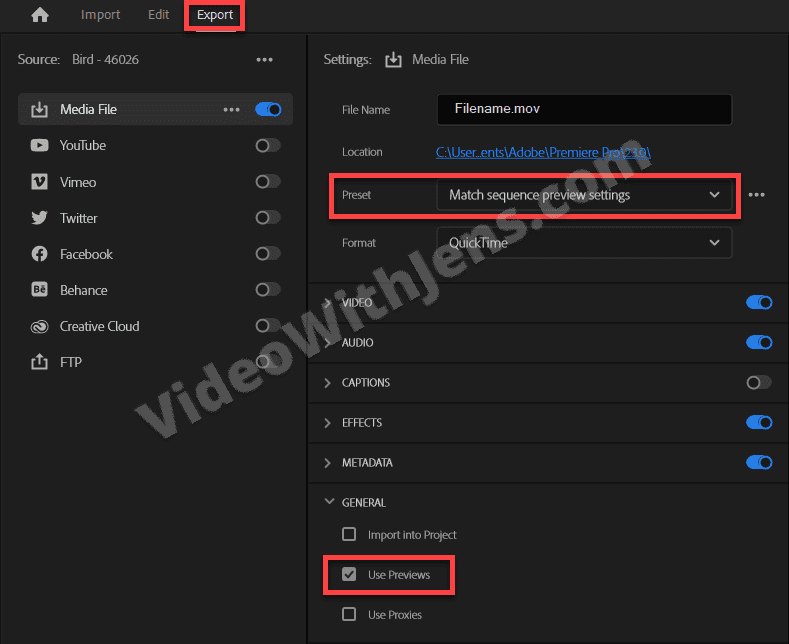
- Click on Sequence > Render In to Out.

- Open the Export tab inside Premiere Pro.
- Set Preset against Match sequence preview settings.
- Enable Use previews under General.
- Export as usual.
For more information about the Error compiling movie, and all the different error codes, check out this complete guide.
General Errors
I’ve categorized all errors not related to import or export as general.
Below, I’ve written a quick guide on how to solve each of these errors.
If you need more information, there’s a link at the bottom of each error to a more detailed guide with additional solutions.
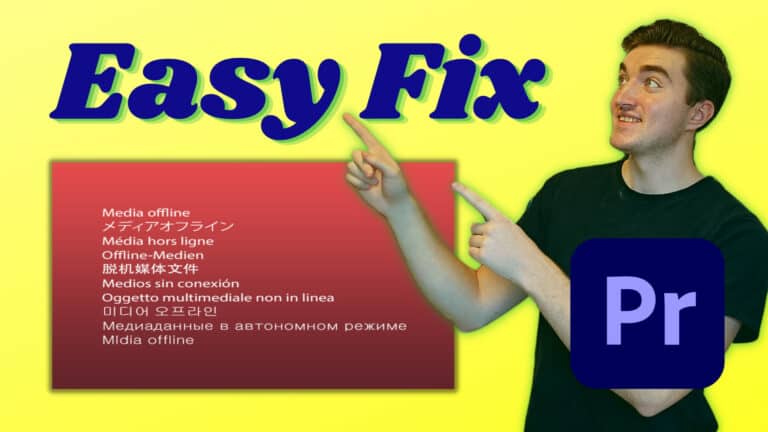
“Media Offline” Error in Premiere Pro
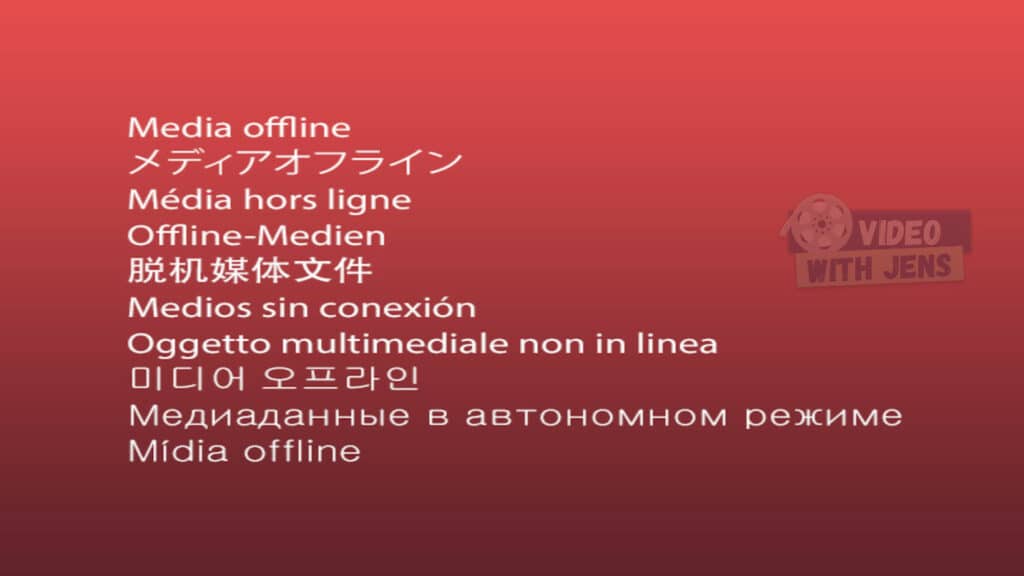
This is an error most people will experience at some point in their editing journey.
It tells you that the connection between Premiere Pro and your footage is broken.
Typically, you’ll get a window popping up called Link Media, where you can click on Locate and navigate to where the clips are located in your file system. Doing this will restore the connection between the clips and Premiere Pro.
You can manually open the Link Media window if you don’t see it.
Here’s a detailed guide with images to fix the Media Offline error.
“Unsupported Video Driver” Error in Premiere Pro
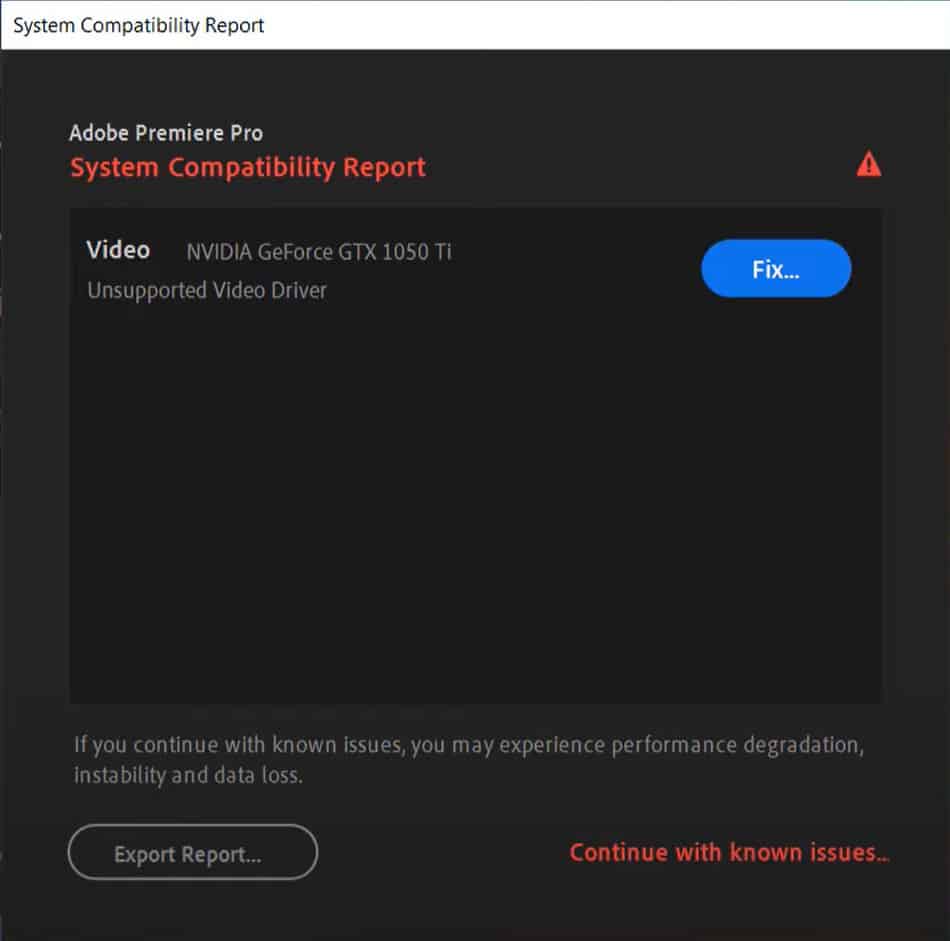
If you see this error, Premiere Pro does not support your graphics card driver, which is usually solved by updating it.
Here’s a link to the most popular GPU manufacturers:
Check out this guide for more information on how to fix the error.
“Error Retrieving Frame” in Premiere Pro
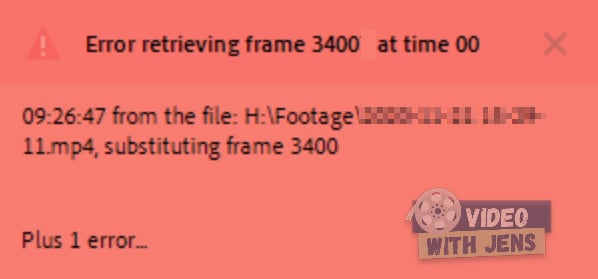
If you are getting this red-boxed error (in 2023, at least), Premiere Pro is struggling to decode a specific frame in your sequence.
There are many reasons why this might be happening.
The most popular methods to solve the error are:
- Reboot computer…
- Delete media cache (might be corrupt).
- Changing the clips’ file location.
- Transcoding.
- And more…
Click here for the rest of the solutions to the Error retrieving frame and how to do them.
“Media Pending” Error in Premiere Pro
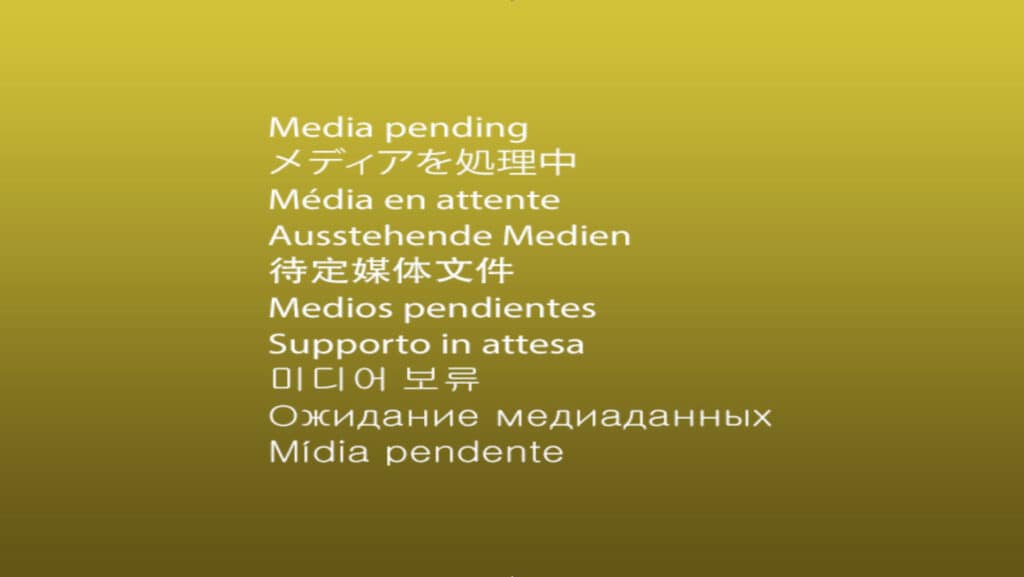
If you see this error, Premiere Pro has difficulties connecting to the clips showing the error.
Users have reported it happens mostly to nested clips and dynamically linked clips. However, it can happen to any clip.
As for many of the errors, there is not only one solution that fits all.
Here are top 4 methods that have been reported to work:
- Disable & re-enable clips.
- Make a minor adjustment.
- Restart Premiere.
- Copy clips to a new sequence.
Click here for more solutions to the media pending error and how to use them.
![[Solved] “There Was An Error Decompressing Audio or Video” Premiere Pro](https://videowithjens.com/wp-content/uploads/2022/12/there-was-an-error-decompressing-audio-or-video-premiere-pro-7-solutions-768x432.jpg)

![[SOLVED] File Importer Detected an Inconsistency in the File Structure Premiere Pro](https://videowithjens.com/wp-content/uploads/2023/01/File-Importer-Detected-an-Inconsistency-in-the-File-Structure-Premiere-Pro-768x432.jpg)