How to Fix ‘Video Not Showing’ in Premiere Pro (2023)
In this post, you’ll learn what to do if your video is not showing in Premiere Pro.
This post will cover 2 issues:
Video Not Showing in the Timeline, ONLY Audio in Premiere Pro
At some point, using Premiere Pro, most people will experience that only the audio part of their clip shows up in the timeline.
Luckily, this is usually a quick fix and not a bug.
Here are 3 ways to fix it:
1. Enable Source Patching
Usually, when only a video clip’s audio is shown in the sequence, the video source patchers is turned off.
To fix this, select the clip problem clip in the Project panel, and then click on the gray part in the Source patching panel (next to the lock in the timeline) to turn it on.
NB: You must select a clip first to see the Source patchers.
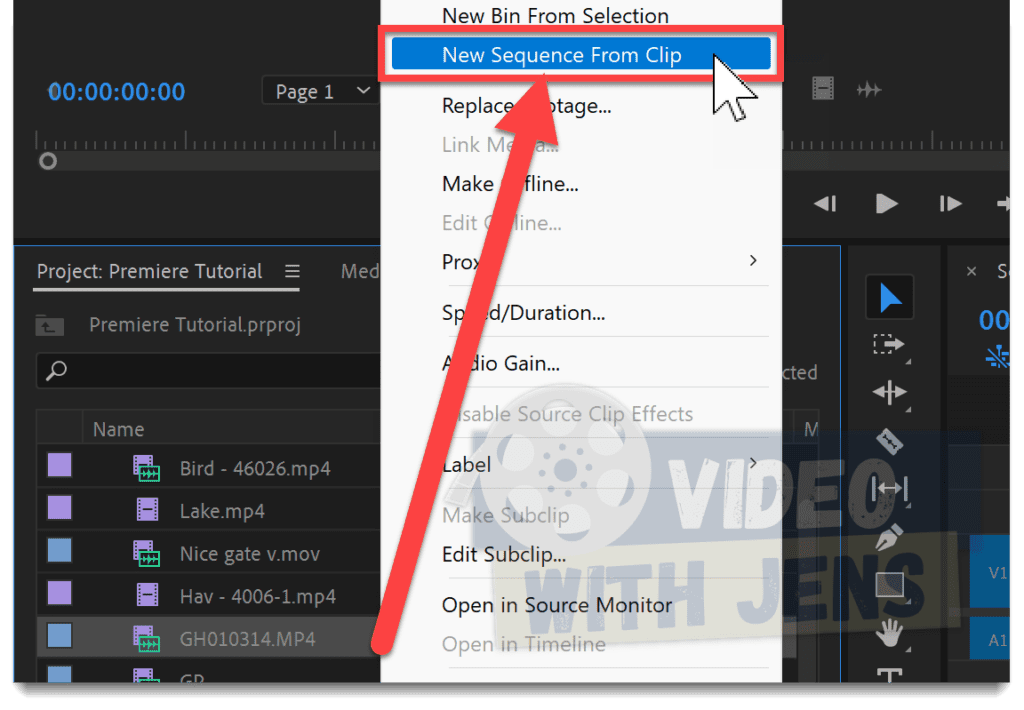
2. Create New Sequence, and Copy the Clip.
If the source patching didn’t fix the issue, I’ve seen some people having success by creating a new sequence.
This is not as dramatic as it sounds:
- Right-click the problem clip in the Project panel, and select New Sequence From Clip.
- Copy the clip from the new sequence.
- Open the old sequence in the Timeline panel, and press the keyboard shortcut: Ctrl/Command + V to paste it.
3. Transcode to a Supported Video Codec
If Premiere does not support the file’s video codec, but the audio codec is supported, you’ll still be able to import the file…
BUT if you add the clip to the timeline, you’ll ONLY see the audio.
To check if this is happening to you, I usually open the video in the VLC media player, which is free to download.
In the VLC media player, click on Tools > Codec Information, and then you’ll find your video- and audio codec.
As you can see in the image below, my video codec is VP9, and the audio codec is AAC. And when checking the list «Premiere Pro supported file formats» on Adobe’s website, I realized that the video codec is not supported.
So, in that case, I need to transcode my file; I’ve written more about that below.

Why is the Audio Not Showing, But the Video Is?
If Premiere only shows the video part of your clips in the sequence, and the audio is missing, it’s usually because the audio source patchers are disabled. To turn them on, select the problem clip in the Project panel and click on the gray part in the Source patching panel (next to the lock in the timeline).
That is pretty much the opposite of what is described above.
Video Preview/Playback Not Showing (Black Screen) in Premiere Pro
Next, let’s discuss what to do if your video preview/playback is not showing in the Program Monitor.
Why is my Video Showing Up Black in Premiere Pro?
If you get a black screen when playing your video in Premiere Pro, it’s usually due to a lack of system resources. To fix this, click on File > Project Settings > General, and set Renderer against Mercury Playback Engine Software Only.
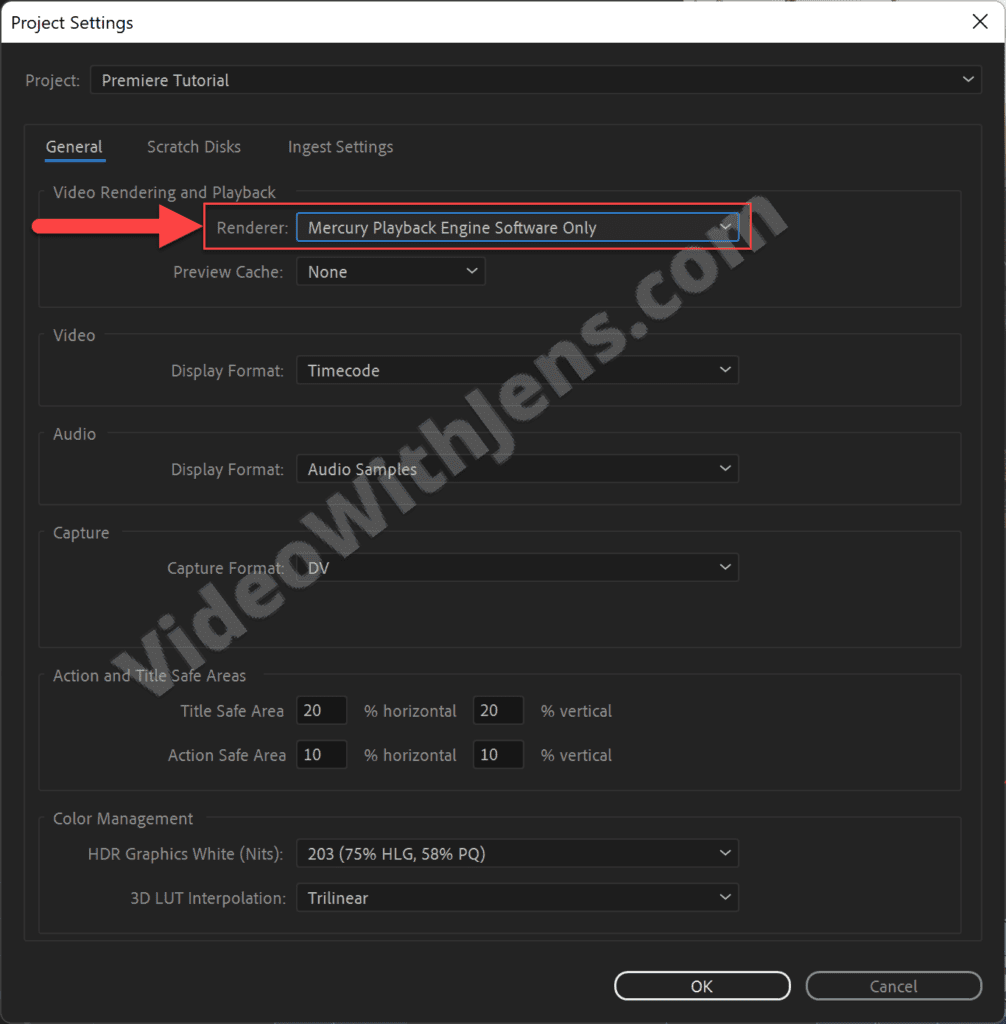
Note that this is more of a workaround that many users have found to fix their black screen. Using software rendering is not as effective as GPU-accelerated rendering.
Therefore, I’ll show you a couple of other solutions you can try first:
1. Reboot Your Computer
As mentioned, the black screen often occurs due to a lack of system resources.
Luckily, sometimes it’s enough to do a quick restart of your computer to free up some memory; it may also fix any bugs that are causing the issue.

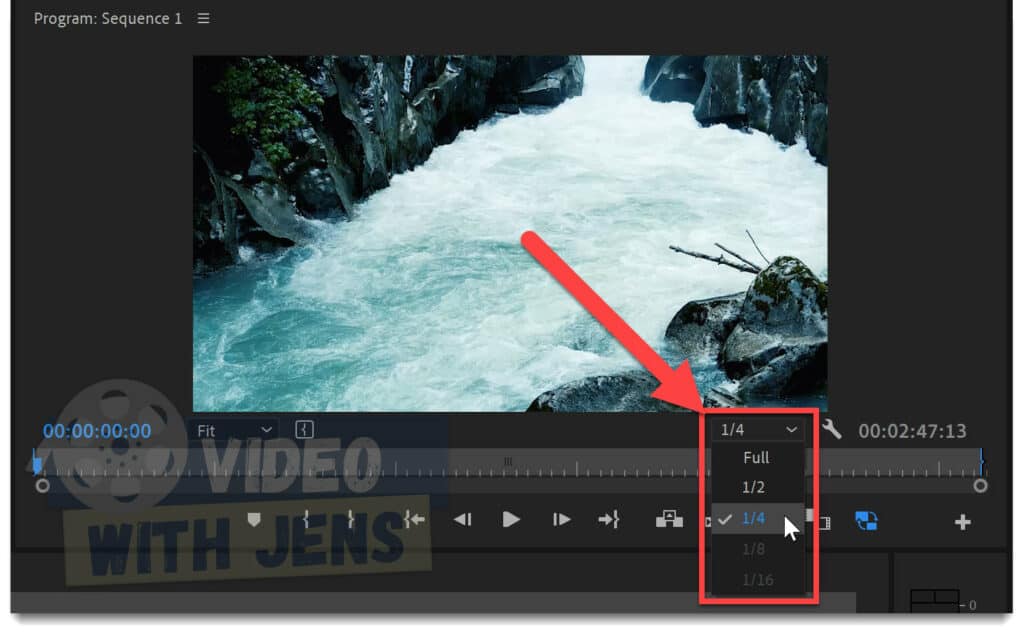
2. Reduce Playback Resolution
Another way to free up some resources is by reducing the playback resolution in the Program Monitor.
In the bottom right corner below the black screen in the Program Monitor, open the drop-down menu, and select 1/4 or below.
Next, try to play/scrub the sequence.
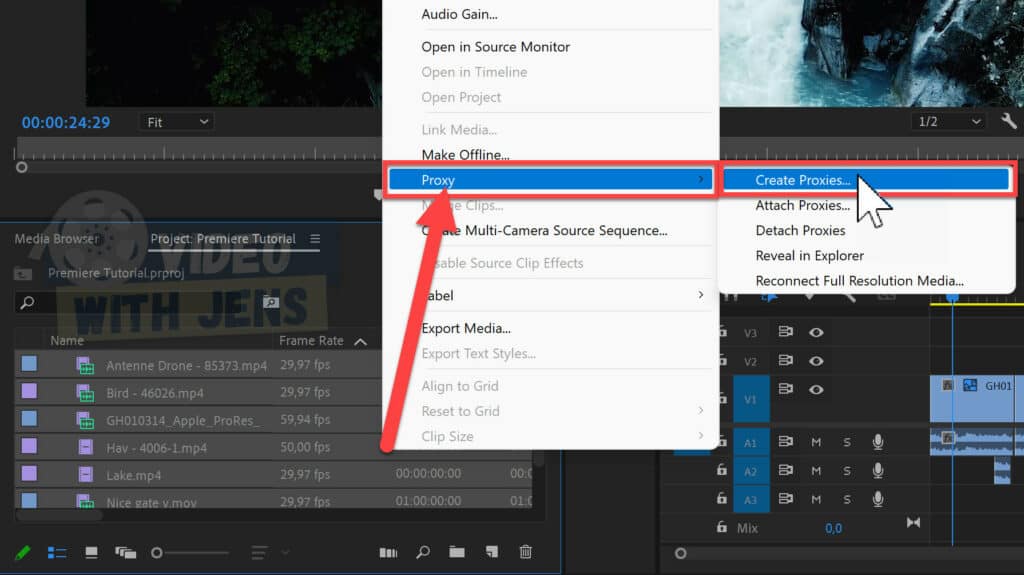
3. Create Proxies
If the two first solutions did not make your video show up, try creating proxy files.
These temporarily created files are much easier for your machine to handle than the regular MP4 files.
- Select the clips in the Project panel.
- Right-click a clip, and select Proxy > Create Proxies.
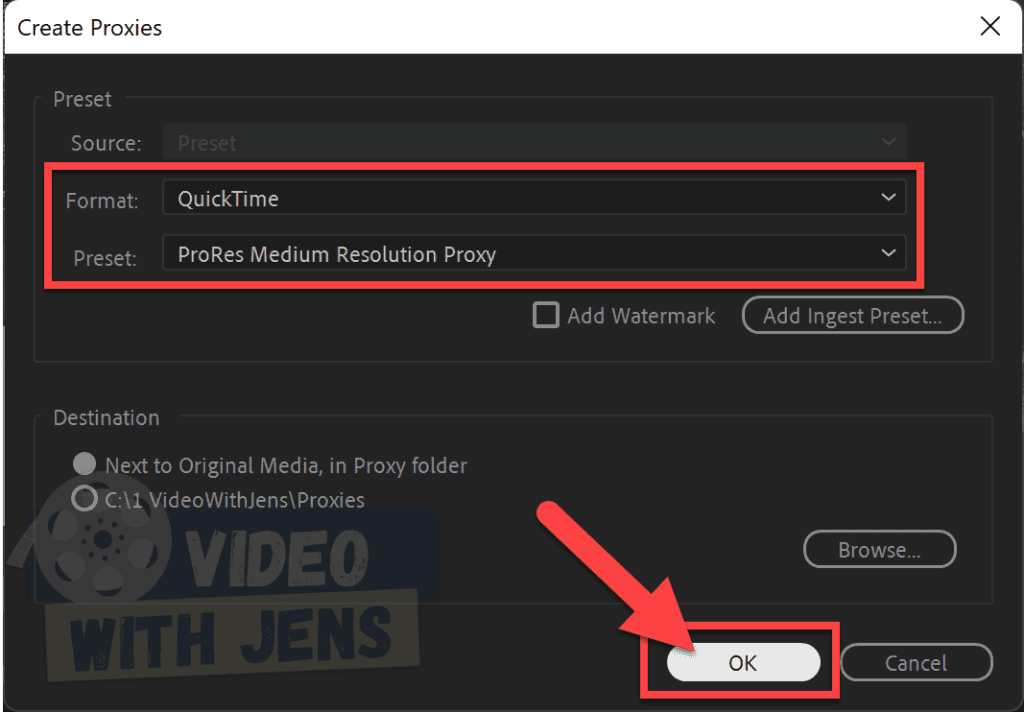
- Set the Format against QuickTime and Preset against ProRes Medium Resolution Proxy.
- Click on OK.
- NB. You must install the Adobe Media Encoder for this to work (included in your Premiere Pro subscription).
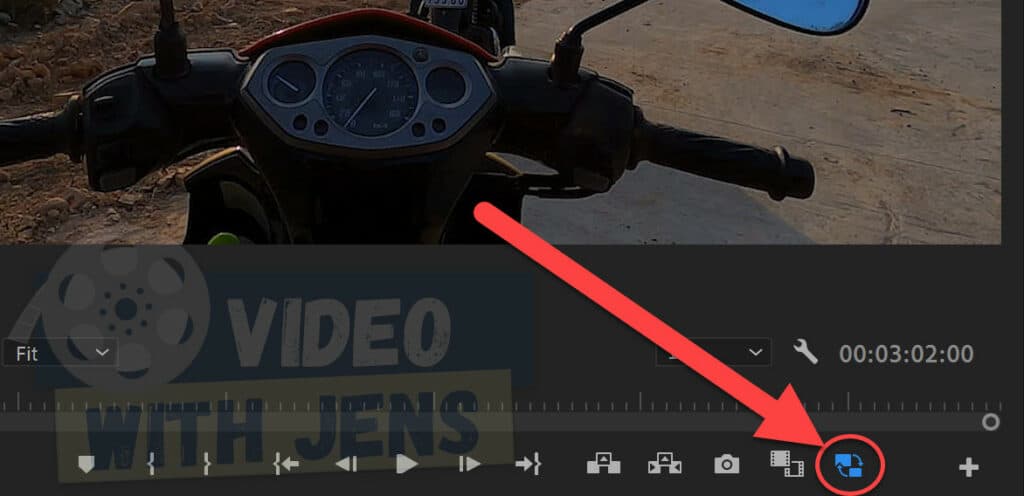
- Click on Toggle Proxies once the proxies are created in the Adobe Media Encoder:
4. Make Sure the Files is Not Corrupt
Sometimes it’s not a lack of resources that causes a video not to show up; instead, it may be that your files are corrupt.
I recommend checking two file types: Media cache files and your video files:
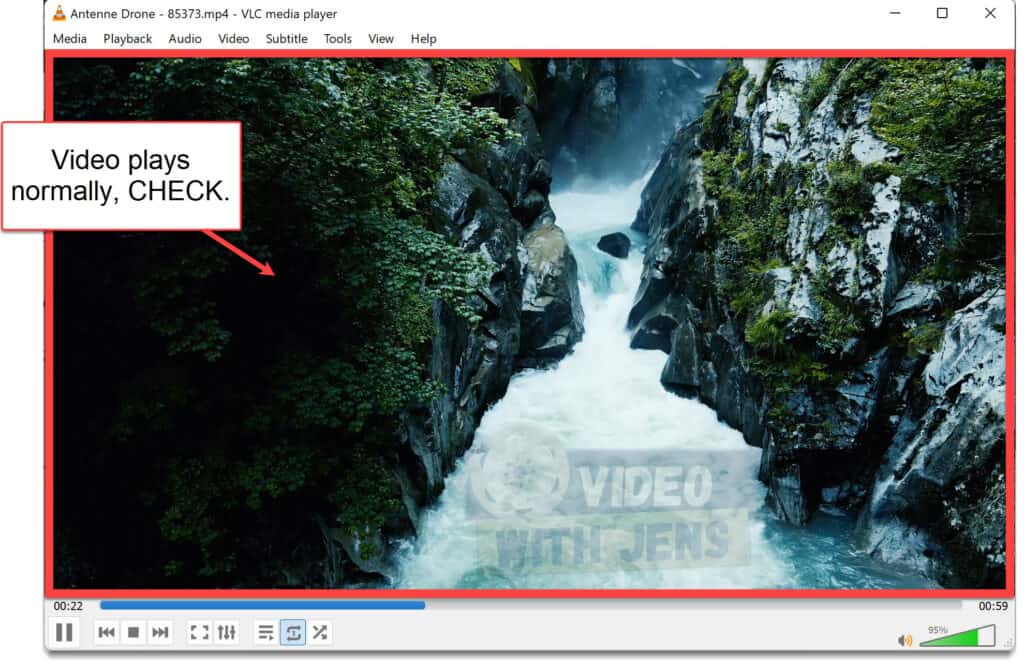
4.1 Open the Video(s) in Another Media Player
Open your video file outside Premiere Pro in another media player.
If it’s playing normally, the video is not corrupt.
4.1.1 How to Transcode
If your video is corrupt or unsupported by Premiere Pro, transcoding is your answer.
There are many software you can use for this task. For example, you can use a free online converter or download any well-known freeware (recommended).
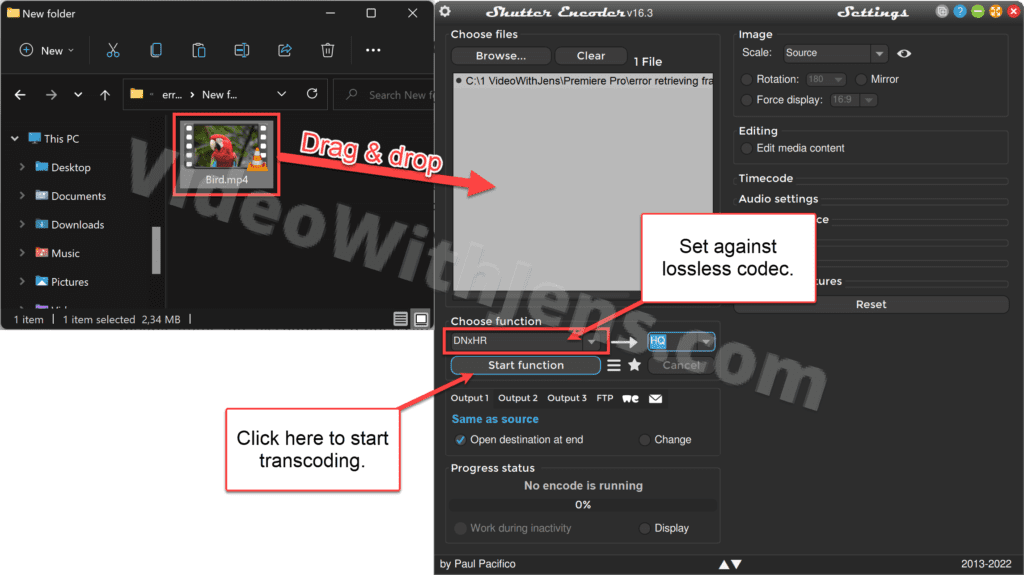
I recommend going with the second option to preserve good video quality; two good freeware are HandBrake and Shutter Encoder.
To use Shutter Encoder:
- Drag & drop your video file(s) on the white box inside Shutter Encoder.
- Under Choose function, select:
- DNxHD for 1080p.
- DNxHR for 4k.
- Alternatively, H.264, you are running low on drive space.
- Click on Start function.
- By default, you’ll find the transcoded file in the exact location as the original file.
- Import transcoded file(s) to Premiere Pro.
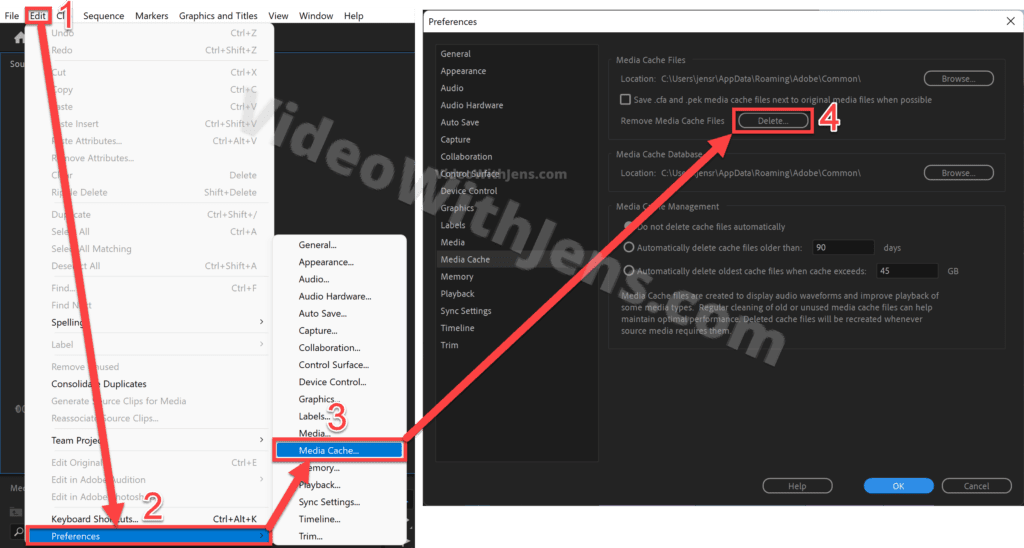
4.2 Delete Media Cache
To ensure the media cache files are not corrupt, I recommend deleting them.
This is done in 9 clicks (or three steps):
- Click on File > Close Project > Yes (to save project).
- Click on Edit > Preferences > Media Cache > Delete.
- Select Delete all media cache files (requires restart) > OK.
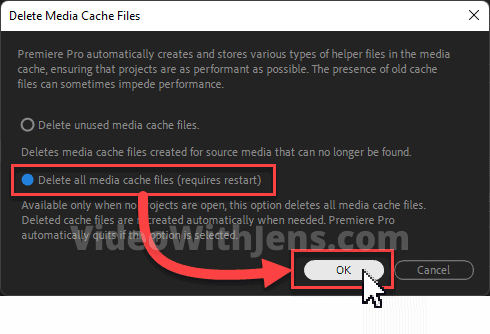
9 clicks 😀
Now, try opening your project, and hopefully, the video playback will show.
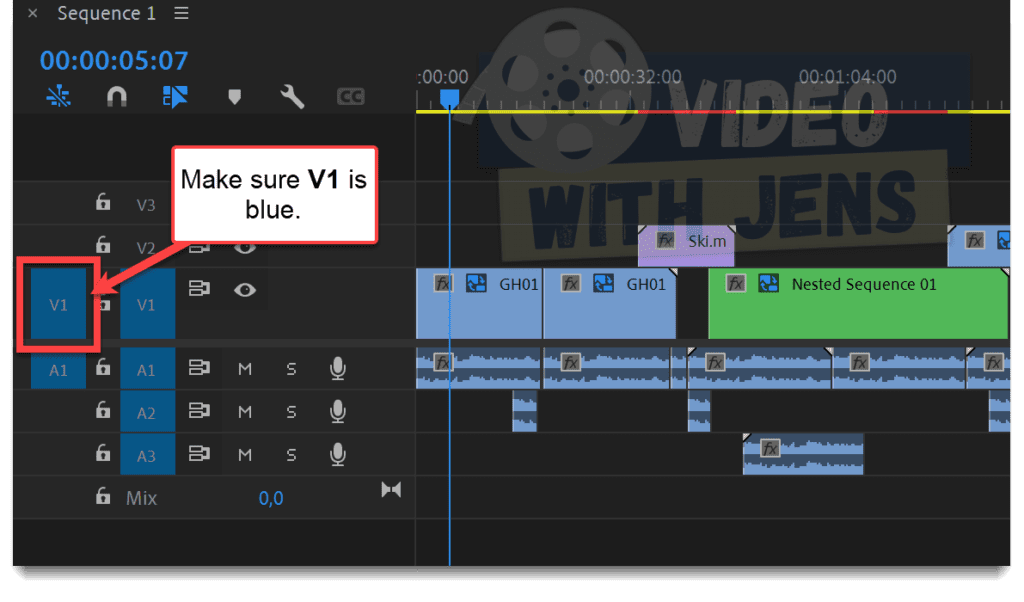
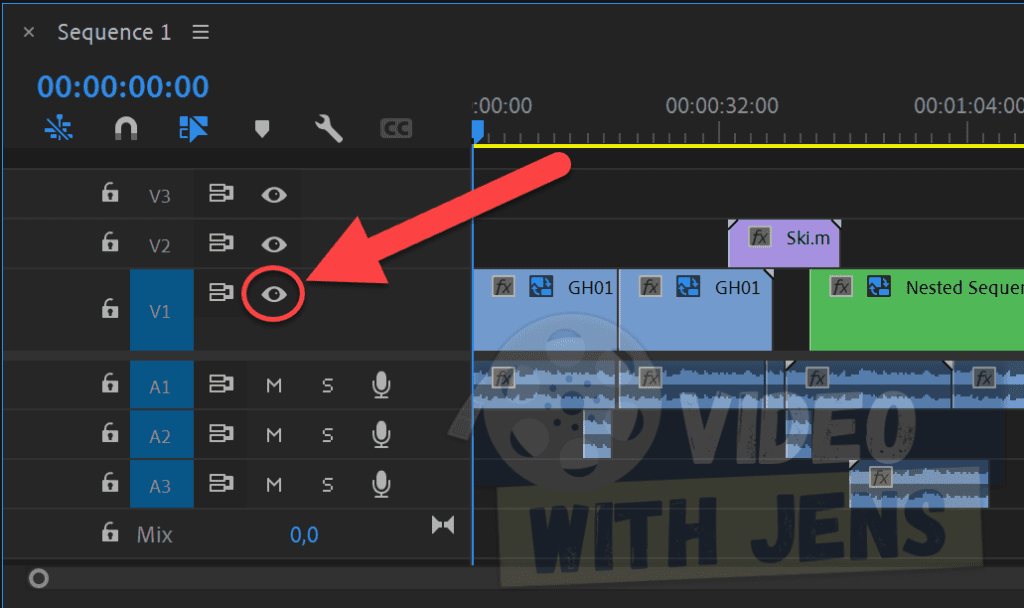
5. Toggle Track Output
If the Track Output is disabled, you won’t be able to see the video in the Program Monitor.
Make sure that the eye icon in the image below is enabled:
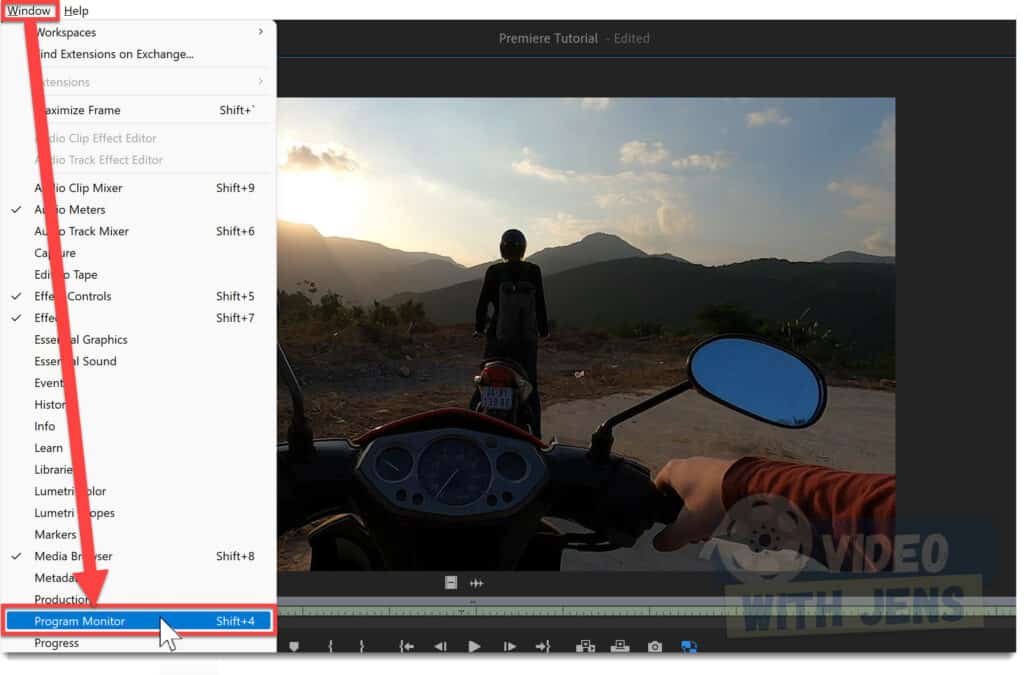
6. Enable the Program Monitor panel
The panels inside Premiere Pro can sometimes be closed by accident, and if that is the case your the Program Monitor panel, you won’t be able to see the video.
To open the Program Monitor panel, click on Window > Program Monitor, then try scrubbing through your timeline.
7. Meet System Requirements
If none of the solutions above fixed the black screen, it may be that your hardware is not suited to run Premiere Pro.
Here’s a link to Premiere Pro’s minimum requirements.
![Premiere Pro Won’t Play Video [SOLVED by Adobe Expert]](https://videowithjens.com/wp-content/uploads/2023/03/premiere-pro-video-not-playing-768x432.jpg)