Premiere Pro Won’t Play Video [SOLVED by Adobe Expert]
In this post, you’ll learn what to do if your video won’t play inside Premiere Pro.
This is usually easy to fix, but the same solution does not work for everyone.
The list below contains the solutions that have worked for most people:
1. Restart Computer
Doing a quick restart of your computer is always a good thing to try first (after restarting Premiere Pro…)
This is easy and known to solve bugs.

2. Change Audio Hardware Settings
Changing the audio hardware settings seems to have helped most people unable to play their video in Premiere Pro.
Here’s how to do it:
Click on Edit > Preferences > Audio Hardware inside Premiere Pro.
Ensure that Device Class is set against MME (Windows) or CoreAudio (macOS).
The second option we want to change is the Default Output; set it to another output (this one is just temporary).
Once the above is done, click OK, and open the Audio Hardware window again. This time set the Default Output to the correct option. If you changed the output to the right option the first time, never mind this step; otherwise, click on OK.
Next, try to play the video. If it’s not playing, you may have to restart Premiere Pro for the settings to take effect.

Check out this video by VideoRevealed for more information:
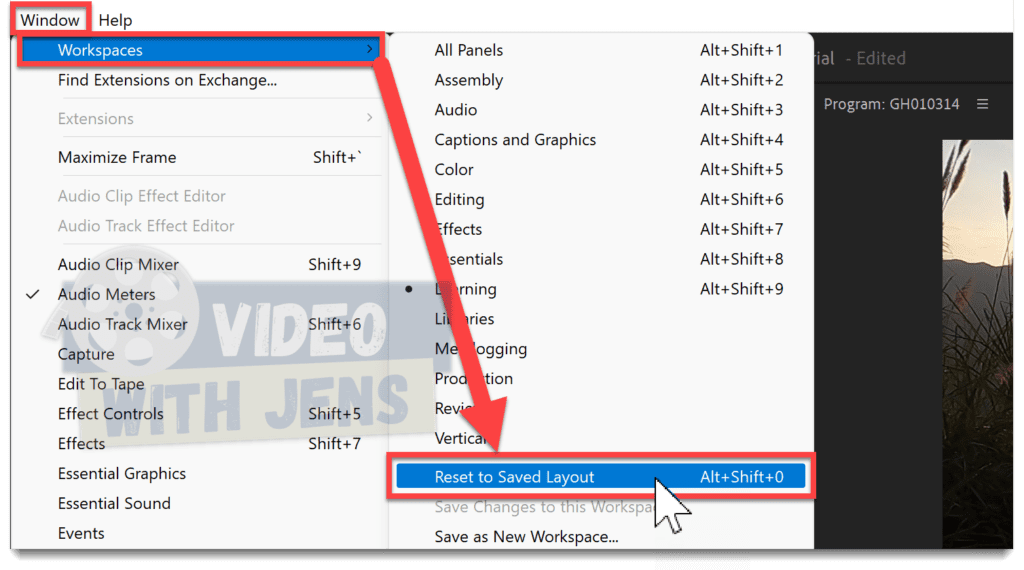
3. Reset the Workspaces
Another solution that seems to have helped many users is resetting the workspaces.
To do this, click on Window > Workspaces > Reset to Save Layout:
4. Delete Media Cache Files
Sometimes the media cache files that are supposed to give better playback become corrupt and cause harm instead.
Thankfully, the Adobe developers have made it easy to purge them for us!
Follow these steps:
- Click on File > Close Project > OK (to save project).
- Click on Edit > Preferences > Media Cache.
- In the window that pops up, click on Delete under Media Cache Files.
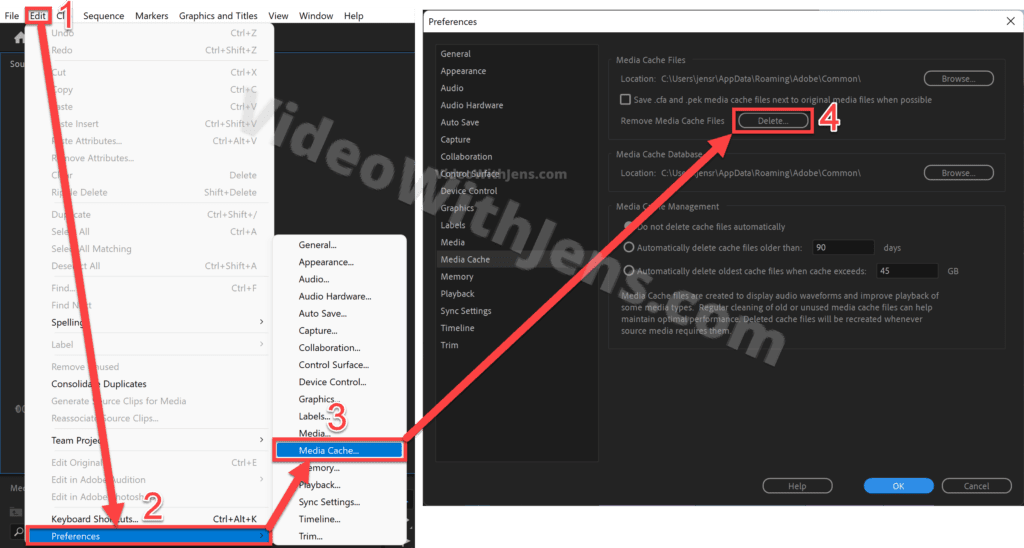
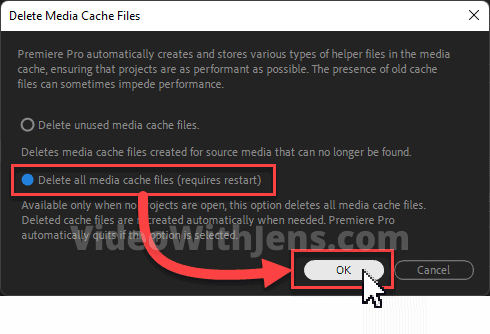
- Select Delete all media cache files (requires restart) > OK.
- Once you confirm, Premiere Pro will automatically close.
Launch Premiere Pro again, and hopefully, you can play the video.
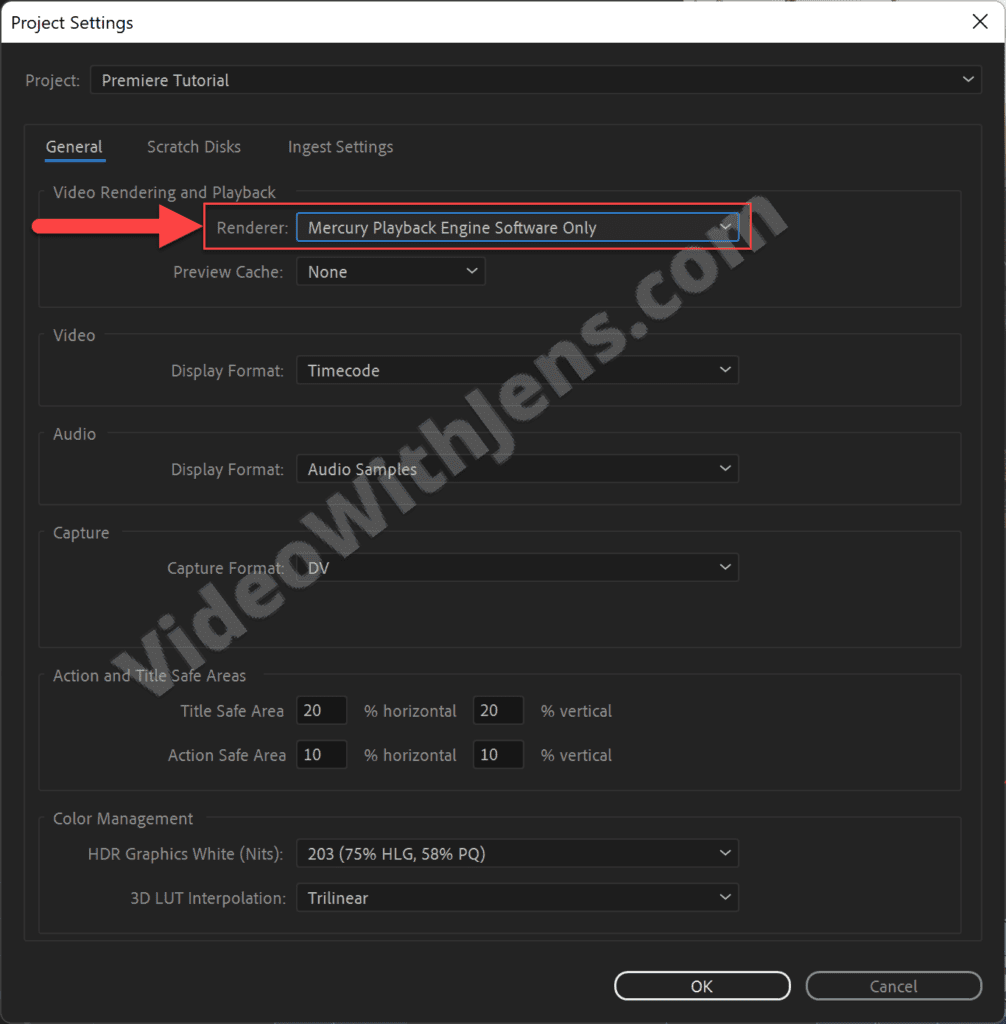
5. Set Renderer to Software Only
Software rendering is a classic solution for issues related to graphics cards.
Here’s how to do it: Click on File > Project Settings > General, then set Renderer against “…Software Only”.
6. Transcode Variable Frame Rate to Constant Frame Rate
All editing software is known to have difficulties dealing with variable frame rates (VFR).
VFR is commonly seen in gaming videos captured using a screen recorder. This is because games constantly vary in FPS; thus, if the screen recorder is not set to constant, it will record in the game’s frame rate.
In Premiere Pro, you can check the frame rate mode by right-clicking the footage in the Project panel > Properties and then look for “Variable Frame Rate Detected.”
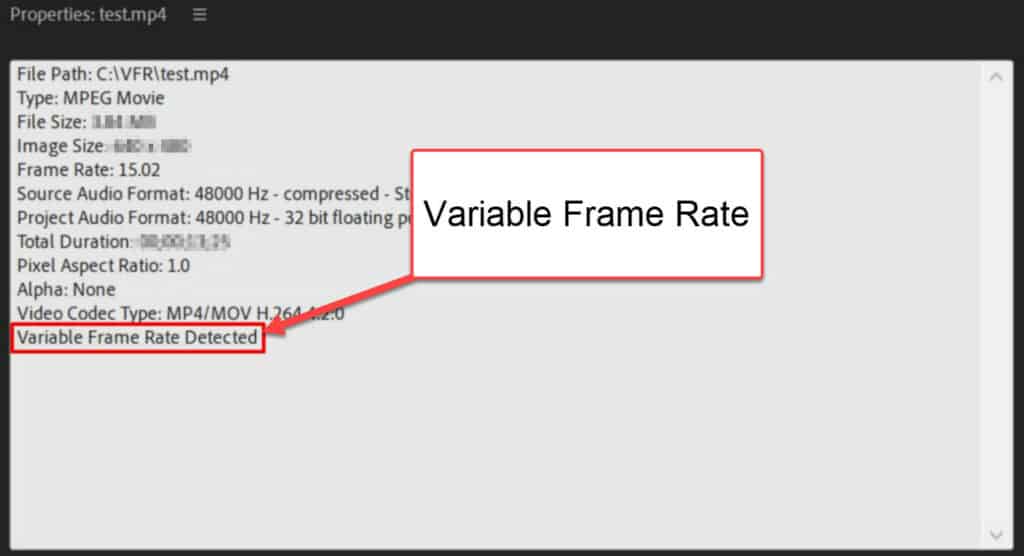
If you don’t see it, the video most likely has a constant frame rate; thus, this is not your problem.
On the contrary, if a variable frame rate is detected, this is likely why Premiere Pro won’t play your video(s). We must transcode the video(s) to a constant frame rate to fix this.
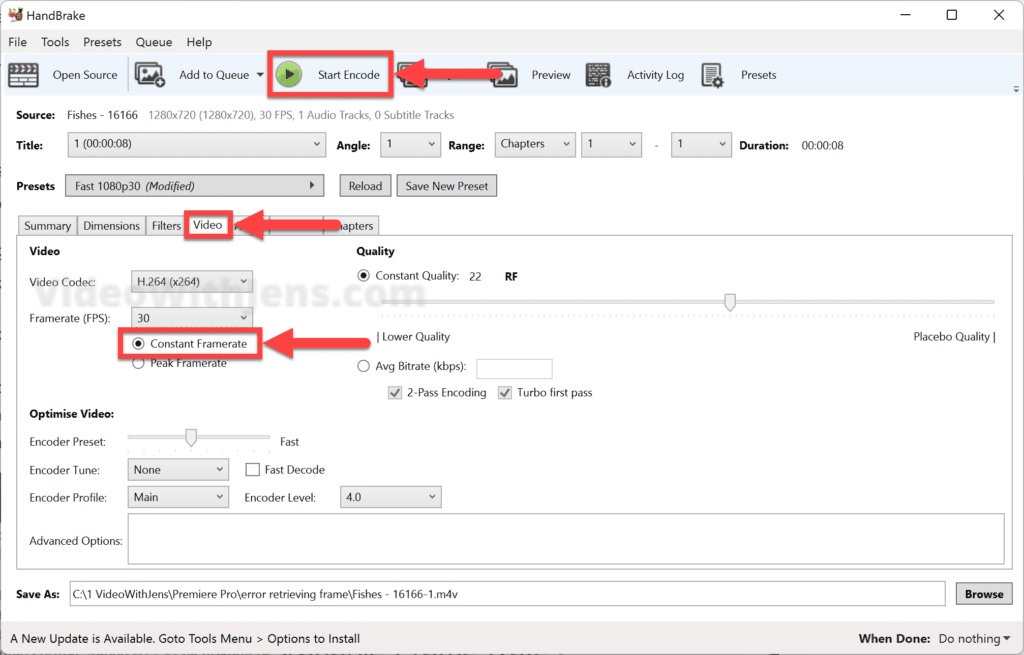
An easy way to do this is by downloading HandBrake (open in a new tab), the most popular transcoder on the internet.
Here’s how to do it:
- Import your footage to HandBrake.
- Set Presets against one that matches your video’s resolution.
- Open the Video tab, and check off Constant Framerate.
- Set the Framerate (FPS) to the closest number to your native video.
- Set the Quality to 23 or lower for high quality.
- Click on Browse to set the file location.
- Click on Start Encode, and once it’s finished, try importing it to Premiere Pro.
7. Move Files to a Faster Storage Unit
Another reason your videos won’t play is that they’re located/stored on a too-slow storage unit for Premiere to play them back in real-time.
In that case (if possible), move your video(s) to a faster drive. Preferably, a solid-state drive (SSD), or at least a fast enough drive connected internally, via USB 3.0 or better.
8. Meet Premiere Pro’s System Requirements
If your hardware does not meet the minimum requirements to run Premiere Pro, you might also run into this problem.
Sometimes, simply meeting the system requirements is not enough. As Kevin Monahan from Adobe says: “If you are serious about video editing, don’t just meet system requirements, exceed them” (source).
9. Update Graphics Card Driver
Make sure that your graphic card driver is up-to-date!
This is something you always want to make sure of, especially whenever you face any issues like this.
Here’s a link to the most popular GPU manufacturers’ driver section:
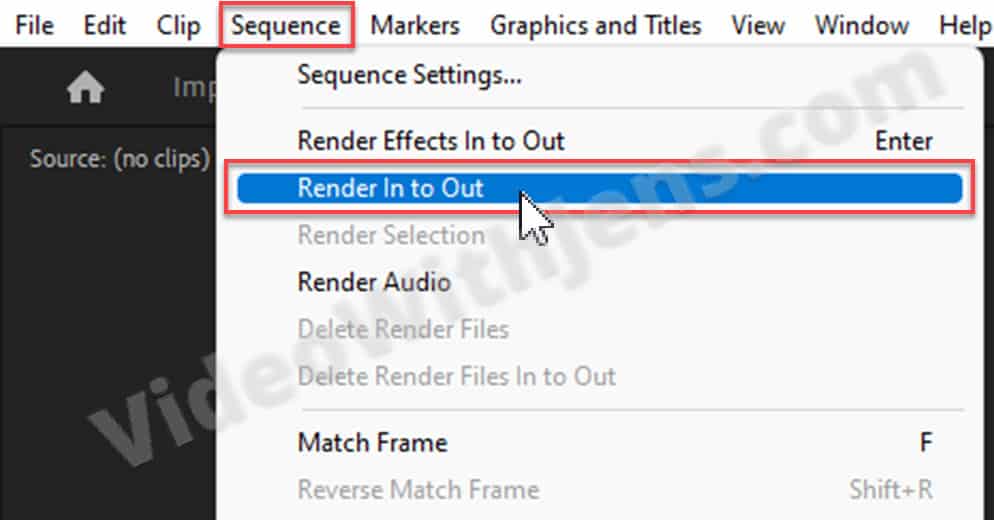
10. Render the Timeline
Adding many effects to your clips will make them more computationally demanding to playback.
To fix this, you can try rendering the section of your sequence you cannot play.
First, set In and Out marks around the section that won’t play in your timeline.
Secondly, click on Sequence > Render In to Out:
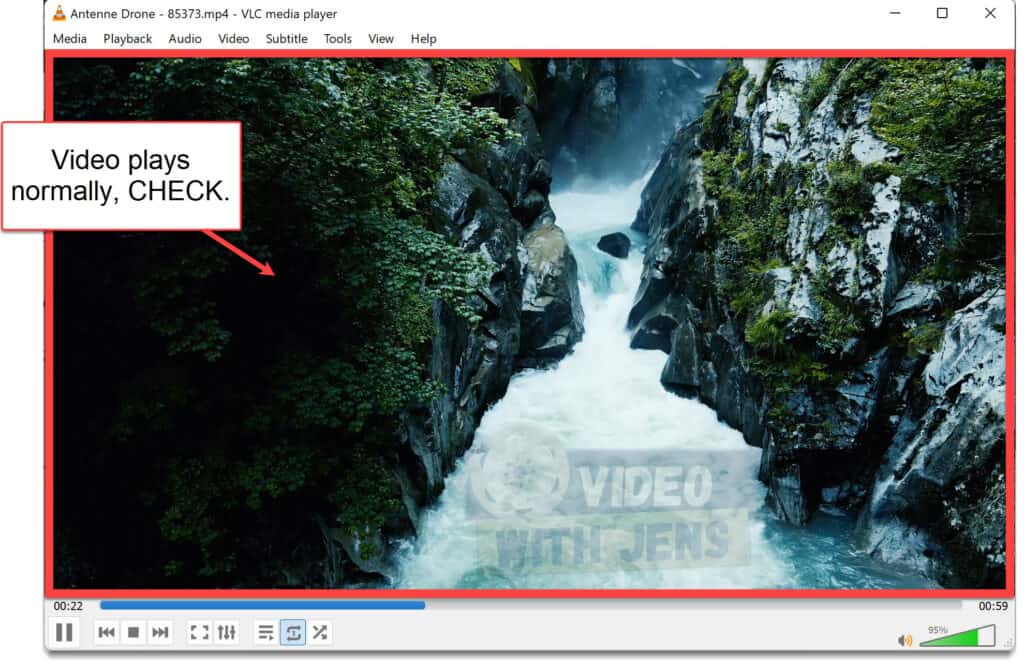
11. Make Sure the Video Is Not Corrupt
Sometimes videos become corrupt for whatever reason, and if that’s the case, you cannot play them properly inside Premiere Pro.
A quick way to check this is by playing the video outside Premiere Pro; if it plays fine, it’s likely, not corrupt:
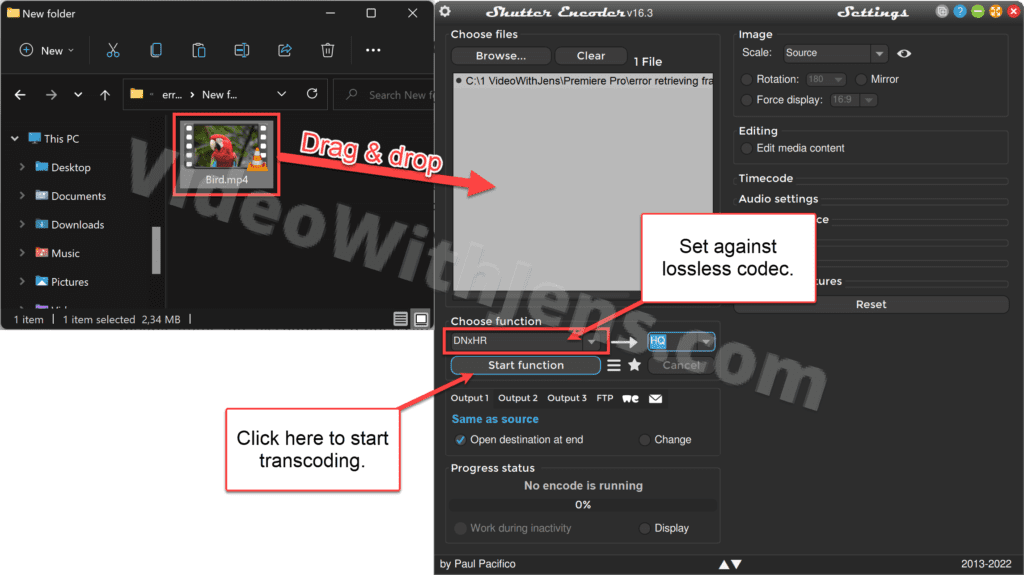
11.1 How to Fix Corrupt Videos
If your video is also not playing normally outside Premiere Pro, it’s likely corrupt.
To fix a corrupt video, try transcoding using free software such as Shutter Encoder or HandBrake.
If you use Shutter Encoder, I recommend setting the codec (under Choose function) against DNxHR to avoid quality loss:
12. Check Your Plugins
Sometimes the fantastic plugins that are supposed to make things easier for us might cause complications and cause issues like this.
To troubleshoot our plugins (if you’ve installed any), we need to access the MediaCore folder in your file system.
For Windows users, this is the default file path:
C:\Program Files\Adobe\Common\Plug-ins\7.0\MediaCore.
For macOS users:
Macintosh HD/ Library/Application Support/Adobe/Common/Plugins/7.0/MediaCore.
Next, temporarily move one of the plugins to another folder, and check if you can play your videos in Premiere Pro.
- Proceed with doing this for all the plugins to check if any of them is causing the issue.
- Move the working plugins back once you’re done troubleshooting.
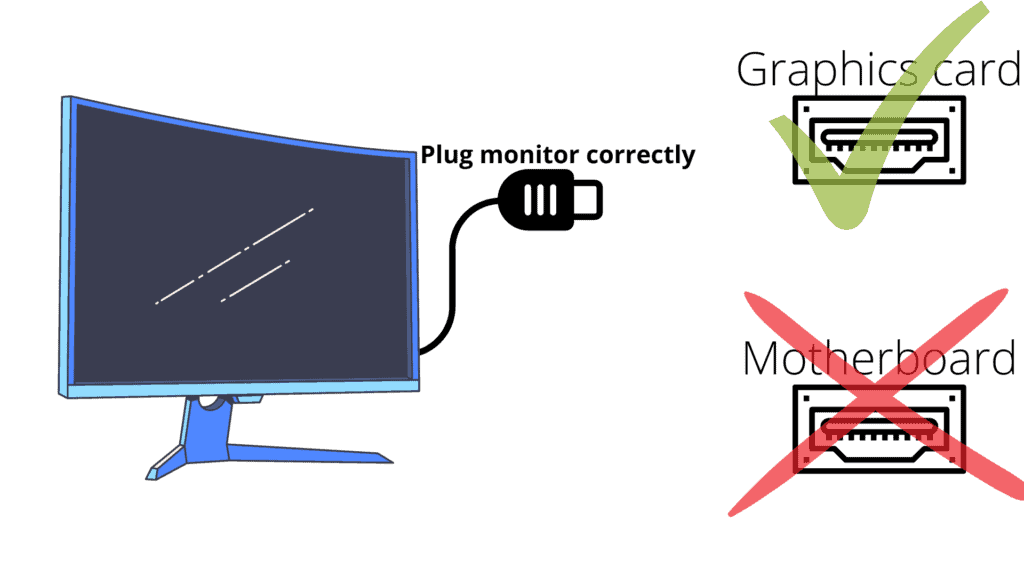
13. Switch to a Single Monitor
According to Kevin Monahan from Adobe, this problem can occur if your hardware does not support multiple monitors (source).
Try to unplug one monitor and ensure the remaining monitor is plugged into your graphics card and not the motherboard. If you are unsure which port is for the graphics card, try switching the port if the issue persists.
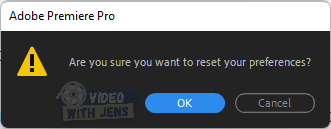
14. Reset Premiere Pro Preferences
Resetting preferences is a classic solution if none of the above works.
I’ve listed it as the last solution because you’ll lose any customizations you’ve done in Premiere Pro, such as personal keyboard shortcuts.
However, as it’s known to fix many bugs, I think it’s worth trying if you find nothing else to work.
To reset the preferences, close Premiere Pro and re-launch it while holding down Alt (Windows) or Option (macOS) until you get asked if you want to reset the preferences.