How to Adjust Brightness in Davinci Resolve
In this article, we’ll go over the best ways to increase and decrease the brightness of videos in Davinci Resolve.
So if your video is too bright or too dark, look no further! Here is absolutely everything you need.
First, the quick-fix method to adjust brightness:
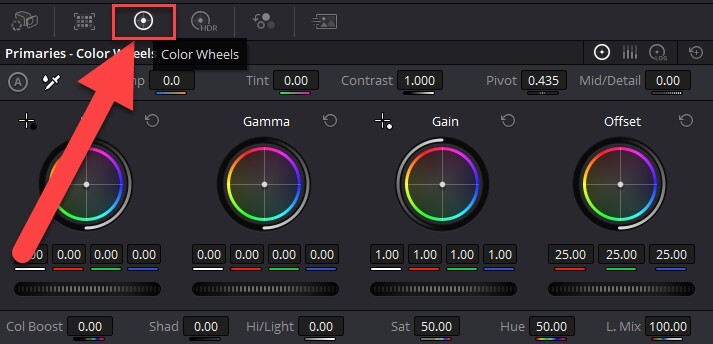
- Go to the “Color” page.
- Click on “Color Wheels” from the bottom left-hand corner.
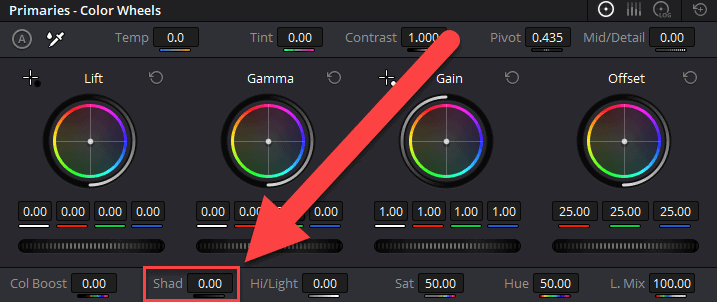
- Increase or decrease “Shad” to adjust the brightness of shadows.
- Increase or decrease “Hi/light” to adjust the brightness of the highlights.
For a more detailed explanation and also some additional tips, read on!
How to Increase Brightness in Davinci Resolve
Firstly, we’ll go into more in detail on how to increase the brightness of your video.
Here’s a quick summary of how to increase the brightness by using the method mentioned above:
- Go to the “Color” page.
- Click on “Color Wheels” from the bottom left-hand corner.
- To increase the brightness of the shadow, increase the value of “Shad”.
- To increase the brightness of the highlights, increase the value of “Hi/Light”.
Now, let’s go into a bit more in detail on how to actually do this!
First of all, go to the “Color” page, by clicking on this icon:

Next, click on the clip you want to increase the brightness of.
If you can’t see this tab containing all the clips. You open it in the top right-hand corner, by clicking on “Clips”. Then just, click on the clip you want to adjust as in the picture below:
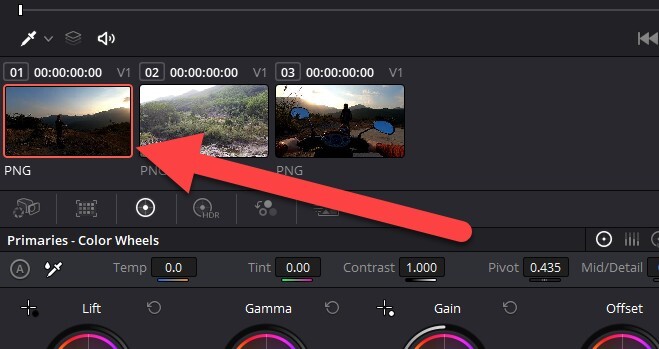
In the bottom left-hand corner, there is a tab called “Color Wheels”, make sure this one is open:
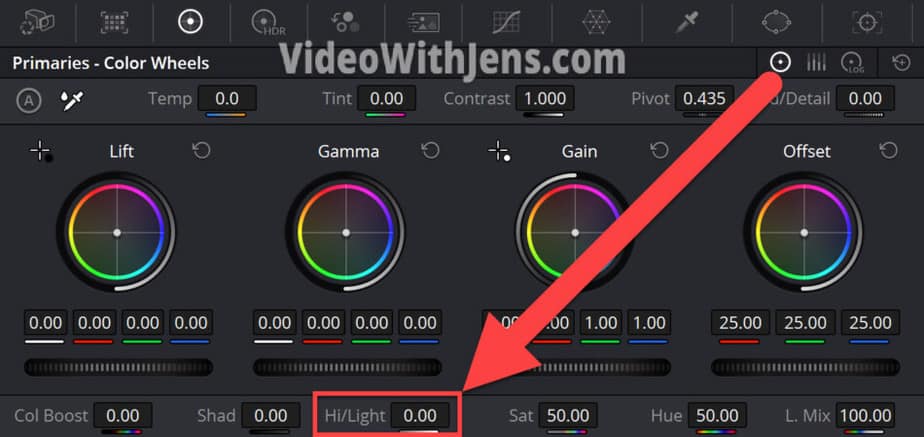
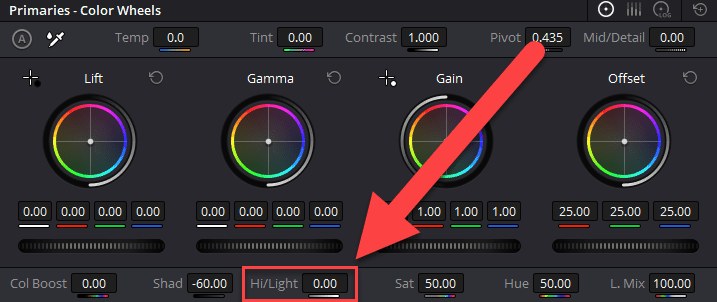
Next, locate the box called “Hi/Light”.
Hover your mouse over the number, click, hold and drag to the right to increase the value.
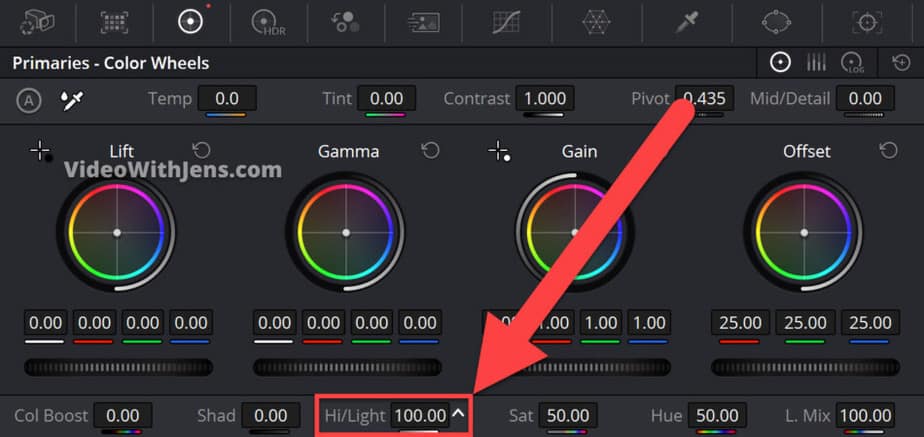
What this will do is obviously increase the highlights. However, if you’re not familiar with the term, it basically means that you increase the brightness of the brightest tones in the image. While the opposite would be increasing the darker tones (shadows).
Here’s an example of how it works:
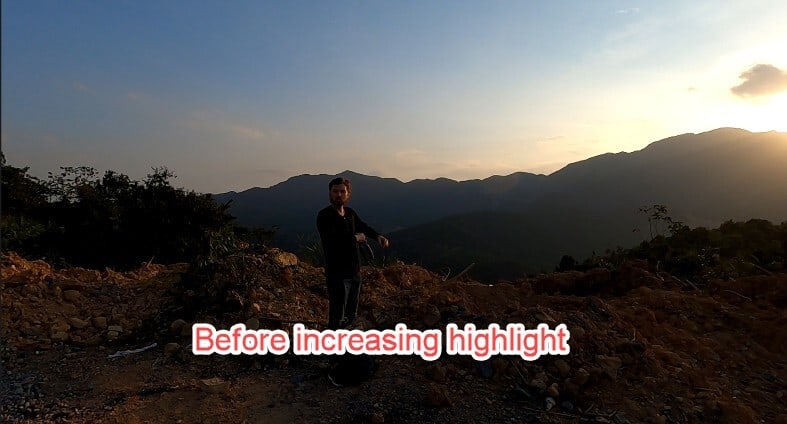
If you look closely, you can see that the sky, skin color, and all the brighter parts of the image are brighter in general.
This is what it does. It increases the brightness of the highlights (brighter parts).
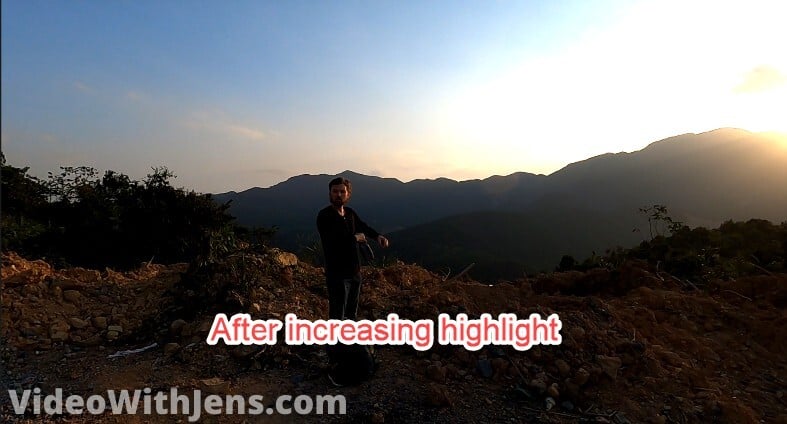
Now, let’s say instead of the sky getting brighter you want the dark parts (shadows) of the image to be brighter.
How do you do this?
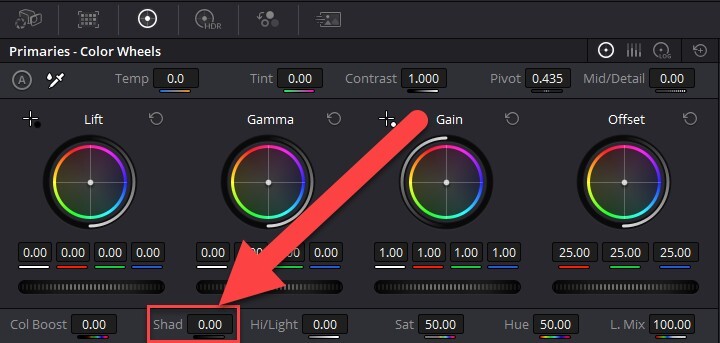
Then, instead of increasing the “Hi/light” value, you want to increase the one that says “Shad” (shadows):
Hover your mouse over the number, click, hold and drag to the right.
Now, the shadows and the darker parts of the image should be brightened.
Here’s an example:
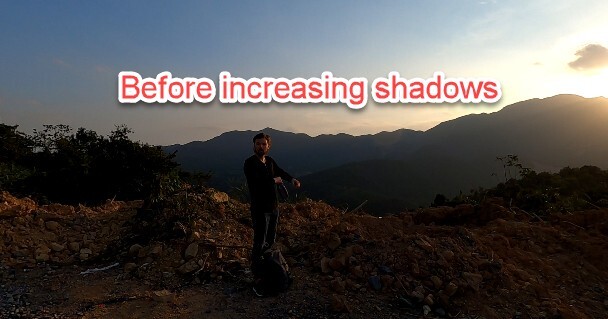
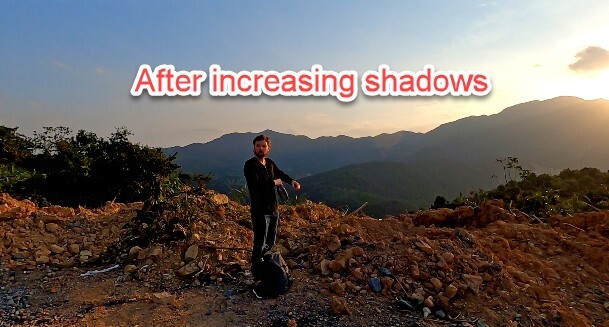
Boom! Awesome, right?
Even if the image is taken in a pretty dark environment, it now looks like it’s in the middle of the day!
In the next section, we’ll discuss how to make the video darker. We are also going to cover a couple of more advanced methods in order to achieve exactly what you want!
How to Make Video Darker in Davinci Resolve
There are a bunch of different methods to make your video darker in Davinci Resolve. Which we will cover in this article!
However, first the simple way of doing it:
- Go to the “Color” page.
- Open the tab called “Color Wheels” from the bottom left-hand corner.
- Locate the values, “Shad” and “Hi/Light”.
- To make your shadows darker, reduce the “Shad” to a negative number.
- To make the brighter parts of the video darker make the “Hi/Light” number negative.
For a bit, more details, and also some examples of how this affects your video, read on!
How to Make the Shadows/Dark Parts Darker:
Make sure to be on the “Color page” with the clips you want to adjust selected.
Next, go to “Color Wheels”, which is where the action takes place.
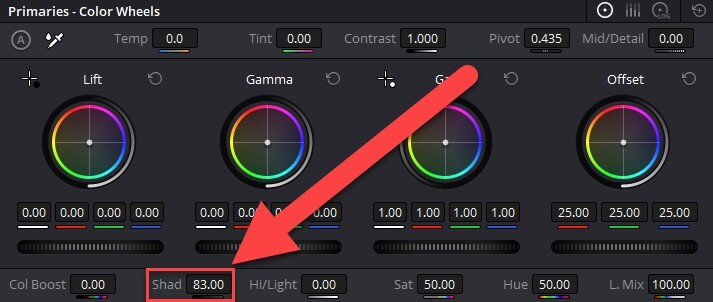
Next locate the value called “Shad”, which means shadows. This number is by default set to 0.00, which means there have been no adjustments yet.
Now, if you want to make the shadows/darker parts of your video even darker, decrease the number inside this box. Either by typing or clicking>hold>drag to the left.
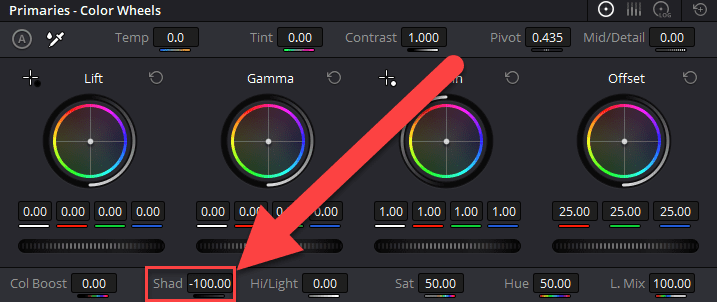
Set this number to your desired range, by looking at the darker part of your videos. In the picture above it says “-100.00” which is the max range.
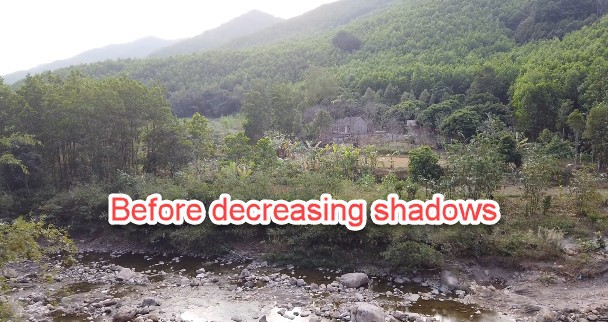
Below you can see an example of how it’s the darker parts of the video being affected and not the brighter part (to some extent).
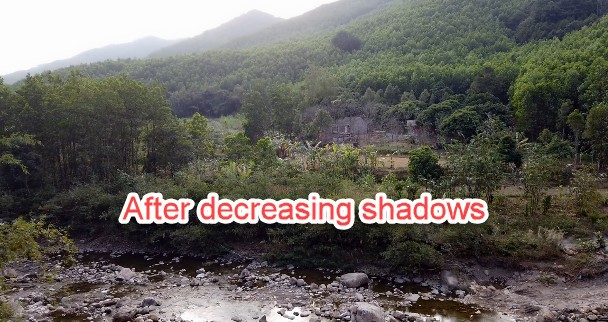
How to Make the Bright Parts Darker:
Next up, it’s how to decrease the brightness of bright parts (make them darker).
You still want to be on the “Color” page > “Color Wheels”.
This time locate the box called “Hi/Light”.
Change this number to a negative value in order to make the bright parts darker.
You can adjust the number by either typing or holding down your left-click on your mouse and dragging to the left.
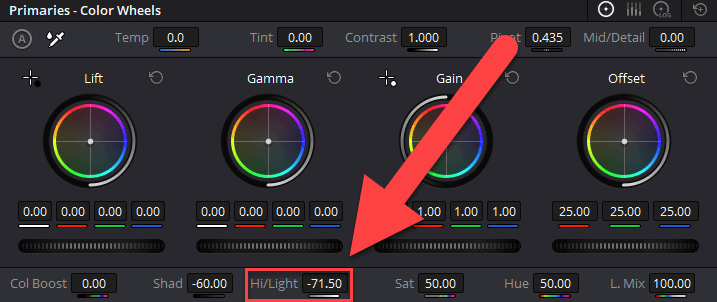
Change this number while looking on at your video until you are satisfied with the brightness.
Below you can see an example of how it affects your video:
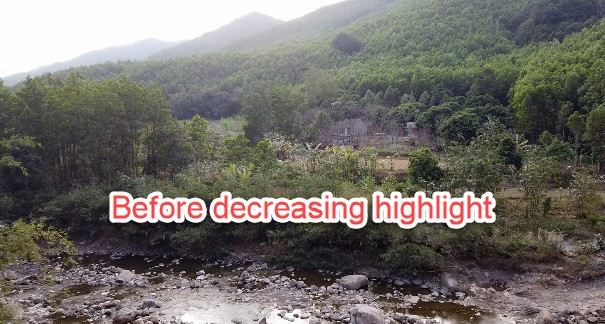
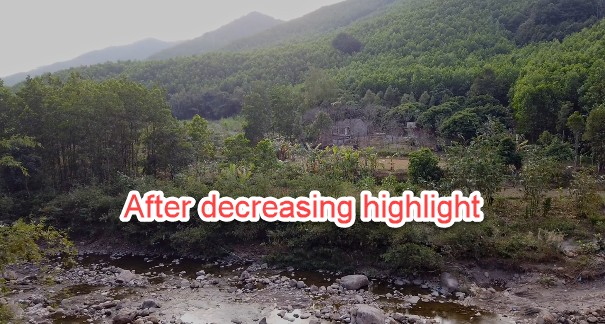
In this example, there is not a lot of difference as most of the picture is in darker territory. If you look at the sky, you can see there is a subtle difference.
If your video is very bright, this will have a huge impact!
How to Brighten Certain Parts of Video in Davinci Resolve
Now, what if you don’t want to affect all the highlights or all the shadows?
This is can be done using the same method described above. All we have to do is a few extra steps!
Here is the straightforward way of doing this:
- Go to the “Color” page.
- Click on the tab called “Window”, located in the middle of the page.
- Click the icon which looks like an ink pen.
- Draw around the part you want to isolate, by clicking around it.
- Connect the first and last dot, created by the ink pen.
- Adjust the brightness of the area.
That’s the short version. Now I will explain more in detail how to do this. There are also some essential things you need to do if the area is moving…
First, make sure to be on the “Color” page.
Next, open the tab called “Window”. It looks like this:
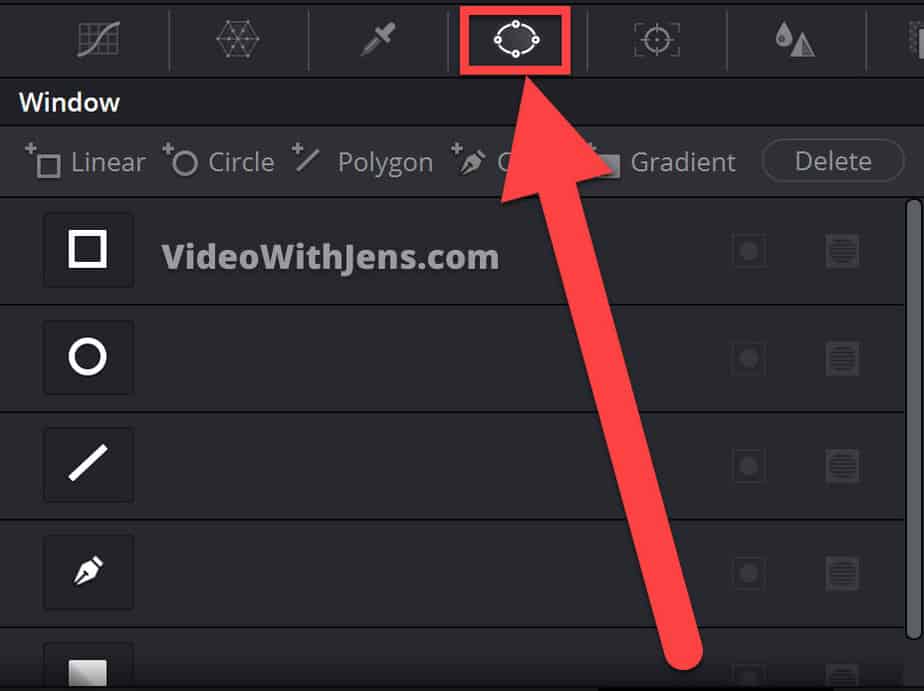
Next up, you have a lot of different shapes to choose from. Choose the shape you think will suit the area you want to brighten best. In this article, we will use the ink pen. Simply click on the icon, to activate it.
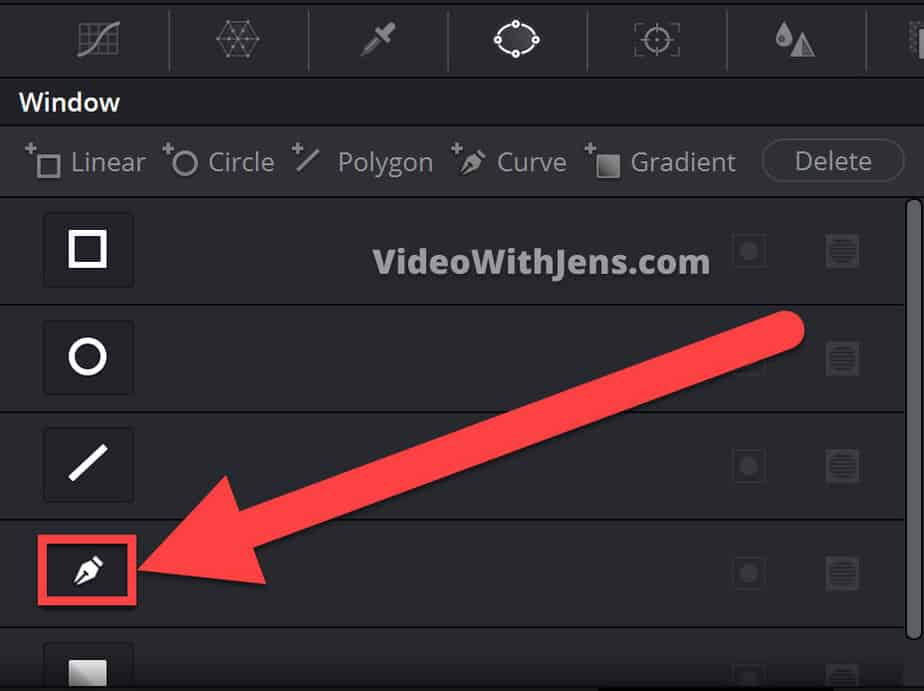
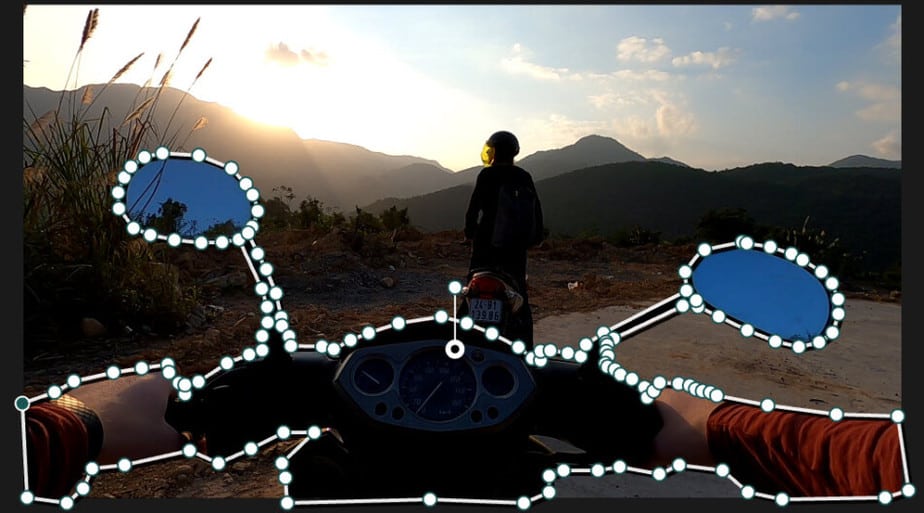
With the ink pen activated, go ahead and draw around the area you want to isolate. You do this by simply clicking around it like this:
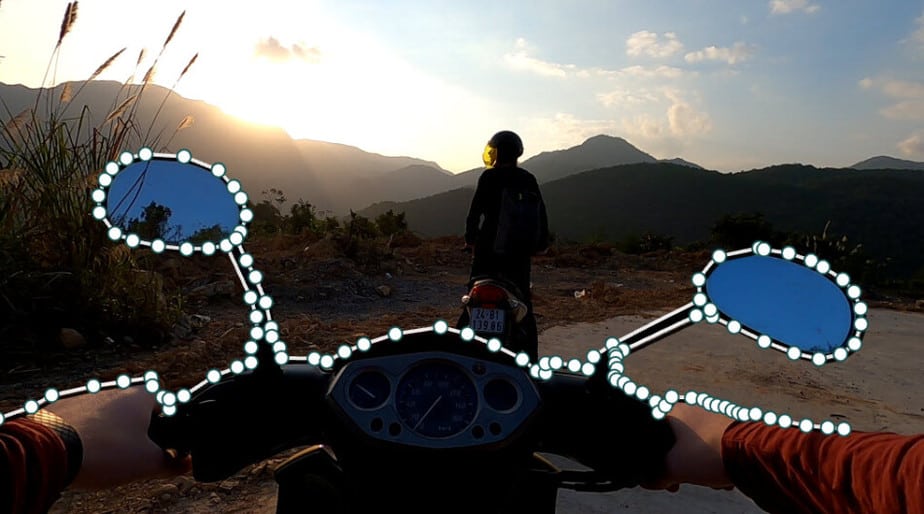
To activate the area, you have to close the drawing/window.
All you have to do to close is to click on the first dot you made. Watch the picture below:
Ok, now you have done what’s called masking. Next up, to hide all these dots locate the drop-down menu shown in the picture below, and click “Off”.
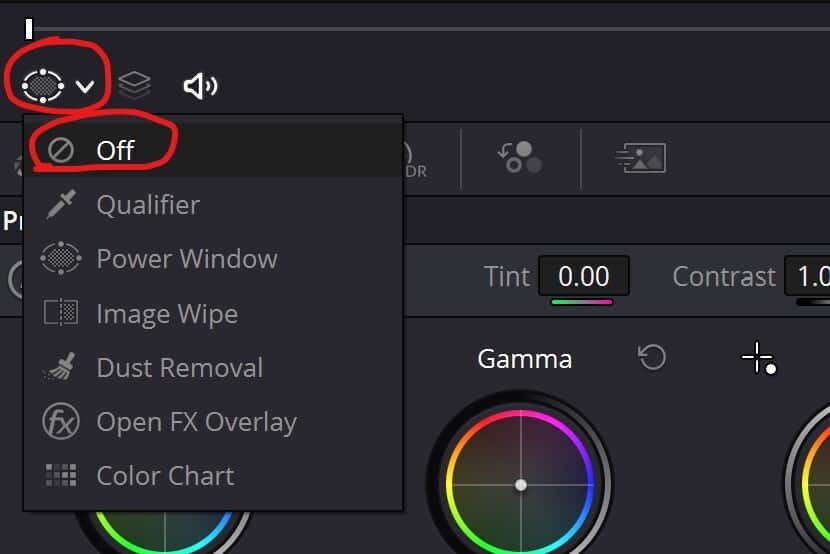
Once that is done if have successfully made a mask!
Now all you have to do is to increase or decrease the brightness, and it will only affect the area inside the mask.
To adjust the brightness you can just use the same methods as discussed earlier in the article!
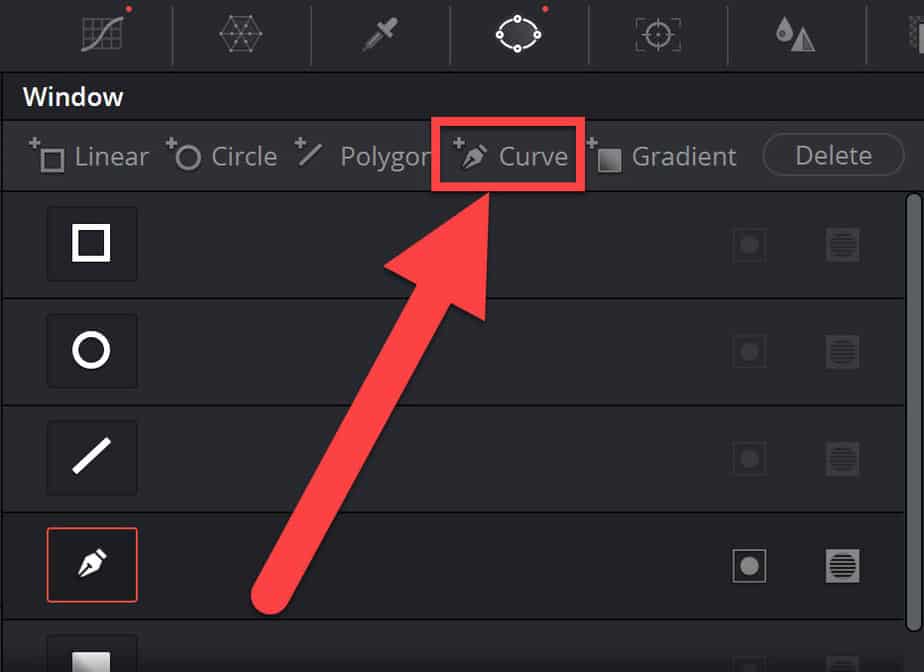
It’s also very common to want to mask more than one area.
To do this either select one of the other shapes in the “Window” tab or click on for example “+ Curve” as shown in the picture below. Then just go ahead and draw around the second area you want to adjust!
The good part is that you don’t have to adjust the brightness again for this area, as this will have the same adjustments made to the other mask/window.
Alright! That’s what you need to know when it comes to isolating.
However, if the area you have masked is moving you’ll have to track it.
This is achieved by using keyframes! The good thing is that you don’t have to use a keyframe for every single frame, as Davinci Resolve has an awesome feature that tracks the area for you! Here’s an article where I explain how to do this!
Next up, you’ll learn a more advanced method to adjust the brightness/luminance!
Advanced Method to Change Brightness/Luminance
These next methods are great, as you get even more control on which parts you adjust the brightness of!
The first method is by using curves.
This method is also happening on the “Color” page of Davinci Resolve.
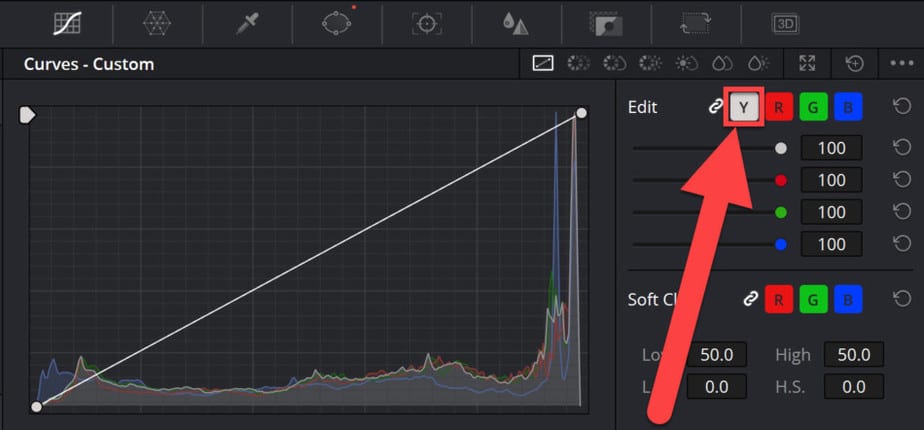
Next, locate and click on this symbol, which by default is placed pretty much in the middle of the page.
When using this method, make sure that “Y” is enabled at all times. The “Y” is controlling the luminance (brightness) which is what we’re going to do. If it’s not checked you’ll mess up your colors.
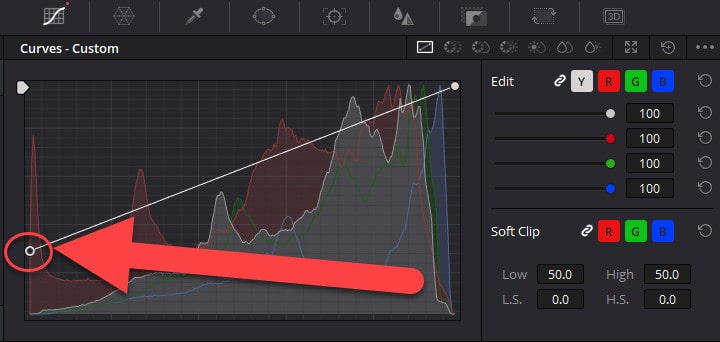
Adjusting Brightness of Highlights:
To decrease the brightness of the highlights, all you have to do is hover your mouse over the dot I’ve made a red circle around and drag it downwards. Watch your video while doing this, and drag it until you’re satisfied!
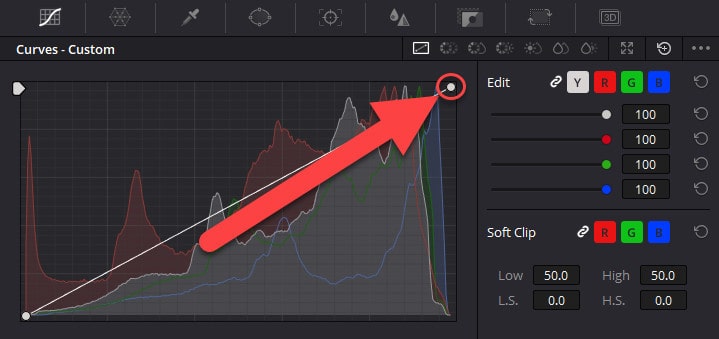

The pictures below are before and after doing this:

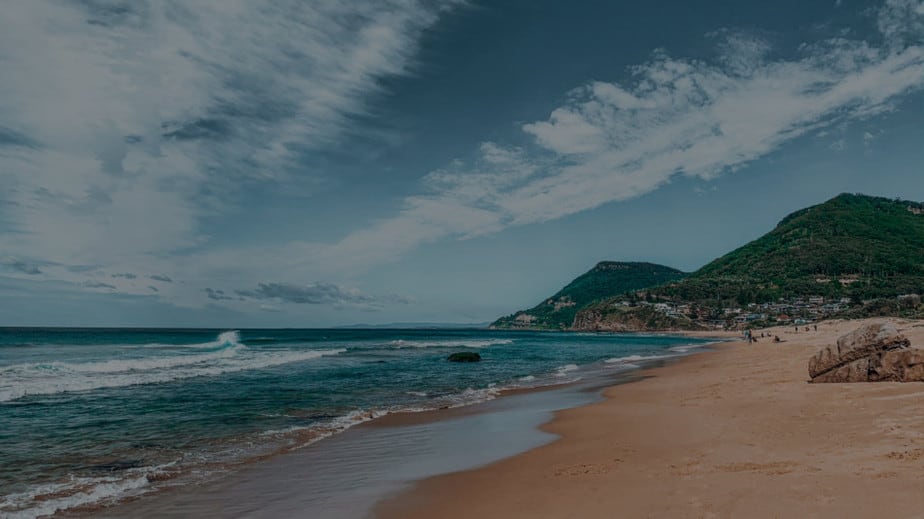
As you can see almost the whole picture just got darker, this is because it’s a very bright picture taken in the middle of the day…
The same thing is true when increasing the highlights.
Pull to the left in order to increase the brightness of the highlights:
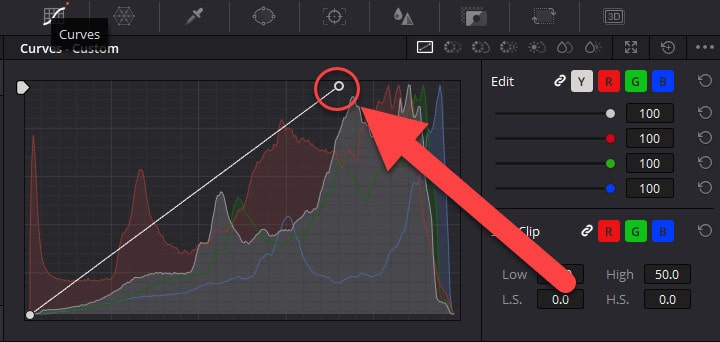
Here’s another before and after of how it will affect the video:
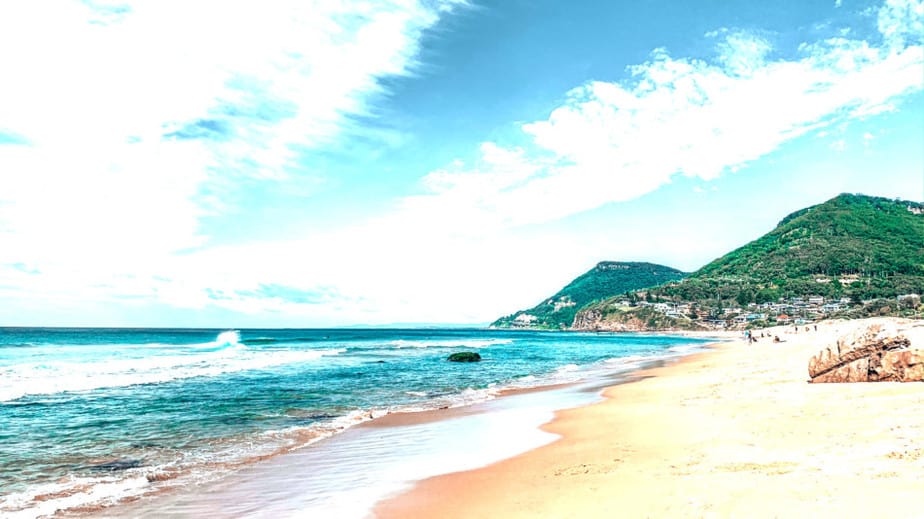
Here we can see something pretty interesting!
It still affects the majority of the picture since it’s in the middle of a sunny day.
However, notice the mountains in the background is not that much affected compared to the brighter parts!
Decreasing Brightness of the Shadows:
To adjust the shadows drag the lower dot instead of the highest one, like in the picture below.
In order to make the shadows darker drag it to the left like this:
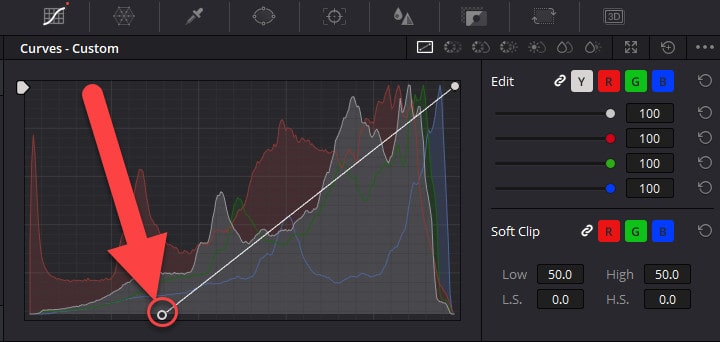
You can see the bottom waves in the background are getting cut off by the line these are the shadow colors. While the waves to the right are less affected, leaving the video with more highlights than shadows.
Below is another before and after image of how this affects the video:
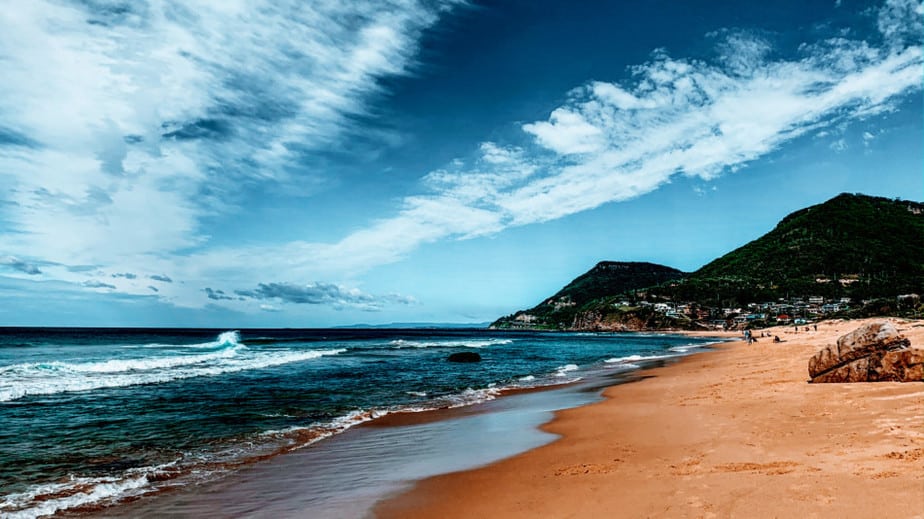
Now, this one is quite cool, right?
Here you can clearly see that it’s mainly the darker parts that are affected. While the sand and sky are a lot less affected.
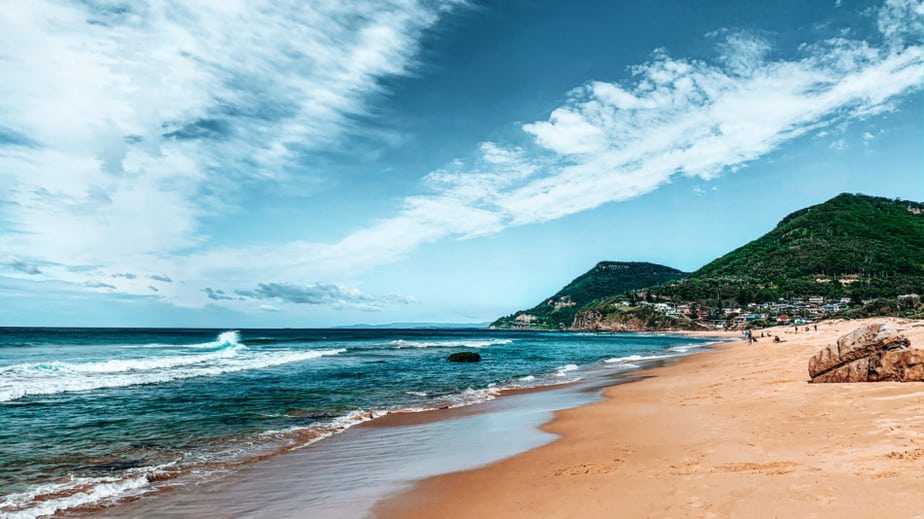
Increasing Brightness of the Shadows:
Drag it upwards, to increase the brightness of the shadows:
Here’s another before and after:

Bonus TIP:
Now, here’s one of the main reasons why using the curves is awesome.
Not only can you change the brightness of the shadows and highlights. You can also adjust the luminance of the MIDTONES!
Meaning you are not restricted to only the shadows and highlights. Instead, you have FULL flexibility to change whatever you want.
Watch the picture below:
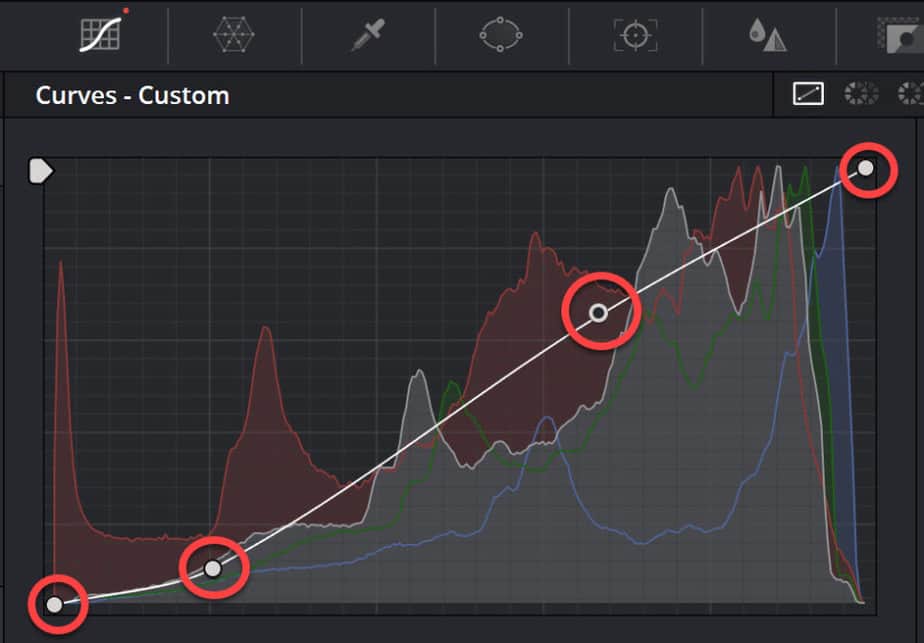
By clicking on the diagonal line you are creating dots that you can drag wherever you want!
I recommend that you play around with these and familiarize yourself with them! In the end, you can tweak the brightness however you want it.
Below is another example of how the curve above affected the picture:
Alright! That’s it.
I hope you found what you were looking for and maybe learned something new!
Cheers,
Your friend, Jens.