Blur Face or Area in DaVinci Resolve (+ Stuff That Moves)
Do you have something to hide? Great! To blur an area or a face in DaVinci Resolve is a great way to hide something.
But seriously, from one video maker to another, telling the truth is often the best. Except when it comes to privacy and blurring stuff in DaVinci Resolve. So let’s get to it!
- Go to the “Color” page of DaVinci Resolve.
- Open the “Window” tab (located in the middle of the toolbar).
- Click on which shape you want the blur to be.
- Position the shape in the video preview by dragging it.
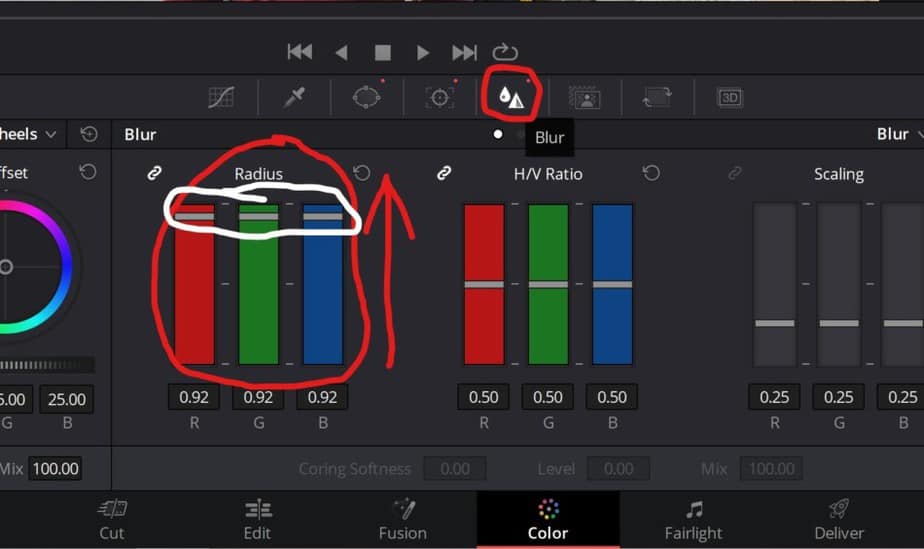
- Go to the “Blur” tab in the toolbar.
- Increase the “Radius” by pulling on the handles.
That was just a quick explanation for those who prefer that, I’ll explain more in-depth now:
How to Blur Face/Object/Area
Now let’s go more in-depth on what I briefly explained above. DaVinci Resolve makes blurring a really easy process. Once you know how to do it, it’s done in a matter of minutes if it’s an easy blurring job. If there is a lot of distractions it’s a little bit more work. But still fairly simple. I will show you how to deal with this too.
(The text will refer to the picture beneath it.)
To get started, navigate to the Color page.
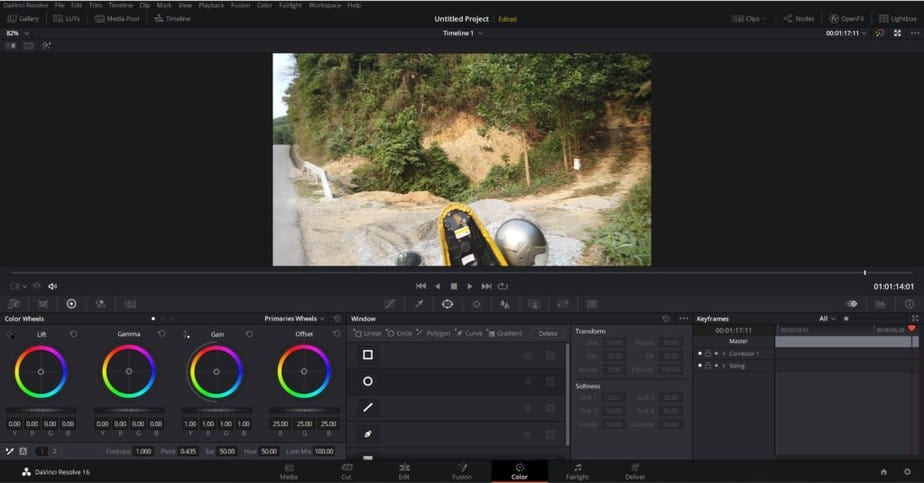
Once you’ve have opened you the color page, you have your video in the viewer. Here I want you to go to the part of the video you want the blurring to occur.
In this example I’m gonna blur my own face. Sometimes the person may be moving their head in all directions and it will be a lot more tricky. I’ll show you how to deal with this later in the article. But for now choose the part of the video where the person is facing the camera most of the time. Remember the same applies to objects/areas. If that’s what you want to blur.
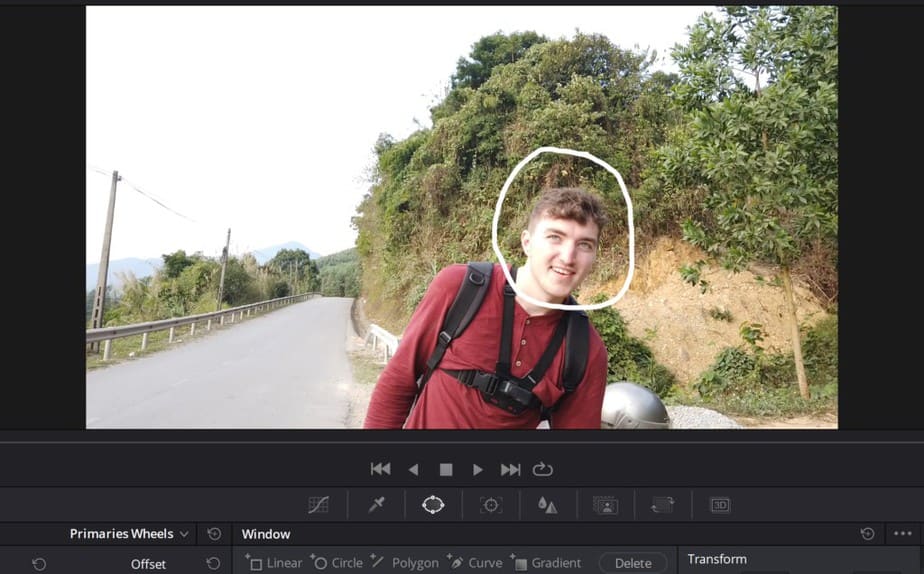
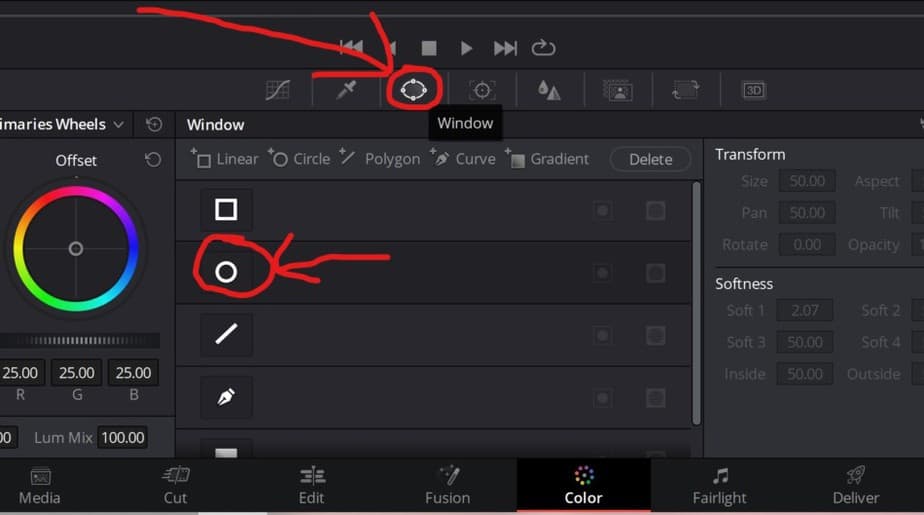
Next, navigate to the “Window” tab, you’ll find this on the right side of the color wheels. (see picture below).
In the “Window” tab you have some different shapes to choose from. These represents which shape you want your blur. If you are gonna blur a face choose the circle. But this is up to you, choose the shape you think gonna do the best job in your situation.
To select shape simply click on the icon of the shape, then it will occur on top of your video in the viewer.
Once you got your shape, you now will have to adjust it to what you’re gonna blur. DaVinci Resolve has done this job a pleasure for us.
To adjust the overall size of the circle (I will say circle, but the same applies for whatever shape) without changing the shape. You just have to grab one of the white dots in the corner and drag them in a direction.
If you want to make the circle more oval or more flat you use the white dots on the line of the circle. To move it, the one in the middle and to rotate it the dot above the one in the middle.
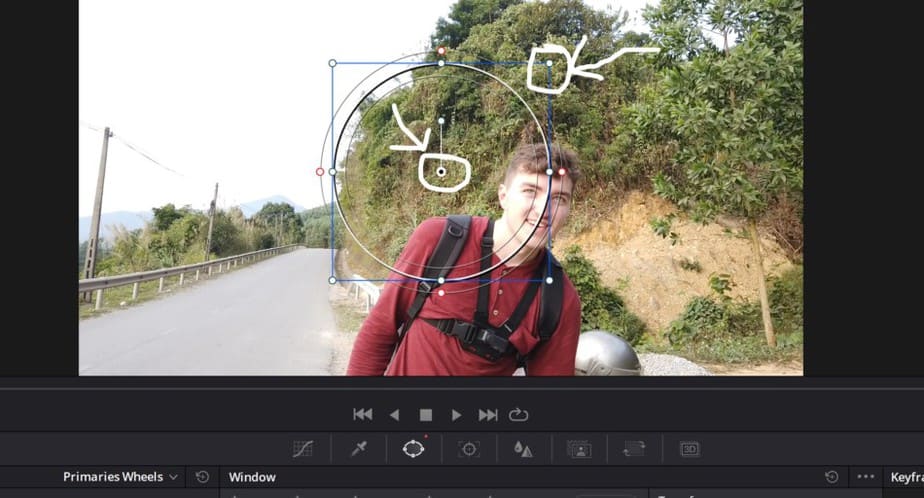
So once the you’ve shaped it as you like, let’s move on!
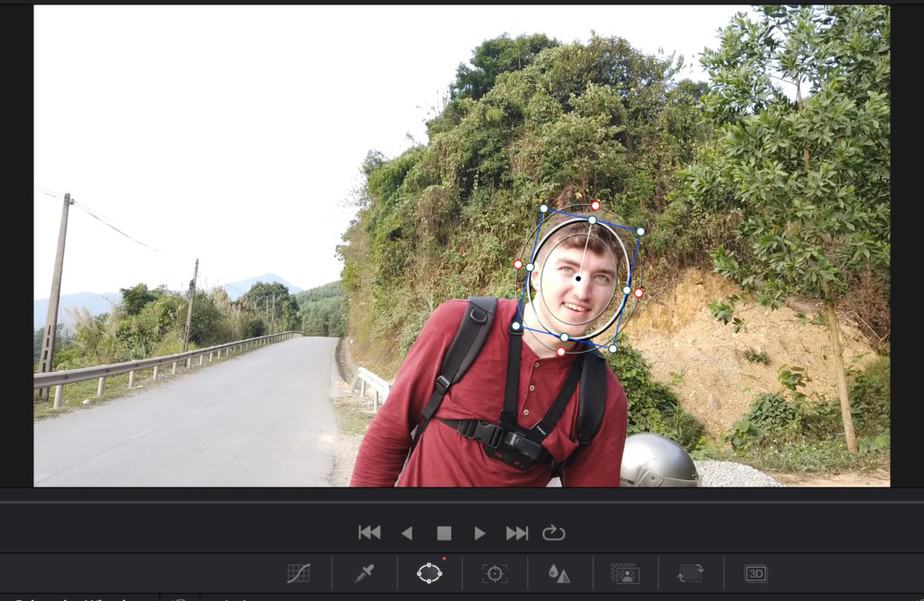
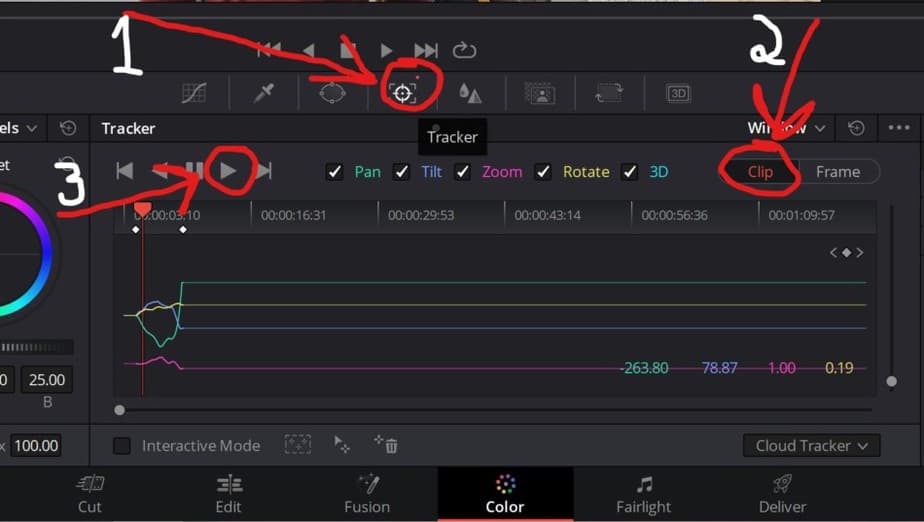
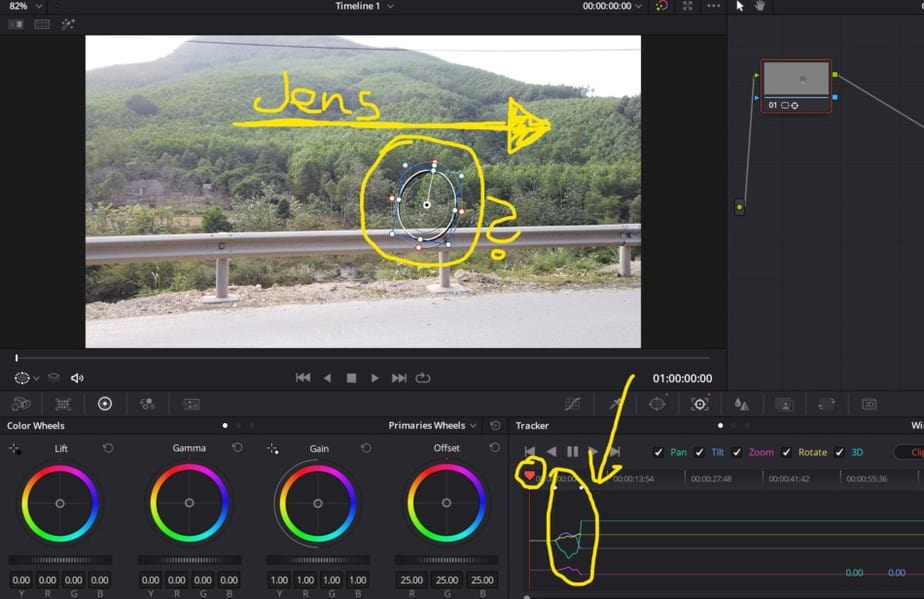
In this step we’re going to make the circle follow the face as it moves. To do this go to the “Tracker” tab which is on the same menu as you found the shapes. (See picture below).
Follow the instructions I’ve drawn upon the picture. First you must be in the “Tracker” tab, then set it to clip and lastly press play.
Stop the tracker if the circle loses its position or the persons turn away. We will deal with this afterward. But track as much you can in this way and you’ll save a lot of work!
Now my friend, it’s time to blur! Navigate to the “Blur” tab in the same menu as the others we’ve used. Here we are going to increase the radius.
Grab one of those gray handles (may look different by the time you’re reading this) and drag them upward until you’re satisfied with the bluring degree on the video.
How to Blur Moving People or Objects/Areas. (Difficult Parts)
Alright, you got your blur and know how to do it! But what you’re blurring is moving a lot so it won’t stick to it. This is what we’re going to solve next!
I recommend that you’ve first done what I described above and tracked your object in the parts where it was possible as this can save you time. But also sometimes it won’t work at all. So for this we have to manually make it follow what you’re blurring.
In the picture below you can see the circled I made to blur my own face in the examples above. But this is at an earlier stage of the video before the camera was turned towards me.
What sucks about this is that you now got a blur in the middle of the video where it’s nothing to blur. You can also see the tracker where I started tracking my face.
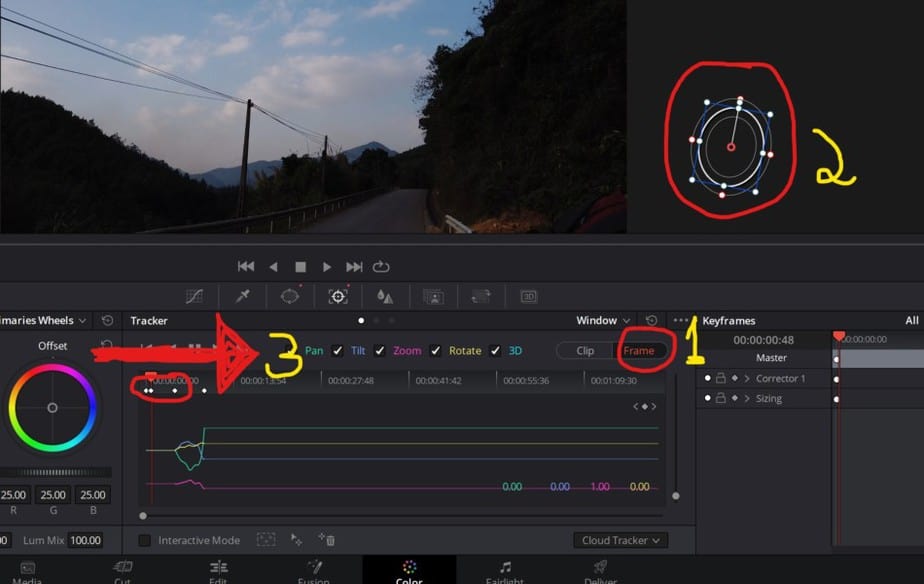
Ok, so to move the blur out of the video when we don’t want it. First change “Clip” to “Frame” in the tracker. What this does is that whenever you move the circle you’ll create a keyframe on the timeline. This is an order you give to the circle at that time of the video. As you can see in the picture below I’ve dragged it outside of the video where we cannot see it.
Once you have done this, use your arrow keys to play the video forward and you’ll notice your circle starts moving if it moves into the video when you don’t want it to simply drag it back outside. This will create a new keyframe for it to follow next time you play.
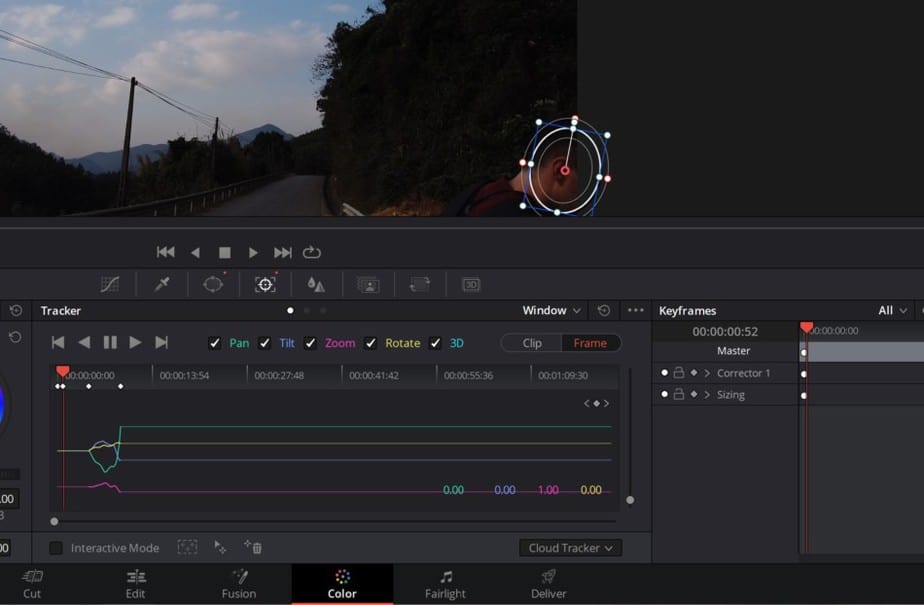
Finally I’m in the sportlight of the video again! Here you can see my face getting in to the frame (Yes, I know the video is way to dark). This is where I want my blur to start working.
Since we’re in frame mode all I have to do is drag the circle over my face. Then I’ll play the video further with my arrows and re-adjust the circle after where my face is in the video until I get to the part where I tracked it earlier.
That’s how you make your blur follow whatever it is in every situation! It’s not basically following when you do it this way. The blur is simply in the position you have ordered it to be at that time in the video.
Change How Blur Looks
If you’re not happy with the way your blur looks it’s a really simple way to do this.
Open “Nodes” and “OpenFX”, as these two windows are open. Then drag the blur you want onto your node. (Make sure that your clip is selected and are showing in the viewer). If you want that classic pixel blur, which is often used to cover nudity choose the “Mosaic Blur”.
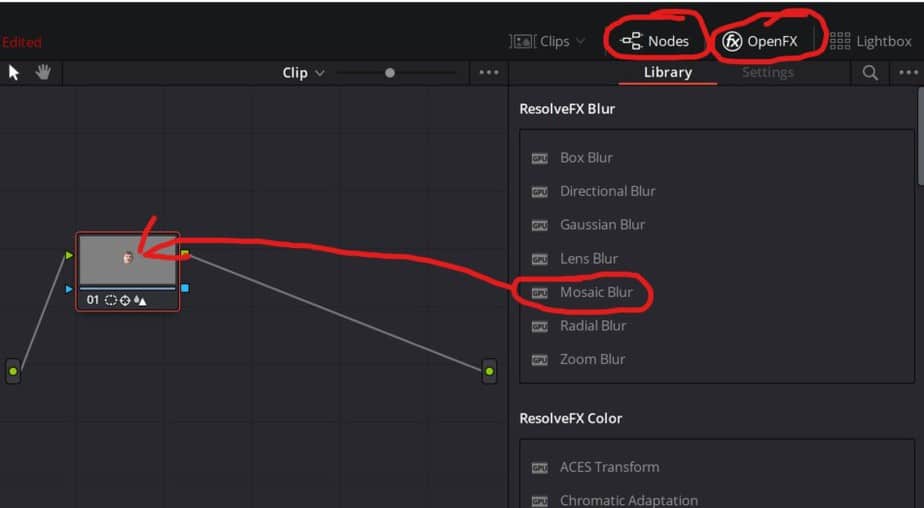
When you have dragged it onto your node a new window will open. If you choose the Mosaic Blur use the “Pixel Frequency” to change how it looks.
Re-adjust the Size/Position of Blur in Video
One more thing!
If you are blurring a person for example that’s running towards you, their face will gradually need a bigger blur as the person will capture more and more space of the frame.
This will be done automatically if there isn’t that much movement as you can use the clip option in the tracker. But if you have to work in frame mode, all you have to do is to increase the size manually and it will create a new keyframe the same way as with the position described above.
Sometimes you may have to go into frame mode and do this in the places you tracked with clip mode as well. There is no problem creating keyframes to re-adjust the blur a little where it’s been auto tracked as well!
If you want to save color grades or copy them from one clip to another… Check out this article!
I hope you found this article helpful!
Cheers,
Jens