How to Add Text Background: Davinci Resolve (Quick and Easy)
In this tutorial, you’ll learn EXACTLY what you came for: “How to add background to text in DaVinci Resolve” + adjusting how it looks like.
I have listed a BUNCH of different ways to add text background, change color, and adjust its appearance.
Let’s get to it!
How to Add Background to Text in DaVinci Resolve
1. Open Resolve and go to the “Edit” page.

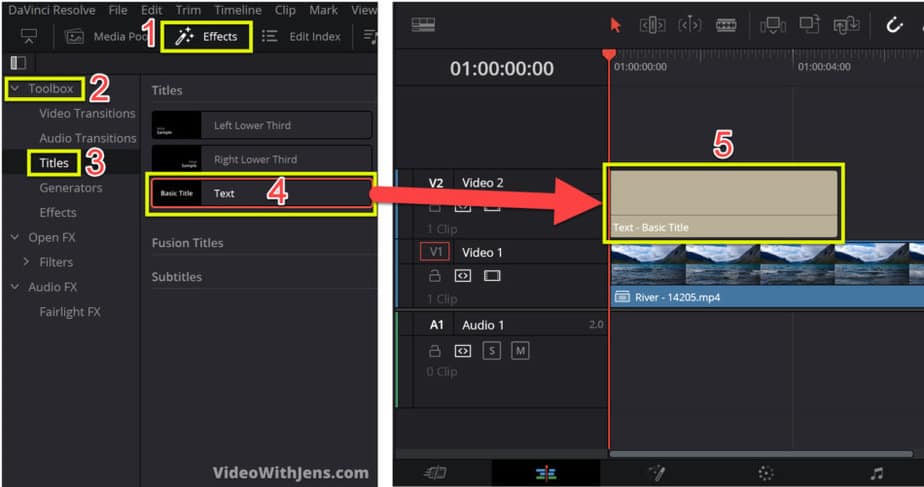
2. Open “Effects” (top left-hand corner) > “Toolbox” > “Titles”.
(Watch the image below).
3. Drag the “Text” into the timeline, and drop it.
If you are going to add text on top of another video or image, you have to drop it in a video track above the video. This is called to overlay, I have an own article regarding that here.
To add text on top of a video watch the image below:
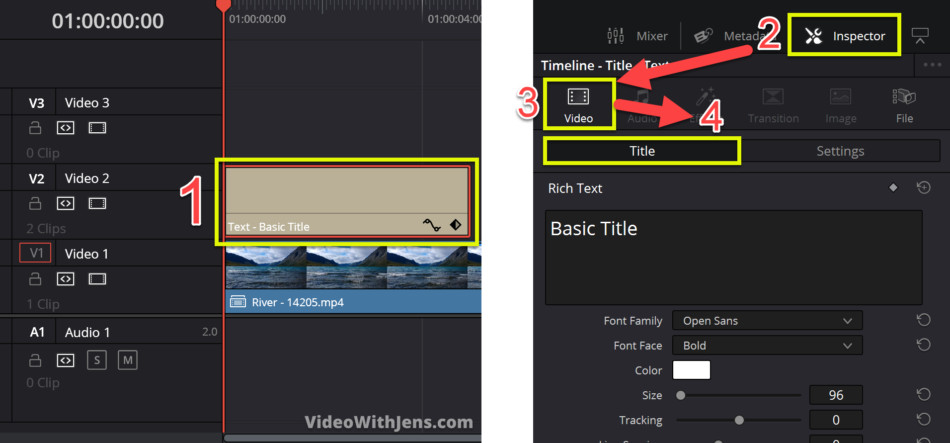
4. Select it in the timeline, then click on “Inspector” (top right-hand corner).
Click on the text template in the timeline to select it (should get a red border around it).
Then open the “Inspector” in the top right-hand corner. Make sure to be under “Video” > “Title“:
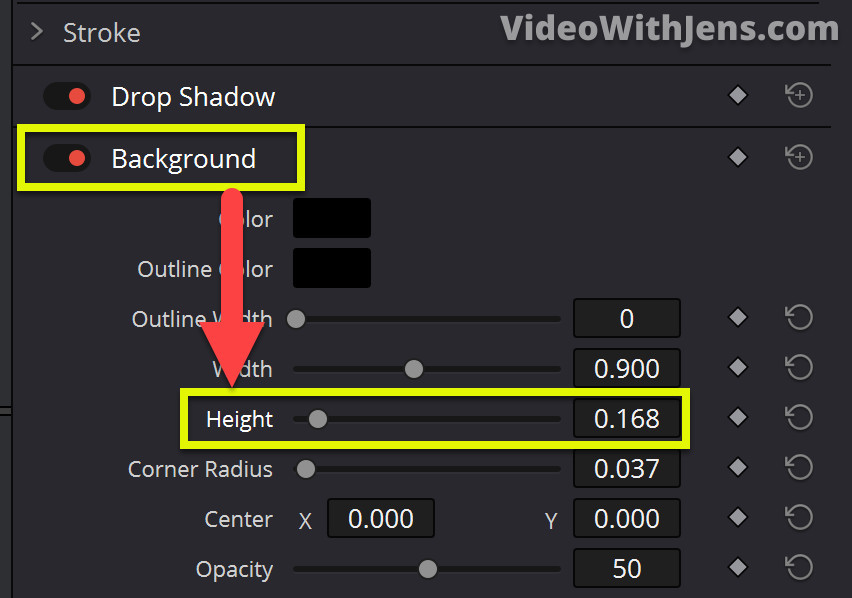
5. Open the “Background” tab, and increase the “Height”.
When you scroll down in the “Inspector” you should be able to see the “Background” tab. If it’s not opened, simply click on the name.
Since the background is activated by default, to prevent it from always showing the “Height” is set to 0 by default aswell…
So in order to see the background you have to increase the “Height” value:
A quick summary, on how to add text background in Resolve:
To add background to text in DaVinci Resolve, go to the “Edit” page. Then in the top left-hand corner, click on “Effects” > “Toolbox” > “Titles”. Next, drag the title called “Text” into the timeline, and select it. Then open the “Inspector”, scroll down to “Background”, and increase the “Height”.
Soon, we will look into how you can adjust the get the look you want. First, we’ll just discuss a common problem I’ve noticed alot of people are struggling with.
Skip this next section if your background is already showing.
Fix Text Background Not Showing in DaVinci Resolve
If your text background in DaVinci Resolve is not showing, simply increase the “Height” value. The “Background” is enabled by default, therefore in order to prevent it from always showing, the “Height” is set to 0 by default.
Check out this image for reference to fix the problem.
Next up, I will show you how to adjust the text background, and change the looks of it:
Adjust the Text Background Appearance
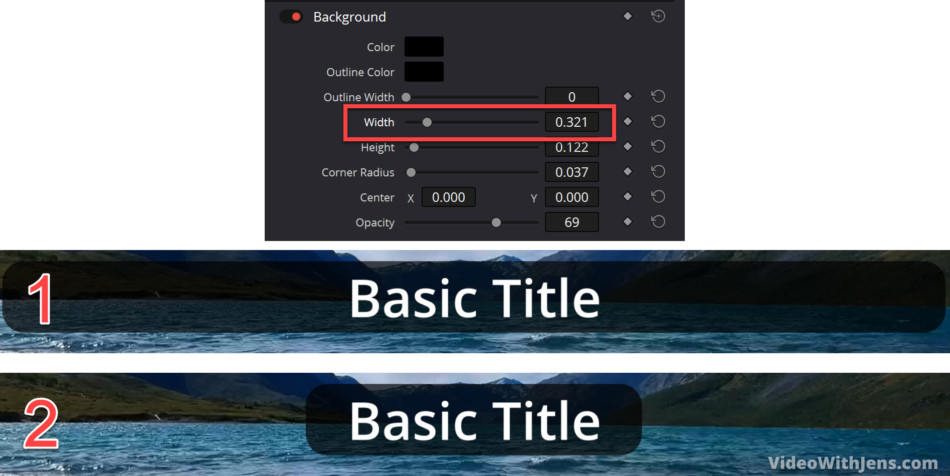
How to Change the Width of the Text Background in DaVinci Resolve
This is done by simply increasing the value of “Width” which is located in the “Background” tab like this:
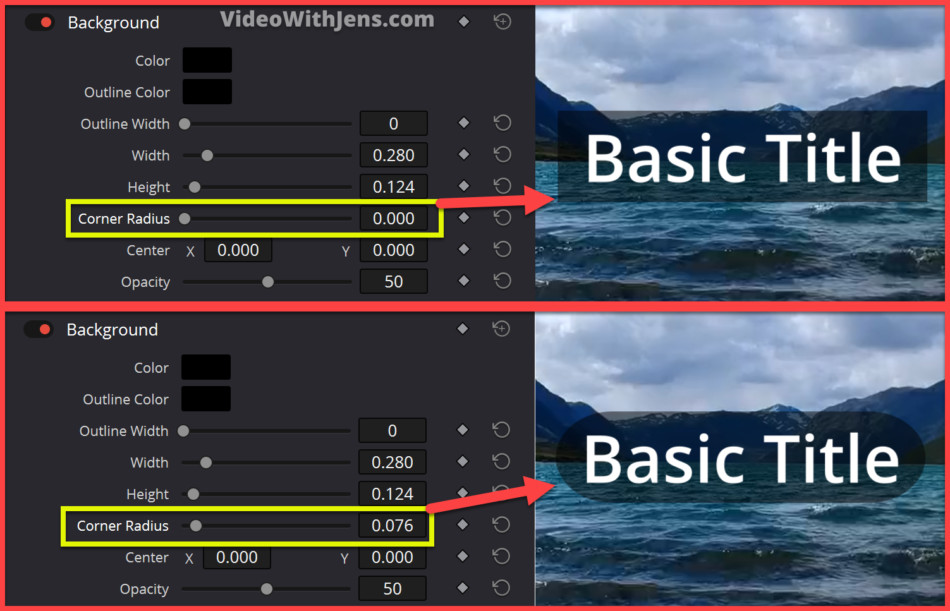
How to Make Rounded Text Background in DaVinci Resolve
To make the text background more rounded in Resolve, select the text effect in the timeline, and open the “Inspector” tab. Then scroll down to the section called “Background”, and click on the name for it to open. Simply, increase the “Corner Radius” value to make the background more rounded.
An images says more than a 1000 words:
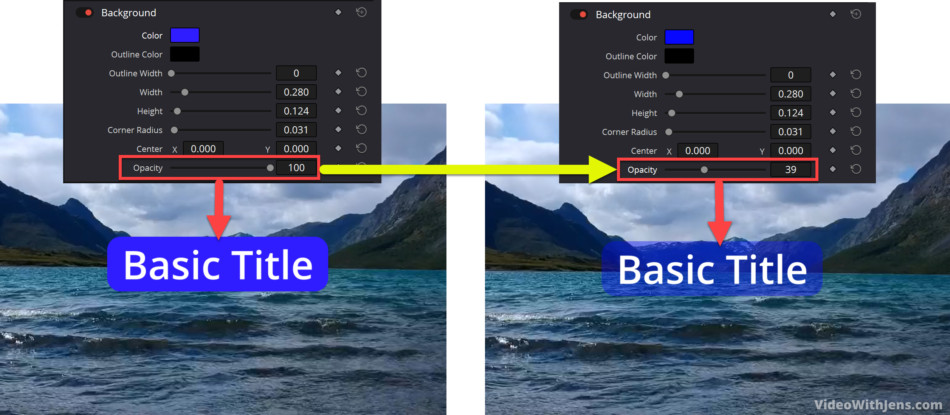
How to Make Text Background Transparent in DaVinci Resolve
- Go to the “Edit” page inside DaVinci Resolve.
- Select the text effect in the timeline, by clicking on it.
- Open the “Inspector” tab in the top right-hand corner.
- Go to the section called “Background“, and click on it to open.
- Decrease the “Opacity” value, to make the text background transparent.
Here’s an illustartion on how to do it:
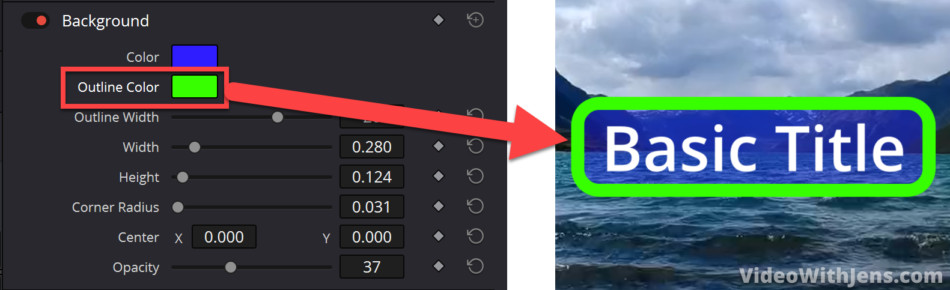
How to a Add Border to Text Background in DaVinci Resolve
- Go to the “Edit” page inside DaVinci Resolve.
- Select the text effect in the timeline, by clicking on it.
- Open the “Inspector” tab in the top right-hand corner.
- Go to the section called “Background“, and click on it to open.
- Increase the “Outline Width” value to make a border.
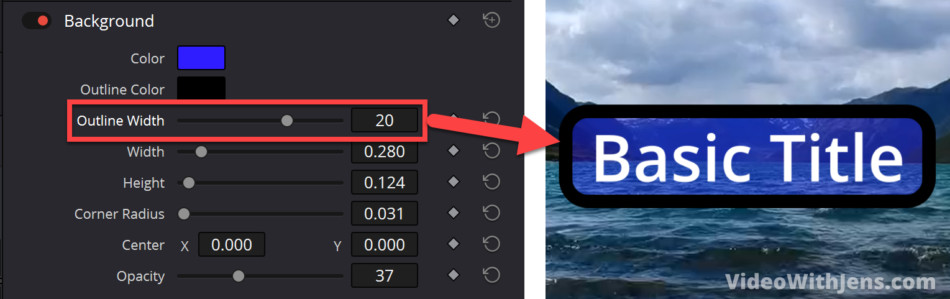
It’s also possible to change the color of it like this:
Alright, that’s it for the first method.
Next up, we’ll discuss how to change the color of a “fullscreen text”:
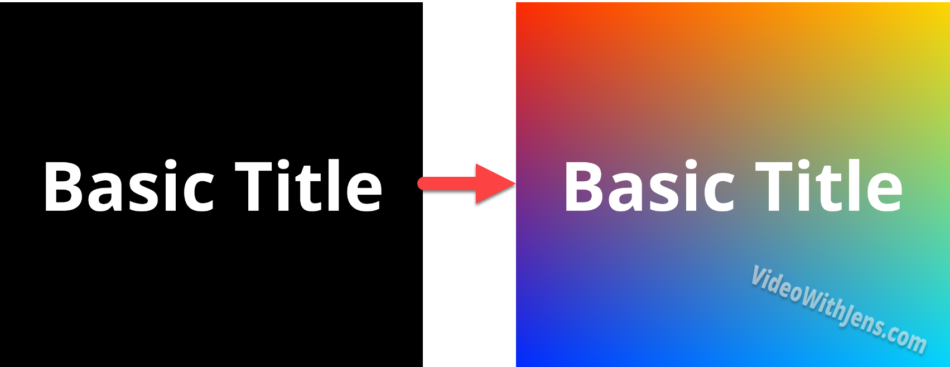
How to Add a Colored Text Background in DaVinci Resolve
By default your text font will be white, and the background will be black.
Here’s how it’s going to look afterwards:
1. Go to the “Edit” page inside Resolve.
Then, I’m assuming you’ve already added some sort of text effect to the timeline. If not go to “Effects” > “Toolbox” > “Titles” > and drag the “Text” into the timeline.
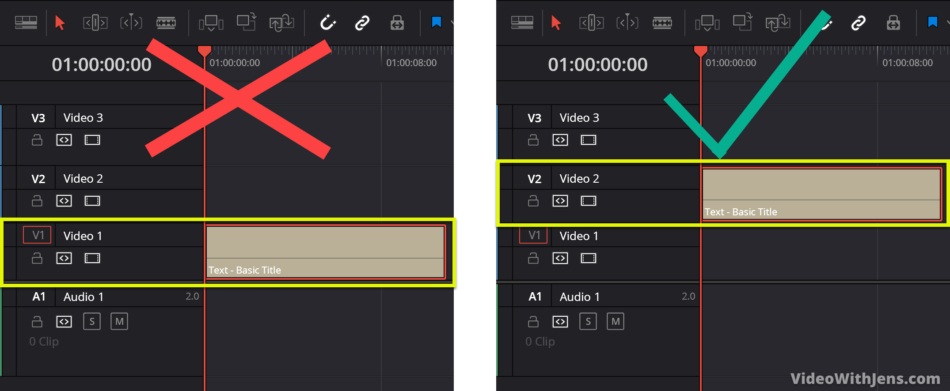
However, since we are going to add background to the text, you have to make room for the background one video track below the text.
Watch the image below on how to do this:
Then it’s time to add out background:
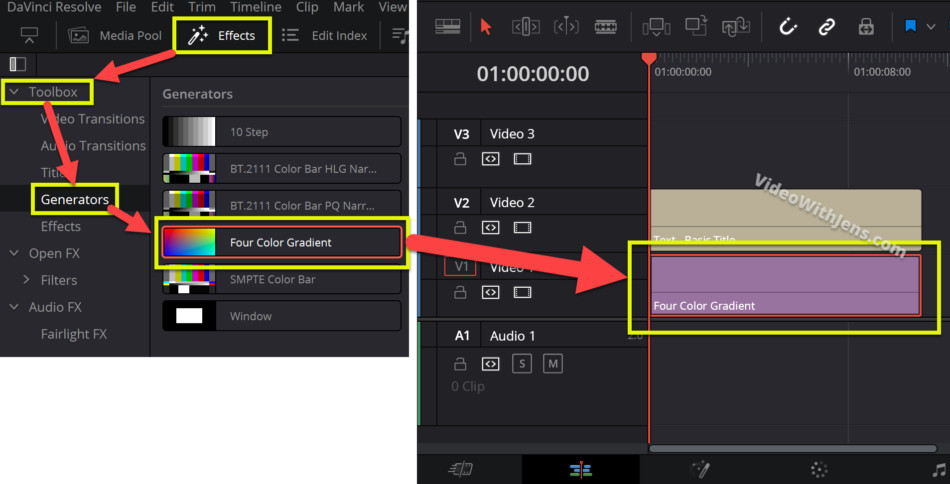
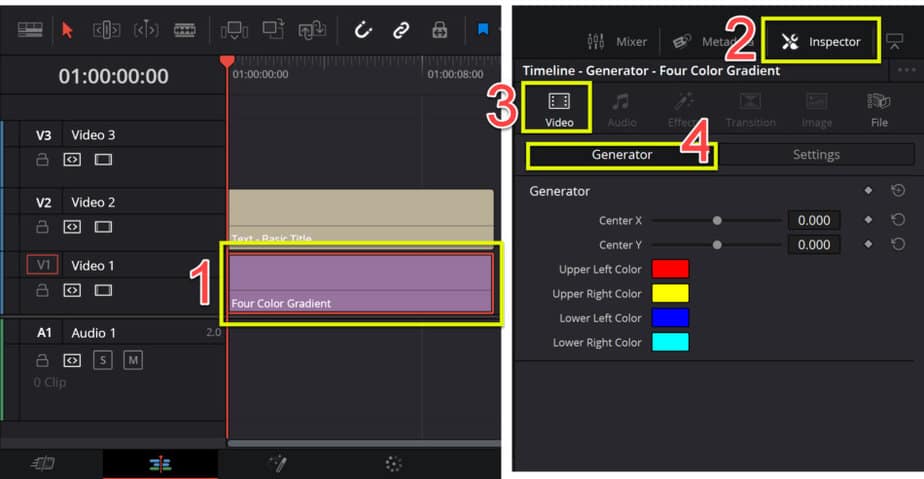
2. Click on “Effects” (top left-hand corner) > “Toolbox” > “Generators”.
(Watch image in step 3):
3. Drag and drop the “Four Color Gradient” in the timeline, one track below the text.
Here you can see that the text effect is placed in video track 2, while we are adding the background/generator to video track 1 below it:
Step 4 and 5 are optional, however, it’s cool to be able to change the colors:
4. Select the generator in the timeline, and open the “Inspector” tab.
You can simply click on the generator/background in the timeline to select it.
Then open the “Inspector” tab, and make sure to be under “Video” > “Generator”, like in the image:
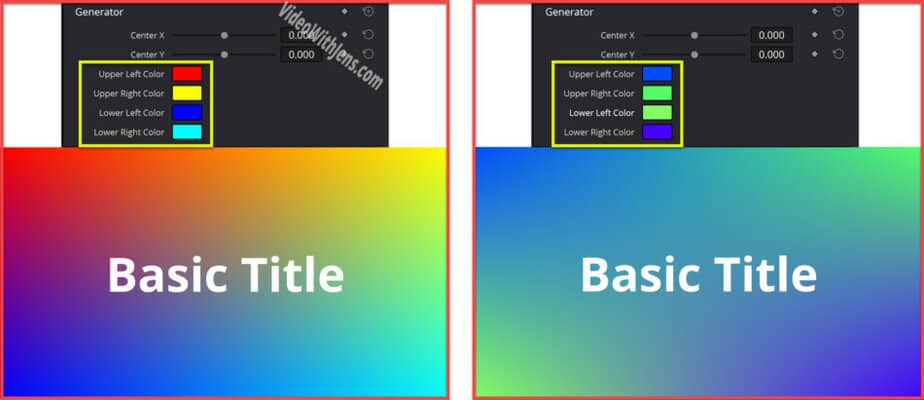
5. Adjust the “Colors” to your preference.
Simply, click on the color boxes to adjust the color.
Notice, that you are changing the colors in different positions, then they are blending together.
Here’s one way you could do it:
A quick summary on how to add colored text background in Resolve:
To add a colored background behind your text in Resolve, go to the “Edit” page. Next, click on the “Effects” in the upper left-hand corner > “Toolbox” > “Generators”. Drag the generator called “Four Color Gradient” into the timeline. Then, simply place the text effect on top of the generator.
Next, up I will show you how you can make the text background white, instead of the default black:
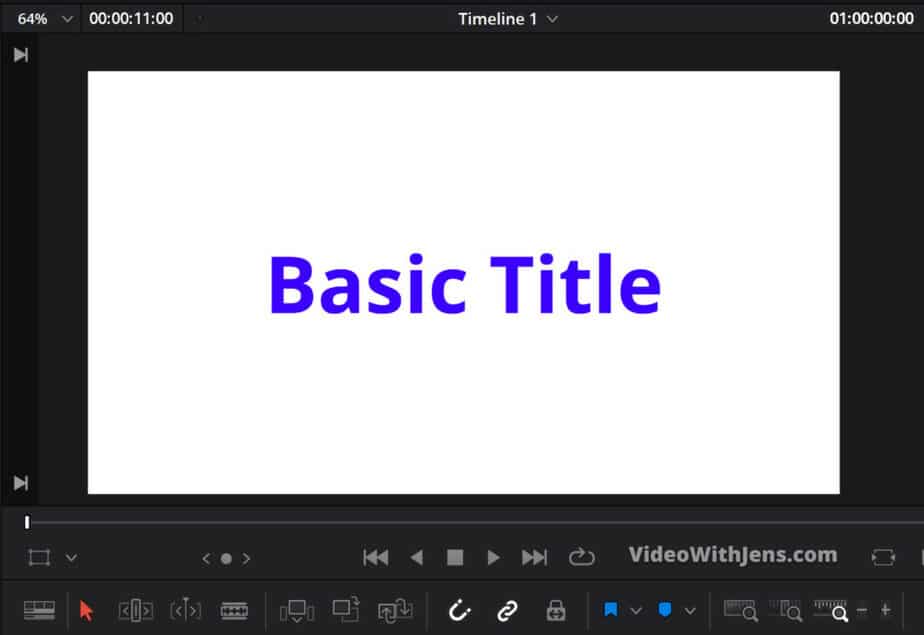
How to Make Text Background White in DaVinci Resolve
By default the background behind the text will be black in DaVinci Resolve.
I will show you how to make the text background white instead:
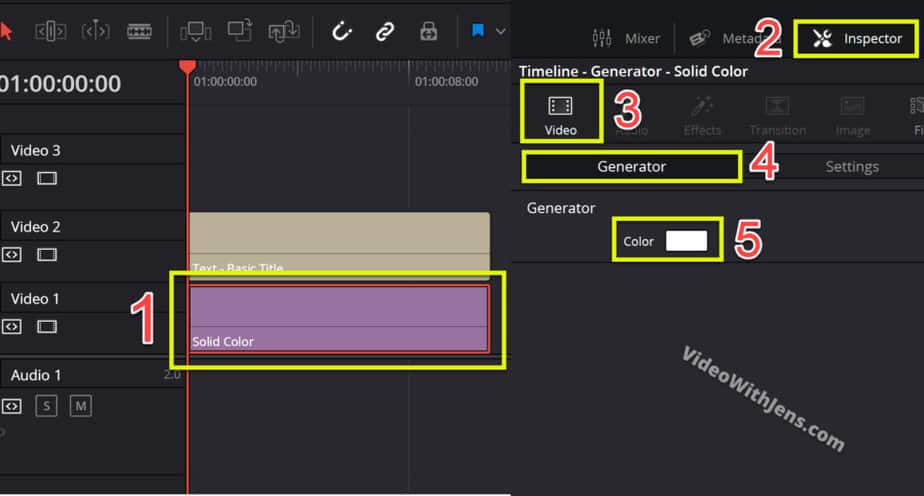
- Go to the “Edit” page inside DaVinci Resolve.
- Click on “Effects” (upper left-hand corner) > “Toolbox” > “Generators“.
- Drag the “Solid Color” from inside the “Generators” and drop it in the timeline.
- Place the text effect one video track above the “Solid Color“.
Simple as that! (Explanation with images below)

The “Solid Color” will be colored white by default.
If you wish to change the color, simply select the generator in the timeline, and go to the “Inspector” tab. Then under “Video” > “Generator”, simply change the “Color”.
Detailed explanation:
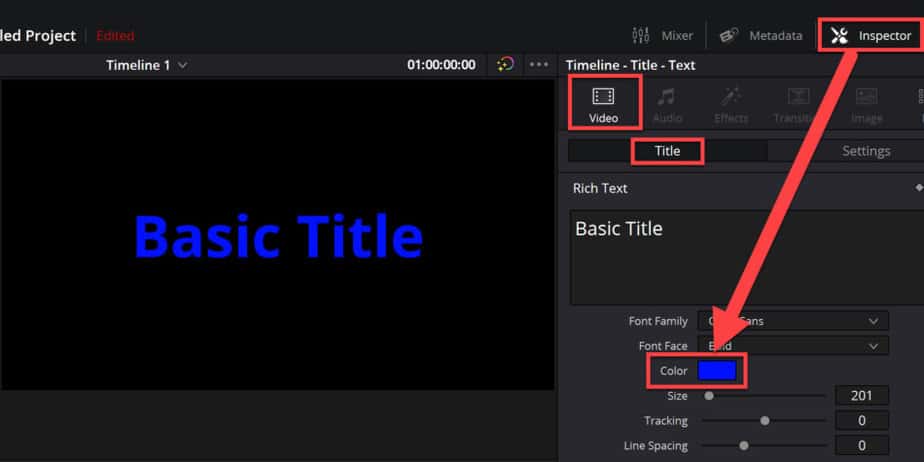
Since the text font by default is white, I recommend changing it before making the background white as well:
Simply, select the text effect in the timeline, and do it like this:
As the text is going to be on top of the background… “You don’t say Captain obvious”.
Place the the text effect one track up like this, to make room for the background:
Then in the upper left-hand corner open the “Effects” tab > “Toolbox” > “Generators“.
Inside the “Generators” tab you should be able to see one called “Solid Color“:
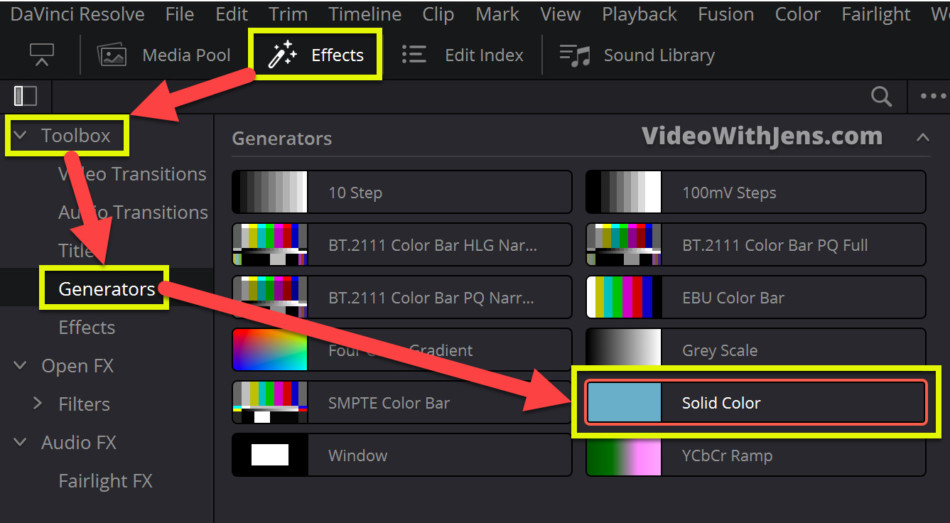
Drag the “Solid Color” into the timeline, one video track below the text.

Voilà!
If you have done everything correctly, you should now be able to see a white text background, like this:
If you want to want another color than white:
Simply select the “Solid Color” in the timeline, by clicking on it.
Then open the “Inspector” tab in the upper right-hand corner of Resolve. Make sure to be under “Video” > “Generator“.
Here you should be able to see the “Color” option. You can then click on the white box to change the color of the text background:
Check out this tutorial on how to customize, and add animation to your text!