Fix MOV Import Issues: DaVinci Resolve (Common Issues)
In this article, we are going to solve common MOV importing issues in DaVinci Resolve.
Click on the links to go directly to a specific section:
- Does DaVinci Resolve Support MOV files?
- How to Import MOV file to DaVinci Resolve (the right way)
- Unable to Import MOV file to DaVinci Resolve.
- No Audio from MOV file Inside Davinci Resolve.
- No Video, Only Audio on MOV file in DaVinci Resolve
Does DaVinci Resolve Support MOV files?
DaVinci Resolve supports the MOV container. However, if it’s encoded with an unsupported codec, Resolve will not be able to recognize the file. The same applies when exporting to MOV, where it’s a limited number of codecs Resolve offers.
With this in mind, we can solve the following issue many people are experiencing:
How to Import MOV file to DaVinci Resolve
Before we get to the issues and how to solve them. Ensure that you are importing the MOV to DaVinci Resolve correctly.
To import a MOV file to DaVinci Resolve, open the “Media Pool” in the top left-hand corner of Resolve. Then, right-click on the gray area, click “Import Media“, select the MOV file you want to import and click “Open.”

For more ways to import media to DaVinci Resolve, check out this article.
If you are experiencing problems after importing, that’s what we are going to look into next:
MOV File is Not Importing to DaVinci Resolve
If you cannot import a MOV file to DaVinci Resolve, it’s probably because it contains a codec not supported by the software. While Resolve supports the MOV container format, it’s limited to what codecs it’s able to decode.
To check if your MOV contains an unsupported codec, I’ve made two tables below; a list of all the codecs supported by Resolve when paired with the MOV container.
Here’s a summary of the tables:
The supported codecs for MOV files in DaVinci Resolve are: Apple ProRes, Canon, DNxHD, DNxHR, GoPro CineForm, Grass Valley, H.264, H.265, AV1, JPEG2000 video, MPEG, Panasonic, Sony, Uncompressed, VP9, QuickTime.
If you’re not sure what codec is used to encode your MOV file, don’t worry, as that’s what I’m going to show you next:
How to Find the MOV file’s Codec
You can use many software to check your file’s codec. You could even google something like “codec checker” and upload the file to cloud-based software that would tell you this.
However, I’m going to use a software known to many people; VLC Media Player (follow the link to download it), which is a free media player.
Locate the MOV file in your system folders, right-click it > “Open with” > “VLC Media Player“:

Then click on “Tools” (upper left corner) > “Codec Information“, alternatively press the keyboard shortcut: “Ctrl + J” or “Command + J” and open the “Codec” tab.
Inside the window that pops up, check what’s next to “Codec” and “Decoded Format.” Here’s an image of what it looks like:
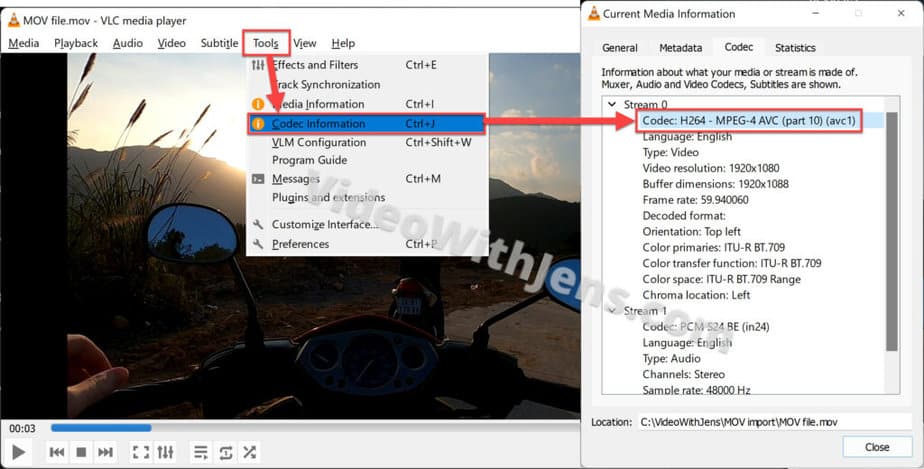
Next, ensure that the codec and the decoded format are included in the table below. If you can’t find it, it’s not supported by DaVinci Resolve; I will show you how to fix that.
The first table is for Windows users, and the second table is for macOS users:
Windows: DaVinci Resolve Supported Codecs For MOV Container
| Codec: | Encode: | Decode: |
|---|---|---|
| Apple ProRes | 422, 422 HQ, 422 LT, 422 Proxy, 4444, 4444 XQ | – |
| Canon | C200 RAW, XF-AVC Intra, XF-MPEG | – |
| DNxHD | Yes | 720p (100/85/55/45 8-bit, 145/120/75/60 8-bit, 220/185/110/90 10-bit, 220/185/110/90 8-bit), 1080i (100 8-bit, 145/120/115 8-bit, 220/185/175 10-bit, 220/185/175 8-bit, Thin Raster 145/120/115 8-bit), 1080p (100/85/80 8-bit, 145/120/115 8-bit, 220/185/175 10-bit, 220/185/175 8-bit, 36 8-bit, 444) |
| DNxHR | Yes | 444 (10-bit, 12-bit), HQX (10-bit, 12bit), HQ, LB, SQ |
| GoPro CineForm | Native, YUV 10-bit, RGB 16-bit | YUV 10-bit, RGB 16-bit |
| Grass Valley | HQ, HQX, Lossless | HQ, HQX |
| H.264 | Yes, GPU accelerated in Studio | Yes, GPU accelerated in Studio |
| H.265 | Yes, GPU accelerated in Studio | Yes, GPU Accelerated. Additional profiles in Studio |
| AV1 | Yes, GPU accelerated | Yes, GPU accelerated on Intel graphics |
| JPEG2000 video | Yes | Native, Kakadu RGB, YUV422 and YUV444 (8-bit, 10-bit, 12-bit each). Studio for >=4k |
| MPEG | MPEG2, MPEG4, MPEG IMX variants | MPEG4 |
| Panasonic | AVC-Intra 50M and 100 M; 720p (24/25/30/50/60), 1080i (50/60), 1080p (24/25/30/50/60), DVCPRO: NTSC, PAL, DVCPRO50: NTSC, PAL, DVCPRO: 720p (50/60), 1080i (50/60), 1080p (25/30) | – |
| Sony | XAVC, XAVC Intra, XDCAM 35MB VBR: 720p EX (24/25/30/50/60), 1080i EX (50/60), 1080p EX (24/25/30), 1080p HD (24/25/30), XDCAM HD422 (50MB CBR): 720p (50/60), 1080i (50/60), 1080p (24/25/30) | – |
| Uncompressed | Uncompressed (ARGB/BGRA 8-bit, RGB 8/10-bit, YUV 422 8/10-bit) | Uncompressed (ARGB/BGRA 8-bit, RGB 8/10-bit, YUV 422 8/10-bit) |
| VP9 | Yes | – |
| QuickTime | Animation QuickTime, HDV 720p (24/25/30/50/60), 1080i (50/60), 1080p (24/25/30), DV – PAL, MotionJPEG, PhotoJPEG | PhotoJPEG |
MacOS: DaVinci Resolve Supported Codecs For MOV Container
| Codec: | Encode: | Decode: |
|---|---|---|
| Apple ProRes | 422, 422 HQ, 422 LT, 422 Proxy, 4444, 4444 XQ | 422, 422 HQ, 422 LT, 422 Proxy, 4444, 4444 XQ |
| Canon | C200 RAW, XF-AVC Intra, XF-MPEG | – |
| DNxHD | Yes | 720p (100/85/55/45 8-bit, 145/120/75/60 8-bit, 220/185/110/90 10-bit, 220/185/110/90 8-bit), 1080i (100 8-bit, 145/120/115 8-bit, 220/185/175 10-bit, 220/185/175 8-bit, Thin Raster 145/120/115 8-bit), 1080p (100/85/80 8-bit, 145/120/115 8-bit, 220/185/175 10-bit, 220/185/175 8-bit, 36 8-bit, 444) |
| DNxHR | Yes | 444 (10-bit, 12-bit), HQX (10-bit, 12-bit), HQ, LB, SQ |
| GoPro CineForm | Native, YUV 10-bit, RGB 16-bit | YUV 10-bit, RGB 16-bit |
| Grass Valley | HQ, HQX, Lossless | HQ, HQX |
| H.264 | Yes, GPU accelerated | Yes, GPU accelerated |
| H.265 | Yes, GPU accelerated | Yes, GPU accelerated |
| AV1 | Yes | – |
| JPEG2000 video | Yes | Native, Kakadu RGB, YUV422 and YUV444 (8-bit, 10-bit, 12-bit each). Studio for >=4k |
| MPEG | MPEG2, MPEG4, MPEG IMX variants | – |
| Panasonic | AVC-Intra 50M and 100 M: 720p (24/25/30/50/60), 1080i (50/60), 1080p (24/25/30/50/60), DVCPRO: NTSC, PAL, DVCPRO50: NTSC, PAL, DVCPRO: 720p (50/60), 1080i (50/60), 1080p (25/30) | – |
| Sony | XAVC, XAVC Intra, XDCAM 35MB VBR: 720p EX (24/25/30/50/60), 1080i EX (50/60), 1080p EX (24/25/30), 1080p HD (24/25/30), XDCAM HD422 (50MB CBR): 420p (50/60), 1080i (50/60), 1080p (24 /25/30) | – |
| Uncompressed | Uncompressed (ARGB/BGRA 8-bit, RGB 8/10-bit, YUV 422 8/10-bit) | Uncompressed (ARGB/BGRA 8-bit, RGB 8/10-bit, YUV 422 8/10-bit) |
| VP9 | Yes | YUV 420 and 422 (8-bit, 10-bit, 12-bit each) |
| QuickTime | Animation QuickTime, HDV 720p (24/25/30/50/60), 1080i (50/60), 1080p (24/25/30), DV – PAL, MotionJPEG, PhotoJPEG | PhotoJPEG |
If you didn’t find your codec, it’s not supported by DaVinci Resolve. That’s a good thing since then we know what’s causing the import issue.
Then all you need is to transcode the file into a supported codec.
Transcode the MOV to a Supported Codec
There are many software you can use to transcode files. Two popular options are HandBrake and Shutter Encoder.
I’ve been using both; however, HandBrake has its limitations, and MOV files did not make it within limits. Therefore, we are going to be using Shutter Encoder in this tutorial.
Here’s a link to Shutter Enocder’s website, where you can download it for free. If you like it, it’s also possible to donate a few bucks to them.
If you don’t like downloading stuff from the internet, there are many cloud-based versions you find by googling something like “online video converter.”
I have been using this one a couple of times, you’ll probably lose a bit of quality compared to using Shutter Encoder, but it’s acceptable for most people.
How to Transcode Using Shutter Encoder
Once you have downloaded and installed the software, it’s pretty straightforward.
First, import the MOV file to Shutter Encoder, either by dragging and dropping it upon the software or by clicking on “Browse…” and locating the MOV file in your system folders.
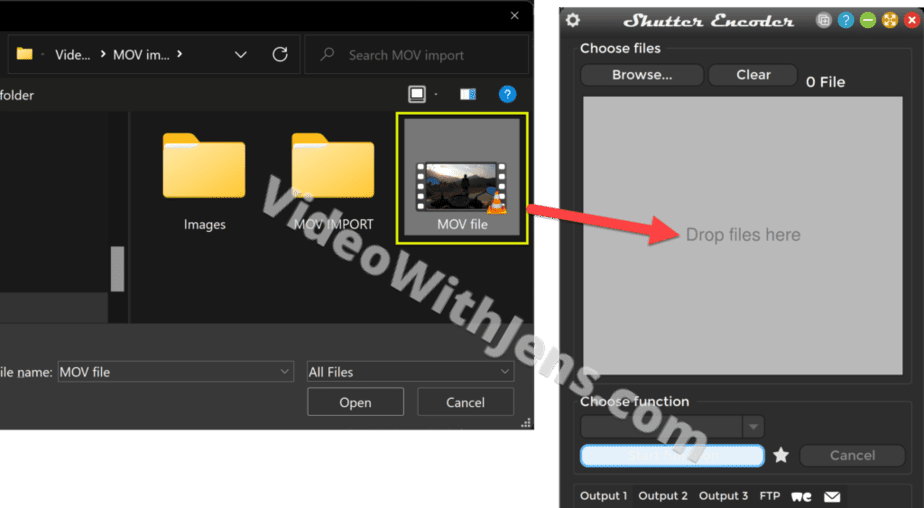
Open the drop-down menu beneath “Choose function”; inside it you’ll see a bunch of codecs to choose from.
Choose one that DaVinci Resolve supports, you’ll find those in the tables above.
Since you will be editing the MOV file, I recommend going with the “ProRes 422” which is less compressed than codecs such as H.264 and H.265. This makes the file more effortless for your computer to decode while editing=less computational power required.
Lastly, click on the “Start function.”
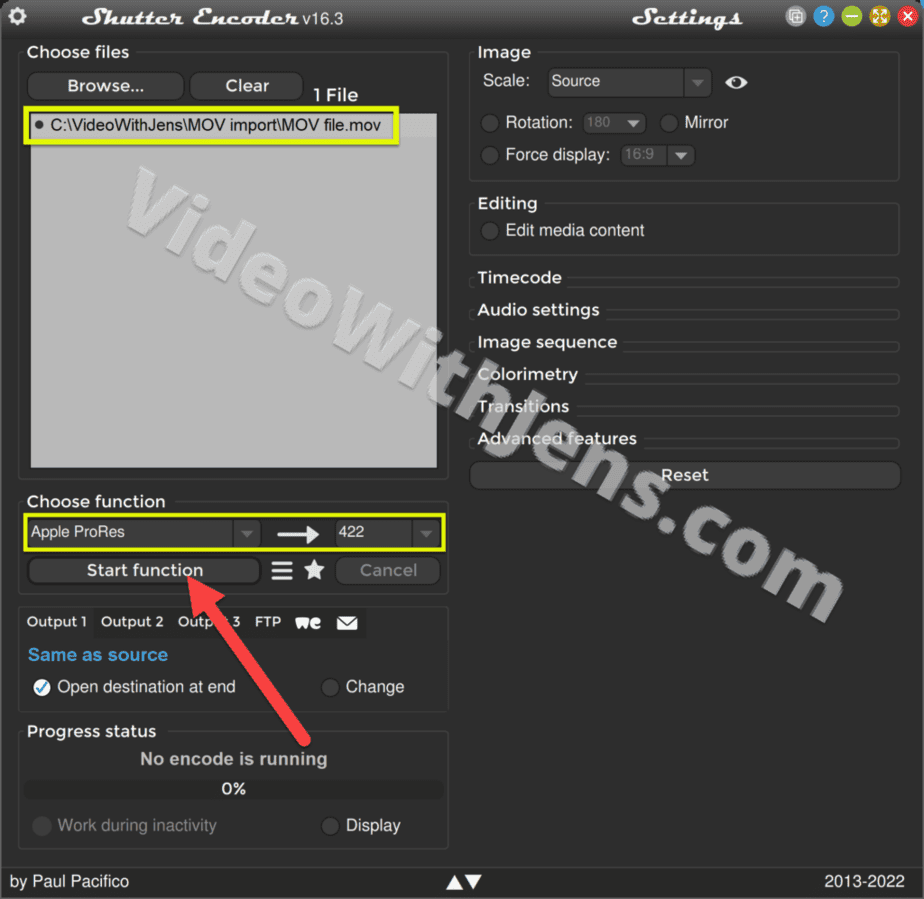
Once it’s done you’ll find the file in the same folder as the original MOV file. Next, import the MOV file to DaVinci Resolve!
Here’s another common problem:
No Audio from MOV file Inside Davinci Resolve
If there is no audio playing from your MOV file inside DaVinci Resolve, but the audio is working elsewhere, it’s most likely because of an unsupported audio codec. To fix this, you must transcode the file to an audio codec supported by DaVinci Resolve.
Gladly, this is an easy thing to do:
First, you need to check if it’s the audio codec causing the issue.
To do this, I’m going to use VLC Media Player, which is among the world’s most popular media players, clocking in about 1 million downloads every day. Oh, yeah, and it’s completely free!
Check MOV’s Audio Codec
Right-click the MOV file in your system folders > Open with > VLC media player:

In the top menu bar (inside VLC), click on Tools > Codec Information and find “Codec” under “Stream 1“.
That’s your audio codec; ensure it’s included in the table below, showing the supported audio codecs in DaVinci Resolve.
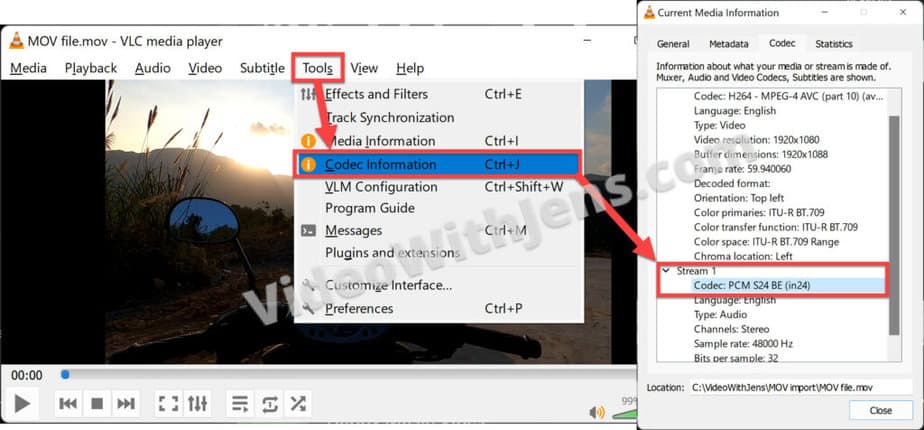
The codec in the image above is “PCM 24-bit“, a decodable codec for DaVinci Resolve. You can see it to the right of the formats “WAV” and “Audio Interchange” in the table below.
If your codec is Mpeg Audio Layer 3 or MP3, I recommend you to read this article. There you learn why your MP3 audio might not work in DaVinci Resolve and how to fix it. Also, I noticed that the VLC media player sometimes mistakes MP3 for MPGA.
Supported Audio Codecs in DaVinci Resolve:
| Format | File Ex. | Decode | Encode |
|---|---|---|---|
| WAV | wav | Independent Uncompressed PCM 16/24/32-bit | Linear PCM 16/24/32-bit |
| Audio Interchange | aiff | Independent Uncompressed PCM 16/24/32-bit | – |
| Mpeg audio | mp3 | Constant bit rate | Constant bit rate |
| Advanced audio coding | aac/m4a | CBR, VBR, average | CBR, VBR, average |
| Free lossless audio | flac | Yes | – |
| Embedded audio in video containers | mov, mxf, r3d, mp4, avi, etc. | All decodable audio formats listed above, with valid header metadata | Linear PCM 16/24/32-bit, AAC (based on container) |
| u-law | mov | Yes | – |
| IMF audio formats | mxf op1a | Yes | Linear PCM, Dolby Atmos(5) |
| OPUS | mov, mp4 | Yes | – |
| AC-3 | ac3 | Yes | – |
Transcode File to a Supported Audio Codec
For this, I will be using a free cloud-based converter called “FreeConvert“, click on the link if you want to use it.
This converter does not have an unlimited amount of audio codecs to choose from. However, it’s perfectly fine if you don’t have any particular preferences.
To import your MOV file to the converter; either drag and drop it on top of the converter or click on “Choose Files” and open it in the system folders:

Then set “Output” to MOV and click on the gear icon:

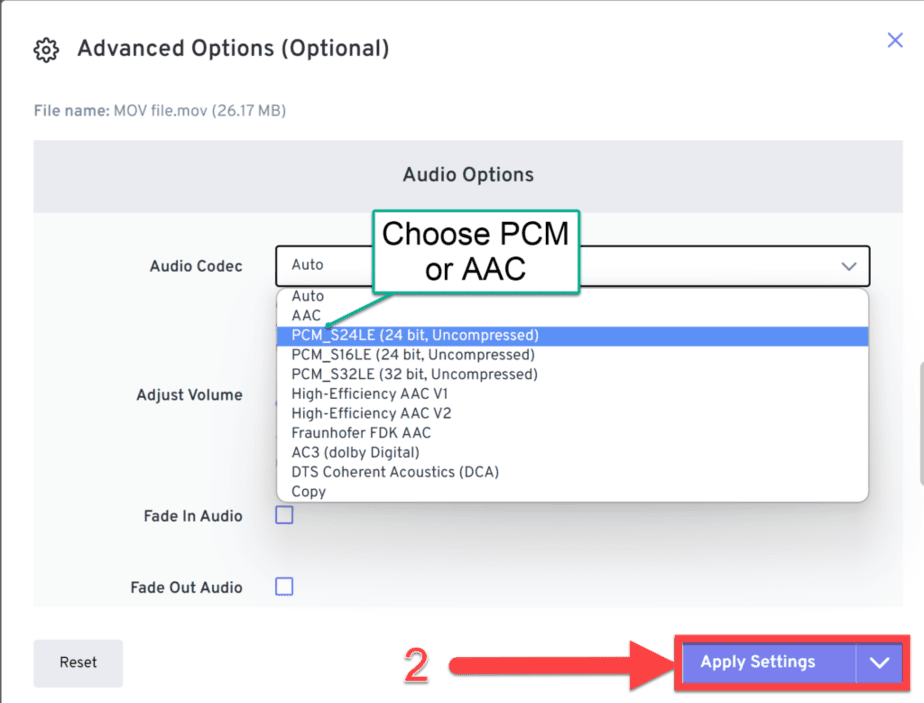
Scroll down to “Audio Options” and set “Audio Codec” against PCM 16-bit or 24-bit if you have high-quality audio; if not, choose AAC.
You’ll find both of those codecs in the table over the supported codecs above.
Secondly, click on “Apply Settings“:
Click on “Convert to MOV” to start the transcoding process, and once it’s complete, download the file!

Now you should be able to hear your audio inside DaVinci Resolve as well.
Another issue I’ve seen quite frequently is:
No Video, Only Audio on MOV file in DaVinci Resolve
DaVinci Resolve does not support variable frame rates, therefore, the video of your MOV file might not show at all. However, since the audio is still supported, it will result in Resolve playing only the audio and the video not showing.
If the video is filmed on a phone or on some type of screen recorder, this is likely what’s causing the issue.
The solution is to transcode the file into a constant frame rate, if you want to edit the video in Resolve,
There are many encoder software you can use for this purpose; most people would recommend HandBrake, it’s also free! (follow the link to download it).
Convert Variable Frame Rate (VFR) to Constant Frame Rate (CFR)
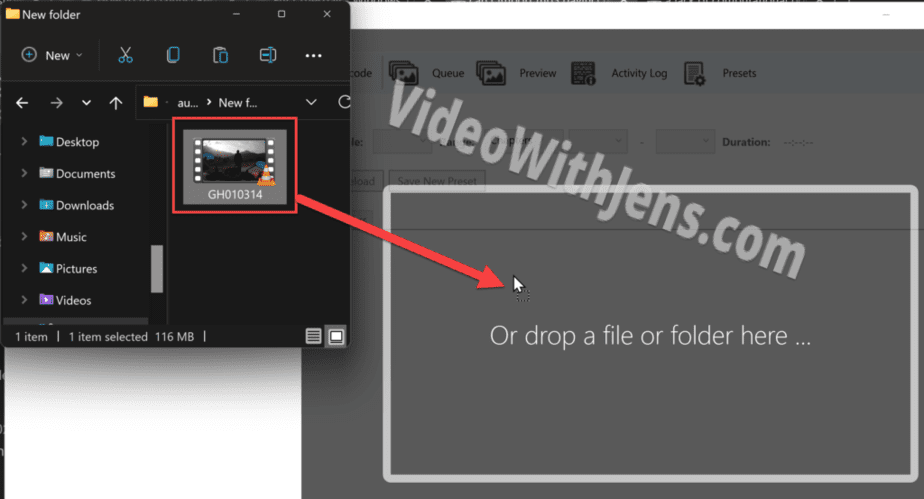
Open Handbrake, and import the MOV file; you can simply drag and drop it like in the image below:
In the “Summary” tab set “Format” against “MP4“, as MOV is not available in HandBrake… However, you should be fine and won’t lose any quality as long as the source file’s codec is H.264 or H.265.
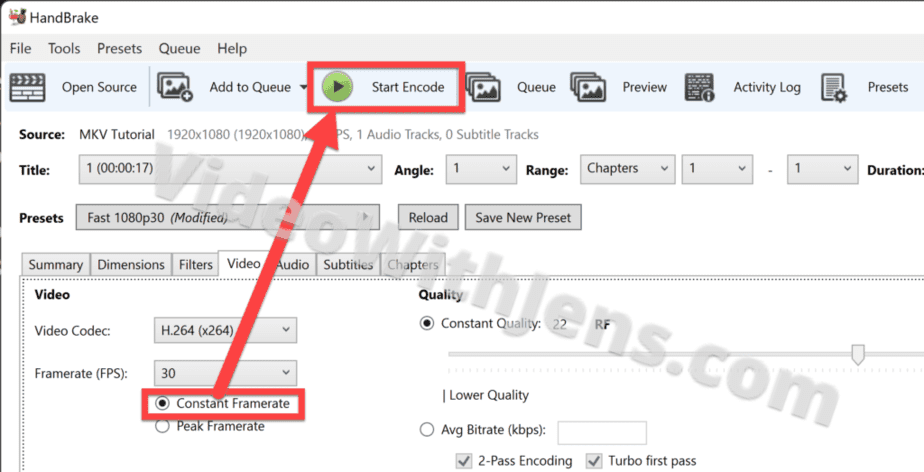
Next, head over to the “Video” tab and set the “Video Codec” to the same as the source file; if you are not sure what the file’s codec is, I’m showing you that above.
Lastly, enable “Constant Framerate” and click on “Start Encode“:
Once it’s finished, import the MOV (MP4) file to DaVinci Resolve!
MOV file Laggy/Choppy Inside Resolve
A of people will experience choppy playback while editing MOV files. The reason for this is not the .mov extension itself or the QuickTime container to put other words.
What’s causing the lag is more likely to be the codec that is inside the container. Especially if the codec is either H.264 or H.265 as this requires a lot of computational power to decode!
To fix this problem I recommend you check out the first solution in this article on how to generate optimized media! That will “temporarily” transcode the video into an edit-friendly codec.

