Import MKV: DaVinci Resolve (+ Fix Issues, errors, audio..)
Look no further if you are having problems importing MKV files to DaVinci Resolve or any other MKV file-related issues.
There are usually 3 issues people are facing with MKV files:
- Can’t import MKV files to DaVinci Resolve.
- MKV files missing audio in DaVinci Resolve.
- MKV files showing “Media Offline” in DaVinci Resolve.
These are all easy to fix, so without wasting any time, let’s solve them.
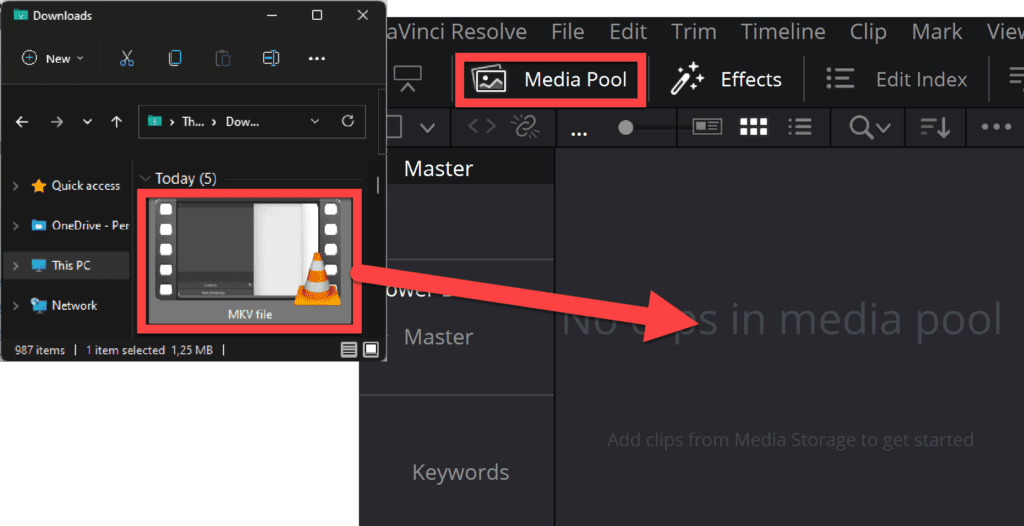
First things first, if there are any doubts on how to import an MKV file to DaVinci Resolve, it’s just like importing any other video file.
Open the “Media Pool” inside Resolve, then drag & drop the file on the gray area inside the media pool. Watch the image illustration below:
Does DaVinci Resolve Support MKV Files?
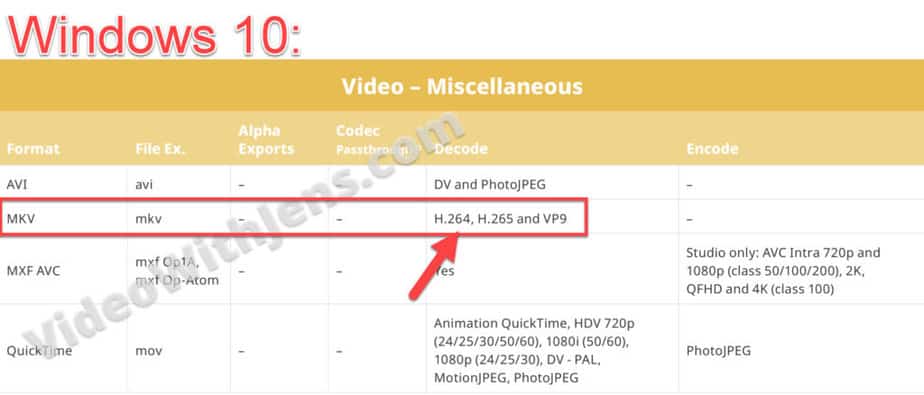
DaVinci Resolve supports files using the MKV container as of version 17.2 and above. However, it must be paired with the following codecs: H.265, H.264, or VP9. It won’t be supported if paired with any other codec.
How to Fix MKV Files that are not Importing to DaVinci Resolve
It probably contains an unsupported codec if you cannot import an MKV file to DaVinci Resolve. To fix this, use a video converter and change the codec to either H.265, H.264, or VP9. There are many free video converters online.
This is the solution that’s most likely to solve your import issue.
The reason is that DaVinci Resolve, per this date, only supports MKV files (MKV is a container btw.) containing the codecs H.265, H264, and VP9.
To stay up to date with such information, head over to Black Magic Design’s support page and scroll down to “Latest Support Notes“. Or simply check the image below:
And the same goes for Mac users:

How to Change the MKV file’s Codec:
You can use numerous converters for this, so if you already got one you prefer, use that one.
I will show you how to do this using this free online converter (no need to download it!). It’s simply one I’ve found to be clean and working perfectly.
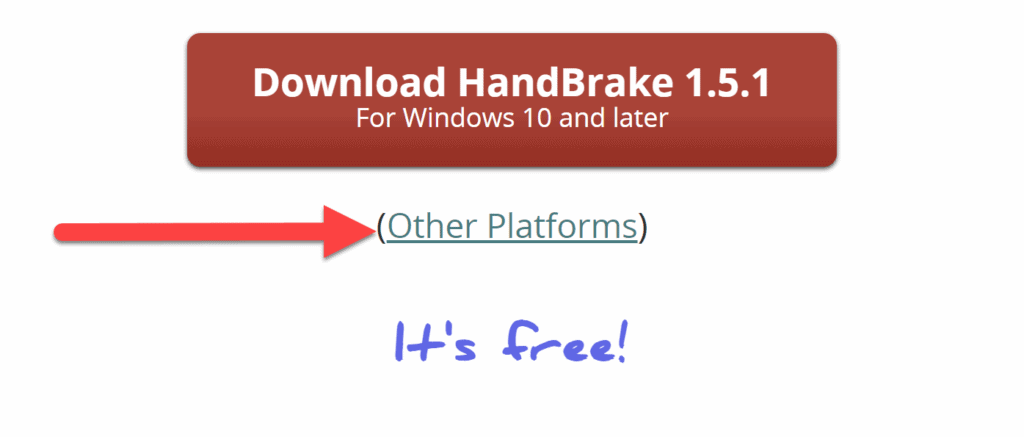
If you want the most famous converter, go with HandBrake (this one you must download). However, it’s free, and I’ll also show you how to use that one here.
To download HandBrake for Mac users, click on “Other Platforms“:
Using the cloud-based version:
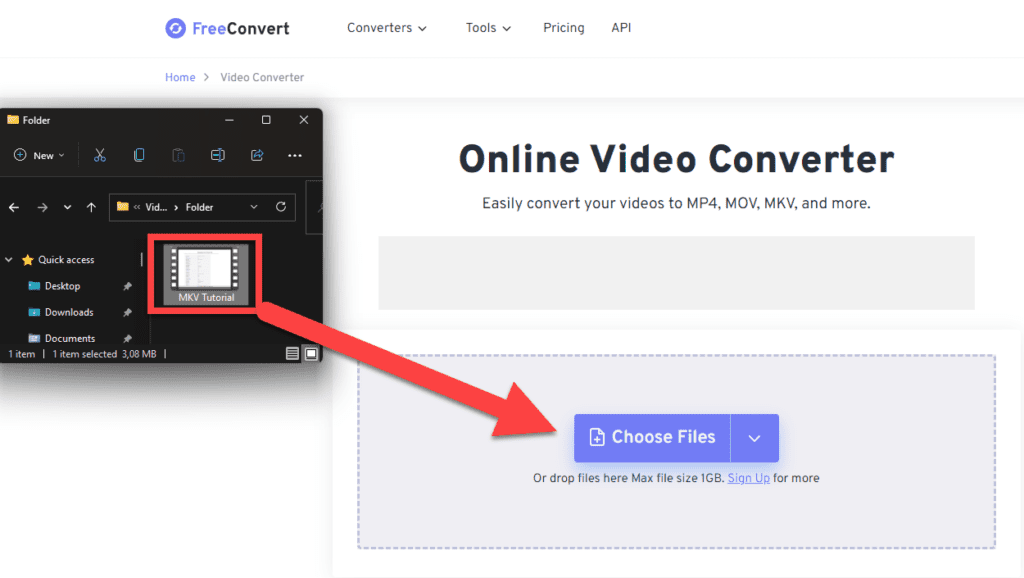
Head over to the free video converter.
Then locate the MKV file(s) in your system folders and drag it into the converter, illustrated in the image below:
Next, make sure that the output is set to MKV:

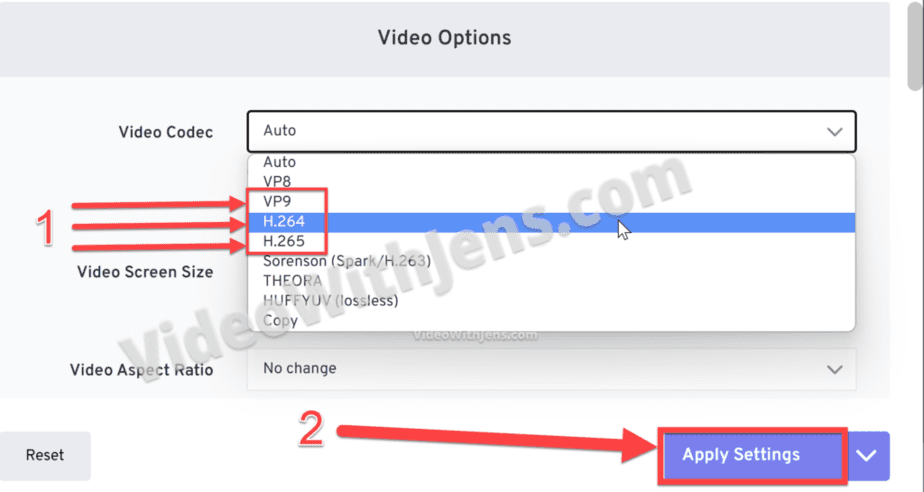
Now, click on the gear icon to open settings:

You want to set the “Video Codec” against either H.264, H.265, or VP9, the codecs DaVinci Resolve supports for MKV files, as shown earlier.
To make editing a bit easier for your computer, I suggest NOT going with the H.265 as it requires tons of computer power to decode.
Once you’ve picked one of them, click on “Apply Settings“:
Then click on “Convert to MKV” to start the transcoding.
Once it’s finished, simply click on “Download MKV“you’ll then find it in your system folders (by default, in “Downloads“).
Next, try importing it to DaVinci Resolve!

You can also use HandBrake to transcode it: (I recommend trying it, as it’s an excellent application!)
Using HandBrake to Change Codec:
Once you’ve downloaded HandBrake, go ahead and open it.
Then you can either drag the MKV file and drop it in HandBrake, or you can do as I show you in the image below:

Then in the “Summary” tab inside HandBrake, set “Format” against “MKV“:

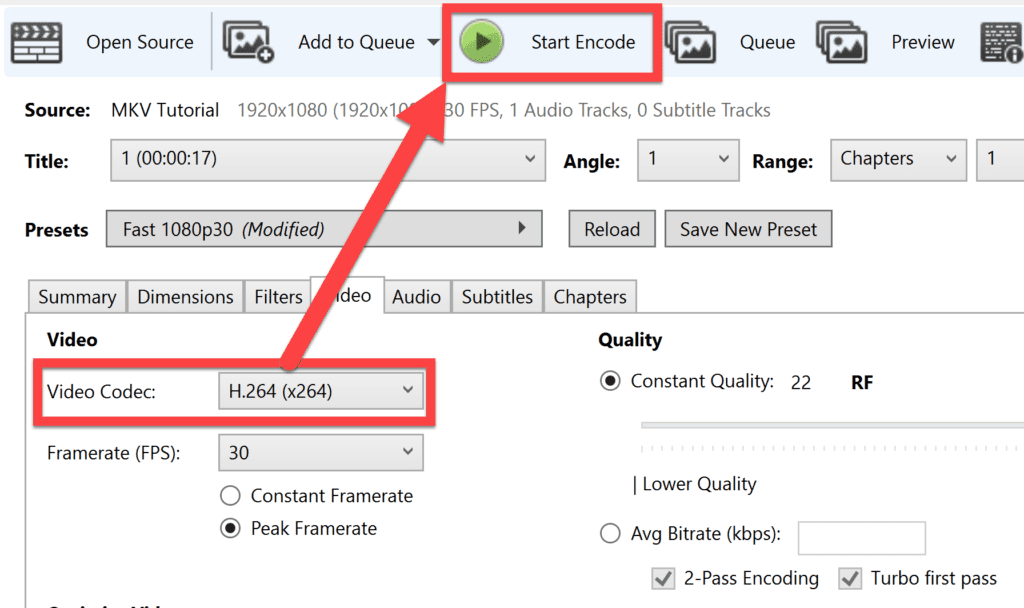
Go to the “Video” tab, and set “Video Codec” against one of the supported codecs discussed earlier. I will go with H.264.
Once that is done, click on “Start Encode“:
(You set the location to where it’s going to be saved at the bottom of the HandBrake application)
Once you’ve converted it, you should be able to import it to DaVinci Resolve.
Next up, I’ll show you what to do if the audio is missing:
MKV files missing audio in DaVinci Resolve
If there is no audio playing from your MKV file in DaVinci Resolve, it probably contains a codec that DaVinci Resolve does not support. Try transcoding the audio codec to AAC or MP3 with a constant bit rate (CBR).
You can find which codecs are supported by DaVinci Resolve in the manual called “DaVinci Resolve Supported Codecs” on Black Magic Design’s website. Or simply watch the images below:

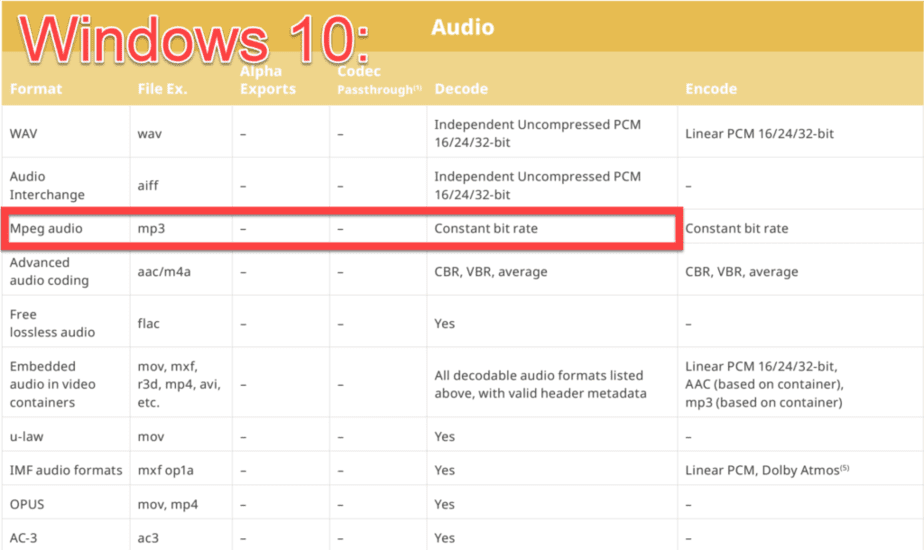
As you can see, Resolve is only able to decode MP3 files which have a constant bit rate (CBR); therefore, if your MKV file contains mp3 audio with a variable bit rate (VBR), it may cause problems!
However, this is an easy fix. You can either use the free cloud-based converter or download HandBrake to do this:
Transcode using the Cloud-based converter:
Head over to the free cloud-based converter and simply drag the MKV file and drop it on top of the converter, like this:
Then make sure the “Output” is set to “MKV“:
Next, head over to the “Settings” by clicking on the gear icon:
Then scroll down in the settings until you see the audio options.
Here you want to set the “Audio Rate Control” against “Constant bit rate (CBR). “
Then click on “Apply Settings“:

Next, click on “Convert to MKV. “
And once it’s done, click on “Download MKV, “then you will, by default, find the converted file in your “Download” folder in your system. Once you’ve located it, try importing it to DaVinci Resolve!
You can also use HandBrake to do the conversion, a fantastic free tool. However, you have to download it.
Transcode Using HandBrake:
Open HandBrake, drag the MKV file from your system folders and drop it on top of HandBrake to import it.
Or locate it by clicking on the button shown in the image below:
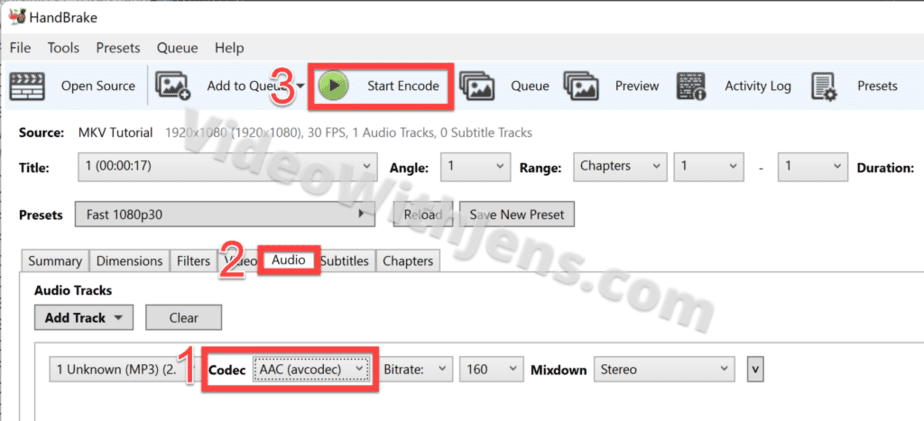
Once uploaded to HandBrake, simply head over to the “Audio” tab inside HandBrake (The number 1 and 2 in the image below should be swapped…)
Then set the “Codec” against “AAC“, which is a supported codec by DaVinci Resolve.
Next, click on “Start Encode“.
You set the location where the converted file will end up at the bottom of the HandBrake.
Once finished, you can import the converted file to Resolve, and you are hopefully able to hear the audio playing!
MKV files showing “Media Offline” in DaVinci Resolve
“Media Offline” errors can occur on MKV files in DaVinci Resolve if they contain a variable frame rate (VFR). This is especially true if you use a screen recorder such as OBS studio to record hardware-intensive tasks. To fix this problem, simply transcode your video to a constant frame rate (CFR).
We will transcode our MKV file using HandBrake (free to download).
Open HandBrake, and open your MKV file:
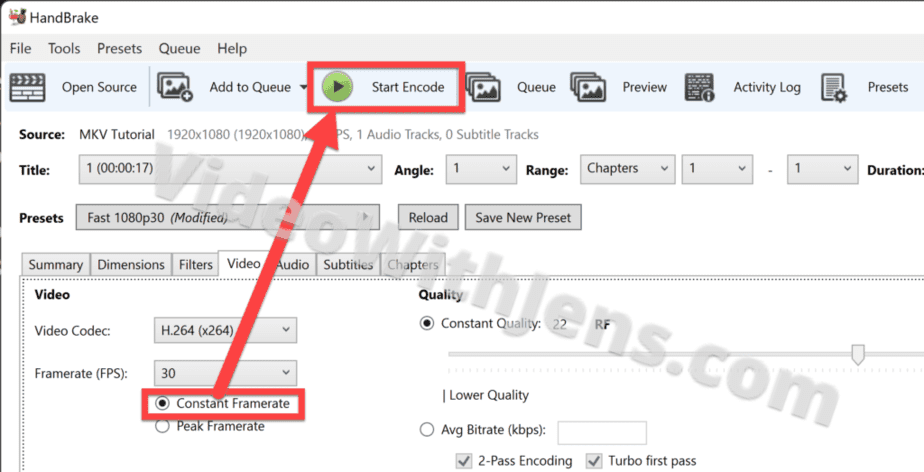
Then go to the “Video” tab inside Handbrake.
Here you want to enable the “Constant Framerate“option, and then click on “Start Encode. “
You can change the location of where you find the converted file at the bottom of HandBrake before transcoding the file.
Once it’s done, try to import the MKV file to Resolve, and hopefully, you have found your solution!
I hope you found a solution to your MKV importing issue!
DaVinci Resolve can decode MKV files. However, it does not yet encode MKV files. So if you wish to export your MKV files, check out this article for a workaround.