Adding Clips to Timeline in DaVinci Resolve (Different Ways)
There are a BUNCH of different ways to add clips to the timeline in DaVinci Resolve.
This is a good thing, however, it can also be a bit overwhelming to learn all of them. Therefore, I’ve written an easy-to-understand tutorial with images and videos trying to make this easier.
In this tutorial you will find all the different methods:
- How to Add Clips to the Timeline (Most basic method).
- Shortcuts to Add Clips to the Timeline.
- Adding Only Video to the Timeline (Without Audio).
- Adding Only the Audio Part of a Clip to the Timeline.
- Different Methods:
- “Insert Clips“, “Overwrite Clips“, “Replace Clips“, “Fit to Fill“, “Place on Top“, “Append at End“, “Ripple Overwrite“.
How to Add Clips to the Timeline in DaVinci Resolve
Since this article is about adding clips to the timeline, I have to mention the most basic method as well:
To add a clip to the timeline in Resolve is easy. Simply, drag the clip from the “Source Viewer” and drop it in the timeline. If it’s a video clip make sure to drop it in a video track.
If you are new to DaVinci Resolve, here’s a complete guide showing you everything you need to get started!
Add Clips to Timeline Shortcuts in DaVinci Resolve
To add a clip to the timeline in DaVinci Resolve, press shortcut F9 on your keyboard. To not overwrite any existing clips, place the playhead at the of the timeline.
Here’s a neat table showing the default shortcuts on how to add clips to the timeline:
| Shortcut: | Action: |
| F9 | Insert Clip |
| F10 | Overwrite Clip |
| F11 | Replace Clip |
Add ONLY Video to Timeline in DaVinci Resolve (Without audio)
To add only the video part of a clip to the timeline in Resolve, that is without audio. Simply double-click the clip inside the “Media Pool“, to make it appear in the “Source Viewer“. Then hold down the ALT key and drag the video onto the timeline.
More details in the video, or watch the images below the video!
Watch the images below on how to do it:
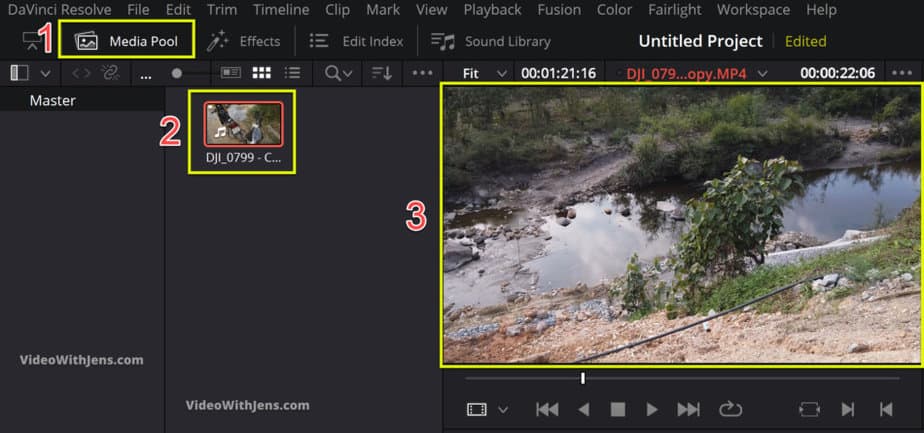
The media pool is located in the left-hand top corner of the “Edit” page inside Resolve.
- Open “Media Pool“.
- Double-click clip to make it appear in the “Source Viewer“:
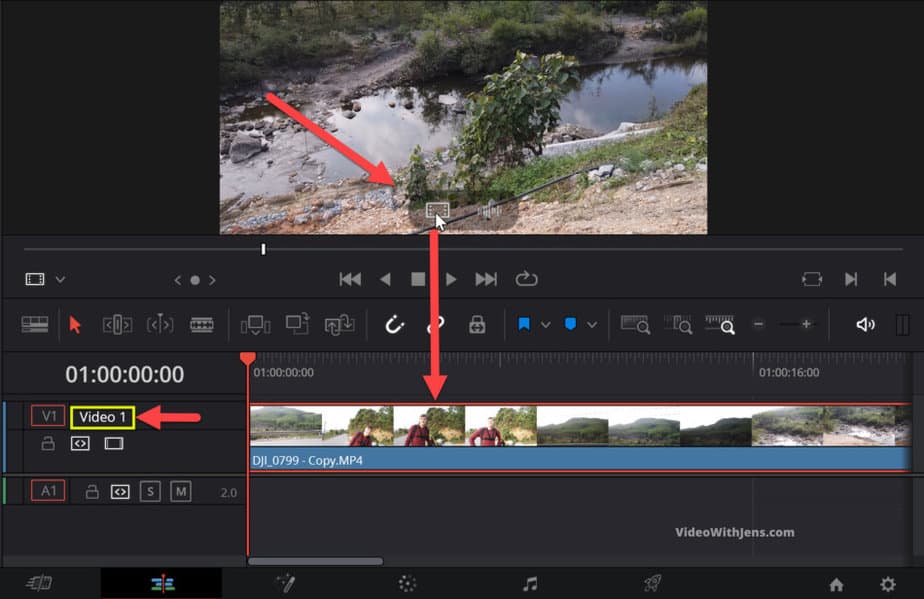
Next, hover your mouse over the clip showing in the “Source Viewer“, then two icons will appear.
We want the first one (the videotape). Hover your mouse over this icon, click, hold and drag it down to the timeline. Make sure that you drop it in a video track.
You can also hold down the ALT key, and simply drag the video from anywhere in the source viewer down to the timeline.
Watch the image below:
Another way you could get rid of the audio is by muting it, or removing it in the timeline. Click on the links to read more about that.
Anyways, there are many ways yet to explore:
DaVinci Resolve: Add ONLY Audio Part of Clip to Timeline
Adding only the audio part of a clip to the timeline in Resolve is easy. Simply, double-click the clip in the “Media Pool” as it appears in the “Source Viewer“. Then, hold down the SHIFT key and drag the clip into an audio track in the timeline.
Watch the images below on how to do it:
First, make sure to be on the “Edit” page:

Then, open the “Media Pool” in the left-hand top corner of Resolve.
Double-click the clip and it will appear in the “Source Viewer”. Check out the image below:
From here you can add it to the timeline using two following methods:
- Hold down the SHIFT key and simply drag the video (audio) from the “Source Viewer” to the timeline.
- Hover your mouse over the “Source Viewer“, and drag the audio wave icon that appears on top of it. Then simply drop it in the timeline.
IMPORTANT: Both of these methods require you to drop the clip into an audio track! Watch the image below:

Next up, I will show you some very powerful ways to add clips to the timeline in Resolve:
How to “Insert Clips” to the Timeline in DaVinci Resolve
To insert a clip to the timeline in Resolve, make sure to be on the “Edit” page. Then, place the timeline playhead in between the clips you want to insert the new clip, and press F9 on your keyboard. Alternatively, click on “Insert Clip” in the toolbar above the timeline.
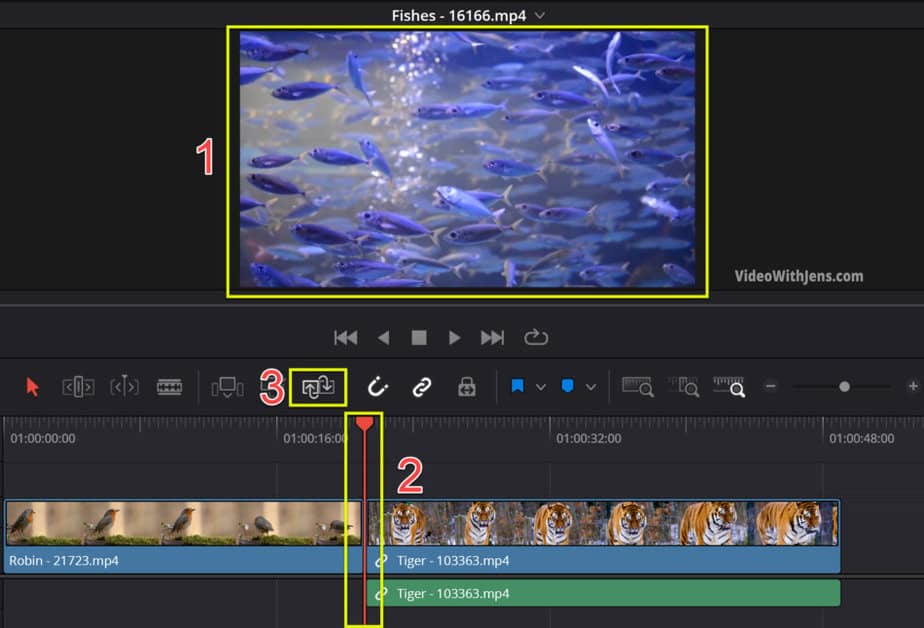
In the image below, I’ve written some numbers in the order you should do this.
So:
- Open the clip you want to insert (Double click it in the “Media Pool”).
- Place the timeline playhead in between two clips.
- Click on “Insert Clip” in the toolbar above the timeline.
What’s cool about the “Insert Clip” is that it does not overwrite the clips which are already added to the timeline. + You spare a lot of time not having to make room for the clip and then add it to the timeline.
How to use the “Overwrite” Feature in DaVinci Resolve
To use the “Overwrite Clip” feature in DaVinci Resolve, simply place the timeline playhead at the start of the clip you want to overwrite. Then click on “Overwrite Clip” in the toolbar above the timeline. Alternatively, you can press shortcut F10 on your keyboard.
On the image below I’ve made some numbers in the order you should do this:
- Open the clip you want to add to the timeline in the “Source Viewer“.
- Place the timeline playhead at the start of the clip you want to overwrite.
- Click on the “Overwrite Clip” button in the toolbar above the timeline.
See image:

How to Replace Clips in Timeline DaVinci Resolve
To use the “Replace Clip” feature in DaVinci Resolve, you must be on the “Edit” page. Secondly, open the clip you want to add to the timeline. Then, place the timeline playhead in front of the clip you want to replace and click on the “Replace Clip” in the toolbar above the timeline.
Watch the numbers I’ve written on top of the image below:
- Open the clip you want to add to the timeline.
- Place the timeline playhead in front of the clip you want to replace.
- Click on “Replace Clip” in the toolbar above the timeline.
The next methods are a little different as you can’t find those in the toolbar:
Advanced methods:
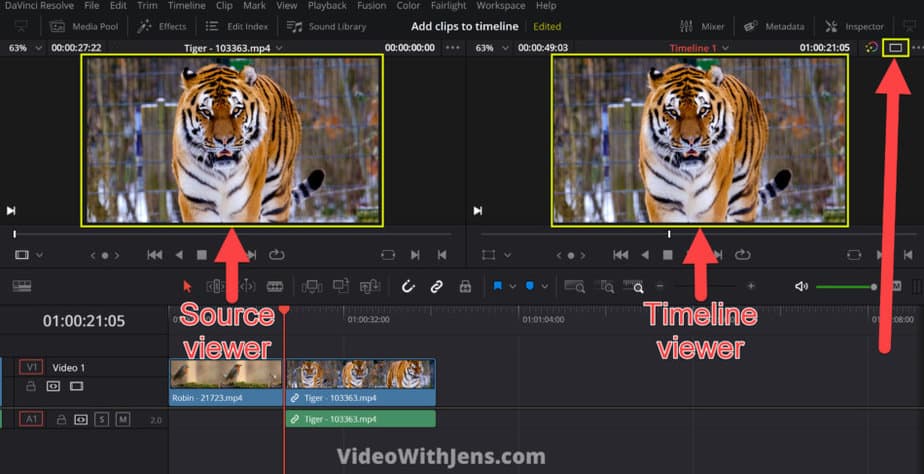
To use these next methods you must have two previews open at once like in the image below.
You might already have both of them open, in that case, you can just skip this step.
If their not both open, simply click on the two boxes in the upper right-hand corner of Resolve.
In the image below you can see, that there is only one box. This is because I’ve already opened them.
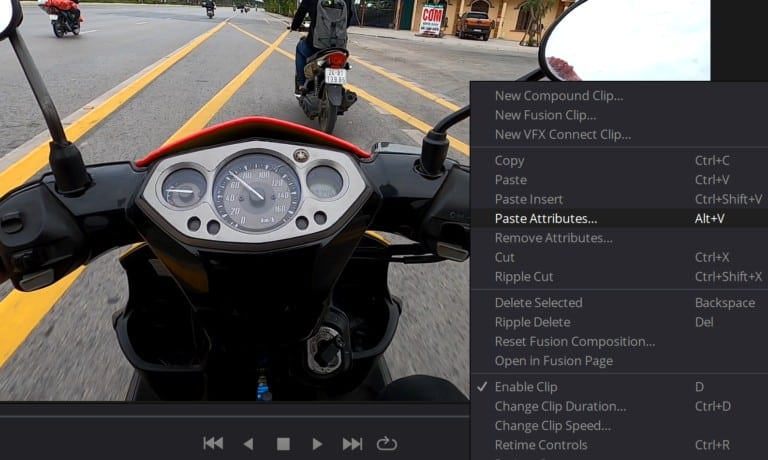
Once you got the “Source Viewer” and the “Timeline Viewer” open, simply drag the video from the “Source Viewer” and hold it on top of the “Timeline Viewer”. Now, the menu in the image below should appear.
To use these options you are presented in the menu, drop the video on top of the action you want to make.
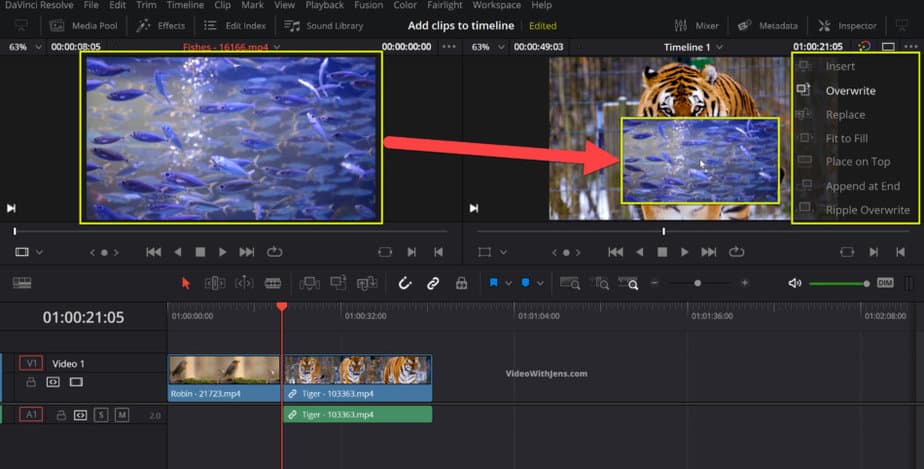
Now it’s time to explore what the different options in the menu do:
How to use the “Fit to Fill” Feature in DaVinci Resolve
- Place the timeline playhead at the front of the clip you want to replace.
- Open the clip you want to use in the “Source Viewer“.
- Drag the clip from the “Source Viewer” and hold it above the “Timeline Viewer“.
- Drop the clip on top of “Fit to Fill” in the menu that appears.
Watch the image below for a more visual explanation:

What’s awesome when using this method is that the clip does what it says, “Fit to Fill”.
Let’s say the clip that you replace with is shorter than the one that’s already in the timeline.
If that’s the case, Resolve will adjust the clip speed of the clip you are adding to make it fit the length of the original clip! (You can see that little icon in the lower-left corner of the clip, that the clip speed has been adjusted).
It may sound a bit weird. But it’s actually quite useful for a lot of instances.
To read more about clip speed and awesome effects you can apply to your videos, check out this article.
Anyways, let’s get to the next method:
How to use the “Place on Top” Feature in DaVinci Resolve
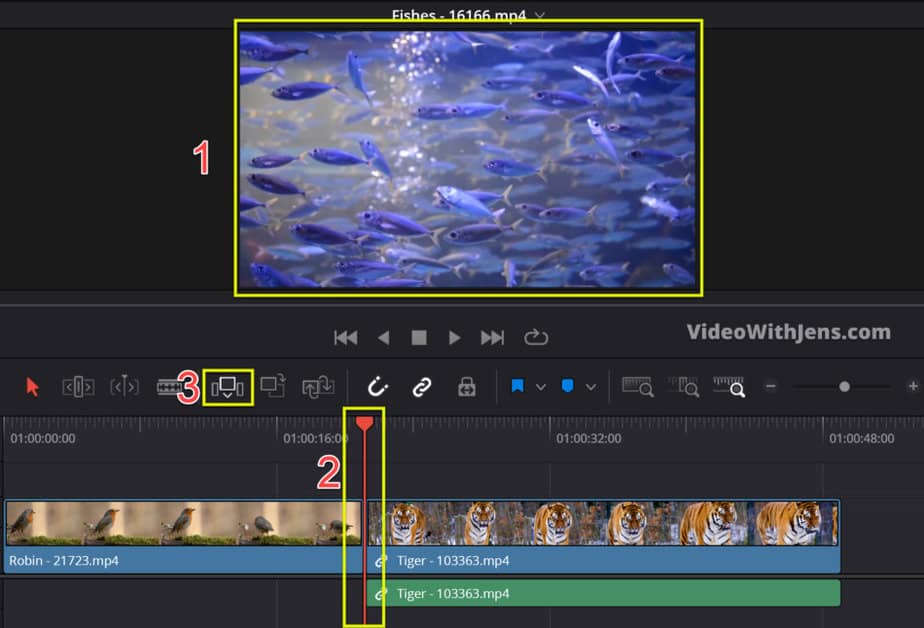
- Place the timeline playhead at the point of time you want to place the clip.
- Open the clip you want to place on top in the “Source Viewer“.
- Drag the clip from the “Source Viewer” and hold it on top of the “Timeline Viewer“.
- Drop the clip on top of “Place on Top” in the menu that appears.
Watch the image below for a more visual explanation:

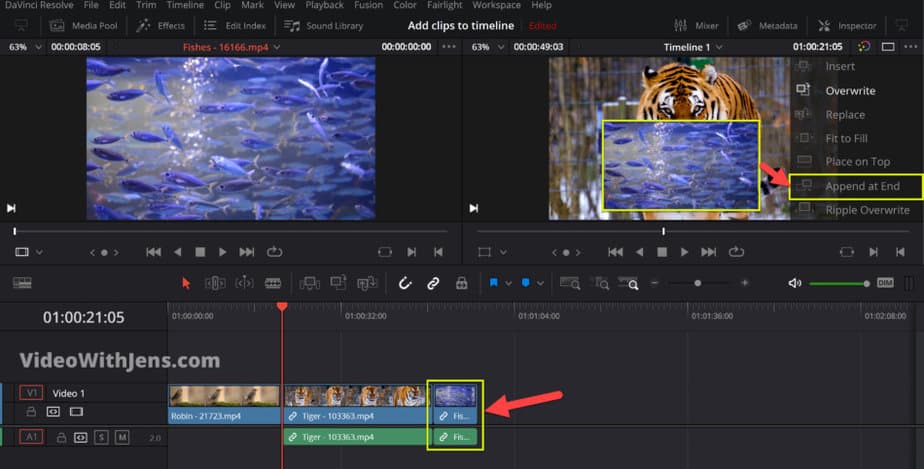
How to use the “Append at End” Feature in DaVinci Resolve
Inside the “Edit” page in Resolve, drag the clip from the “Source Viewer” and hold it on top of the “Timeline Viewer“. In the menu that appears, drop the clip on top of “Append at End“. The clip should then be added to the timeline as the last clip.
Using this method you don’t have to worry about overwriting other clips. This is because the clip will simply be placed on top of everything else.
Watch the image below:
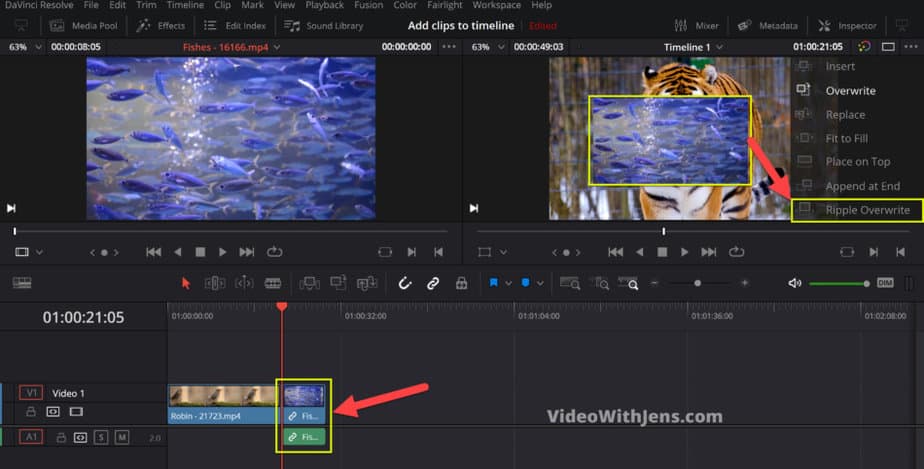
How to use the “Ripple Overwrite” Feature in DaVinci Resolve
To use the “Ripple Overwrite” feature in DaVinci Resolve, place the timeline playhead where you want to add the clip. Then, drag the clip from the “Source Viewer” and hold it on top of the “Timeline Viewer“. Drop the clip on top of “Ripple Overwrite” in the menu that appears.
Doing this, even if the clip in which you place the timeline playhead in front of is longer… The shorter clip will completely replace it.
Watch the image below:
I highly recommend you check out this article on how to move clips in the timeline. Knowing these methods will speed up your editing alot!