Mute Audio in DaVinci Resolve (Clips, part of clip, track)
There are many instances where you would want to mute clips. Therefore, I will show you how you can do this using DaVinci Resolve.
Here’s what you can find in this article:
- How to Mute a Clip in DaVinci Resolve
- How to Mute Part of a Clip in DaVinci Resolve
- How to Mute Audio Track in DaVinci Resolve
- How to Mute Part of Clip Using Keyframes
How to Mute a Clip in DaVinci Resolve
Quick Guide
You can mute clips on the “Edit” page inside DaVinci Resolve in the timeline. To do that, hover your mouse over the horizontal white line on top of the audio and pull it to the bottom. Doing this will reduce the volume to -100dB, i.e., mute the clip.
Detailed Guide
You can use this method to mute clips in the timeline on the “Edit” page, “Cut” page, and the “Fairlight” page.
Since the “Edit” page is where most people spend their time, this is where I will show you how to mute clips first. However, you can also use the same method on the “Fairlight” page. Finally, if you want to know how to mute on the “Cut” page, I also get to that (skip to that part here).
Another way to get rid of the audio you don’t need is by adding them to the timeline without the audio in the first place! Here’s how to do that.
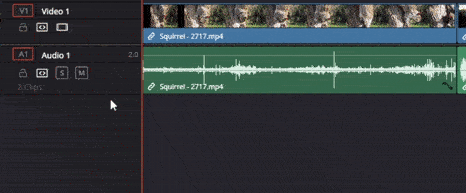
To mute clips on the “Edit” page, the clip has to be added to the timeline.
Next, I recommend that you change the audio track height. You do that by hovering your cursor over the bottom of the track on the gray area on the left-hand side. Then simply pull it downwards.
Here’s a GIF illustration: (and here’s an article on making GIFs in Resolve!).
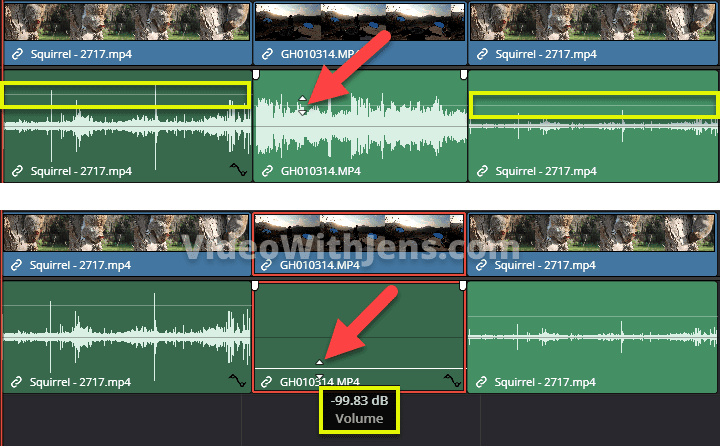
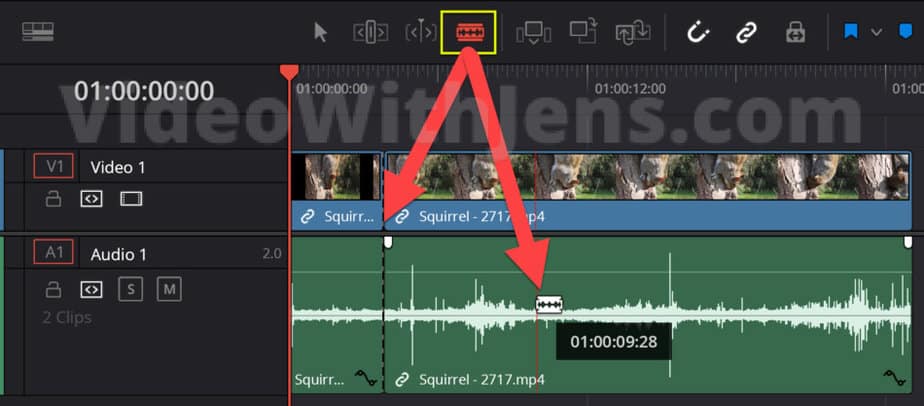
Next, hover your mouse over the white horizontal line on the audio clip. Once the cursor changes to two triangles, click, hold and pull it to the bottom.
Then you have reduced the volume by -100dB.
Watch the image illustration below:
As mentioned above, it’s also possible to mute clips on the “Cut” page in Resolve. This method is quite nice too:
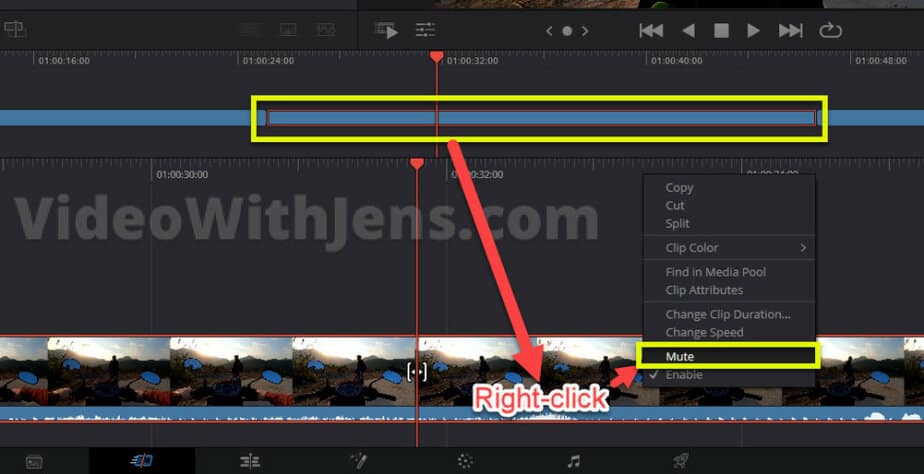
Mute Clips using the “Cut” page in DaVinci Resolve
You can mute clips on the “Cut” page inside DaVinci Resolve. Simply right-click the clip in the timeline and click on “Mute.“
To find your clip faster on the “Cut” page, simply click on the timeline nr. 1 to find it. The one in the yellow rectangle in the image below:
(Right-click clip in timeline nr. 2):
How to Mute Part of a Clip in DaVinci Resolve
Quick Guide
In the timeline, you can mute part of a clip on the “Edit” page inside DaVinci Resolve. Start by cutting out the part you want to mute from the rest of the clip. Then hover your mouse cursor over the white horizontal line running across the audio and pull it to the bottom.
Detailed Guide
There are some different ways to mute part of a clip.
I’m going to show you two. The second one is a bit more advanced and involves keyframes (skip to that part here).
However, the first one is the easiest:
Simply cut out the part you want to mute from the rest of the clip. You want to be on the “Edit” page and cut the clip in the timeline.
To cut, enable the “Blade Edit Mode,“ which looks like a razor blade in the toolbar above the timeline. This is awesome to cut clips. Check out this article to learn how you can cut, split and trim clips.
However, once “Blade Edit Mode” is active, click on the clip in the timeline where you want to split the clip.
Split the clip where you want the mute to start and then a second time where you want the mute to end:
Next, hover your mouse over the white horizontal line on the audio clip. The cursor should turn into two triangles. Then simply hold down the left mouse button and drag the line down.
By doing this, you will reduce the clip’s volume to -100dB i.e., mute the clip (See image below):

Next, I will show you how to mute the entire audio track. (If you want to learn the advanced way of muting part of the clip, skip to that part here).
How to Mute Tracks in DaVinci Resolve
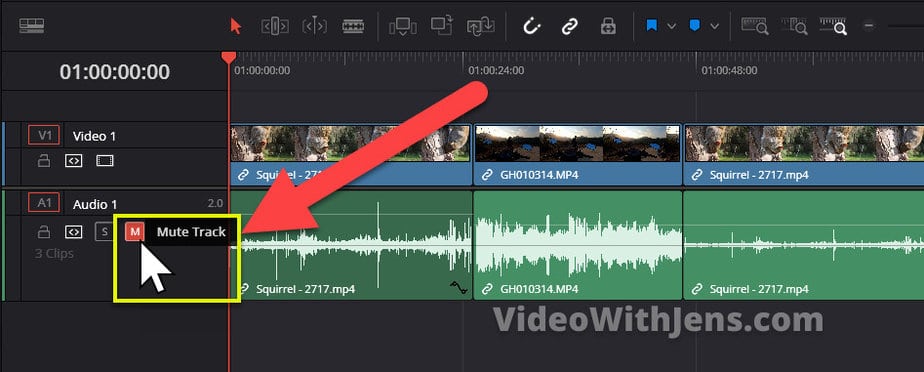
To mute an audio track in DaVinci Resolve, you can do this on the “Edit” page. Simply click on the “M” (Mute Track) in the track’s sidebar. The button turns red once enabled.
Next up, you’ll learn to use keyframes to mute part of a clip:
Keyframe Audio to Mute Clip in DaVinci Resolve
This method is awesome for a smoother transition from normal to no volume. As simply muting a clip can feel a bit too quick.
How to Add Keyframes to Audio in DaVinci Resolve
To add keyframes to the audio in DaVinci Resolve, you need to be on the “Edit“- or “Fairlight” page. Then press Alt on your keyboard (Option for Mac) while clicking on the white horizontal line on top of the audio in the timeline.
Read on for a more detailed explanation of how to do it with images!
How to Mute Part of Video with Keyframes in DaVinci Resolve
To do this, you need to add a keyframe where you want the volume to be muted and one where you want the audio to go back to normal.
However, you also need one keyframe, a few frames to the left of the first keyframe, and a keyframe a few frames on the right of the last keyframe (Watch image below).
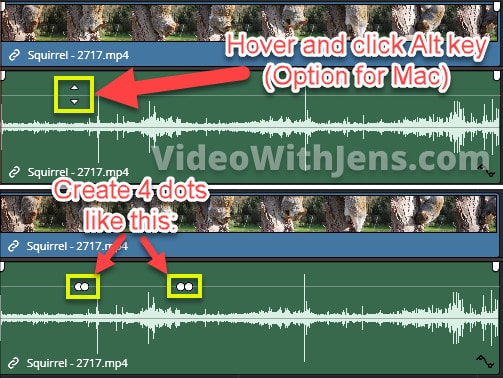
Once you’ve done that, you should, in total, have four keyframes at each side of the part you want to mute.
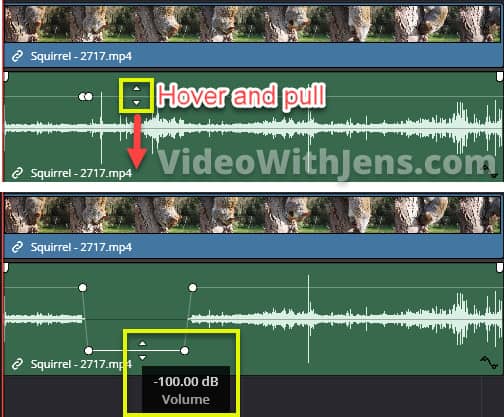
Then go ahead and pull the line between the dots downwards as it shows -100dB, i.e., muted.
If you want a more gradual transition, simply move the keyframes to the sides, as the line between the keyframes is less steep.
Instead of muting clips you don’t need, a better way would be to simply remove them, here is an article about how to do that effectively.
FAQ:
Can you keyframe audio in DaVinci Resolve?
You can keyframe audio in DaVinci Resolve on both the “Edit“- and “Fairlight” page. To do this, simply hold down Alt on your keyboard (Option for Mac) while right-clicking on the white horizontal line on top of the audio in the timeline.