Premiere Pro: Export Small File Size (in High Quality)
In this post, I will show you how to export videos in a small file size using Premiere Pro.
You’ll also learn how to do so without losing quality.
So let’s get to it!
To reduce the file size of a video in Premiere Pro, set the Format against a final codec such as H.264 or H.265, use a Variable Bit Rate, and decrease the Target Bitrate.
How to Export in Small File Size in Premiere Pro
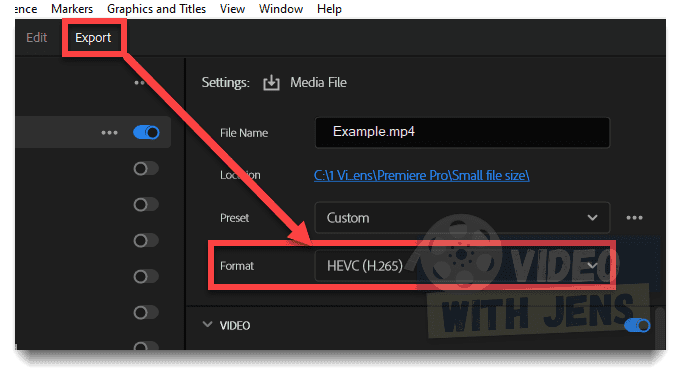
To export your video in a small file size, open the Export tab inside Premiere Pro.
Next, give the video a File Name & Location in your file system.
I recommend setting the Format against HEVC (H.265); however, H.264 is also OK.
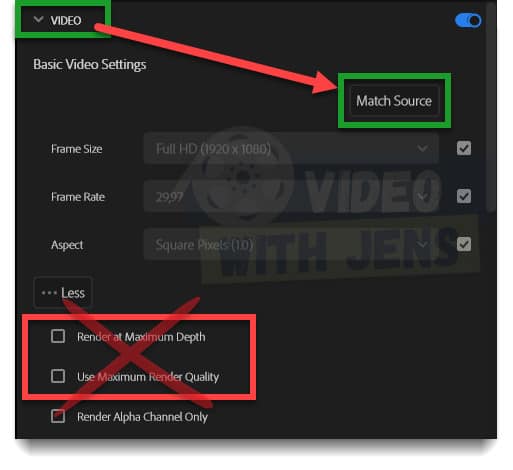
Under Video, click on Match Source to export using the Frame Size and Frame Rate.
Next, ensure that Render at Maximum Depth and Use Maximum Render Quality is checked off. These will not increase the file size (at least not noticeable), however, they are very important for quality.
- If you have done a lot of zooming, rotation, etc., the Use Maximum Render Quality can help a lot.
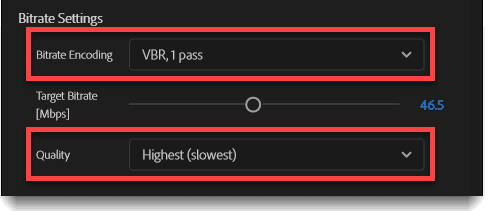
For the Bitrate Settings, you want to set the Bitrate Encoding to VBR, 1 pass, which will give a smaller file size than CBR or VBR, 2 pass.
Decreasing the Target Bitrate is the most critical setting to reduce the video’s file size. However, if you set it too low, the video quality will decrease (more about this below).
If you use the HEVC (H.265) codec, set the Quality against Highest (slowest), making your video higher quality without increasing the file size!
If you look above the Export button in the bottom left corner, you can see the Estimated File Size while adjusting the export settings:

Reducing File Size Without Losing Quality in Premiere Pro
To reduce the file size without losing quality in Premiere Pro, ensure that the “Target Bitrate” is equal to or greater than the bitrate of your source clip.
You might wonder how to check the bitrate of your source video?
Pretty easy!
First, download the freeware VLC media player (open in a new tab).
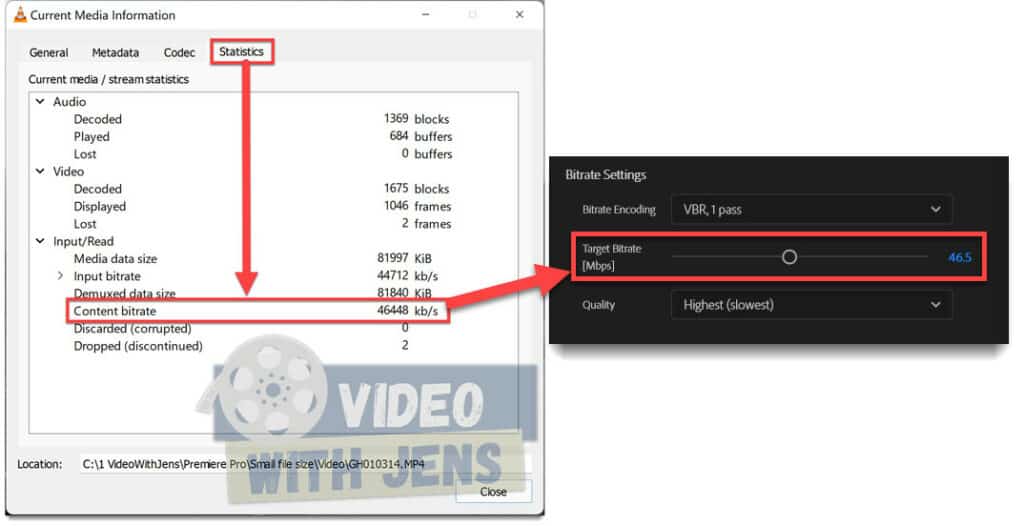
Now, open the source video using the VLC media player, and while playing it, click on Tools > Media Information > Statistics, and monitor the Content bitrate.
Once you’ve watched the video, take note of the highest bitrate you observed, and head to Premiere Pro.
Now, leave all the Export Settings as described above, but this time, set the Target Bitrate against the bitrate you took note of.
In my case, it was 46448 Kb/s, the same as 46.5 Mb/s.
- If you have been doing tons of editing and applying effects to the video in Premiere Pro, you’ll probably need to increase the bitrate slightly.
Check out this article to gain a better understanding about the export settings in Premiere Pro.