Premiere Pro: YouTube Export Settings for High Quality
In this post, you will learn the secret ingredients to get high-quality YouTube videos using Premiere Pro.
I will show you the export settings you need to get right step-by-step…
To save time, I’ve also made some export presets you can download below.
Here’s a video for those who prefer that:
Premiere Pro: Export Settings For High Quality YouTube Videos
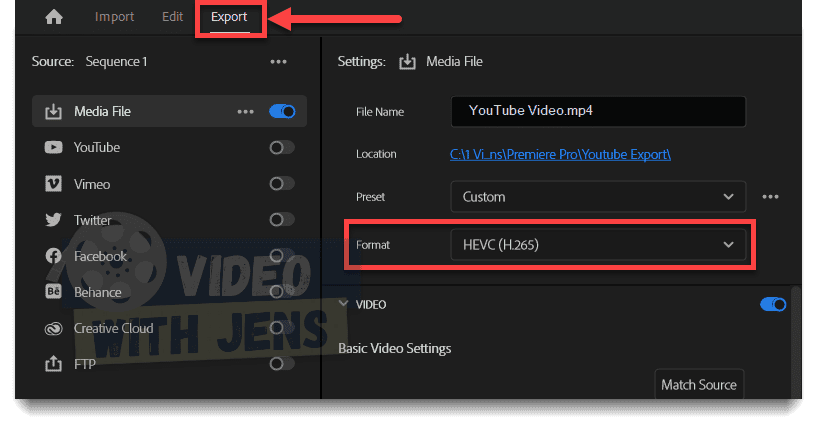
The Best Format for YouTube in Premiere Pro
Recommended: HEVC (H.265)
After many test uploads to YouTube using different formats and hearing what others in the community report…
Many people (myself included) seem to get the best quality on YouTube when setting the format against HEVC H.265.
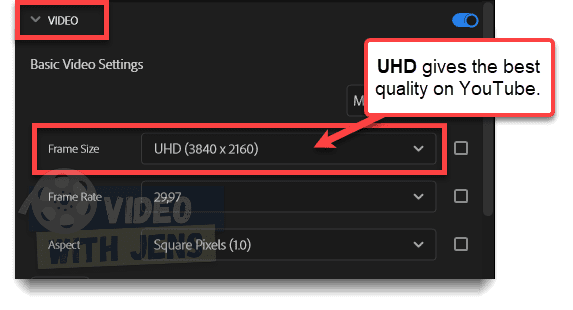
What Resolution to Use for YouTube in Premiere Pro? (Surprising)
Recommended: UHD (3840 x 2160) or Quad HD (2560 x 1440)
Uploading in UHD might sound a bit controversial since the highest resolution allowed on YouTube is obviously going to give a higher quality than a normal Full HD (1920 x 1080) video.
BUT what’s interesting is that YouTube does not compress videos above 1920×1080 to the same degree as they do with the ones below.
Meaning, if your video is originally in Full HD (1920 x 1080) or below, you’ll get higher quality by upscaling the video.
Therefore, set the Frame Size against UHD (3840 x 2160) or Quad HD (2560 x 1440), regardless of your source video’s resolution.
What Frame Rate to Use?
Correct Answer: the same as your source video.
The Frame Rate should always match your source video(s) unless you want to create some kind of slow-motion effect (in that case, you’ll already know the Answer).
YouTube supports all kinds of Frame Rates; the most common ones are 24, 25, 30, 48, 50, and 60 FPS; here’s a link to supported frame rates.
- They do not currently support 120 FPS for video uploads (source).
You can quickly check the video’s frame rate in the Project panel inside Premiere Pro; this is what you should match the Frame Rate in the export settings to:

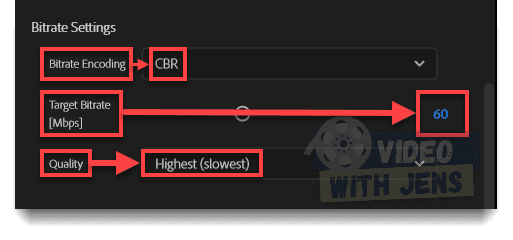
The Best Bitrate for YouTube Videos in Premiere Pro
Recommended:
- Bitrate Encoding: CBR.
- Target Bitrate [Mbps]: twice the Frame Rate.
- Quality: Highest (slowest).
That is the bitrate I recommend for HEVC (H.265) upscaled videos.
If you prefer to upload in 1080p or 720p, I’ve written more about that below.
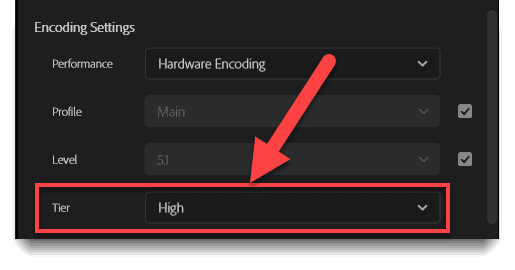
NB! Make sure that you set the Tier against High.
- If not, you cannot increase the Target Bitrate to how much you want.
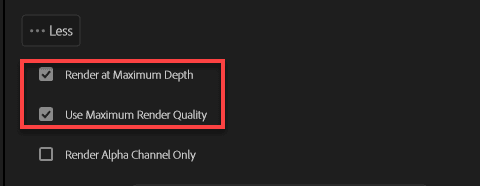
Additional Settings for Higher Quality:
To ensure the highest quality possible, enable the Render at Maximum Depth, and Use Maximum Render Quality.
Ready to Export?
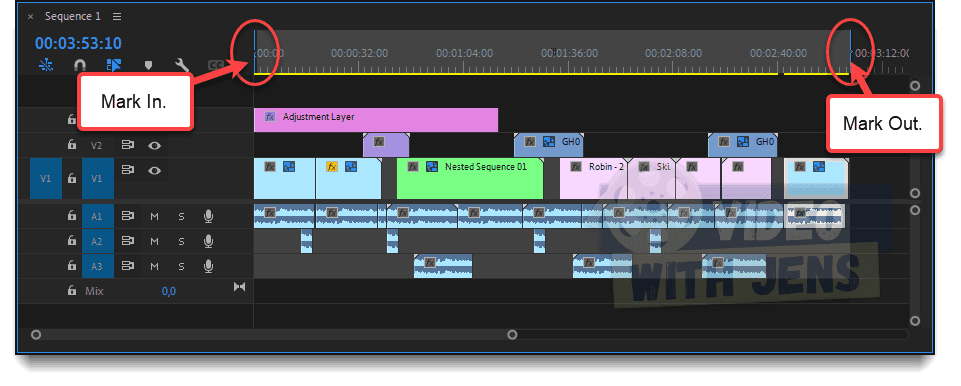
Once you are ready to export, I recommend marking the timeline in and out to ensure you export the entire video.
To do this, place the playhead at the beginning of your timeline, press shortcut “I,” and then do the same where the video ends, only this time press “O.”
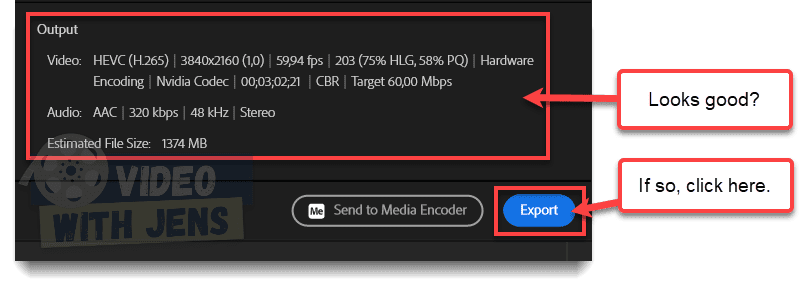
Finally, in the lower right corner of the Export tab, make sure that the Output information is correct, and click on Export!
Check out this article for more information about exporting and what all the export settings mean.
Export Settings for Different Resolutions (+ Free Preset)
YouTube Export Settings for 4k in Premiere Pro (UHD)
These are the export settings I recommend for all frame sizes/resolutions, even if the source video has a lower resolution (that’s called upscaling).
The reason is that YouTube compresses ultra HD videos less than Full HD videos and below.
To save time, you can download the preset from my Dropbox here (opens in a new tab).
- Format: HEVC (H.265).
- Frame Size: UHD (3840 x 2160).
- Frame Rate: match the frame rate of your source video.
- Tier: High.
- Bitrate encoding: CBR.
- Target bitrate: 50-120 Mbps.
- 50 for 24 FPS.
- 60 Mbps for 30 FPS.
- 120 Mbps for 60 FPS.
- Field order: Progressive.
- Enable:
- Render at Maximum Depth.
- Use Maximum Render Quality.
YouTube Export Settings for 2560p in Premiere Pro (QUAD HD)
These are generally the best export settings for 2560 x 1440 high-quality YouTube videos. However, for maximum quality, I recommend it as described above.
To save time, you can download the preset from my Dropbox here (opens in a new tab).
- Format: HEVC (H.265).
- Frame Size: Full HD (2560 x 1440).
- Frame Rate: match the frame rate of your source video.
- Tier: High.
- Bitrate encoding: CBR.
- Target bitrate: 24-60 Mbps.
- 24 Mbps for 24 FPS.
- 30 Mbps for 30 FPS.
- 60 Mbps for 60 FPS.
- Field order: Progressive.
- Enable:
- Render at Maximum Depth.
- Use Maximum Render Quality.
YouTube Export Settings for 1080p in Premiere Pro
These are generally the best export settings for 1080p high-quality YouTube videos. However, for maximum quality, I recommend it as described above.
To save time, you can download the preset from my Dropbox here (opens in a new tab).
- Format: HEVC (H.265).
- Frame Size: Full HD (1920 x 1080).
- Frame Rate: match the frame rate of your source video.
- Tier: High.
- Bitrate encoding: CBR.
- Target bitrate: 24-60 Mbps.
- 12 Mbps for 24 FPS.
- 15 Mbps for 30 FPS.
- 30 Mbps for 60 FPS.
- Field order: Progressive.
- Enable:
- Render at Maximum Depth.
- Use Maximum Render Quality.
YouTube Export Settings for 720p in Premiere Pro
These are the general export settings I recommend for 720p YouTube videos; for even better quality, you should upscale your video as described here.
To save time, you can download the preset from my Dropbox here (opens in a new tab).
- Format: HEVC (H.265).
- Frame Size: HD (1280x 720).
- Frame Rate: match the frame rate of your source video.
- Tier: High.
- Bitrate encoding: CBR.
- Target bitrate: 20-40 Mbps.
- 7.5 Mbps for 24 FPS.
- 9.5 Mbps for 30 FPS.
- 18.9 Mbps for 60 FPS.
- Field order: Progressive.
- Enable:
- Render at Maximum Depth.
- Use Maximum Render Quality.
YouTube’s Recommendations:
Did you know YouTube has made its recommended export settings available to the public? Here’s a link if you want to check them out.
However, for the highest quality possible, I recommend following what we’ve discussed above.