Premiere Pro is Not Exporting (Solved by Adobe Expert)
Is Premiere Pro not exporting? Confused?
If so, don’t worry. I’m a community expert at Adobe and have compiled a list of the most common solutions to this problem.
Most of these straightforward solutions won’t take you more than 1 minute each.
1. Reboot Your Computer
Obvious, yes. Effective, yes.
Rebooting the computer is known to solve many bugs and will also free up some system memory.

2. Meet the System Requirements
Another reason you can’t export your video is that your hardware is not powerful enough.
Here’s a link to Premiere Pro’s system requirements at Adobe’s website (opens in a new tab).
Make sure you meet the “Minimum specifications…”; preferably, you want to meet the “Recommended specifications…”
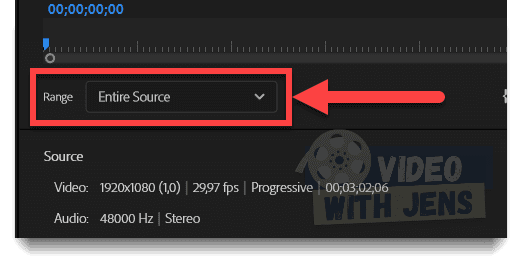
3. Set the Export Range Correctly
Some people complain that Premiere Pro won’t export the full video but only a fraction of it.
If this is the case for you, make sure that the Range is set against Entire Source (this option is located in the Export tab below the Program Monitor):
4. Delete Media Cache
For Premiere Pro to run smoothly, it creates cache files for your video files; however, sometimes, these become corrupt and create issues.
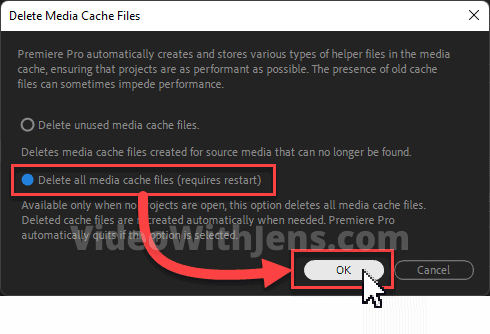
To fix this, close your project if it’s open (File > Close Project).
Next, click on Edit > Preferences > Media Cache > Delete:
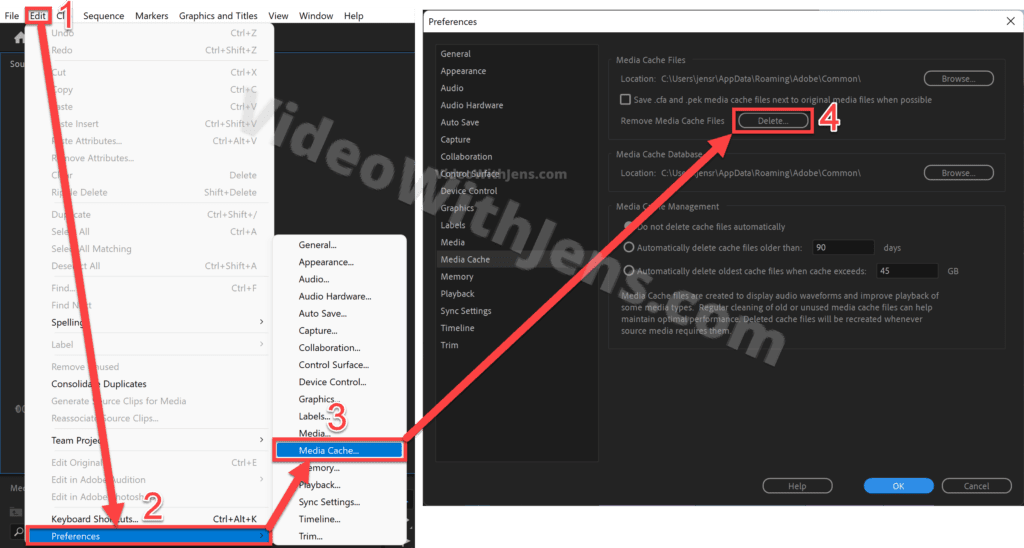
In the window that pops up, select Delete all media cache files (requires restart), and click on OK.
- Premiere Pro will automatically close, and you’ll have to re-launch it.
Once that is done, try to export!
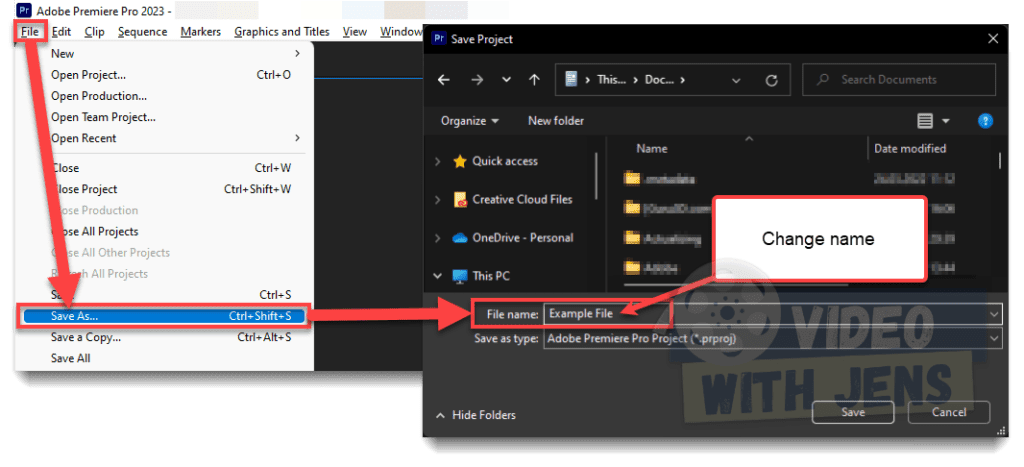
5. Save Project as a New File
Some community users who were unable to export reported that they fixed the issue by simply re-saving the project.
To do this, open your project > File > Save As > Give a new file name > Save:
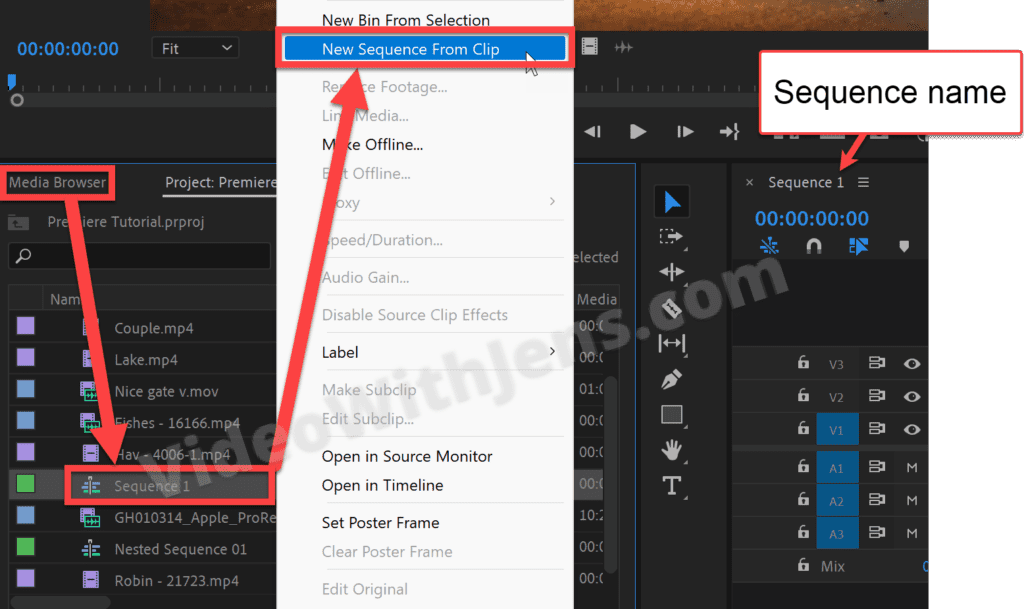
6. Create New Sequence
Sometimes the sequence itself may become corrupt; an easy way to fix this is by creating a new one.
Here’s the best way to do it:
- Right-click the Sequence inside the Media Browser and click on New Sequence From Clip.
- This way, the setting on the new sequence will be set up correctly.
- Copy all the clips from the old/original sequence.
- Press “Ctrl/Command + A” or simply lasso select, and then press “Ctrl/Command + C” to copy.
- Open the new sequence, delete the clip already inside, and press “Ctrl/Command + V” to paste all the copied clips.
- NB! You may have to re-adjust the audio levels.
- Try to export the new sequence.
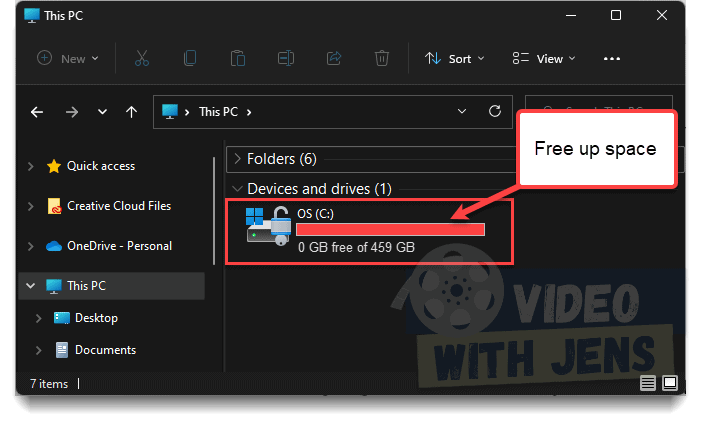
7. Free up Disc Space
When Premiere Pro is not exporting, it often boils down to a full storage unit.
Here are 3 easy ways to free up disc space:
- Delete Media Cache (described above).
- Empty your computer’s Recycle Bin.
- Empty the Downloads folder, often containing a lot of unnecessary files.
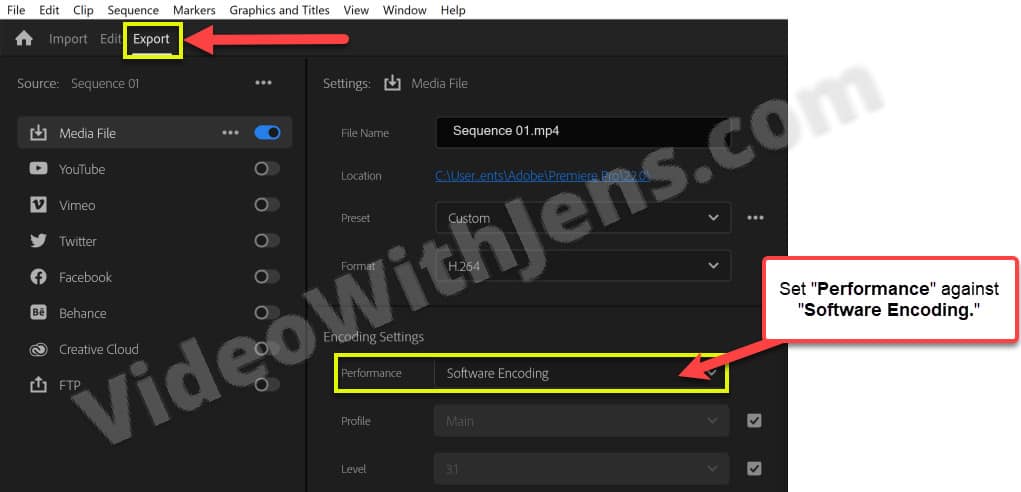
8. Use Software Encoding
Often, when people are unable to export their project, it’s because of some GPU-related issue.
An easy way to check if this is the case for you (it’s also a workaround) is to set the Performance under Encoding Settings against Software Encoding.
- This is one of the export settings.
9. Error Compiling Movie
If you get an error that says “Error Compiling Movie,” it simply means that your error belongs to the export/render errors.
Luckily, I’ve written a full guide on solving this particular error category here.
10. Update Premiere Pro
If Premiere Pro is not exporting due to a bug in the current version, the developers are likely aware, and it will be fixed in the next version.
Thus, check if there are any updates available.
Open the Adobe Creative Cloud desktop application, and go to Updates:

11. Use the Creative Cloud Cleaner Tool
Adobe has made this fantastic tool intended to fix common issues and bugs.
It’s called Adobe Creative Cloud Cleaner tool; here’s a guide (opens in a new tab) on their website on how to set it up.
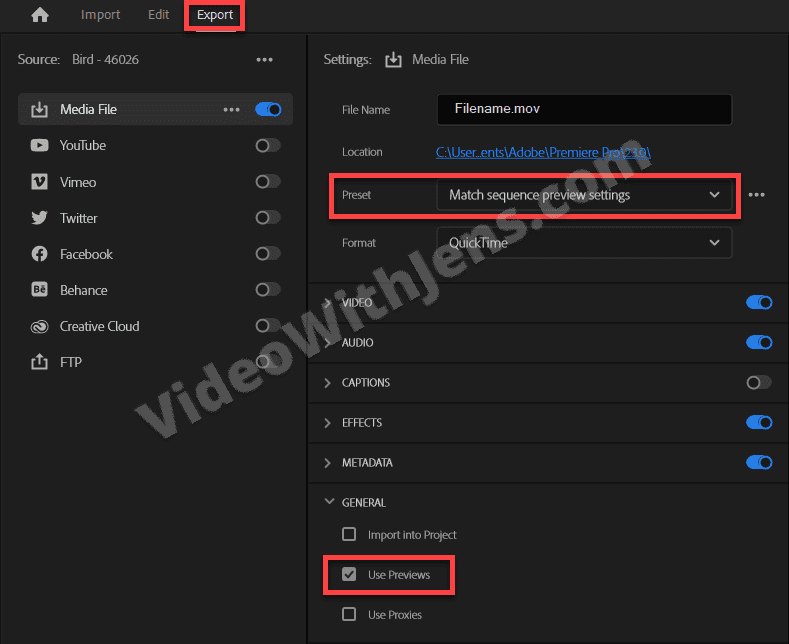
12. Smart Rendering
Smart rendering is excellent for fixing export-related issues and will also speed up the encoding time!
Here’s how to do it:
- Click on Sequence > Sequence Settings.
- Set the Preview File Format against QuickTime, select a Codec, and click OK.
- Apple ProRes 422 LT is very popular.
- Next, click on File > Render In to Out.
- Open the Export tab, and set Preset against Match sequence preview settings.
- Click on Export.
13. Close Programs Running in the Background
Sometimes, if you’ve opened your video in another program, like a media player, the file will not be available for Premiere Pro.
Therefore, ensure no programs interact with the files other than Premiere Pro or the Media Encoder. If you are unsure, you could restart your computer.
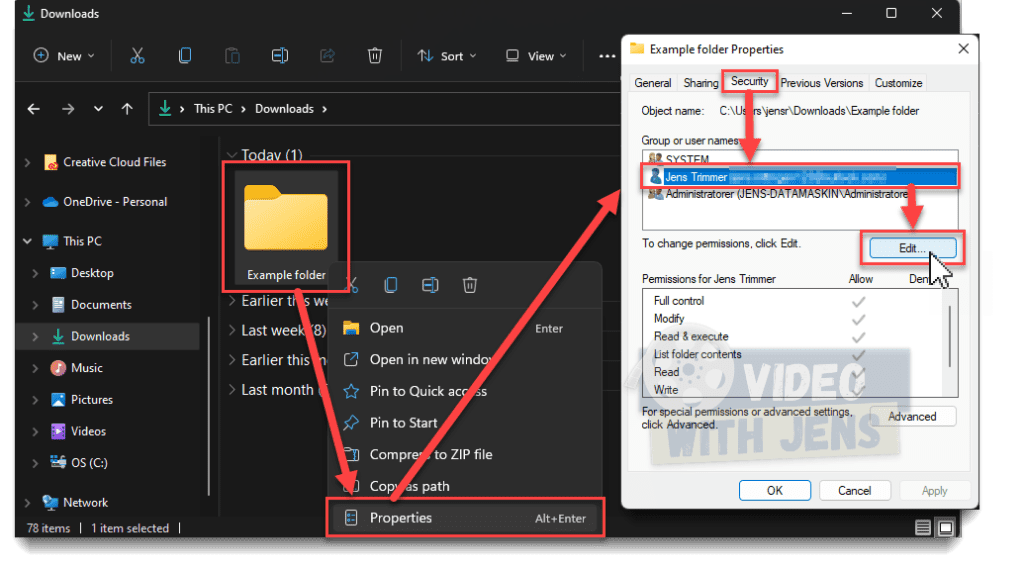
14. Check for Folder Permissions
If Premiere Pro is not permitted to see what’s inside the folder containing your clips, you will not be able to export.
To fix this:
- Right-click the folder > Properties > Security.
- Select your user name, and click on Edit.
- Make sure non of the boxes under Deny is checked.
- Click OK.
(Consider restarting Premiere Pro)
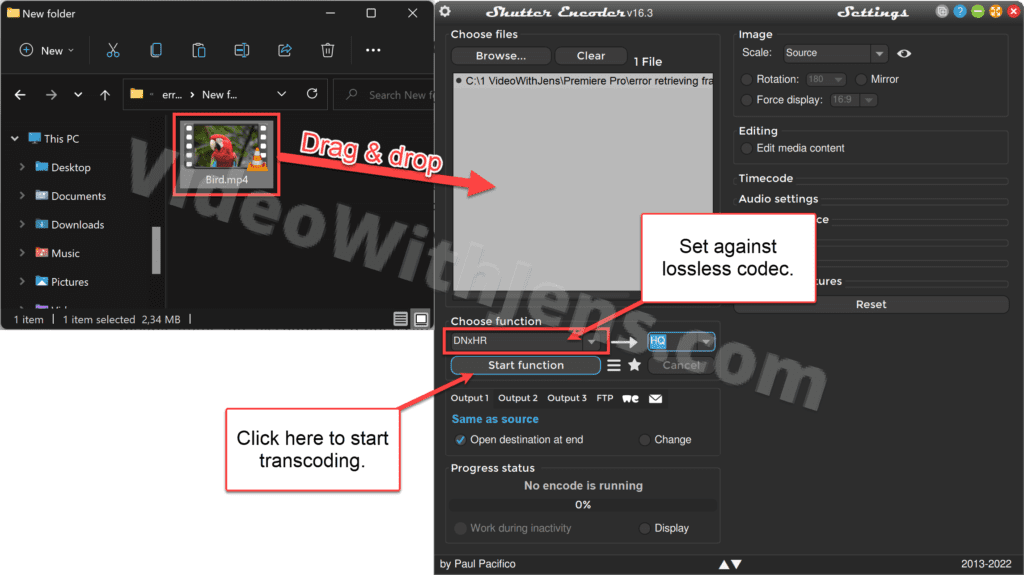
15. Transcode the Video Clips
Make sure that Premiere Pro supports the format of your video clips.
Here’s a list of supported formats (opens in a new tab).
If you are unsure what format your video is in, an easy way to check this is by downloading the freeware VLC media player (opens in a new tab).
Then, open the video clip inside the VLC media player, and click on Tools > Codec Information.
In my case, you can see that the codec is VP9 which Premiere Pro does not support. Thus, I need to transcode the file.

To transcode, I usually throw my clips into Shutter Encoder, set the codec against DNxHR (to prevent losing quality), and click Start function!
That’s it!
Here’s a link to the freeware Shutter Encoder (opens in a new tab).
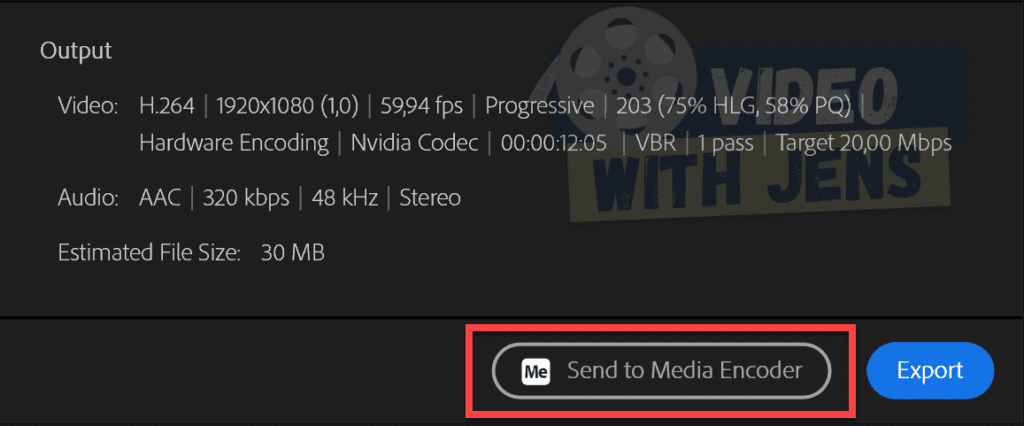
16. Export Using the Media Encoder
A Premiere Pro subscription will also include the Media Encoder, which you can use to export your projects.
You can download it from the Adobe Creative Cloud application under All apps.
Once you’ve installed the software, instead of clicking on Export, click on Send to Media Encoder:
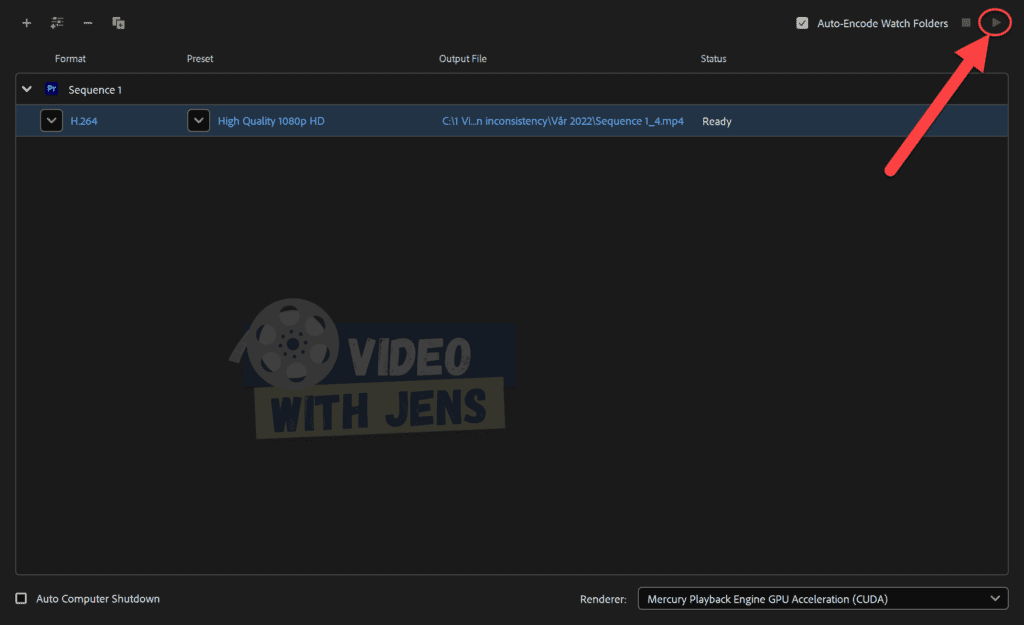
This will open the Media Encoder; inside it, click on the play icon to start encoding/exporting your project:
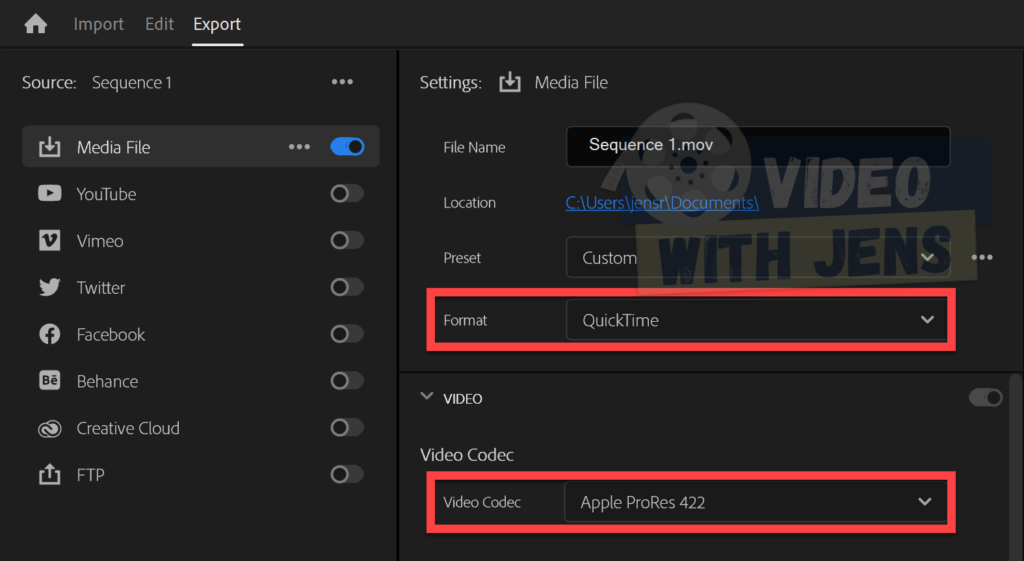
17. Export to Another Format
A couple of users in the Adobe community reported that they were able to export after changing the codec.
Therefore, if you’ve set the Format against H.264 for example, try switching to QuickTime, then set the Video Codec against Apple ProRes 422 HQ.
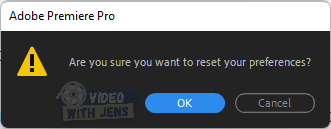
18. Reset Preferences
If Premiere Pro still won’t export your project, consider resetting the preferences.
This solves many bugs and issues; however, stuff like personal keyboard shortcuts and customizations will get lost.
To do it, close Premiere Pro and hold down the Option key (macOS) or Alt key (Windows) while re-launching until you get a popup message asking if you want to reset your preferences, in which case you confirm.
Other articles you might find helpful:
Here’s an article on exporting from Premiere Pro and the best export settings.