Premiere Pro “Error Compiling Movie” Solved by Adobe Expert
Unable to export or render in Premiere Pro? Doing so results in the message “Error Compiling Movie”?
If so, you are not alone.
Contrary to what many say, no solution will work for everyone.
This is because the “Error Compiling Movie” is not a specific error but more of a category name for many export/render-related errors.
Down below, you’ll find the most common errors in this category:
Here’s a video version of the article:
First… Are You Meeting Premiere Pro’s Minumum Requirements?
Before getting to the specific errors, and the solutions to fix them, there is one thing that’s important to check first:
Are your hardware meeting Premiere Pro’s minimum requirements?
If not, this likely triggers the “Error Compiling Movie,” and you might want to consider upgrading… Or at least take some precautions to make the software less demanding.
The minimum requirements are as follows:
- Processor: Intel® 6th Gen or newer CPU – or AMD Ryzen™ 1000 Series or newer CPU
- OS:
- Windows 10 (64-bit) V20H2 or later
- macOS 11.0 (Big Sur) or later
- Memory: 8 GB or RAM.
- GPU: 2 GB of VRAM.
- Storage: Additional high-speed drive for media
For more information, check out Adobe’s official website.
Remember that those are the absolute minimum requirements, and Adobe’s recommendations are slightly higher depending on what type of media you are working with.
Here’s a video on how to check your system specifications:
If you are meeting the system requirements, find your error in the list below:
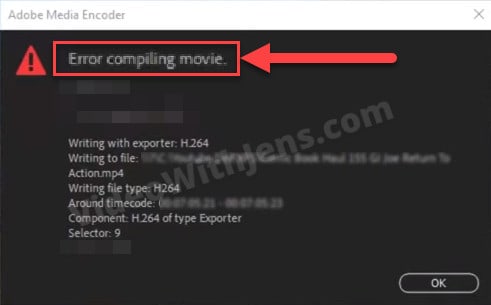
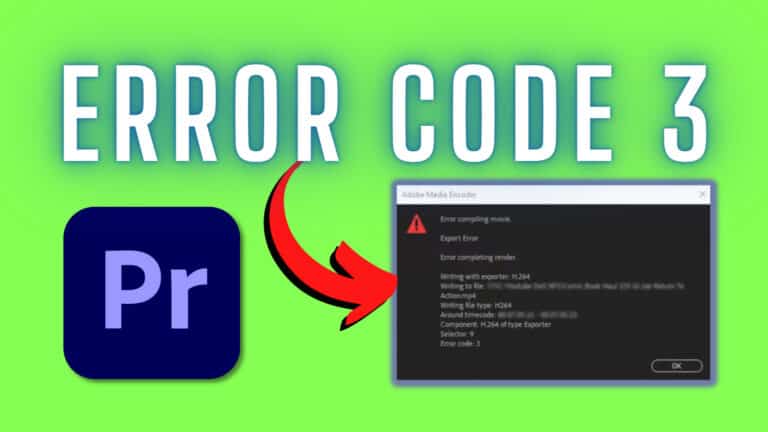
Error Code 3
By far the most seen export/render error in Premiere Pro.
The reason for this is that many different things can trigger it. Hence, finding the correct solution usually requires a bit of digging.
Gladly, I’ve listed the most popular solutions below:
- Reboot Computer.
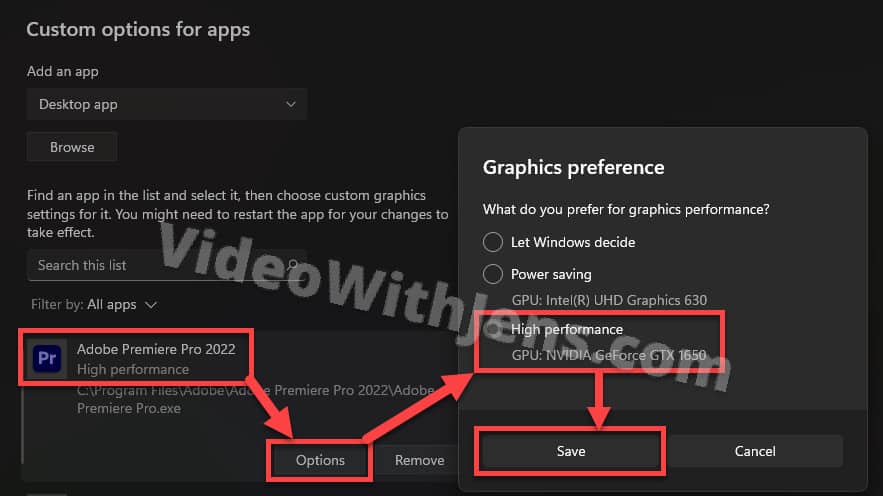
- Set Premiere Pro to “High performance” mode in Windows.
- Open Graphics Settings, and add Premiere Pro to the list.
- Click on Options > High performance > OK.
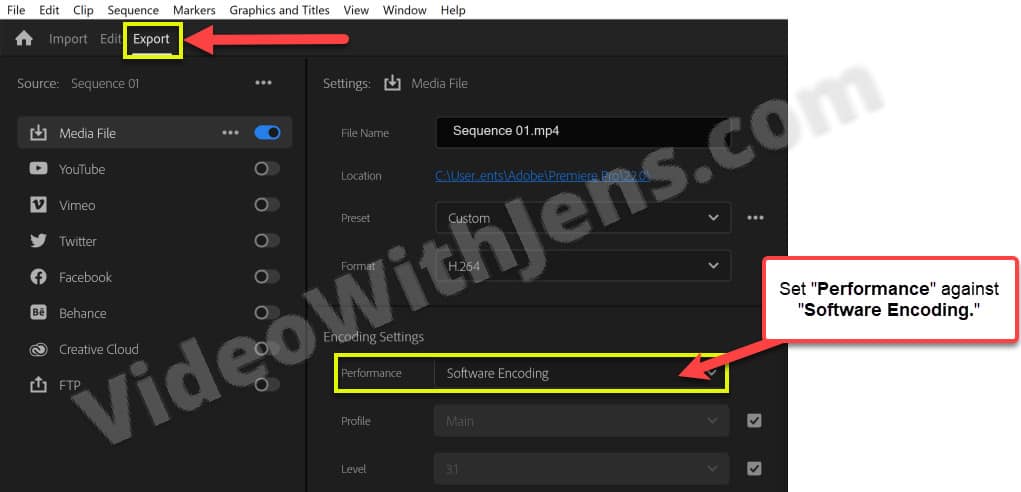
- Use Software Encoding.
- Export:
- Under Encoding Settings, set Performance against Software Encoding.
- Rendering:
- Click on File > Project Settings > General, and set Renderer against «…Software Only».
- Go to Edit > Preferences > Media, and uncheck “hardware accelerated decoding.»
- Then restart Premiere Pro.
- Export:
Check out this article for a more detailed guide on how to fix error code 3 in Premiere Pro.
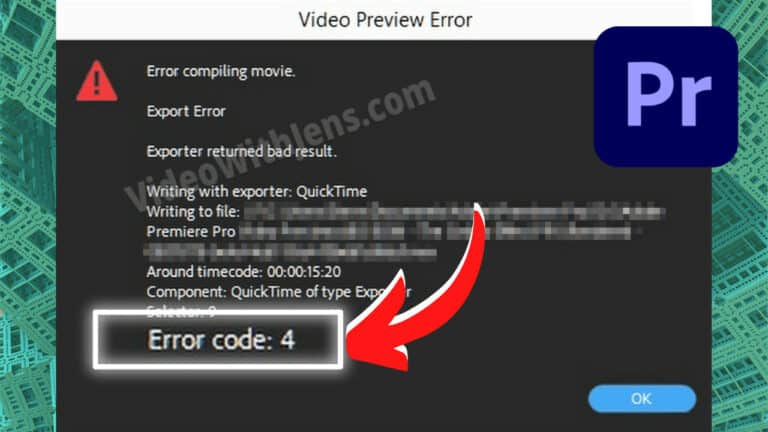
Error Code 4
If you are facing this error, you are in luck! As this is usually a quick fix.
The error code 4 means that you are out of disc space, or in other words, there is not enough disc space for the render/export to complete. So you need to free up disc space.
However, instead of just deleting a bunch of precious files on your storage unit, there may be some better ways to do it:
- Delete Media Cache (builds up over time).
- Export to another Drive.
- Free Up Space on Your Drive.
- Change Media Cache Location.
Check out this tutorial for more information on how to do the things mentioned above.
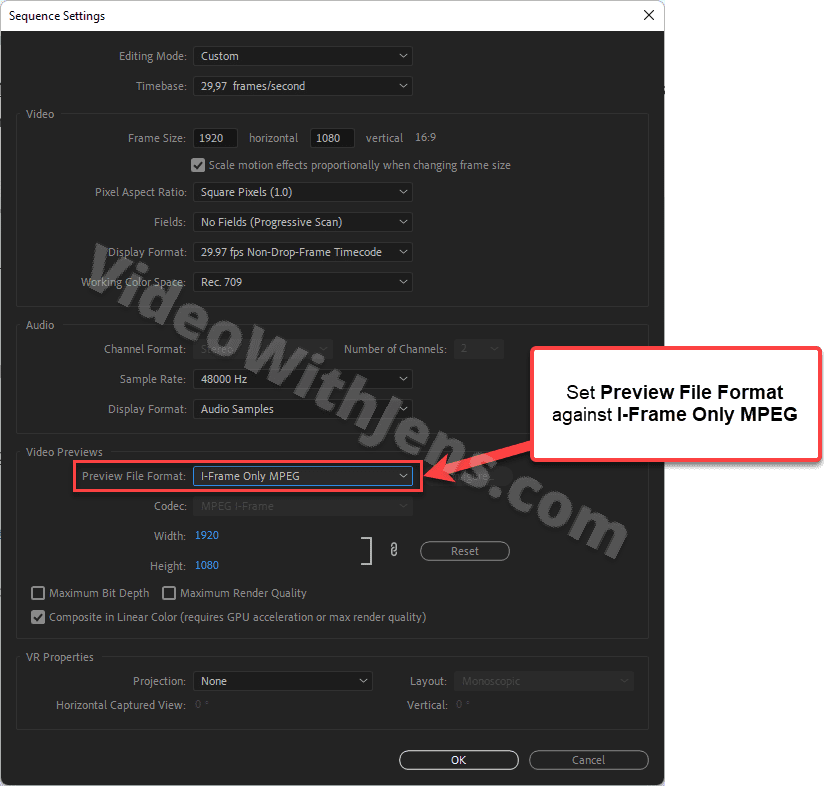
Error Code 19
Most frequently seen when rendering the sequence/trying to create video previews.
To fix this error click on Sequence > Sequence Settings, and set the Preview File Format against I-Frame Only MPEG > click OK.
Here’s an article with more information on how to solve the error.
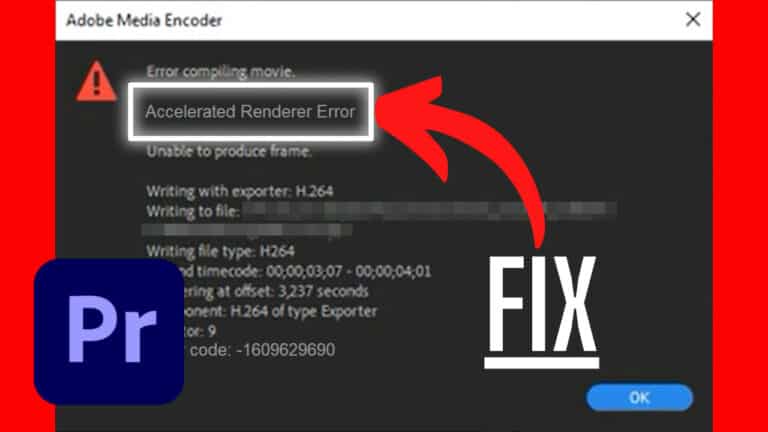
Error Code -1609629690, Accelerated Renderer Error
This accelerated renderer error is commonly seen when your GPU has too much to handle.
However, it’s also seen as due to bugs or a corrupted sequence. In the Adobe community, users reported that closing all applications and services from Adobe Creative Cloud has fixed the error.
To check if the latter solution works for you, do as follows:
- Close Premiere Pro.
- Open the Task Manager (Windows) or the Activity Monitor (macOS).
- Close all applications and services from Adobe Creative Cloud.
- Applications like Premiere, Photoshop, etc.
- The services usually have the same logo.
- Launch Premiere Pro.
- Click on File > Project Settings > General, and set Renderer against CUDA, Metal, or Open CL.
Check out this article for more solutions and details to fix this error.

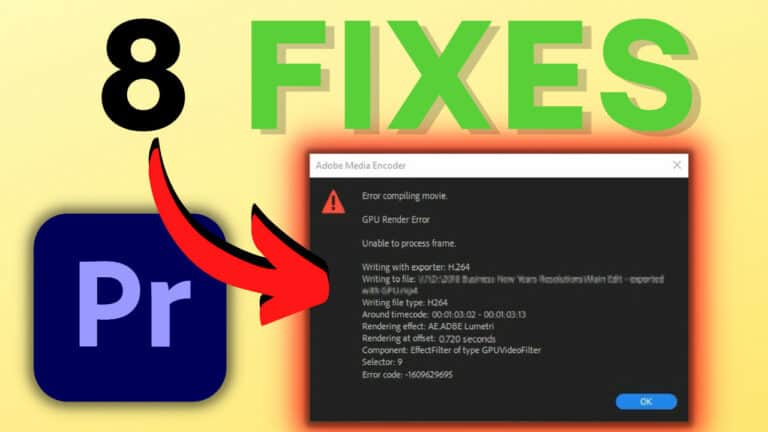
Error Code -1609629695, GPU Render Error
This error is related to graphics card issues. However, why it happens is heavily debated on various forums across the internet.
Thus, it’s also come up with creative ways of solving it.
Check out this complete guide on how to solve the error.
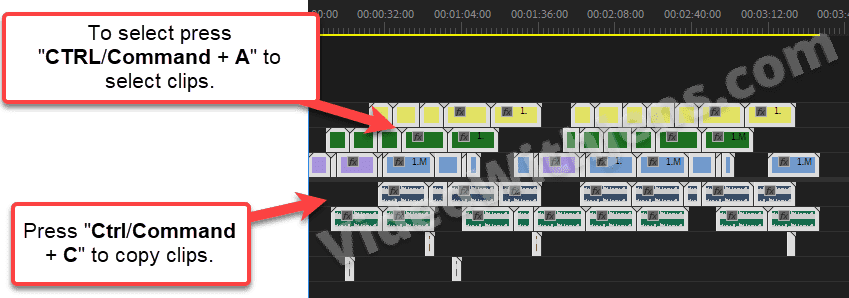
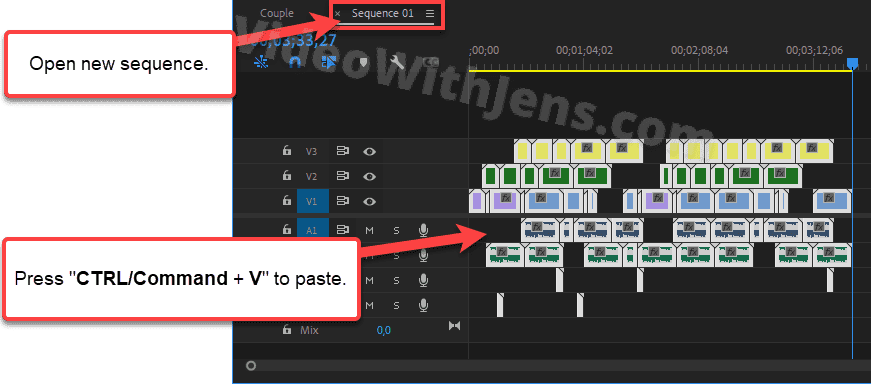
The most popular solution is to copy the clips to a new sequence.
Here’s a quick guide on how to do it:
- Select the timeline panel by clicking on it.
- Click on File > New > Sequence, and choose the correct settings.
- Press the keyboard shortcut “Ctrl/Command + A” to select all clips (old sequence), and press “Ctrl/Command + C.”
- Open the new sequence, and press “Ctrl/Command + V” to paste the clips.
- Adjust audio levels if necessary.
General Solutions to Solve “Error Compiling Movie”
Test the solutions below if you cannot find your error in the list above.
These solutions have worked for thousands of users getting the “Error Compiling Movie.”
1. Restart Your Computer
Obvious, yes. Effective, yes.

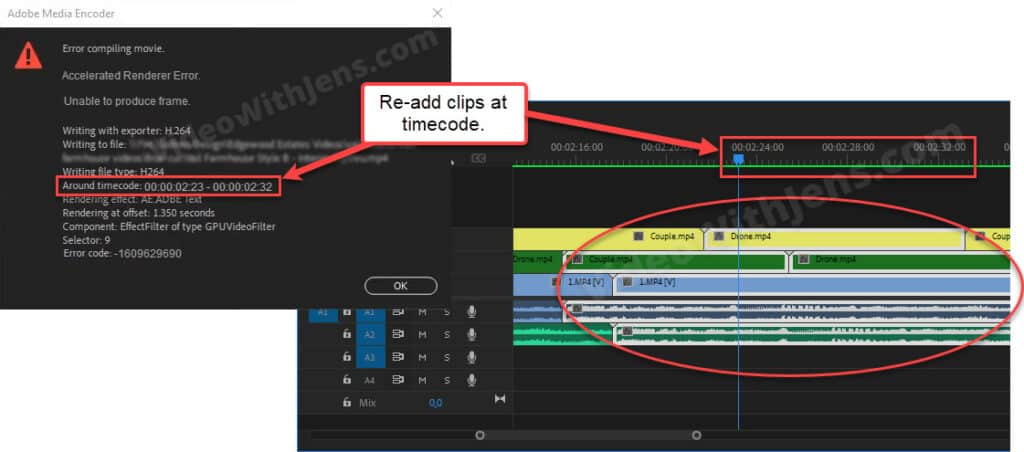
2. Check the Timecode
These error types usually include a timecode, which tells you where the error was triggered.
The timecode gives you valuable information, making it easier to troubleshoot.

Check the sequence where the error was triggered. Are there any particular elements that stand out?
Things to look for:
- Corrupt clip: is there any clip that starts around the time code? If so, you may try to re-add it, and if that doesn’t work, transcode it to ensure it’s not corrupt.
- Unsupported Media: Ensure the clip has the correct format, codec, framerate, resolution, etc.
- You should also make sure it does not have a variable frame rate.
- Color adjustments: (lumetri): try exporting without it to troubleshoot.
- Effects: Try to remove it, or replace it.
- Sound design.
- Titles/text.
- Transitions.
- Images.
- Ensure the filename does not have any special characters.
- Transcode the image using professional software.
That’s just some examples of things to look for.
If you can’t find anything special, some users have reported that simply re-adding all clips located at the timecode solved the error. You could also try to transcode the clips to ensure they have all the correct settings.
3. Copy Clips to a New Sequence
This solution has done wonders for a lot of people, not only to fix this error but all kinds of errors.
The reason is that it’s a quick way of fixing a corrupt sequence, which happens from time to time.
Click on File > New > Sequence > Choose Sequence Preset > Click OK.
Select the timeline panel, and open the old sequence.
Then press “Ctrl/Command + A” to select clips and “Ctrl/Command + C” to copy them.
Next, open the new sequence, and press “Ctrl/Command + V” to paste the clips.
NB: You might have to re-adjust the audio levels.
4. Use Software Encoding
Since this error often happens because of the GPU, rendering/exporting without it using only the CPU should solve the error for many of you.
This is more of a workaround than a solution since we basically ignore the issue. It will also result in increased render/export times.
However, it might be worth doing this if you are in a hurry.
If the error happens when you are exporting the project from Premiere Pro, set the Performance against Software Encoding, located under Encoding Settings in the export tab:
If the error happens when rendering the sequence, click on File > Project Settings > General, and set Renderer against “…Software Only.”
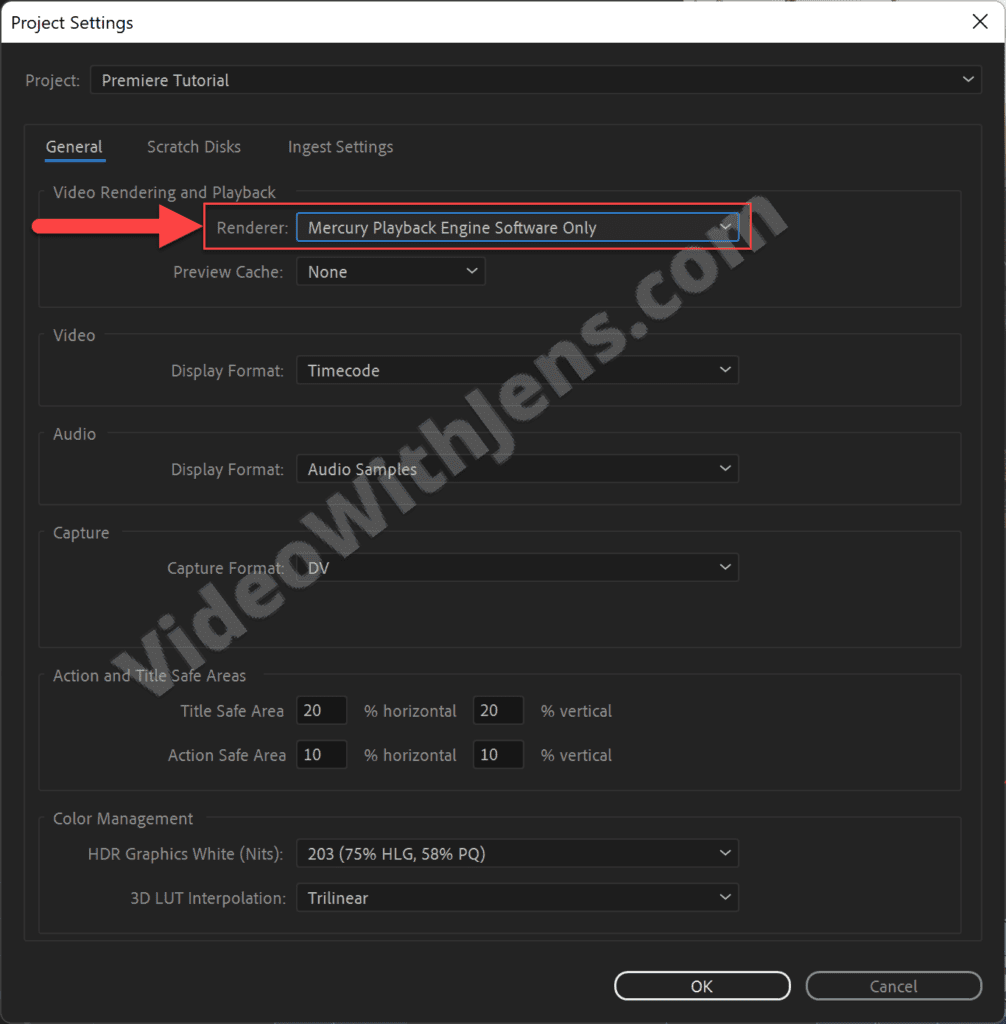
If the error still pops up, click Edit > Preferences > Media, uncheck Hardware accelerated decoding, and restart Premiere Pro.
Once that’s done, try to render!
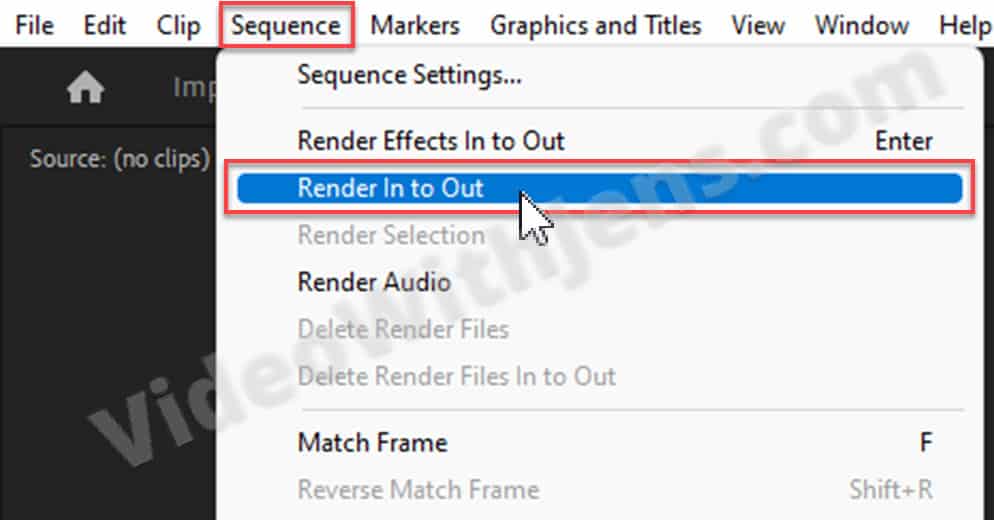
5. Smart Rendering
Smart rendering is reported to work if you cannot export from Premiere Pro.
It will not work if you cannot render, as this solution depends on it; in that case, skip to the next solution.
Select the Timeline Panel, click on Sequence > Render In to Out, and wait for it to finish:
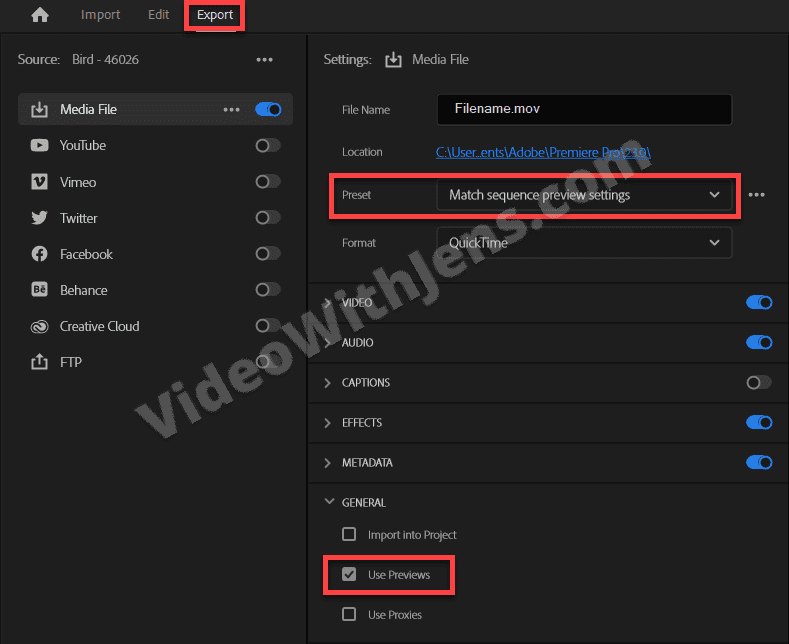
Next, head over to the Export tab, set Preset against Match sequence preview settings, and enable the option Use Previews:
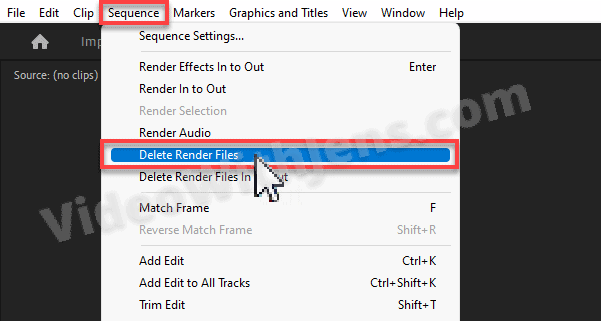
6. Delete Rendered Files
If you already use the smart render feature (exporting video previews), deleting them might solve the issue.
The reason is that these files can become corrupt. Therefore, try exporting without them or creating new ones.
Click on Sequence > Delete Render Files:
7. Update or Downgrade Premiere Pro
Each Premiere Pro update is known to fix bugs and errors, and thus you should make sure the software is up-to-date.
7.1 Update Premiere Pro
Open the Adobe Creative Cloud application, go to Apps > Updates, and click on the Update button next to Premiere Pro.
If you can’t see it, you’re probably already up-to-date.

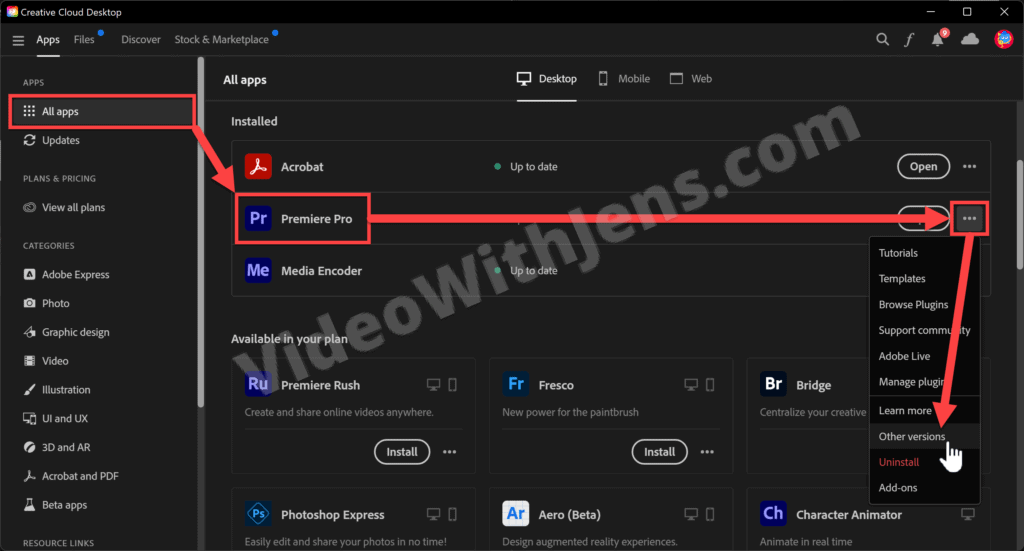
7.2 Downgrade Premiere Pro
If you did not encounter the error in the previous version of Premiere Pro, it might be worth doing a “rollback” to that version.
To downgrade the software, click on All apps (inside Adobe Creative Cloud), and then click on the three dots next to Premiere Pro.
In the drop-down menu, click “Other versions” and choose the previous version (or the version where you had no problems).
8. Export Part of the Project
Exporting part of the project may sound a bit weird; however, many people have found this to solve the error.
If you have applied a bunch of effects and color adjustments to your clips, that can become quite heavy for your GPU to handle.
So to lift some weight off it, we export the video in two parts.
For example:
- Remove effects or color grading from the video and export it.
- Import the export file to a new sequence.
- Re-apply effects or color grading and then export again.
As shown above, I recommend making a duplicate timeline before removing the effects in case it doesn’t work.

9. Additional reading
Another great read to deal with this error is by Kevin Monahan from Adobe; here’s a link to his post.
Check out this complete list of solutions to the most common errors in Premiere Pro.
- TIP: Bookmark the list to solve errors quickly in the future!
![[SOLVED] File Importer Detected an Inconsistency in the File Structure Premiere Pro](https://videowithjens.com/wp-content/uploads/2023/01/File-Importer-Detected-an-Inconsistency-in-the-File-Structure-Premiere-Pro-768x432.jpg)